Eclipse Shoprider 778S User manual
- Category
- Scooters
- Type
- User manual
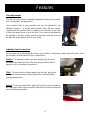
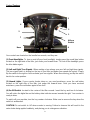
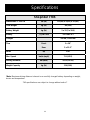
Eclipse Shoprider 778S is a versatile and adjustable electric scooter designed for comfortable and safe personal mobility. With its adjustable tiller, reclining and swiveling seat, and various controls for headlights, turn signals, and hazard lights, the 778S offers a user-friendly and customizable experience. Its features ensure a comfortable and safe ride, making it suitable for daily commutes, running errands, or leisurely outings.
Eclipse Shoprider 778S is a versatile and adjustable electric scooter designed for comfortable and safe personal mobility. With its adjustable tiller, reclining and swiveling seat, and various controls for headlights, turn signals, and hazard lights, the 778S offers a user-friendly and customizable experience. Its features ensure a comfortable and safe ride, making it suitable for daily commutes, running errands, or leisurely outings.


-
 1
1
-
 2
2
-
 3
3
-
 4
4
-
 5
5
-
 6
6
-
 7
7
-
 8
8
-
 9
9
-
 10
10
-
 11
11
-
 12
12
-
 13
13
-
 14
14
-
 15
15
-
 16
16
-
 17
17
-
 18
18
-
 19
19
-
 20
20
-
 21
21
-
 22
22
-
 23
23


Eclipse Shoprider 778S User manual
- Category
- Scooters
- Type
- User manual
Eclipse Shoprider 778S is a versatile and adjustable electric scooter designed for comfortable and safe personal mobility. With its adjustable tiller, reclining and swiveling seat, and various controls for headlights, turn signals, and hazard lights, the 778S offers a user-friendly and customizable experience. Its features ensure a comfortable and safe ride, making it suitable for daily commutes, running errands, or leisurely outings.
Ask a question and I''ll find the answer in the document
Finding information in a document is now easier with AI
Related papers
Other documents
-
Shoprider 889DXD Owner's manual
-
-
Shoprider 889-4XLS User manual
-
-
-
 Roma Medical GK9 User manual
-
-
-
-
