Kärcher K 4 Premium Operating Instructions Manual
- Category
- Paint Sprayer
- Type
- Operating Instructions Manual
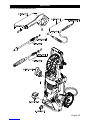
Kärcher K 4 Premium: Tackle stubborn dirt and grime effortlessly with this pressure washer. Ideal for cleaning cars, patios, garden furniture, and more. Features include a high-pressure hose, detergent bottle, and various nozzles for different cleaning tasks. Enjoy efficient cleaning with Kärcher quality.
Kärcher K 4 Premium: Tackle stubborn dirt and grime effortlessly with this pressure washer. Ideal for cleaning cars, patios, garden furniture, and more. Features include a high-pressure hose, detergent bottle, and various nozzles for different cleaning tasks. Enjoy efficient cleaning with Kärcher quality.


-
 1
1
-
 2
2
-
 3
3
-
 4
4
-
 5
5
-
 6
6
-
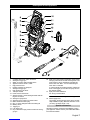 7
7
-
 8
8
-
 9
9
-
 10
10
-
 11
11
-
 12
12
-
 13
13
-
 14
14
-
 15
15
-
 16
16


Kärcher K 4 Premium Operating Instructions Manual
- Category
- Paint Sprayer
- Type
- Operating Instructions Manual
Kärcher K 4 Premium: Tackle stubborn dirt and grime effortlessly with this pressure washer. Ideal for cleaning cars, patios, garden furniture, and more. Features include a high-pressure hose, detergent bottle, and various nozzles for different cleaning tasks. Enjoy efficient cleaning with Kärcher quality.
Ask a question and I''ll find the answer in the document
Finding information in a document is now easier with AI
Related papers
-
Kärcher K4 HOME 11801540 User manual
-
-
Kärcher K 2.110 M Original Operating Instructions
-
-
-
-
-
-
-
Other documents
-
Kranzle X 8-150 TST - X 10-140 TST Operating instructions
-
Kraenzle Primus 1000 TST User manual
-
K RCHER WV 5 Plus N Rechargeable Handheld Vacuum cleaner User manual
-
-
-
Bosch Aquatak 110 PLUS User manual
-
Bosch Aquatak 1200 Plus User manual