Page is loading ...
3
Contents
THESE INSTRUCTIONS ARE VALID FOR THOSE COUNTRIES IDENTIFIED BY THE
SYMBOLS REPORTED ON THE COVER OF THIS MANUAL.
INSTRUCTIONS FOR THE USER: these instructions contain user
recommendations, a description of the controls and the correct
procedures for cleaning and maintenance of the appliance.
INSTRUCTIONS FOR THE INSTALLER: these are intended for the
authorised person who must install the appliance, set it functioning and
carry out an inspection test.
Further information about the products can be found at www.smeg.com
@
1. INSTRUCTIONS FOR USE ................................................................ 4
2. SAFETY PRECAUTIONS ................................................................... 6
3. ENVIRONMENTAL RESPONSIBILITY .............................................. 8
4. KNOW YOUR APPLIANCE ................................................................ 9
5. USING THE HOB.............................................................................. 10
6. CLEANING AND MAINTENANCE.................................................... 14
7. POSITIONING ON THE HOB TOP................................................... 15

General instructions
4
1. INSTRUCTIONS FOR USE
THIS MANUAL CONSTITUTES AN INTEGRAL PART OF THE APPLIANCE. THIS
MANUAL CONSTITUTES AN INTEGRAL PART OF THE APPLIANCE. IT SHOULD BE
KEPT INTACT AND AT HAND FOR THE APPLIANCE’S ENTIRE LIFE CYCLE.
IT IS IMPORTANT TO CAREFULLY READ THIS MANUAL AND ALL THE
INSTRUCTIONS CONTAINED HEREIN BEFORE USING THE APPLIANCE.
INSTALLATION MUST BE CARRIED OUT BY COMPETENT PERSONS IN
ACCORDANCE WITH THE REGULATIONS IN FORCE. THIS APPLIANCE IS
INTENDED FOR HOUSEHOLD USE AND COMPLIES WITH THE EEC DIRECTIVES
CURRENTLY IN FORCE. THE APPLIANCE HAS BEEN BUILT TO CARRY OUT THE
FOLLOWING FUNCTIONS: COOKING FOOD; IT IS CONSIDERED UNSUITABLE FOR
ANY OTHER USE.
THE MANUFACTURER CANNOT BE HELD LIABLE FOR USE OTHER THAN AS
INDICATED.
IF THE APPLIANCE IS INSTALLED ON BOATS OR IN CARAVANS, DO NOT USE IT AS
A ROOM HEATER.
DO NOT USE THIS APPLIANCE FOR HEATING ROOMS.
THIS APPLIANCE IS MARKED ACCORDING TO EUROPEAN DIRECTIVE 2002/96/EC
ON WASTE ELECTRICAL AND ELECTRONIC EQUIPMENT (WEEE).
THIS DIRECTIVE DEFINES THE STANDARDS FOR THE COLLECTION AND
RECYCLING OF WASTE ELECTRICAL AND ELECTRONIC EQUIPMENT APPLICABLE
THROUGHOUT THE EUROPEAN UNION.
THE IDENTIFICATION PLATE WITH THE TECHNICAL DATA, SERIAL NUMBER AND
BRAND NAME HAS BEEN VISIBLY AFFIXED TO THE APPLIANCE.
DO NOT REMOVE THIS PLATE FOR ANY REASON.
BEFORE OPERATING THE APPLIANCE ALL PROTECTIVE COVERS MUST BE
REMOVED.
SUITABLE HEAT-PROOF GLOVES SHOULD BE WORN FOR ALL OPERATIONS.
DO NOT USE STEEL SPONGES AND SHARP SCRAPERS AS THEY WILL
DAMAGE THE SURFACE.
USE NORMAL NON-ABRASIVE PRODUCTS, INCLUDING WOODEN OR
PLASTIC UTENSILS IF NECESSARY. RINSE THOROUGHLY AND DRY
USING A SOFT CLOTH OR A MICROFIBRE CLOTH.
General instructions
5
DO NOT LEAVE THE APPLIANCE UNATTENDED DURING COOKING PROCESSES
WHERE FATS OR OILS COULD BE RELEASED.
FATS AND OILS MAY CATCH FIRE.
ALWAYS CHECK THAT THE CONTROL KNOBS ARE IN THE O (OFF) POSITION
WHEN YOU FINISH USING THE APPLIANCE
NEVER PLACE PANS WITH BOTTOMS WHICH ARE NOT PERFECTLY FLAT AND
SMOOTH ON THE COOKING HOB PAN STANDS.
NEVER USE PANS WHICH PROJECT BEYOND THE OUTSIDE EDGE OF THE HOB.
DO NOT OBSTRUCT VENTILATION OPENINGS AND HEAT DISPERSAL SLITS.
(ONLY FOR GLASS CERAMIC MODELS)
TAKE CARE NOT TO SPILL SUGAR OR SWEET MIXTURES ON THE HOB WHILE
COOKING OR TO PLACE MATERIALS OR SUBSTANCES WHICH COULD MELT ON IT
(PLASTIC OR TINFOIL). IF THIS HAPPENS, TO AVOID DAMAGE TO THE SURFACE,
TURN OFF THE HEAT IMMEDIATELY AND CLEAN THE SURFACE WHILE THE PLATE
IS STILL WARM. IF THE GLASS CERAMIC HOB IS NOT CLEANED IMMEDIATELY,
THERE IS A RISK THAT INCRUSTATIONS WILL BE LEFT THAT ARE IMPOSSIBLE
TO REMOVE ONCE THE HOB HAS COOLED.
General instructions
6
2. SAFETY PRECAUTIONS
REFER TO THE INSTALLATION INSTRUCTIONS FOR THE SAFETY REGULATIONS
FOR ELECTRIC OR GAS APPLIANCES AND VENTILATION FUNCTIONS.
IN YOUR INTERESTS AND FOR YOUR SAFETY THE LAW REQUIRES THAT THE
INSTALLATION AND SERVICING OF ALL ELECTRICAL APPLIANCES IS CARRIED
OUT BY QUALIFIED PERSONNEL IN ACCORDANCE WITH THE REGULATIONS IN
FORCE.
OUR APPROVED INSTALLERS GUARANTEE A SATISFACTORY JOB.
GAS OR ELECTRICAL APPLIANCES MUST ALWAYS BE DISCONNECTED BY
SUITABLY SKILLED PEOPLE.
BEFORE CONNECTING THE APPLIANCE TO THE POWER GRID, CHECK THE DATA
ON THE PLATE AGAINST THE DATA FOR THE GRID ITSELF.
THE IDENTIFICATION PLATE CONTAINING THE TECHNICAL DATA, SERIAL NUMBER
AND
BRAND NAME IS IN A VISIBLE POSITION UNDER THE CASING.
DO NOT REMOVE THIS PLATE ON THE CASING FOR ANY REASON.
BEFORE CARRYING OUT INSTALLATION/MAINTENANCE WORK, MAKE SURE THAT
THE APPLIANCE IS NOT CONNECTED TO THE POWER GRID.
THE PLUG TO BE CONNECTED TO THE POWER SUPPLY CABLE AND ITS SOCKET
MUST BE OF THE SAME TYPE AND CONFORM TO THE REGULATIONS IN FORCE.
THE SOCKET MUST BE ACCESSIBLE AFTER THE APPLIANCE HAS BEEN BUILT IN.
NEVER DISCONNECT THE PLUG BY PULLING ON THE CABLE.
IF THE POWER SUPPLY CABLE IS DAMAGED, CONTACT THE TECHNICAL SUPPORT
SERVICE IMMEDIATELY AND THEY WILL REPLACE IT.
IT IS OBLIGATORY FOR ALL ELECTRICAL EQUIPMENT TO BE EARTHED
ACCORDING TO THE METHODS LAID DOWN BY SAFETY REGULATIONS.
IMMEDIATELY AFTER INSTALLATION, CARRY OUT A BRIEF INSPECTION TEST,
FOLLOWING THE INSTRUCTIONS BELOW. SHOULD THE APPLIANCE NOT
FUNCTION, DISCONNECT IT FROM THE ELECTRICITY SUPPLY AND CALL THE
NEAREST TECHNICAL SUPPORT CENTRE.
NEVER ATTEMPT TO REPAIR THE APPLIANCE.
DURING USE THE APPLIANCE BECOMES VERY HOT. BE CAREFUL NOT TO TOUCH
THE HEATING ELEMENTS.
THIS APPLIANCE MAY NOT BE USED BY PEOPLE (INCLUDING CHILDREN) OF
REDUCED PHYSICAL AND MENTAL CAPACITY, OR LACKING IN EXPERIENCE IN
THE USE OF ELECTRICAL APPLIANCES, UNLESS THEY ARE SUPERVISED OR
INSTRUCTED BY ADULTS RESPONSIBLE FOR THEIR SAFETY.
General instructions
7
DO NOT LET CHILDREN GO NEAR THE APPLIANCE WHEN IT IS IN OPERATION OR
PLAY WITH IT AT ANY TIME.
DO NOT INSERT POINTED METAL OBJECTS (CUTLERY OR UTENSILS) INTO THE
SLITS IN THE APPLIANCE.
DO NOT USE STEAM JETS FOR CLEANING THE APPLIANCE.
THE STEAM COULD REACH THE ELECTRONICS, DAMAGING THEM AND CAUSING
SHORT-CIRCUITS.
DO NOT MODIFY THIS APPLIANCE.
FAT AND OIL CAN CATCH FIRE IF THEY OVERHEAT. YOU ARE THEREFORE
RECOMMENDED NOT TO LEAVE THE HOB WHILE PREPARING FOODS
CONTAINING OIL OR FAT. IF FAT OR OIL CATCHES FIRE, NEVER PUT WATER ON IT.
COVER THE PAN AND SWITCH OFF THE COOKING ZONE.
AS SOON AS YOU NOTICE A FRACTURE OR A CRACK ON THE SURFACE OF THE
GLASS CERAMIC HOB, SWITCH THE APPLIANCE OFF AND CONTACT AN
AUTHORISED TECHNICAL ASSISTANCE CENTRE.
DO NOT SPRAY ANY SPRAY PRODUCTS NEAR THE ELECTRICAL APPLIANCE
WHILE IT IS IN OPERATION.
DO NOT USE SPRAY PRODUCTS WHILE THE PRODUCT IS STILL HOT.
USERS OF PACEMAKERS OR SIMILAR DEVICES MUST ENSURE THAT THE
OPERATION OF THEIR DEVICES WILL NOT BE AFFECTED BY THE INDUCTION
FIELD, WHICH HAS A FREQUENCY RANGE OF 20-50 KHZ.
IN CONFORMITY WITH THE PROVISIONS REGARDING ELECTROMAGNETIC
COMPATIBILITY, THE ELECTROMAGNETIC INDUCTION COOKING HOB COMES
UNDER GROUP 2 AND CLASS B.
The manufacturer cannot be held liable for damage to persons or things caused
by failure to observe the above instructions, by interference with any part of the
appliance or by the use of non-original spare parts.
Instructions for disposal
8
3. ENVIRONMENTAL RESPONSIBILITY
3.1 Your environmental responsibility
Our product's packing is made of non-polluting materials, which are therefore
compatible with the environment and recyclable. Please help by disposing of the
packaging correctly. You can obtain the addresses of collection, recycling and
disposal centres from your retailer or from the competent local organisations.
Do not discard the packaging or any part of it, or leave it unattended. It can
constitute a suffocation hazard for children, especially the plastic bags.
Your old appliance also needs to be disposed of correctly.
Important: hand over your appliance to the local agency authorised for the
collection of electrical appliances no longer in use. Correct disposal enables
intelligent recovery of valuable materials.
Before disposing of your appliance it is important to remove doors and leave
shelves in the same position as for use, to ensure that children cannot
accidentally become trapped inside during play. It is also necessary to cut the
connecting cable to the power grid, removing it along with the plug.
Instructions for the user
9
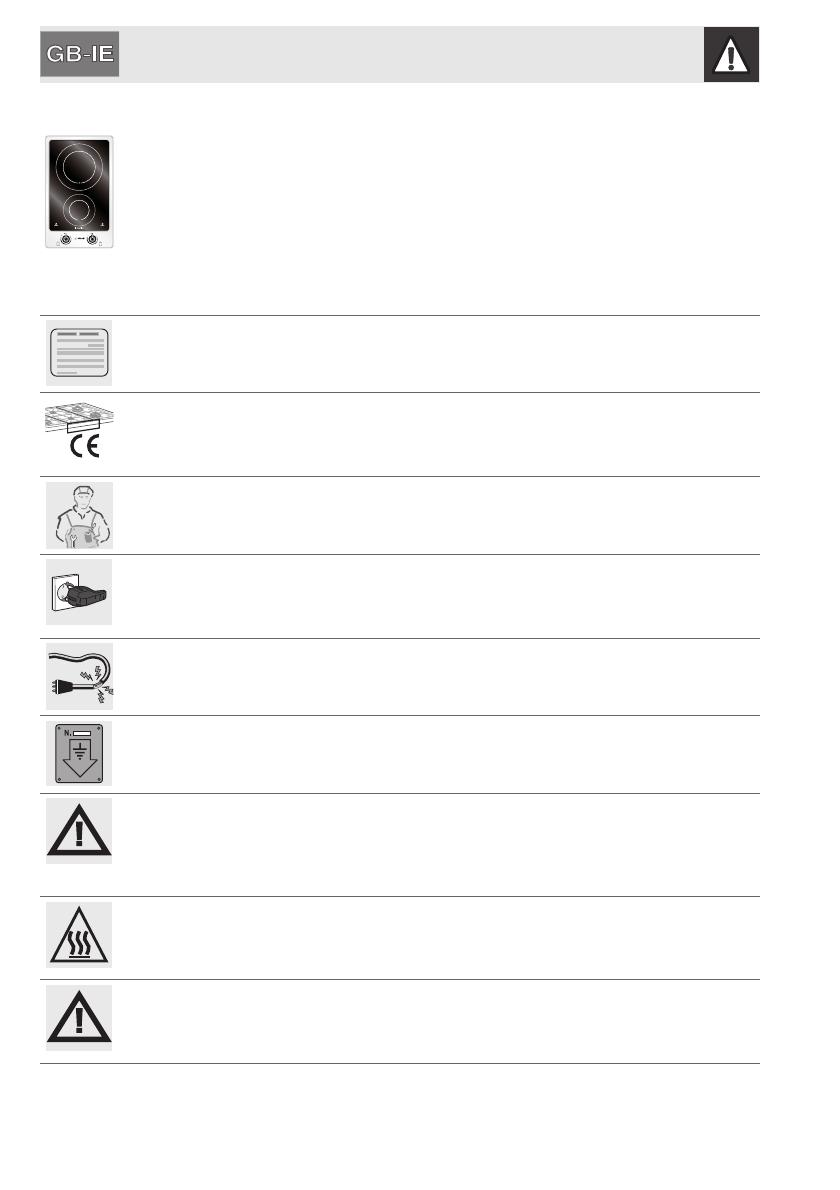
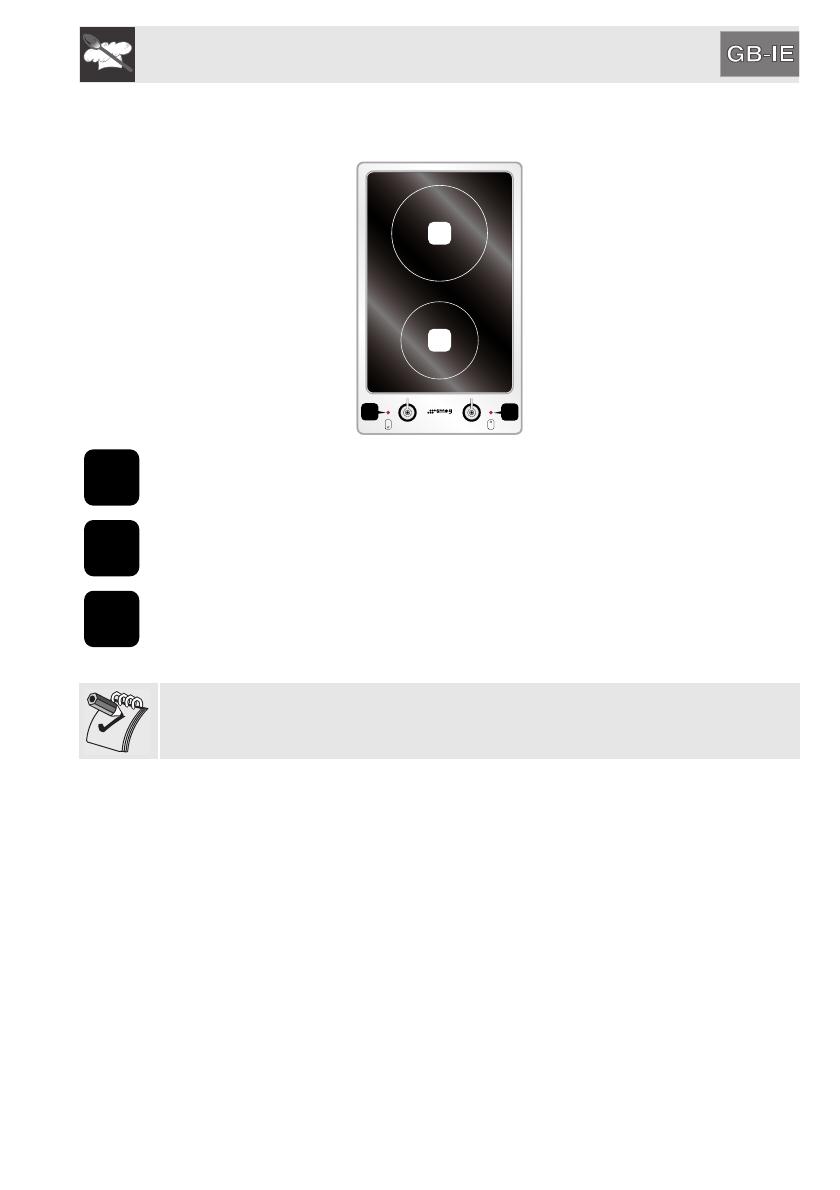
4. KNOW YOUR APPLIANCE
Small glass ceramic hot plate
Large glass ceramic hot plate
Residual heat indicator lights
Before using the electric plates or the barbecue (if included) for the first time,
pre-heat them to the maximum temperature long enough to burn off any
manufacturing oily residues which could give the food a bad smell.
1
2
3
4
5
6
7
8
91
2
3
4
5
6
7
8
9
2
1
3 3
1
2
3
Instructions for the user
10
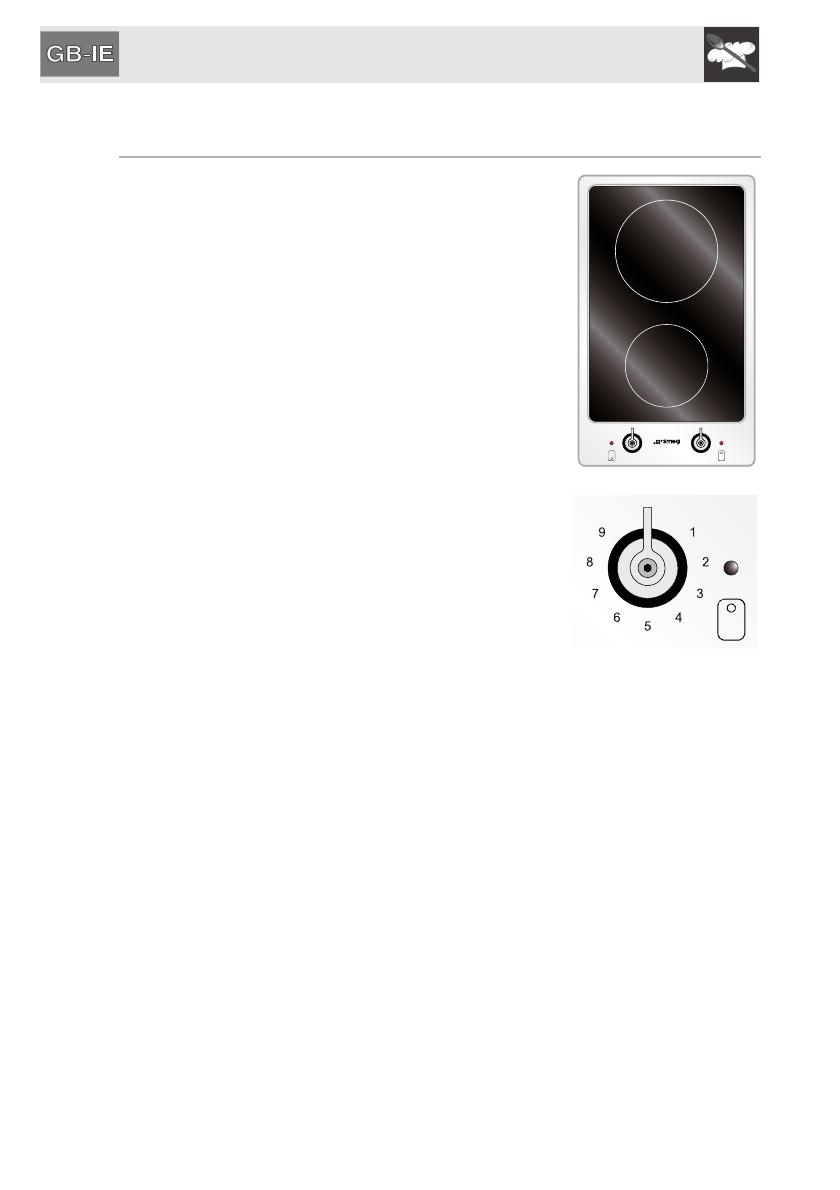
5. USING THE HOB
5.1 Glass ceramic hob
The appliance has two cooking zones of various
power levels and diameters.
The positions are clearly indicated by circles and the
heat is concentrated within the diameters traced on
the hob. The radiating zones come on after a few
seconds and their heat level can be adjusted by
rotating the knob of the power regulator.
To switch the cooking zones on, press and rotate the
knob to the desired position between 1 and 9.
The adjustment is gradual so all the intermediate
zones can be used. The lights to the side of the knobs
indicate the residual heat: they come on when the
electric hot plates exceed 50°C and go off when the
temperature falls below this level. For cleaning, see
paragraph "6.2 Cleaning the cooking hob parts”.
1
2
3
4
5
6
7
8
91
2
3
4
5
6
7
8
9
Instructions for the user
11
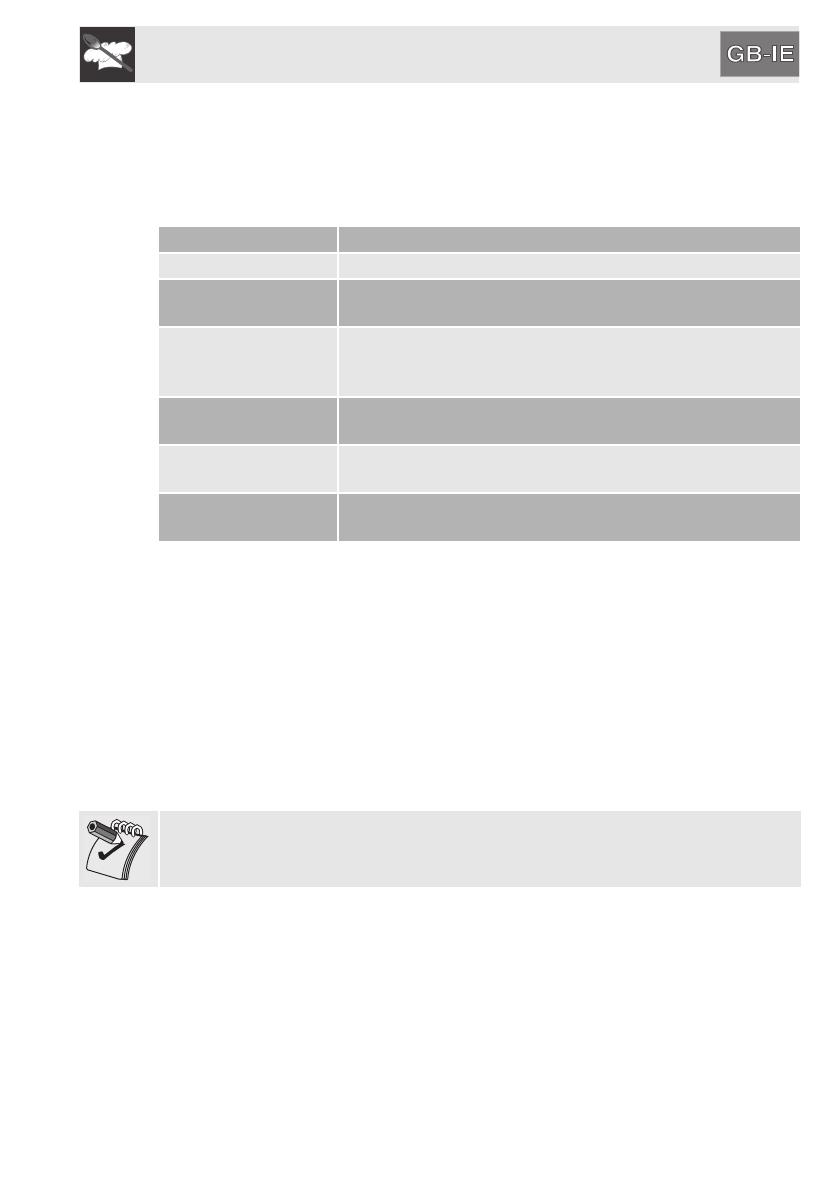
5.1.1 Cooking guidelines
The table below shows the power values which can be set, with the relative type
of food alongside. Settings may vary depending on the amount of food and
personal taste.
Knob Position Suitable kind of cooking
1To melt butter, chocolate or similar products.
2 - 3 To heat food, keep small amounts of water on the boil,
and whip up sauces with egg yolk or butter.
4 - 5
To heat solid or liquid food, keep water on the boil, thaw
deep-frozen food, cook omelettes of 2 or 3 eggs, fruit and
vegetables, various cooking processes.
6To stew meat, fish and vegetables, simmer food, make
jams, etc.
7 - 8 To roast meat, fish, steaks and liver; to sauté meat, fish,
eggs, etc.
9To deep-fry potatoes, etc., or bring water to the boil
rapidly.
For best cooking results and energy saving, only use containers suitable for
electric cooking:
• The bases of containers must be very thick, perfectly flat and clean and dry.
The hob must also be clean and dry.
• Do not use cast iron saucepans or saucepans with a rough base, as they
may scratch the cooking surface.
The diameter of the base of the saucepans must be equal to the diameter of the
circle outlining the cooking zone. If not, energy will be wasted.
Before using the hob for the first time, pre-heat it to the maximum temperature
long enough to burn any manufacturing oily residues which could give the food
unpleasant odours.
Instructions for the user
12
5.1.2 Glass ceramic hob thermal protection
Every cooking zone has a device that constantly measures the temperature.
If the temperature surpasses certain values, the device will activate certain
functions to lower the temperature and allow the glass ceramic hob to continue
to work correctly.
Below is a table with the operations that are activated automatically and the
relative start temperature:
Operation Activating
temperature
Operating power reduced from Power to 9
250° C
Reduction of the power of a point 280° C
Switching off the cooking zone 300° C
Return of the power to the set value 250° C
5.2 Using fat and oil
When using fat and oil in cooking, it is very important to cook at the right
temperatures. Fat and oil will keep their properties intact when used at the
correct temperature. If the temperature is too high, fat and oil begin to smoke
(smoke point) and then burn.
Fat - oil Maximum
temperature (°C) Smoke point (°C)
Butter 130 150
Lard 170 200
Beef fat 180 210
Olive oil 180 200
Sunflower oil 200 220
Peanut oil 200 235

Instructions for the user
13
5.3 Operating temperatures
The table below indicates the temperatures corresponding to each plate heating
level
Position Temperature (°C)
0 -
150
280
3100
4130
5160
6180
7200
8220
9230
The temperatures are indicative; the real value may differ from that indicated by
± 10°.
Instructions for the user
14
6. CLEANING AND MAINTENANCE
Before performing any operations requiring access to powered parts, switch off
the power supply to the appliance
NEVER USE A STEAM JET FOR CLEANING THE APPLIANCE.
6.1 Cleaning stainless steel
To keep stainless steel in good condition it should be cleaned regularly after
use. Let it cool first.
6.1.1 Ordinary daily cleaning
To clean and preserve the stainless steel surfaces, use only specific products
that do not contain abrasives or chlorine-based acids.
How to use: pour the product onto a damp cloth and wipe the surface, rinse
thoroughly and dry with a soft cloth or chamois leather.
6.1.2 Food stains or residues
Do not use metallic sponges or sharp scrapers as they will damage
the surface.
Use ordinary non-abrasive products for steel, with the aid of wooden
or plastic utensils if necessary.
Rinse thoroughly and dry with a soft cloth or chamois leather.
6.2 Cleaning the cooking hob parts
The glass ceramic hob should be regularly cleaned, preferably after every use,
once the residual heat warning lights have gone off.
Smudges from aluminium-based pans can be easily cleaned off with a cloth
dampened in vinegar. Remove any burnt residues after cooking; rinse with water
and wipe dry with a clean cloth.
Never use abrasive or corrosive detergents (e.g. cleaning powders, oven sprays,
spot-removers and wire sponges).
Never use a jet of steam to clean the appliance.
Instructions for the installer
15
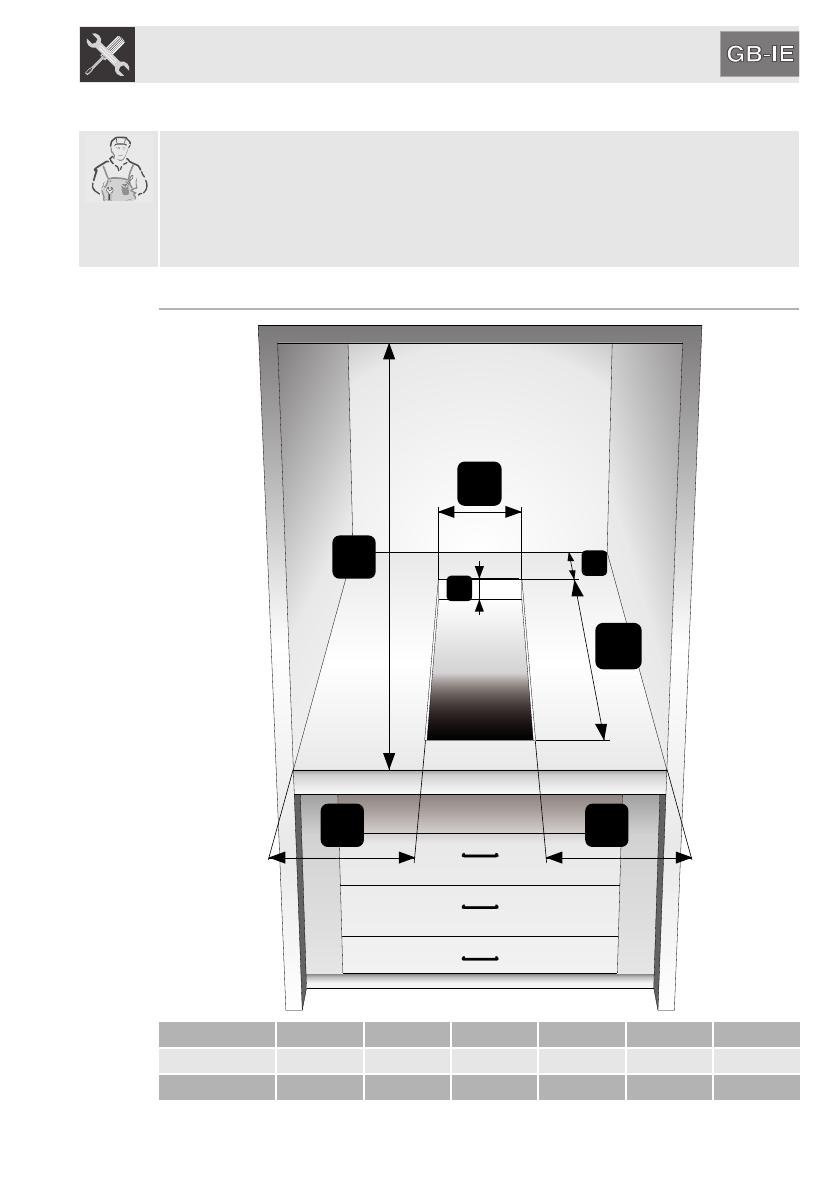
7. POSITIONING ON THE HOB TOP
This is a cat. 3 appliance (built-in).
The following operation requires building and/or carpentry work and must
therefore be carried out by a competent tradesman.
Installation can be carried out on various materials such as masonry, metal,
solid wood or plastic laminated wood as long as they are heat-resistant (T
90°C).
7.1 Built-in dimensions
DISTANCES A B C D E H
MINIMUM 292 mm. 494 mm. 20 mm. 110 mm. 50 mm. 750 mm.
MAXIMUM 292 mm. 494 mm. 70 mm. ---
A
B
D
C
E
H
D
Instructions for the installer
16
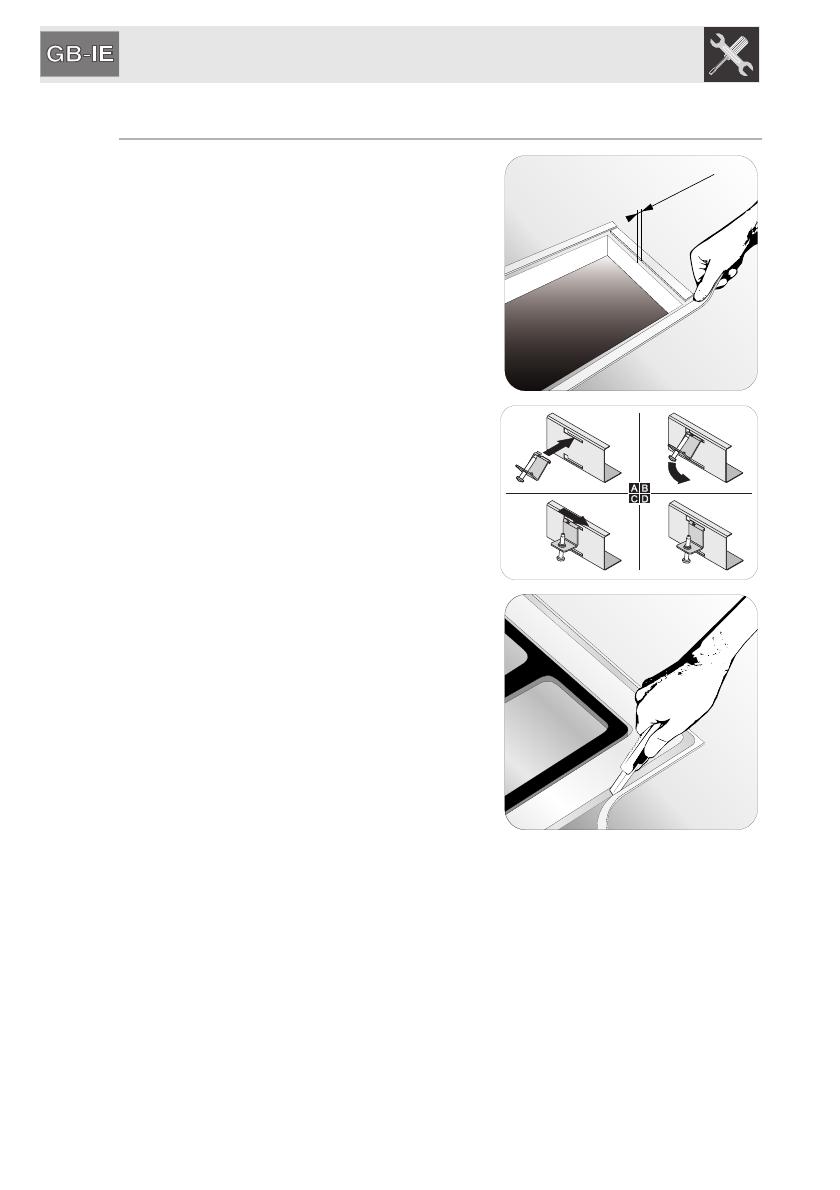
7.2 Fixing to the supporting structure
Carefully position the supplied insulating seal
on the outer edge of the hole on the top hob,
as indicated in the figure alongside. Try and
make it stick to the whole surface by applying
light hand pressure.
The seal must be placed at a distance of 3-4
mm from the edge of the hole in the top.
Carry out this operation by supporting the hob
on the isolating seal and using screws and
clamping brackets to fix the hob to the
support structure, in order to obtain the
complete flatness.
Carefully trim the surplus away from edge
beyond the seal.
3-4 mm

Instructions for the installer
17
Precautions: the temperature of the inside surface of the hob may exceed 125°
C. To avoid any hazardous situations, access to the underside of the hob must
be restricted. Refer to the installation instructions.
IMPORTANT: if the appliance is mounted on a unit, make sure that a separating
shelf is installed, as shown in the figure.
However, if the appliance is on an oven installed under the hob, there is no need
to install a separating shelf.
If installed on top of an oven, the latter must be equipped with a cooling fan.
Max
150 mm
Max
100 mm
Min. 20 mm

Instructions for the installer
18
7.3 Electrical connection
Make sure that the voltage and capacity of the power line conform to the data
shown on the plate located under the casing. Do not remove this plate for any
reason.
The plug at the end of the supply cable and the wall socket must be of the same
type and must conform to the applicable legislation on electrical installations.
Make sure that the supply line is suitably earthed.
Fit power line with an omnipolar circuit breaker with a contact opening gap equal
to or greater than 3 mm in an easily accessible position close to the hob.
Avoid the use of adapters and shunts.
If the power cable is replaced, the cross-
section of wires in the new cable must be
no less than 1.5 mm2 (3 x 0.1.5 cable),
remembering that the end for connection to
the appliance must have an earth wire
(yellow/green) which is
at least 20 mm longer. Only use a H05V2V2-F or similar resistance cable to the
maximum temperature of 90°C. Its replacement must be carried out be a
specialised technician who must carry out the network connection following the
diagram below.
L = brown
N = blue
= yellow/green
The manufacturer cannot be held liable for damage to persons or things caused
by non-observance of the above directions or by interference with any part of the
appliance.
914779074/ A
/