Jackson Grills 2016 Premier 700BI User manual
- Category
- Barbecues & grills
- Type
- User manual

FIRE IT UP WITH JACKSON GRILLS. www.jacksongrills.com
OWNER’S MANUAL for PREMIER700-BI
For Built-in Models:
JPG700BI-LP (Liquid Propane)
JPG700BI-NG (Natural Gas)
Version: SEPT15
Important Notice
Please read ALL safety notices on Pg. 2-3
before assembling or operating this grill.

2
!WARNING!
If you smell gas:
1. Shut off gas to the appliance.
2. Extinguish any open flame.
3. Open lid.
4. If odor continues, keep away from appliance and
immediately call your gas supplier & fire department.
!WARNING!
1. Do not store or use gasoline or other
flammable liquids in the vicinity of this
appliance.
2. Do not store disconnected propane
tanks in the vicinity of this appliance.
!WARNING!
Failure to follow all manufacturers’
instructions could result in serious
bodily injury and/or property damage.
!SAFETY WARNINGS!
IMPORTANT: Please read and understand all warnings and precautions prior to operating your gas grill.
1 This grill is for outside use only, and shall not be used in any building, garage, enclosed area or vehicle.
2 This grill is set up from the factory for use with Propane Gas (LP). (Propane Cylinder /Tank not included)
.
3 Do not use gasoline, alcohol or other volatiles for lighting!
4 The Propane (LP) gas supply cylinder must be constructed and marked in accordance with the
specifications for propane gas cylinders of the US Department of transport (DOT) CFR 49 or the National
Standards of Canada, CAN/CSA B339, Cylinders, Spheres and Tubes for the Transportation of
Dangerous Goods.
5 Always open the grill lid slowly & carefully as heat and steam in the grill can cause severe burns.
6 Always place your grill on a hard level surface away from combustible materials
7 Do not attempt to move this grill while lit.
8 Do not leave a lit grill unattended. Keep children and pets away from this grill at all times.
9 Do not use this grill unless it is COMPLETELY assembled and all parts are securely installed.
10 To prevent liquid propane from entering the regulator valve and causing a possible hazard, please ensure
that the propane cylinder is at a lower level than the regulator valve/regulator when in use.
11 Keep grill area clear and free from combustibles and gasoline or other flammable vapors and liquids.
12 Do not alter this grill in any manner.
13 Do not touch any metal surfaces on this grill until it has completely cooled to avoid burns, unless wearing
protective gear. (Pot holders, gloves, BBQ mittens, etc.)
14 It is essential to keep the valve compartment, burners, and circulating air passages clean and free of
obstructions and debris. Inspect the grill before each use.
15 Do not store any spare propane cylinders within 10 feet of this Portable Grill.
16 Please note that propane (LP) is explosive under pressure, heavier than air, and settles and pools in low
areas, which can create an explosion hazard.
17 Contact with propane gas can cause freeze burns to your skin.
18 Dented and rusted propane cylinders may be hazardous and should be checked by a propane gas
supplier, before use.
19 This grill is equipped with a three-prong (grounding) plug for your protection, and should be plugged into
a grounded three-prong receptacle. Do not cut or remove the ground prong.
20 Keep electrical supply cords away from any heated surfaces.
!
!

3
CERTIFICATION & TESTING
This appliance has been tested by Labtest Certification (LC) and has been tested to ANSI Z21.58a-1198 & CGA
16a-M98, and Certified for Canada and the USA.
NOTE: The use and installation of this product must conform to local codes. In the absence of local codes, use the
National Fuel and Gas Code, ANSI A223.1, Storage and Handling of Liquefied Petroleum Gasses, NFPA / ANSI 58.
TABLE OF CONTENTS
Safety Warnings: 3
Certification & Testing; 4
Unpacking Your Grill; Parts Checklist 4
Special Message to Owners: 5
Owner Registration: 5
Tools Required for Assembly: 6
Assembling & Preparing your Grill: 6-7
Installation of a Built-In model 8
Propane Gas Connection: 9-10
Natural Gas Connection 10
Leak Testing: 11
Installer Final Checklist: 12
Fuel Conversions: 12
Lighting Instructions: 13
Grill and Rotisserie Cooking 14-15
Cleaning & Maintenance: 16-18
Storing your Grill: 18
Trouble Shooting: 19
Exploded Parts View: 20
Parts List: 21
Warranty: 22

4
UNPACKAGING YOUR GRILL
The JPG700BI-2 Built-In Model comes packaged one box. Please open the box carefully and set
aside all loose components. Once unpacked, match the parts to the list shown below. Check
all components for possible damage before assembling your grill. Most of your portable grill
has been factory assembled, however there are still some items that must be unpacked, and
placed in the correct position in your barbecue. For assembly instructions please refer to the
Section, “Assembling & Preparing Your Grill” (Pp.6).
PARTS CHECKLIST:
1 x Main Firebox Assembly
1 x Warming Rack
4 x Flame Diffusers
2 x Cook Grids
1 x Jackson Cover
1 x Grease Cup
1 x AA Battery for Rotisserie Ignition
1 x Complete Rotisserie Kit w/
Flex Light
1 x Owner’s Manual
Propane Models:
1 x Propane (LP) Hose & Regulator
Natural Gas Models:
1 x Natural Gas Hose with Quick Release
!TECH-TIP!
Do not throw away packaging
until you have confirmed that
all parts are present.
!WARNING!
Exercise caution when handling stainless steel; metal edges
may be sharp and can cause injury.

5
Special Message for our Customers
All of us at Jackson thank you, for choosing a Jackson grill! This appliance was designed, engineered, and built with
quality components and we are confident that it will provide you with years of excellent operation.
Please take the time to read the entire manual and familiarize yourself with all of the features of the Jackson Grill. This
manual also contains important safety information and operation instructions. Please write your barbecue’s serial
number in the space below, and ensure that this manual remains handy to the barbeque for quick reference.
To obtain replacement parts for your Jackson Grill, contact your local dealer. If you have any questions please call us
anytime at the number below: (Please have your model and serial number at hand)
Grill Model: JPG700BI-2
*Serial Number: ________________
*write your serial number here for future reference.
OWNER REGISTRATION: Please take the time to fill out and return a Warranty Registration Card. This can be done
on-line at www.jacksongrills.com, or simply fill in the form below and mail or fax to:
Jackson Grills Fax: 1 (877) 855-5373
#106-2480 Mt. Lehman Rd.
Abbotsford, BC
Canada, V4X 2N3 Customer Service: 1 (888) 287-3333
Please complete and return within 10 days. Thank you.
Title: Mr. Mrs. Ms. Miss (Circle One)
First Name:
Initial:
Last Name:
Street:
Apt. #:
City:
State/Prov.:
Zip/Postal:
Phone:
Email:
Date Purchased:
Dealer:
Model:
Serial #:
Comments:
Thank you for taking the time to fill out this Ownership and Registration Card
Dear Grill Owner; please keep this manual for future reference.

6
Tools Required for Assembly*:
*Please use the proper tools to simplify installation and prevent personal injury or damage to your grill.
A) Installer Supplied Tools:
1 x Medium Phillips Screwdriver
1 x 5/16” Wrench (or 8mm)
2 x ¾’ Wrench (or 19mm)
Assembling & Preparing Your Grill:
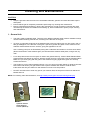
B) Install Flame Diffusers, Cook Grids and Warming Rack:
1. Remove the flame diffusers from the packaging. Please ensure that all protective plastic has been removed.
2. Install the diffusers directly above each burner, by slotting them onto the small pins on the front and rear wall of
the firebox (Fig. 1). Please ensure that the diffusers sit down correctly in their slots, to optimize diffuser function.
3. Install 2 X Cook Grids on the upper ledges of the firebox (Fig. 2)
4. Remove warming rack from packaging and install above cooking grids on the 2 side brackets (or ledges) on
the inner hood.
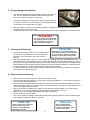
C) Rear Burner Spark Igniter:
1. Unscrew the plastic/rubber cap from the rear burner ignition module.
2. Insert the supplied AA battery with the positive end facing out. (Fig. 3)
3. Re-install cap.
4. To test the Igniter; push the Igniter button and hold. The ticking noise
from the electrode indicates that the Spark Ignition is working fine!
Figure 1
Figure 3
Figure 2

7
Figure 4
Figure 6
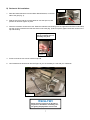
D) Rotisserie Kit Installation:
1. Slide the Rotisserie Motor onto the Motor Mount Bracket, on the RH
side of the grill (Fig. 4).
2. Side the two forks and the counter balancer onto the spit rod, and
position as desired. Tighten in place.
3. Place the rotisserie rod into the motor. Slide the rotisserie rod bushing over the opposite end of the rod and drop
into the cut-out provided in the RH side of the inner hood (Fig. 5).Once in place, tighten the thumb-screw on the
spit rod bushing.
.
4. Screw round knob onto end of rotisserie spit rod.
5. Your Rotisserie Kit should look like the Figure 6: you are all ready to cook with your rotisserie!
Line groove up with
cut-out, and drop spit rod
assembly into place.
!TECH-TIP!
Apply anti-seize grease to the threads of
any screw or bolt before reinstalling. This
will greatly simplify future service work.
Figure 5

8
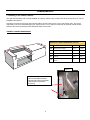
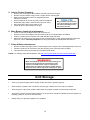
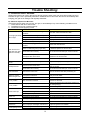
Installation:
A. Installing in an outdoor cabinet:
This grill must be safely and correctly installed as a built in, before using. Please refer to the chart below, for correct
installation dimensions.
Framing must enclose the grill on the back and sides, but the bottom of the cut-out may be left open. The grill is
supported by the three integral flanges (left, right and rear), so no support underneath is required. NOTE: please
ensure that fuel line openings provide adequate space for the lines,
CABINET FRAMING DIMENSIONS:
Installation in NON-COMBUSTIBLE Cabinets
A
Width
32 ½”
82.7 cm
B
Depth (Front to Rear)
18 ½”
45.8 cm
C
Height (Top to Bottom)
10 ¼”
25.5 cm
D
Minimum Total Cabinet Depth
24”
61 cm
E
Rear Clearance to Cabinet
Vertical*
5 ½”
14 cm
F
Bottom Clearance to Accessory
Doors
3”
7.7 cm
Example of an Installation in
Non-Combustible materials:
cement board and metal studs.
(Grill raised for illustration
purposes).
Figure 7

9
Propane Gas Connection:
Fuel Source: The following instructions are for a Propane Equipped grill ONLY.
Hose & Regulator: Use only the propane hose and regulator supplied with your Propane grill.
Installation Codes: The installation of this appliance must conform with local codes or, in the absence of local
codes, to the National Fuel Gas Code, ANSI Z223. 1 or CAN/CGA-B149.2 Propane Installation Code.
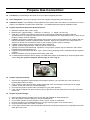
Propane Cylinder Requirements & Specifications:
1. Maximum Cylinder Size: 20 lbs. (9 Kg)
2. Measurement: (approximately) Diameter: 12’’(30.5cm) X Height: 18” (45.7cm):
3. USA: All LP cylinders used with this grill must be constructed and marked in accordance with the
Specifications for LP (Propane) Gas Cylinders of the US Department of Transportation (D.O.T.). Refer to your
propane cylinder collar for markings.
4. CANADA: All propane cylinders used with this grill must be constructed and marked in accordance with the
National Standard of Canada, CAN/CSA-B339; Cylinders, Spheres and Tubes for the Transportation of
Dangerous Goods and Commission. Refer to your propane cylinder collar for markings.
5. Cylinder supply system must be arranged for vapor withdrawal.
6. Cylinder must be equipped with a collar to protect the outlet valve.
7. Cylinders must be rust and dent free: a dented or rusty propane cylinder may be hazardous, and must be
professionally inspected before use.
8. Cylinders must be equipped with QCC Type 1 (Quick Closing Coupling) outlet, compatible with the regulator
supplied.
9. Propane Cylinders must be equipped with a safety relief valve.
10. UL listed Overfill Protection Device (OPD); This OPD safety feature is identified by a unique triangular hand
wheel. Only use cylinders equipped with this type of valve. (Fig. 8)
Propane Cylinder Handling:
1. Government regulations prohibit shipping full Propane cylinders. You must take your new cylinder to a
Propane filling station for filling.
2. A full cylinder is under high pressure; always handle with care, and transport secured and in an upright
position. Protect the valve from accidental damage.
3. Do not tip the propane cylinder while connecting it to your grill’s regulator
4. If the cylinder is tipped over while connected to your grill, shut it off and disconnect it; then have it checked
before use.
Propane Cylinder Storage:
1. Disconnected propane cylinders must have a dust cap installed for storage purposes.
2. Store all propane cylinders outdoors in a well-ventilated area.
3. Do not store cylinders in direct sunlight or near a source of heat or combustion.
4. Propane cylinders must be REMOVED from your grill; when the grill is to be stored indoors.
5. Keep all propane tanks out of reach of children.
6. If your grill is stored outside, the propane tank may be left connected to the grill. Turn off propane tank valve
when grill is not in use.
Figure 8

10
Connecting Your Grill to a Propane Cylinder:
1. Make sure tank valve is in its full off position (turn clockwise to stop).
2. Check tank valve to ensure that is equipped with external (male) threads (i.e. QCC-1 type connecter).
3. Make sure all burner knobs are in their off position.
4. Remove the protective dust cap from the cylinder valve. Always reuse dust cap when storing a cylinder.
5. Inspect valve connection port and regulator; look for any damage or debris. Inspect hose for damage. Never
attempt to use damaged or plugged cylinders. Contact your local propane gas dealer for repair.
6. When connecting the regulator to the valve, hand-tighten the black plastic Quick Coupling Connecter (QCC)
nut clockwise to a positive stop. Do not use a wrench to tighten as this may damage the nut and cause leaks.
7. Open tank valve fully (counterclockwise). Use a soapy water solution to check all connections for leaks
before attempting to light grill. If a leak is found, turn tank valve off and do not use grill until a local L.P. gas
dealer can make repairs.
Disconnecting a Propane Cylinder
1. Turn all the grill knobs to off.
2. Turn the tank valve off fully (turn clockwise to stop).
3. Detach the regulator from tank valve by turning the Quick Coupling Connecter (QCC) nut counterclockwise.
4. Install the protective cap back onto the threads of the propane cylinder valve.
Natural Gas Connection:
Fuel Source: The following instructions are for a Natural Gas Equipped grill ONLY.
NG Hose: Use only the natural gas hose supplied with your Propane grill.
Install the Natural Gas Hose supplied, onto the nipple in at the RH wall of the grill cart. The nipple is located on
the bottom of the fuel regulator, and it is a flare nut type connection; DO NOT USE SEALANT of any kind.
Tighten using a ¾” open end wrench.
Attach the supplied female quick release to the home owner’s new or existing Natural Gas Quick Release. This
connection requires Gas Pipe Sealant, or Gas rated Teflon Tape.
Next, double check to ensure that the source gas pressure is no more than 7” water column.
!WARNING!
1 Never insert any foreign objects in valve outlet, as this may cause leaks.
2 Do NOT connect this grill to unregulated Propane systems such as in a
motor home or camper trailer. System pressure MUST be regulated before
hook up.
3 Do NOT use this grill until leak tests have been completed.
4. If a gas leak is detected and cannot be stopped, call the fire department
immediately.
!WARNING!
1 Never insert any foreign objects in the quick release or Natural Gas hose,
as this may cause leaks.
2 Source pressure for Natural Gas MUST be confirmed at 7” Water Column
or less; using a grill at higher pressures could result in property damage,
and injury or death.
3 Do NOT use this grill until leak tests have been completed.
4. If a gas leak is detected and cannot be stopped, call the fire department
immediately.

11
Leak Testing:
1. GENERAL:
Although all gas connections on the grill are leak tested at the factory prior to shipment, a complete gas tightness
check must be performed at the installation site due to possible mishandling in shipment, or excessive pressure
unknowingly being applied to the unit. Periodically check the whole system for leaks, or immediately check if the
smell of gas is detected.
2. BEFORE TESTING:
a) Make sure that all packing materials are removed from the grill and cart.
b) Do not smoke while leak testing.
c) Never leak test with an open flame.
d) Make a soap solution with one part liquid detergent and one part water. Prepare a spray bottle, brush, or rag
to apply the solution to the connections. For the initial leak test, make sure the propane cylinder is full.
e) Grill must be leak tested outdoors in well-ventilated area, away from ignition sources such as gas fired or
electrical appliances, and flammable materials.
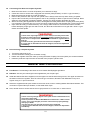
3. TESTING PROCEDURES:
a) Make sure all control knobs are in the “OFF” position.
b) Make sure the regulator is connected to the propane cylinder tightly.
c) Completely open propane cylinder valve by turning counter clockwise. If you hear a “POP” sound, turn gas off
IMMEDIATELY, it indicates a heavy leak at the connection. Call your gas dealer or fire department.
d) Check every connection from the propane cylinder or natural gas quick release, up to and including the
connection to the manifold pipe assembly (the pipe that goes to the burner) by brushing or spraying the soapy
solution on the connections.
e) If soap bubbles appear, there is a leak. Turn off propane cylinder valve or natural gas quick release
IMMEDIATELY and retighten connections, Open valve again, and recheck.
f) Always close the propane cylinder valve after leak test by turning clockwise.
g) Only those parts recommended by the manufacturer should be used on the grill. Substitution can void the
warranty. Do not use the grill until all connections have been checked and do not leak.
4. LEAK TEST SAFETY TIPS:
a) Always check for leaks after every propane cylinder change.
b) Always check for leaks at every connection before use.(Including natural gas quick release hook up)
c) If any grease or hot items fall on the valve, regulator, hose or any part that conveys gas, shut the gas off
immediately, check the cause and rectify it. Then, perform a complete leak test before reusing the grill.

12
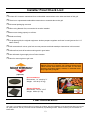
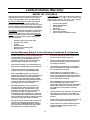
Introducing the ISLAND GRILLSTONE™ Check out this
fabulous new way to enhance your cooking! Quarried from
natural volcanic rock and then cut into slabs, it is the ideal
accessory for grilling veggies, seafood, or marinated meats.
Drops right onto your grill!
Installer Final Check List:
At least 36” clearance maintained from combustible constructions to the sides and back of this grill.
There is no unprotected combustible construction or materials above the grill.
All internal packaging removed.
When using Natural Gas; conversion kit must be installed.
Burners are sitting properly on orifices.
Knobs turn freely.
For propane grills; the original equipment Jackson propane regulator and hose is used (pre-set for 11.0”
water column).
Grill connections & valves, plus fuel sources pressure and leak tested per instructions in this manual.
Grill test fired, and all functions working and in good order.
User informed of gas supply shut off valve location.
Owner’s manual given to grill user.
.
Fuel Conversion:
This grill is convertible to Natural Gas or Propane as needed, with the installation of the appropriate Gas Conversion
Kit. (See parts list, PP 20) The kit should be installed by a qualified gas fitter. Please contact your local dealer for
information.
(Optional)
Round Grillstone
Dimensions: 14” round by ¾”
Weight: 12.5 lbs (5.67 kg)
Square Grillstone
Dimensions: 12”x12” x 3/4”
Weight: 9.9lbs (4.5 kg)

13
Grill Lighting Instructions:
1. BEFORE LIGHTING:
a) Always inspect the gas supply hose before turning the gas “ON”. If there is evidence of cuts, wear, or
abrasion, it must be replaced before use. Use only a manufacturer approved replacement hose.
b) Check all gas connections for leaks before each use. Do not light grill if gas odor is present.
2. TO LIGHT MAIN BURNERS OF THE GRILL:
a) Read instructions before lighting.
b) Open lid prior to lighting your grill.
c) Turn all knobs to “OFF” then open the propane cylinder valve or the natural gas valve on your gas hook up.
Always keep your face and body averted when lighting.
d) Push in and rotate each control knob counter clockwise slowly, to the “HI” position. (When rotating the knob,
rotate for a two second count: do NOT turn the knob rapidly) The built-in igniter will click and spark, thus
lighting the torch light pilot flame, then the main burner. If the burner does not light IMMEDIATELY turn the
knob to off and wait 5 minutes for gas to dispel and repeat the lighting procedure.
e) Follow match lighting instructions if burner can’t be lit after repeating 3-4 times.
3. TO LIGHT MAIN BURNERS with a MATCH or Barbecue Lighter:
(Temporary Solution when Ignition is disabled)
a) Read instructions before lighting.
b) Open the lid during lighting.
c) Turn all knobs to “OFF” then open the propane cylinder valve or the natural gas valve on your gas hook up.
Always keep your face and body averted when lighting.
d) A long stove match or BBQ lighter must be used to reach the burners.
e) Do NOT drop a burning match into grill for lighting purposes.
f) Push and turn the main burner knob to the “HI” position, then release.
g) Light burner by match. Make sure the burner lights and stays lit.
h) If necessary, call your dealer or the Jackson service line, for assistance with repairing your ignition system.
4. Flame Characteristics:
a) Check for proper burner flame characteristics. Each burner is adjusted prior to shipment; however, variations
in the local gas supply may take subtle necessary adjustments.
b) Burner flames should be blue and stable. There should be no excessive noise, or flame lifting. If any of these
conditions exist please call your Dealer. If the flame is yellow, it indicates insufficient air. If the flame is noisy
and tends to lift away from the burner, it indicates too much air.
c) NOTE: small yellow tips are okay.
5. Lighting the Rear Rotisserie (Infrared) Burner:
a) Read instructions before lighting.
b) Turn all knobs to “OFF” then open the propane cylinder valve,
Or the natural gas valve at the quick release.
c) Always keep your face and body averted when lighting the grill.
d) Open lid during lighting.
e) Push and turn rear burner control knob to the “HIGH” position, then
push and hold igniter button until burner lights. Up to 5 seconds is allowed for ignition.
f) Follow match lighting instruction if burner can’t be lit after repeating above steps 3-4 times.
6. Lighting the Rear Rotisserie (Infrared) Burner by match:
a) Read instructions before lighting.
b) Open the lid during lighting.
c) Push and turn the rear burner knobs slowly to “HI” position, then release.
d) Light by match with left hand. Make sure the burner lights and stays lit.
TECH-TIP
Remove Warming Rack before
using your rotisserie burner;
otherwise the rack may be
damaged due to excessive heat.

14
Grill and Rotisserie Cooking:
Total Gas Consumption:
Total gas consumption per hour, per burner: MODEL JPG700:
Main burners: 15,000 Btu/hr. X 4 = 60,000 BTU/hr.
Rear burners: 13,500 Btu/hr. X 1 = 13,500 BTU/hr.
Total Potential Consumption: = 73,500 BTU/hr.
SAFETY REMINDERS:
Always leak test your grill before use.
NEVER let children operate the grill or play near the grill.
This grill is for outdoor use ONLY. NEVER use in an enclosed area like a carport, porch, covered patio,
garage, or under a surface that can catch fire.
Do not block the ventilation holes in the four sides of the grill cart, it may affect the combustion
performance of the burner due to insufficient air.
Use your grill at least 36’’ away from any wall or surface &120’’ away from objects that may spark and
ignite gas i.e. live electrical appliances, pilot lights of water heaters, etc.
Do not use this grill on or under wood balconies.
This grill is designed to use only propane (or natural gas if equipped with natural gas orifices). DO NOT
use lava rock, briquettes, or charcoal with this grill.
NEVER light the burner with lid closed. Non-ignited gas accumulated inside a closed grill may cause
explosions.
Check the burner flames periodically.
Turn off the gas supply when the grill is not in use.
Always turn off the propane cylinder completely and detach from the grill before moving.
FOOD SAFETY:
Always adhere to the following tips to enjoy a safe and healthy outdoor grilling.
Always use hot soapy water to wash hands, surfaces & utensils after processing raw meat.
Always separate the raw meats from done foods to avoid cross contamination
Always use clean utensils to handle the food.
Always cook the meat thoroughly to kill germs. Use a thermometer to inspect the inner temp of the meat, if
necessary.
Place all foodstuffs promptly into refrigerator once the meal is over, to prevent spoiling.
1. General:
a) The thickness of the meat will affect the grilling time and results; whether rare, medium, or well done.
b) The pre-heated temperature of the grill affects grilling time and results.
c) Defrost meat in the refrigerator overnight. Do not use a microwave, as this dries out the meat.
d) For best results, use a metal spatula or tongs or a fork to turn the meat (not a fork).
e) To get the juiciest meats, use appropriate cooking times and temperatures.
f) Cut off any excess fat from the meat before grilling, as this will prevent flame flare ups.
g) The hot grids sear the food, caramelizing it for optimal flavor. The longer your grill is the preheated, the
faster the meat will sear.
!WARNING!
Clean your grill often, especially the
grease pan and grease cup. Failure to
do so may cause a grease fire,
resulting in injury or property damage!

15
!WARNING!
Do not leave grill unattended
while cooking! Potential
BURN and FIRE RISK!
2. Using the Grilling Surface (Cook Grids):
a) Grilling requires high heat for searing and proper browning.
b) Most foods are cooked at the “HI” heat setting for the entire
cooking duration.
c) When grilling large pieces of meat or poultry, it may be necessary
to turn the heat to a lower setting, after the initial searing. This
allows the food to cook through without burning the outside. Foods cooked for a long time or basted with
a sugary marinade may need a lower heat setting near the end of the cooking time.
d) Turn the control knob(s) to “Hi” and preheat the grill for 8 minutes. (Time may vary based on climate)
Note: Keep the grill closed during preheating.
e) Place the food on the grill and cook to the desired doneness. Adjust heat setting, if necessary. The control
knobs may be set to any position between “HI” and “LO”.
3. Using the Rotisserie Kit:
a) Take off the rotisserie kit (spit rod & forks assembly) from the grill.
b) Loosen and slide the left fork off of the spit rod.
c) Load the meat or poultry onto the spit rod; center the meat as much as possible. Do not exceed 12 lbs.
d) Re-install the left fork, then slide the two forks into the meat to secure.
e) Center forks and meat on the spit rod, then tighten down the fork wing nuts
f) If the meat has any loose portions, wrap the meat with butcher’s string (never use nylon or plastic )
g) Re-install the rotisserie kit into your grill, ensuring that the pointed end is fitted into the motor.
h) Ensure the meat is at least two inches away from the infrared burner and any excess fat is removed. Fat is
very flammable and should be a safe distance away from the burner for best results.
4. Tips for ROTISSERIE cooking:
a) When using the rotisserie, the meat should be centered on the spit rod, after which it must
be balanced. To balance the meat, first rotate the cut so that heaviest side is facing downwards.
Next, position the counter balance so that it faces upwards. Secure in place by tightening the counter
balance wing nut. Check the rotisserie function to ensure that the spit is rotating freely. It may be
necessary to adjust the counter balance weight in or out, to achieve a smooth rotation.
b) Place a drip pan on top of the upper flavor shields and position the pan directly beneath the food on the
spit rod. Depending on the flavor you desire, place liquid in the pan such as, water, juices or wine, chop up
onions or add garlic, As the juices fall from the meat they will mix with the liquid and evaporate directly into
the meat, this removes the need for manual basting as this is a self-basting system.
c) Do not let the drip tray dry out.
d) You are now ready to rotisserie cook!
e) Season meat or poultry as desired, then light the rotisserie burner (refer to instructions in this manual).
f) Always use a meat thermometer to determine how well the meat is cooked. Insert the thermometer into
the center of the meat. Do not allow the thermometer to touch a bone as this will not give an accurate
reading on the meat thermometer. When checking poultry, the best location to insert the thermometer is in
the center of the thigh muscle, next to the body.
g) Close lid while cooking.
Note: Please keep your rotisserie kit in a warm and dry area when not in use. Clean all
components well after every use. Leaving food products and other environmental
particulate matter on the surfaces of these components can cause them to have
surface rust. This can be polished out, sometimes with a lot of effort.

16
Cleaning and Maintenance:
CAUTION:
Keep the grill area clear and free from combustible materials, gasoline and other flammable vapors
and liquids
Ensure that the grill is completely cold before performing any cleaning and maintenance.
Burning off deposits and soiling by turning the main burners on high for about 5 minutes after each
use will keep excessive food residue from building up, but this DOES NOT replace proper cleaning
and maintenance.
1. General Info:
This grill is made of stainless steel. There are many different stainless steel cleaners available. Always
use the mildest cleaning method first, scrubbing in the direction of the grain.
To touch up noticeable scratches in the stainless steel, sand very lightly with very fine emery cloth or
800 grit sandpaper, in the direction of the grain. Specks of grease can gather on the surfaces of the
stainless steel and bake onto the surface, giving the appearance of rust.
Use a cleaning pad (such as ScotchBrite) along with a stainless steel cleaner to remove these stains.
(Rub in the direction of the stainless grain.) Final finish with a stainless steel polish, using a soft, dry
cloth.
For a deep clean and to remove layers of carbon and grease build-up, Jackson Grills Stainless Steel
Cleaner/Polish (see below) is a strong, abrasive cleaner that can cut through even the toughest stains.
Make sure you clean going with the grain of the stainless as going against the grain can severely
scratch the surface.
This product is not for clean polished surfaces. It is a very strong but safe cleaner for tougher jobs that
both cleans and shines your grill surface back to prime condition. Be careful to read all of the
instructions and ask your dealer for clear direction on how to use this product.
Do NOT use steel wool to clean any part of your Jackson Grill, as fine pieces of the wool will be left
behind and rust.
NOTE: For cleaning video demonstrations, visit http://www.jacksongrills.com/see/cleaning/index.php
Optional Jackson
Grills Stainless
Cleaner (SSCP16)

17
TECH-TIP
Some cleaners may remove the
silk screened labels on the
console; use caution when
cleaning the console.
TECH-TIP
When cleaning heavy
soiling, always polish or
scrub in the direction of the
stainless steel grain.
TECH-TIP
Do NOT turn on the rotisserie burner
when the main burners are being used
to clean the grill; otherwise overheat
damage to your barbecue may result.
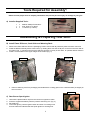
2. Grease Management System:
Your grill is equipped with a small grease cup in the back of the
unit. This cup should be emptied & cleaned thoroughly after
each use and before the grill is transported.
Your grill is designed to allow grease to flow along the bottom of
the firebox, and collect in both the grease collecting pan and the
small grease cup. (See photos next page).
Both the grease pan and the cup must be cleaned on a regular basis, for the system to work as
designed, and prevent grease fires.
A small amount of sand can be added to the grease pan and cup for absorbing accumulated grease.
3. Cooking Grid Cleaning:
If the grids are heavily soiled, turn your main burners
on high for 10 minutes to burn off excess deposits.
(Do NOT run the rotisserie burner with the main
burners).
After each grilling session, clean the cooking grids with a stainless or brass wire barbecue brush. The
best method is to clean immediately after cooking, while the grill is still hot. Wear a barbeque mitt to
protect your hand from heat and steam. Dip your brush frequently in tap water and scrub the hot grill.
Steam created by the hot grill assists the cleaning process by softening deposits. The food particles
will fall off and be burn up later. Never immerse ANY hot parts in water.
For final cleaning, the cooking surface can be washed with hot soapy water, utilizing a Scotch Brite
scouring pad for stubborn deposits.
4. Exterior Surface Cleaning:
Use mild dish soap and hot water to clean the outside of the grill.
Do not use any abrasive cleaners, scouring pads, strong degreasers etc., on the exterior of this grill;
this will scratch the stainless finish.
If using the Jackson Stainless Steel Cleaner to remove any surface corrosion be sure to go with the
grain of the finish in order to not make swirls in the stainless steel, this product is mildly abrasive and
is should be applied with a soft cloth.
Specks of grease can adhere to the surfaces of the stainless steel and bake on; this will give the
appearance of rust. Use an abrasive pad with stainless steel cleaner to remove.
Sand heavy scratches lightly with 600 grit wet and dry sandpaper.
Always rinse with clean hot water.
Use a spray polish on stainless steel polish to add shine and help protect the exterior stainless steel
from surface contaminants and any corrosion.
!WARNING!
Clean your grease pan AND grease
cup regularly. Failure to do so may
cause a grease fire, resulting in
injury or property damage!

18
5. Interior Firebox Cleaning:
Remove the cooking grid, flame diffuser and the burner from the grill.
Remove excess residue using a brush, scraper and/or cleaning pad.
Spray inside the firebox with oven degreaser and let
stand for 5 minutes.
Use a toothbrush to loosen up grease and food residues.
Wash with soapy water, and rinse with clean hot water.
Wipe out firebox with a paper towel or rag.
Leave lid open to allow the grill to air dry.
6. Main Burner cleaning & maintenance:
Check to ensure that all gas knobs and valves are off.
Remover burners and inspect inner and outer surfaces for contamination and debris.
Clean the exterior burner surface with a stiff stainless steel grill brush.
Make sure all of the burner port holes are free of obstruction by using a large paperclip to poke the
holes out. This is extremely important to prolong the lifespan of the stainless steel burner.
7. Flame diffuser maintenance:
Remove residue and larger pieces of food using a brush, scraper and or cleaning pad after each use.
If desired, cleaners can be used for the final cleaning; then rinse with clean hot water.
This will reduce flare ups and prevent premature break down.
NOTE: For cleaning video demonstrations, visit http://www.jacksongrills.com/see/cleaning/index.php
.
Grill Storage:
Clean your grill thoroughly before storage as this will result in greater longevity.
When propane cylinder is left connected, store the grill outdoors and out of reach of children.
Store the grill in a dry indoor location ONLY after the propane cylinder is turned off and removed.
All propane cylinder must be stored outdoors, out of the reach of children. NEVER store the cylinder in a
building, garage or any other enclosed area.
Always store your grill with supplied cover installed.
TECH-TIP
Many cleaners can be caustic,
so for final cleaning use soapy
hot water followed by a rinse
with clean hot water.
!WARNING!
When reinstalling the main burners after cleaning, the
burners must be positioned so that orifices of the
valves are inserted into the center of each burner.
Failure to do so could cause flames to escape around
the burner inlets, which may result in damage or injury.

19
Trouble Shooting:
A) SPIDER AND INSECT WARNING:
Spiders and insects can nest in the burners during storage: these nests can cause fires inside burners or
beneath the grill. This is potentially hazardous: ALWAYS remove and clean the burners immediately after
bringing your grill out of storage, and regularly thereafter.
B) When to Inspect Your Burners:
Inspect the burners each time you use your grill, or immediately if any of the following conditions occur:
1. Yellow flames with burnt insect odor.
2. Temperature too low or heats unevenly
3. The burners make popping noises.
PROBLEMS
POSSIBLE CAUSE
SOLUTIONS
Torch light pilot flame
will not light.
Electrode deposited with cooking
residues.
Use clean swab and alcohol to clean.
Electrode or wire damaged & no spark.
Replace gas valve assembly.
Electrode wire loose or fallen off.
Reconnect electrode wire at gas valve.
Plugged torch light orifice
Unplug orifice.
Pilot outlet tube (flame tube) blocked.
Check & clean tube of insects, nests, & debris.
Main burner won’t
light after torch light
lights successfully.
Burner orifices plugged/caked with
residue.
Check and clean burners.
Valve not delivering fuel (no gas flow)
Check that gas is turned on. If only one burner
is affected, replace one burner valve
Air shutters set incorrectly
Re-set burner air shutters per owner’s manual.
Burner incorrectly installed and
misaligned with valve orifice
Re-install burner correctly so that the orifice is
centered in the burner’s inlet
Gas flow is intermittent
Clean/clear burners and main orifices.
No spark at rear
burner
Dead battery in rear burner igniter switch.
Replace battery by unscrewing switch cap.
Inadequate heat
Incorrect burner orifice size
Replace orifices and/or set shutter to match gas
type (LP or NG)
Air shutters set incorrectly
Re-set burner air shutters per owner’s manual.
Gas valve hard
Corrosion at valve stem
Remove knob and lube with penetrating oil
Yellow or orange
flame with gas odor
Incomplete combustion
Call your local dealer.
Burner or orifice blocked.
Clear blockage.
Low heat with knob
in “HI” position
Gas hose bent or kinked.
Smooth out the hose
Low heat with knob
in “HI” position
Low gas pressure
Call the gas dealer (Check propane cylinder may
be nearing empty)
Grill not preheated
Preheat the grill for 15 minutes
Flame Flare-Ups
Excessive fat on meats
Cut of fat before grilling
Temperature too high
Adjust
Excess grease deposits
Clean
Flame out
High winds
Turn up flames; keep watch so it does not go out.
Air Shutters set incorrectly
Re-set burner air shutters per owner’s manual.
Flame lifting
Too high of a gas pressure
Call the gas dealer.
Flash back
Burner inlet blocked with debris
Remove burner and clean inlet
Grease fire
Grease accumulated in grease tray & cup
due to improper cleaning & maintenance.
Regularly inspect and clean grease pan and cup
to prevent grease accumulation.
Knobs getting too hot
Wind blowing from behind the grill
Reposition grill or create wind barrier.
Grill is not level
Reposition grill

20
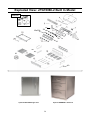
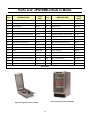
Exploded View: JPG700BI-2 Built In Model
Optional BIDOORS Single Door
Optional DRAWER-3 drawer kit
15a/15b
30
31
41
40
40
32
33
34
9
56a/56b
14
Page is loading ...
Page is loading ...
-
 1
1
-
 2
2
-
 3
3
-
 4
4
-
 5
5
-
 6
6
-
 7
7
-
 8
8
-
 9
9
-
 10
10
-
 11
11
-
 12
12
-
 13
13
-
 14
14
-
 15
15
-
 16
16
-
 17
17
-
 18
18
-
 19
19
-
 20
20
-
 21
21
-
 22
22


Jackson Grills 2016 Premier 700BI User manual
- Category
- Barbecues & grills
- Type
- User manual
Ask a question and I''ll find the answer in the document
Finding information in a document is now easier with AI
Related papers
-
Jackson Grills KEYSTONE BLACK Owner's manual
-
-
-
-
-
-
-
-
-
Other documents
-
Pit Boss PB200P User manual
-
Kamado Joe ComboJoe Owner's manual
-
Cuisinart C560S Installation guide
-
 Kenmore Elite 119.17676800 Owner's manual
-
Capt'n Cook XG5CKWNA Owner's manual
-
Barbeques Galore Turbo STS 750-0057-4BRB User manual
-
Master Chef S405 Owner's manual
-
-
Member's Mark BQ06042-1 Owner's manual
-
Members Mark BQ05046-6 Owner's manual
