Page is loading ...

customerservice@puregbi.com 1-866-498-5269 MODEL# 9011TS - PAGE 1
Do not allow more than one person on this product at any time.
Adult supervision is required.
Please read all the instructions before using this product.
Consult a physician before beginning any exercise program or strenuous activity.
ADULT ASSEMBLY REQUIRED.
Please visit www.pureglobalbrands.com to register your product to ensure warranty coverage.
WARNING
THE CONTENTS OF THIS PACKAGE ARE NOT SUITABLE FOR CHILDREN
UNDER 3 YEARS OF AGE. CONTAINS SMALL PARTS WHICH MAY CAUSE CHOKING.
120 LBS MAXIMUM WEIGHT RATING
PURE FUN - USER MANUAL
7’ TRAMPOLINE & ENCLOSURE SET
MODEL# 9011TS
SIMPLY GOOD PRODUCTS FOR REAL LIFE
Age Recommendation:
!
6 - 10

customerservice@puregbi.com 1-866-498-5269 MODEL# 9011TS - PAGE 2
IMPORTANT MESSAGE
WARNING - PLEASE READ
WARNING:
CHOKING HAZARD - Small Parts
NOT for children under 3 years of age.
ADULT ASSEMBLY REQUIRED
WARNING
While every attempt is made to ensure the highest degree of
protection in all equipment, we cannot guarantee freedom
from injury. The user assumes all risks of injury due to use. All
merchandise is sold on this condition, which no representative of
the company can waive or change.

customerservice@puregbi.com 1-866-498-5269 MODEL# 9011TS - PAGE 3
Thank you for purchasing our 7’ Trampoline &Enclosure Set
At Pure Global Brands, we want all of our customers to be completely satisfied with their purchase.
Please take time to review the contents of the product you have just received to make sure that all
of the parts are included. If you find that any parts are missing or damaged, we will happily provide
replacement parts at no charge within 30 days of purchase. Please keep in mind that for select
damaged part replacement requests, we will require a photo for submission to our quality
control office.
To order these parts, or if you have any other questions or concerns about this Pure Global product,
please e-mail the Pure Global Brands, Inc. customer service department at:
customerservice@puregbi.com or contact us at 1-866-498-5269.
You can also visit our website at: www.pureglobalbrands.com
If you request replacement parts, please be sure to include the following information in your correspondence:
YOUR NAME
YOUR MAILING ADDRESS
YOUR EMAIL ADDRESS
RETAILER WHERE YOU PURCHASED PRODUCT
DATE OF PURCHASE
ORDER # (IF AVAILABLE)
PRODUCT MODEL #: 9011TS
SERIAL #
PRODUCT NAME: 7’ Trampoline & Enclosure Set
PART # (located in manual)
QUANTITY NEEDED
PICTURE OF DAMAGED PART(s) – SUBMIT VIA Email , Fax, or Mail
Again, thank you for purchasing a Pure Global Brands product.
Sincerely,
Customer Service
Pure Global Brands, Inc.
Phone: 1-866-498-5269
Email: customerservice@puregbi.com
8040 Belvedere Rd.
West Palm Beach, FL 33411
CUSTOMER SERVICE INFORMATION

customerservice@puregbi.com 1-866-498-5269 MODEL# 9011TS - PAGE 4
Pure Global Brands, Inc. warrants this product to be free from defects in workmanship and materials
under normal use and conditions for the duration of the period outlined below FROM THE DATE OF
ORIGINAL PURCHASE. This Limited Warranty is not transferable and is available only for the
original purchaser of the Product.
The various components of the trampoline/enclosure are warranted against defects and workmanship
for the following time period(s):
• Steel Frame: 2 Years
• All Other Parts: 90 Days
All warranty coverage extends only to the original retail purchaser from the date of purchase. Pure Fun’s
obligation under this Warranty is limited to replacing or repairing, at Pure Fun’s option, the product at one of its
authorized service centers. All products for which a warranty claim is made must be received by Pure Fun at
one of its authorized service centers and accompanied by sufficient proof of purchase (photocopy of the original
store receipt, indicating the date of purchase). All freight and handling fees are the responsibility of the consumer
to pay, both to and from Pure Fun. All warranty claims must be pre-authorized by Pure Fun. Pre-authorization
can be obtained by calling 866-498-5269. This warranty does not extend to any product or damage to a product
caused by or attributable to freight damage, abuse, misuse, improper or abnormal usage, or repairs not provided
by a Pure Fun authorized service center or for products used for commercial or rental purposes. This warranty
does not cover ordinary wear and tear, weathering, failure to follow directions, improper installation, improper
maintenance or acts of Nature (such as damage caused by wind, lightning, snow, water or ice). Weather damage,
damage caused by unauthorized repair work or damage caused by improper use of the products are not covered
by the product warranty. No other warranty beyond that specifically set forth above is authorized by Pure Fun.
PURE FUN IS NOT RESPONSIBLE OR LIABLE FOR INDIRECT, SPECIAL OR CONSEQUENTIAL DAMAGES ARISING OUT OF
OR IN CONNECTION WITH THE USE OR PERFORMANCE OF THE PRODUCT OR OTHER DAMAGES WITH RESPECT TO ANY
ECONOMIC LOSS, LOSS OF PROPERTY, LOSS OF REVENUE OR PROFITS, LOSS OF ENJOYMENT OR USE, COST OF REMOVAL,
INSTALLATION OR OTHER CONSEQUENTIAL DAMAGES. SOME STATES DO NOT ALLOW THE EXCLUSION OR LIMITATION
OF INCIDENTAL OR CONSEQUENTIAL DAMAGES. ACCORDINGLY, THE ABOVE LIMITATION MAY NOT APPLY TO YOU. THE
WARRANTY EXTENDED HEREUNDER IS IN LIEU OF ALL OTHER WARRANTIES AND PURE FUN SPECIFICALLY DISCLAIMS
ANY IMPLIED WARRANTY OF MERCHANTABILITY OR FITNESS FOR A PARTICULAR PURPOSE IS LIMITED IN ITS SCOPE AND
DURATION TO THE TERMS SET FORTH HEREIN. SOME STATES DO NOT ALLOW LIMITATION ON HOW LONG AN IMPLIED
WARRANTY LASTS. ACCORDINGLY, THE ABOVE LIMITATION MAY NOT APPLY TO YOU.
This warranty gives you specific legal rights.
You may also have other rights, which vary from state to state.
LIMITED WARRANTY

customerservice@puregbi.com 1-866-498-5269 MODEL# 9011TS - PAGE 5
WARNINGS
• DO NOT allow children under the age of 3 to handle or use
chalk pieces. Broken chalk or chalk remnants present a
choking hazard and serious injury or death may occur.
• This unit must be assembled and disassembled by ADULTS
ONLY.
• This Trampoline is suitable for use by most children 6 to 10
YEARS OF AGE.
• DO NOT exceed the MAXIMUM WEIGHT limit of 120 lbs
(54kgs) regardless of age.
• FOR HOME USE ONLY: This Trampoline is designed
for family residential use. It is NOT intended for use in
commercial applications and/or use in public areas such
as schools, parks, nurseries, day schools, day cares, etc.
• ALWAYS locate this equipment on a stable, level surface
AT LEAST 7 feet away from any structure, obstruction,
or possible hazard(s) such as walls, pools, power lines,
overhangs, other playground equipment, driveways, hard
surfaces and/or roadways.
• Children must be supervised at all times when using this
equipment. DO NOT leave children unattended at any time.
• DO NOT attach items to the trampoline not specifically
designed for this purpose. Especially in the case of jump
ropes, chains, clotheslines, pet leashes and cables.These
may cause a strangulation or physical hazard.
• This Trampoline is NOT for adult or adolescent use.
• DO NOT allow more than one child to jump on the
Trampoline at any time.
• DO NOT allow children to wear glasses or helmets when
using the Trampoline.
• DO NOT allow the padding cover of this trampoline to
become wet. If accidental spillage occurs, immediately blot
this with a damp towel and allow to dry.
• DO NOT place objects on or under the trampoline, or allow
people and pets to stand or sit on, near or under the unit.
• ALWAYS secure the Trampoline against unauthorized and
unsupervised use.
• DO NOT allow children to wear loose fitting clothing,
clothing with straps/loops, backpacks or wear and/
or hold accessories with straps or loops, or any article
of clothing or accessory with sharp edges which may
present a hazard or become snagged or caught on the
Trampoline during use. Serious injury and/or accidental
strangulation may occur.
• DO NOT allow children to sit or stand on the frame pad
edge or attempt to hang or swing from the enclosure
poles, this presents a safety hazard and can cause
serious injury and damage to the trampoline set.
• NEVER allow a child to jump from or onto this trampoline
from any other object or surface area.
• Children must ALWAYS jump while securely centered on
the Trampoline mat.
• DO NOT allow use of this trampoline if the jumping
surface is wet. Allow jumping surface to fully dry before
resuming use.
• It is not recommended that this trampoline is used while
wearing shoes. Additionally, children should always wear
socks when jumping to prevent injury to feet.
• Before each use of this product, inspect this unit for
any worn, defective or missing parts. Although this
Trampoline is made to take a lot of wear, over time parts
may need to be replaced. It is important to check the
unit to ensure the Springs, Frame, Padding, Enclosure
Poles, Enclosure Netting, and Enclosure Entry Panel
are undamaged and secure and all parts are in good
condition. If any loose, cracked, missing, or otherwise
damaged components are found, cease use of this item
immediately and secure it from unauthorized use until
the issue has been corrected and/or replacement parts
obtained. Failure to do so may result in injury and/or void
your warranty.
• Dispose of all packaging materials safely and per local
ordinance.
• Please read and refer to other warnings and use
information in the Trampoline instructions before use.
Please read these warnings and the information in this manual in its entirety.
Failure to comply with the following instructions may increase the risk of serious injury and/or death:

customerservice@puregbi.com 1-866-498-5269 MODEL# 9011TS - PAGE 6
Please visit www.pureglobalbrands.com for any important product information updates and/or additional safety
warnings before assembling or using this product.
Use search word: 9011TS
When you are ready to start, make sure that you have the correct tools at hand and adequate space for assem-
bly. Please refer to the following pages for part descriptions and numbers. The assembly instruction uses these
descriptions and numbers as reference. Make sure you have all parts listed.
If you are missing any parts, contact customer service at:
customerservice@puregbi.com or by calling
1-866-498-5269 (9am-5pm EST, Monday-Friday).
IMPORTANT: USE GLOVES TO PROTECT AGAINST PINCH POINTS DURING ASSEMBLY.
Enclosed are the current specifications and product features available at time of printing, however, changes may
be made in equipment, availability, specifications and features without notice.
Tools Required (Included): Spanner Wrench, Allen Wrench, Spring Tool.
PRIOR TO ASSEMBLING
HARDWARE LIST
13
HARDWARE USE FOR TRAMPOLINE AND ENCLOSURE
REMEMBER TO USE GLOVES DURING ASSEMBLY TO AVOID PINCHING.
AT LEAST 2 PEOPLE ARE REQUIRED TO ASSEMBLE THE TRAMPOLINE.
Key Number Part Number
Key Number Part Number
7
PFP-88-31.8
18
ESLS-88
9
TSLT
19
ECN-88
15 Screw 20 Wrench
16
EAW-88
21
Allen Wrench
17
ESLW-88
#7 Plastic Flat plate x 6pcs
#16 Arc Washer x 12pcs
#20 Wrench x 1pc
#9 Spring Loading Tool x 1pc
#17 Spring lock Washer x 6pcs
#15 Screw x 6pcs
#18 Self-locking Screw x 6p
cs
#19 Cap Nut x 6pcs
#21 Allen Wrench x 1pc
#13 Chalk
#12 Plastic Flat Plate (6 Pieces)
#14 Wrench (1 Piece)
#16 Spring Loading Tool (1 Piece)
#19 Allen Wrench (1 Piece)
#20 Cap Nut (6 Pieces)
#21 Self-Locking Screw (6 Pieces)
#15 Spring Lock Washer (6 Pieces)
#17 Arc Washer (12 Pieces) #18 Screw (6 Pieces)

customerservice@puregbi.com 1-866-498-5269 MODEL# 9011TS - PAGE 7
PARTS LIST
12
PARTS LIST USE FOR TRAMPOLINE
Key
Number
Description Quantity
1 TMSP-88-36-28
Trampoline Mat, stitched
with Triangle-Rings and
Safety Pad
1
2 TR-88-36-38.1 Top Rail 6
3 CTRS-88-36-38.1
Corner Top Rail wit
h
socket
6
4 VLE-88-31.8
Vertical Leg Extensi
on
6
5 PVLE-88-31.8
Plastic Vertical Leg
Extension
6
6 PHLB-88-31.8
Plastic Horizontal Le
g
Base
3
8 T28N
R-hooked Galvanized
Springs (28N 5 1/2”) 36
10 TSP88
Safety Instruction Placard 1
PARTS LIST USE FOR ENCLOSURE
Key
Number
Description Quantity
11 EST-88-3A-25.4
Straight Frame Tube with Foam 6
12 ECT-88-3A-25.4
Curve Frame Tube with Foam 6
Parts
Parts
13 EHT-88-3A-25.4 Horizontal Tube with Foam 3
14 EN-88-3A
Enclosure Netting 1
12
PARTS LIST USE FOR TRAMPOLINE
Key
Number
Description Quantity
1 TMSP-88-36-28
Trampoline Mat, stitched
with Triangle-Rings and
Safety Pad
1
2 TR-88-36-38.1
Top Rail 6
3 CTRS-88-36-38.1
Corner Top Rail wit
h
socket
6
4 VLE-88-31.8
Vertical Leg Extensi
on
6
5 PVLE-88-31.8
Plastic Vertical Leg
Extension
6
6 PHLB-88-31.8
Plastic Horizontal Le
g
Base
3
8 T28N
R-hooked Galvanized
Springs (28N 5 1/2”) 36
10 TSP88
Safety Instruction Placard 1
PARTS LIST USE FOR ENCLOSURE
Key
Number
Description Quantity
11 EST-88-3A-25.4
Straight Frame Tube with Foam 6
12 ECT-88-3A-25.4
Curve Frame Tube with Foam 6
Parts
Parts
13 EHT-88-3A-25.4 Horizontal Tube with Foam 3
14 EN-88-3A
Enclosure Netting 1
12
PARTS LIST USE FOR TRAMPOLINE
Key
Number
Description Quantity
1 TMSP-88-36-28
Trampoline Mat, stitched
with Triangle-Rings and
Safety Pad
1
2 TR-88-36-38.1 Top Rail 6
3 CTRS-88-36-38.1
Corner Top Rail wit
h
socket
6
4 VLE-88-31.8
Vertical Leg Extensi
on
6
5 PVLE-88-31.8
Plastic Vertical Leg
Extension
6
6 PHLB-88-31.8
Plastic Horizontal Le
g
Base
3
8 T28N
R-hooked Galvanized
Springs (28N 5 1/2”) 36
10 TSP88
Safety Instruction Placard 1
PARTS LIST USE FOR ENCLOSURE
Key
Number
Description Quantity
11 EST-88-3A-25.4
Straight Frame Tube with Foam 6
12 ECT-88-3A-25.4
Curve Frame Tube with Foam 6
Parts
Parts
13 EHT-88-3A-25.4 Horizontal Tube with Foam 3
14 EN-88-3A
Enclosure Netting 1
PART # IMAGE DESCRIPTION QTY
1
1
1
26
6
3
6
6
4
8
6
6
5
9
3
3
6
10
36
7
11
Trampoline Mat, stitched with
Triangle-Rings and Safety Pad
Top Rail
Corner Top Rail with Socket
Vertical Leg Extension
Plastic Vertical Leg Extension
Plastic Horizontal Leg Base
R-Hook Galvanized Spring
Straight Frame Tube with Foam
Curve Frame Tube with Foam
Horizontal Tube with Foam
Enclosure Netting

customerservice@puregbi.com 1-866-498-5269 MODEL# 9011TS - PAGE 8
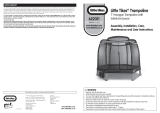
ASSEMBLY INSTRUCTIONS
PARTS NEEDED: Vertical Leg Extensions (Part #4), Plastic Vertical Leg Extension (Part #5),
Plastic Horizontal Leg Base (Part #6), Plastic Flat Plate (Part #12)
Step 1:
Connect Plastic Flat Plate (Part
#12) to the bottom of Vertical Leg
Extension (Part #4) and twist the
plate until firmly attached.
Finish attaching the plastic plates
to the remainder of the Vertical
Legs Extensions.
Step 2:
Insert all Vertical Leg Extensions
to Plastic Horizontal Leg Base
(Part #6) to circular openings.
Step 4:
Insert the Plastic Vertical Leg
Extension (Part #5) into the
standing leg extensions.
Bottom emboss should fit securely
into Horizontal Leg Base.
Step 3:
All 3 bases should have 2
complete legs with hardware
openings on top.
x3
Step 1
Step 2
Step 3
Step 4

customerservice@puregbi.com 1-866-498-5269 MODEL# 9011TS - PAGE 9
16
Now, go back to screw the other 2/3 plastic thread of the Plastic Flat plate (#7).
Plastic Flat plate (#7). Please do not over tighten it!
Trampoline Mat Assembly
STEP 6
Cover the Trampoline Frame Tubes by pulling the Trampoline Mat, stitched with Triangle-Rings and Safety Pad (#1)
downward. The six holes at the corner of the Trampoline Mat, stitched with Triangle-Rings and Safety Pad (#1) should be
inserted to the Lower Frame tube Foam (with one hole, take out foam before insert Safety Pad, and put it back after Safety
Pad) (#11) as shown in FIGURE 6.
FIGURE 5
STEP 5
Slide the Top Rail (#2) to the Corner Top Rail with socket as shown in FIGURE 5. To connect the parts, simply slide a
section (male) of tubing that is smaller on one end into the adjacent section (female) that has a larger opening.
!
Important note: Please make sure the curve point of the Plastic Horizontal Leg base is facing outward!
FIGURE 6
ASSEMBLY INSTRUCTIONS
PARTS NEEDED: Top Rail (Part #2) Corner Top Rails (Part #3), Straight Frame Tubes with Foam (Part #8), Wrench (Part #14),
Spring Lock Washer (Part #15), Arc Washer (Part #17), Screw (Part #18), Allen Wrench (Part #19), Cap Nut (Part #20)
Step 5:
Place all Corner Top Rails (Part #3)
onto the rest of leg extensions, facing
the inside of the center.
Attach Straight Frame Tubes (Part #8)
securely into legs. Openings should
align to be able to install hardware.
Step 6:
Insert Screw (Part #18) with one Arc
Washer (Part #17) from the outside
until it reaches the other side of the
Corner Top Rail. Use 1 Arc Washer,
1 Spring Lock Washer (Part #15)
and 1 Cap Nut (Part #20) to securely
fit the screw from the inside of the
trampoline.
Use the Wrench (Part #14) and Allen
Wrench (Part #19) to tighten the
screw into place. Tighten remainder
of pieces until all hardware is secure
into Corner Top Rails.
Inside
#8 #8
#2
#2
Outside
Step 7:
Connect Top Rails (Part #2) to all
Corner Top Rail Sockets to create
the foundation of the trampoline.
Step 5
Step 6
Step 7
Step 8
Step 8:
Place Jumping Mat (Part #1) on
Vertical leg extensions by placing
all 6 corresponding edge openings
from safety pad.
16
Now, go back to screw the other 2/3 plastic thread of the Plastic Flat plate (#7).
Plastic Flat plate (#7). Please do not over tighten it!
Trampoline Mat Assembly
STEP 6
Cover the Trampoline Frame Tubes by pulling the Trampoline Mat, stitched with Triangle-Rings and Safety Pad (#1)
downward. The six holes at the corner of the Trampoline Mat, stitched with Triangle-Rings and Safety Pad (#1) should be
inserted to the Lower Frame tube Foam (with one hole, take out foam before insert Safety Pad, and put it back after Safety
Pad) (#11) as shown in FIGURE 6.
FIGURE 5
STEP 5
Slide the Top Rail (#2) to the Corner Top Rail with socket as shown in FIGURE 5. To connect the parts, simply slide a
section (male) of tubing that is smaller on one end into the adjacent section (female) that has a larger opening.
!
Important note: Please make sure the curve point of the Plastic Horizontal Leg base is facing outward!
FIGURE 6

customerservice@puregbi.com 1-866-498-5269 MODEL# 9011TS - PAGE 10
C-Hook
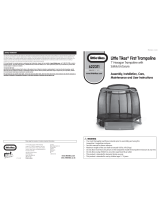
ASSEMBLY INSTRUCTIONS
Step 9:
Attach all 36 Springs Hook ends
(Part #7) using the Spring Loading
Tool (Part #16) to all Top Rail
Openings by following the correct
placement order. The R-Hook end
should be attached to Trampoline
Mat, and C-Hook to Top Rail.
For even distribution of tension
and ease of assembly, springs
should be placed on opposite
sides of the mat/frame. Attach
springs 1-18 in the correct
numerical order to properly
distribute tension of the mat.
Once the first 18 springs have
properly attached to all Top Rails,
install the remaining springs
to complete the instalation of
the trampoline mat onto the
foundation.
Step 10:
Tie down the all elastic straps
attached to the trampoline pad into
the the top rails tightly.
17
STEP 7
Lay out the Trampoline Mat with Safety Pad (#1) inside the frame with Safety Pad flip up as shown in FIGURE 7.
There are total of 36 Triangle-rings sewn on the mat, and 36 holes on the Top Rail Frame. None are numbered so please
follow the instructions carefully to ensure proper installation. Now, select an arbitrary point on the Top Rail Frame (call it
ZERO) as shown in FIGURE 7.
SPRING LOADING INSTRUCTION
CAUTION
� Make sure to flip up the safety pad for ease of installation of springs.
� Two adults are required in this assembling step.
� CAREFUL - When attaching the springs, please do not put your hands, legs, or body close to the connector points.
The connector points can become pinch points since the trampoline is tightening up.
� Wear heavy duty working gloves to protect your hand.
� Use the special spring loading tool included.
STEP 8
Attach the R-Hooked Galvanized Spring (#8) with “R” Hook end to the Triangle-Ring on the mat as shown below.
HINT: Holding the spring at 45 degree in relation to the mat surface will be much easier to install into Triangle -Ring.
SPRING LOADING TOOL (9)
Hold the spring loading tool underhand and pull spring hook towards the point “ZERO” on the Top Rail frame as shown in
FIGURE 8. Drop hook into frame hole until it latches on completely and tap it down if hook is not completely in the hole.
FIGURE 8
“R” HOOK END
SPRING (#8)
POINT ZERO
SPRING LOADING TOOL(#9)
ZERO
FIGURE 7
18
Then, attach a springs at the Corners Top Rail (#3) first as shown in FIGURE 9. For even distribution of tension and ease
of assembly, springs should be placed on opposite sides of the mat/frame…..i.e. 5, 6 then 23, 24; Zero, 35 then 17, 18, etc.
Now, you should have 12 springs install at ZERO, 5, 6, 11, 12, 17, 18, 23, 24, 29, 30, and 35.
STEP 9
Attach a spring at every 3 holes and corresponding Triangle-rings. For even distribution of tension and ease of assembly,
springs should be placed on opposite sides of the mat/frame…..i.e. 3 then 21, 33 then 15, etc. In addition to the previously
installed springs, you should have springs at 3, 9, 15, 21, 27, and 33 as shown in FIGURE 10.
FIGURE 10
FIGURE 9
(# 1)
(# 1)
CAUTION:
If you notice that you have miscount a hole and Triangle-rings connection, recount and remove or attach any springs
required to maintain the count of springs.
18
18
Then, attach a springs at the Corners Top Rail (#3) first as shown in FIGURE 9. For even distribution of tension and ease
of assembly, springs should be placed on opposite sides of the mat/frame…..i.e. 5, 6 then 23, 24; Zero, 35 then 17, 18, etc.
Now, you should have 12 springs install at ZERO, 5, 6, 11, 12, 17, 18, 23, 24, 29, 30, and 35.
STEP 9
Attach a spring at every 3 holes and corresponding Triangle-rings. For even distribution of tension and ease of assembly,
springs should be placed on opposite sides of the mat/frame…..i.e. 3 then 21, 33 then 15, etc. In addition to the previously
installed springs, you should have springs at 3, 9, 15, 21, 27, and 33 as shown in FIGURE 10.
FIGURE 10
FIGURE 9
(# 1)
(# 1)
CAUTION:
If you notice that you have miscount a hole and Triangle-rings connection, recount and remove or attach any springs
required to maintain the count of springs.
18
19
STEP 10
Then, attach the remaining 18 springs by using the same theory of counting equal holes as shown in FIGURE11.
STEP 11
Flip down the Safety Pad stitched with the trampoline mat (#1). Pull tight the elastic straps over the frame as shown in
FIGURE 12 and make sure safety pad covers the frame.
Perform a complete inspection of the trampoline to make sure all parts are assembled and attached properly.
FIGURE 11
(# 1)
ELASTIC STRAP
Trampoline Pad
(In lift-up position)
FIGURE 12
Read this entire manual and make sure all jumpers completely understand all of the safety rules printed in the manual and
on the various warning signs. Instruct all jumpers in the basic bounces described in the manual.
!
IMPORTANT NOTICE: Make sure the safety pad is securely attached to the frame and completely covers the
frame and all springs before using this trampoline. Do not use trampoline if even one spring or Triangle-ring is damaged or
missing.
12
3
4
5
78
9
10
11
12 13
14
15
16
17
18
6
19
STEP 10
Then, attach the remaining 18 springs by using the same theory of counting equal holes as shown in FIGURE11.
STEP 11
Flip down the Safety Pad stitched with the trampoline mat (#1). Pull tight the elastic straps over the frame as shown in
FIGURE 12 and make sure safety pad covers the frame.
Perform a complete inspection of the trampoline to make sure all parts are assembled and attached properly.
FIGURE 11
(# 1)
ELASTIC STRAP
Trampoline Pad
(In lift-up position)
FIGURE 12
Read this entire manual and make sure all jumpers completely understand all of the safety rules printed in the manual and
on the various warning signs. Instruct all jumpers in the basic bounces described in the manual.
!
IMPORTANT NOTICE: Make sure the safety pad is securely attached to the frame and completely covers the
frame and all springs before using this trampoline. Do not use trampoline if even one spring or Triangle-ring is damaged or
missing.
PARTS NEEDED: Trampoline Mat (Part #1), Spring Hook (Part #7), Spring Loading Tool (Part #16)
R-Hook
Opening
Spring(#7)
(#1) (#1)
(#1)
Elastic Strap
Step 9
Step 10

customerservice@puregbi.com 1-866-498-5269 MODEL# 9011TS - PAGE 11
(#13)
ASSEMBLY INSTRUCTIONS
Step 11:
Slide the Horizontal Tubes with
Foam attached (Part #10) through
the pocket on top of the Enclosure
Netting (Part #11).
Step 12:
Attach the Horizontal Tube with
Foam to the Curve Frame Tubes
with Foam (Part #9) to form an
“ARCH”, Then tighten with Self-
locking screw (Part #21).
Step 13:
Attach the remainder of the foam
to Straight Frame Tubes to prepare
for Enclosure Netting
Fold up the Enclosure Netting over
the top of the “ARCH” and attach
the assembled “ARCH” to the
Straight Frame Tube with Foam
(Part #8) to secure enclosure.
21
STEP 14
!
CAUTION: TWO ADULTS ARE REQUIRED
Fold up the Enclosure Netting over the top of the “ARCH” and attach the assembled “ARCH” to the Straight Frame Tube
with Foam (#11) as shown in FIGURE 15.
ARCH
#12
#11
STEP 15
After all three “ARCHES” are attached to the Straight Frame Tube with Foam (#11), pull down and the
Enclosure Netting evenly over the Straight Frame Tube with Foam (#11) as shown in FIGURE 16.
FIGURE 15
ENLARGED
DIAGRAM
FIGURE 16
!
IMPORTANT NOTE!! When attaching the “ARCH” to the Straight Frame Tube with Foam
please ensure the “ARCH” is aligned with the support assembly. The Enclosure Netting should wrap
around the outside of the Straight Frame Tube with Foam when attaching the “ARCH” assembly.
Please adjust the top of the enclosure netting by pulling the two ends of the enclosure arch cap and by
pulling the elastic strap sewn on the enclosure netting downward.
PARTS NEEDED: Chalk (Part #13), Straight Frame Tube (Part #8). Curve Frame Tubes (Part #9), Horizontal Tubes with Foam (Part #10)
Enclosure Netting (Part #11), Self Locking Screw (Part #21)
STEP 16
Tie the elastic straps on the Enclosure Netting (#14) to the Trampoline Top Rail frame by looping around the triangle-rings
on the trampoline mat and the Corner Top Rail with socket (#3) as shown in FIGURE 17.
Triangle-Rings (#1)
#3
Top Rail (#2)
STEP 17
Pull the zipper of Enclosure Netting (#14) at the door which should be located on top of the support assembly as shown in
FIGURE 18. Then secure the door with hook.
ENLARGED
DIAGRAM
FIGURE 17
22
DISASSEMBLY
FIGURE18
ENLARGED
DIAGRAM
To disassemble the trampoline, follow assembly STEP 1 through STEP 17 in reverse order. Do not attempt to disassemble
any frame components before the springs and the mat have been removed. Use gloves to protect your hands from pinch
points during disassembly.
CARE AND MAINTENANCE AND USE INSTRUCTIONS MUST BE READ CAREFULLY BEFORE USING THE
TRAMPOLINE!
Step 16:
Tie the elastic straps on the
Enclosure Netting (Part #11) to
the Trampoline Top Rail frame by
looping around the triangle-rings
on the trampoline mat and the
Corner Top Rail with socket
Step 15:
Pull the zipper of Enclosure
Netting at the door which should
be located on top of the support
assembly, then secure the door
with hook.
Step 14:
Place Chalk (Part #13) into Chalk
pocket in Net Enclosure
(#9)
(#8)
20
STEP 12
Using the tie wrap, attach the Trampoline Safety Instruction Placard (#10) to the trampoline as shown in FIGURE 13.
The tie wrap should go around the Top Rail to ensure that is doesn’t slide off the trampoline.
Frame Pad Assembly
WARNING
Never use the trampoline without attaching the frame pad. Properly tie down the frame pad before
each use!!
STEP 13-Enclosure Assembly
!
CAUTION: TWO ADULTS ARE REQUIRED.
Slide the Horizontal Tube with Foam (#13) through the pocket on top of the Enclosure Netting (#14), as shown in FIGURE
14-1. Attach the Horizontal Tube with Foam (#13) to the Curve Frame Tube with Foam (#12) to form an “ARCH” as shown
in FIGURE 14-2 then tighten with self-locking screw (#18). Lay down the “ARCH” on the Mat for further use.
(# 1)
FIGURE 13
Safety Instruction Placard (#10)
ENLARGED
DIAGRAM
#18
FIGURE 14 14-1 14-2
(#21)
Enlarged
Diagram
Enlarged
Diagram
ARCH
Step 11 Step 12
Step 13
Step 14
Step 15
Step 16

customerservice@puregbi.com 1-866-498-5269 MODEL# 9011TS - PAGE 12
CARE & MAINTENANCE
FREQUENTLY ASKED QUESTIONS
IMPORTANT: While no regular maintenance is required, you must inspect the trampoline before each use and replace
any worn, defective, or missing parts. The following conditions could represent potential hazards: Missing, improperly
positioned, or insecurely attached frame padding; Punctures, frays, tears, or holes worn in the bed or frame padding;
Deterioration in the stitching or fabric of the bed or frame padding; Broken or missing springs; A bent or broken frame; A
sagging jump mat; or sharp protrusions on the frame or suspension system; Bent or broken enclosure poles; Missing or
torn foam on the poles; Torn or ripped enclosure netting; Broken or fraying zipper in the enclosure opening. Cease using
trampoline immediately and secure it against unauthorized use if any of these conditions are present.
• If any part of the trampoline frame requires cleaning, simply wipe with a damp cloth. (Do not jump on the trampoline
after cleaning until completely dry).
• To clean chalk from mat, wipe down net with wet rag. Allow mat to fully dry before jumping.
QUESTION: “The foam padding or mat is damaged, what should I do?”
ANSWER: IF YOU ARE STILL WITHIN YOUR WARRANTY PERIOD (90-DAYS FROM INITIAL PURCHASE) YOU
SHOULD CONTACT CUSTOMER SERVICE (info below).YOU CAN ALSO PURCHASE REPLACEMENT PADDING AND
MATS AT: http://www.pureglobalbrands.com
QUESTION: “I had a part missing from my box” or “something was damaged in shipping, can you send it to me?”
ANSWER: IF IT HAS BEEN 30 DAYS OR LESS FROM THE DATE OF YOUR INITIAL PURCHASE, YOU CAN CONTACT
CUSTOMER SERVICE (info below) FOR A REPLACEMENT PART TO BE ISSUED.
/