Page is loading ...

TUNDRA (34413U)
i
Foreword
Welcome to the growing group of value−conscious people who drive Toyotas. We
are proud of the advanced engineering and quality construction of each vehicle we
build.
This Owner’s Manual explains the features of your new Toyota. Please read it and
follow the instructions carefully so that you can enjoy many years of safe motoring.
When it comes to service, remember that your Toyota dealer knows your vehicle
best and is interested in your complete satisfaction. He will provide quality mainte-
nance and any other assistance you may require.
Please leave this Owner’s Manual in this vehicle at the time of resale. The next
owner will need this information also.
All information and specifications in this manual are current at the time of
printing. However, because of Toyota’s policy of continual product improve-
ment, we reserve the right to make changes at any time without notice.
Please note that this manual applies to all models and explains all equipment,
including options. Therefore, you may find some explanations for equipment
not installed on your vehicle.
©1999 TOYOTA MOTOR CORPORATION
All rights reserved. This material may not be reproduced or copied, in whole or in
part, without the written permission of Toyota Motor Corporation.

TUNDRA (34413U)
ii
New vehicle warranty
Your new vehicle is covered by the following Toyota
limited warranties:
D New vehicle warranty
D Emission control systems warranty
D Others
For further information, please refer to the separate
Owner’s Warranty Information Booklet" or Owner’s
Manual Supplement".
Your responsibility for maintenance
It is the owner’s responsibility to make sure that the
specified maintenance is performed. Part 6 gives details
of these maintenance requirements. Also included in
Part 6 is general maintenance. For scheduled mainte-
nance information, please refer to the separate Sched-
uled Maintenance Guide" or Owner’s Manual Supple-
ment".
Accessories, spare parts and
modification of your Toyota
A wide variety of non−genuine spare parts and accesso-
ries for Toyota vehicles are currently available in the
market. You should know that Toyota does not warrant
these products and is not responsible either for their
performance, repair or replacement, or for any damage
they may cause to, or adverse effect they may have on,
your Toyota vehicle.
This vehicle should not be modified with non−genuine
Toyota products. Modification with non−genuine Toyota
products could affect its performance, safety or durabili-
ty, and may even violate governmental regulations. In
addition, damage or performance problems resulting from
the modification may not be covered under warranty.

TUNDRA (34413U)
iii
Spark ignition system of your
Toyota
The spark ignition system in your Toyota meets all re-
quirements of the Canadian Interference−Causing Equip-
ment Standard.
Installation of a mobile
two−way radio system
As the installation of a mobile two−way radio system in
your vehicle could affect electronic systems such as
multiport fuel injection system/sequential multiport fuel
injection system, cruise control system, anti−lock brake
system, SRS airbag system and seat belt pretensioner
system, be sure to check with your Toyota dealer for
precautionary measures or special instructions regarding
installation.
Scrapping of your Toyota
The SRS airbag and seat belt pretensioner devices in
your Toyota contain explosive chemicals. If the vehicle
is scrapped with the airbags and pretensioners left as
they are, it may cause an accident such as a fire. Be
sure to have the systems of the SRS airbag and seat
belt pretensioner removed and disposed of by a qualified
service shop or by your Toyota dealer before you dis-
pose of your vehicle.
On−pavement and off−road
driving tips
(four−wheel drive models only)
This vehicle will handle and maneuver differently from
an ordinary passenger car because it is also designed
for off−road use. As with other vehicles of this type,
failure to operate this vehicle correctly may result in
loss of control or an accident. Be sure to read Off−
road vehicle precautions" in Part 2 and Off−road driving
precautions" in Part 3.

TUNDRA (34413U)
iv

TUNDRA (34413U)
v
Important information about this manual
Safety and vehicle damage warnings
In this manual, you will see CAUTION and NOTICE warn-
ings. These are used in the following ways:
CAUTION
This is a warning against something which may cause
injury to people if the warning is ignored. You are
informed what you must or must not do in order to
avoid or reduce the risk to yourself and other people.
NOTICE
This is a warning against something which may cause
damage to the vehicle or its equipment if the warning
is ignored. You are informed what you must or must
not do in order to avoid or reduce the risk of damage
to your vehicle and its equipment.
Safety symbol
In this manual, you will also see a circle
with a slash through it. This means Do
not", Do not do this", or Do not let this
happen".


TUNDRA (34413U)
2
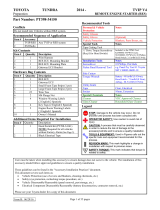
Instrument panel overview
1. Side vents
2. Instrument cluster
3. Center vents
4. Garage door opener box or
auxiliary box
5. Personal lights
6. Side defroster outlet
7. Power door lock switches
8. Power window switches
9. Glove box
10. Manual transmission gear shift lever
11. Front drive control lever
12. Parking brake lever
(vehicles with manual transmission)
13. Lower vent
14. Hood lock release lever
15. Parking brake pedal
(vehicles with automatic transmission)
16. Power rear view mirror control switch

TUNDRA (34413U)
3
1. Front fog light switch
2. Headlight and turn signal switch
3. Wiper and washer switches
4. Automatic transmission selector lever
5. Cargo lamp switch
6. Emergency flasher switch
7. Car audio
8. Air conditioning controls
9. Passenger airbag manual on−off switch
10. Clock
11. Cup holder
12. Power outlets
13. 4LO" button
14. 2WD/4HI" button
15. Ashtray
16. Cigarette lighter
17. Cruise control switch
18. Ignition switch
19. Tilt steering lock release lever
20. Instrument panel light control knob
21. Clutch start cancel switch

TUNDRA (34413U)
4
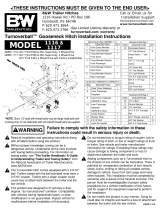
1. Oil pressure gauge
2. Service reminder indicators and
indicator lights
3. Tachometer
4. Speedometer
5. Voltmeter
6. Fuel gauge
7. Trip meter reset knob
8. Odometer and two trip meters
9. Engine coolant temperature gauge
Instrument cluster overview
"With tachometer

TUNDRA (34413U)
5
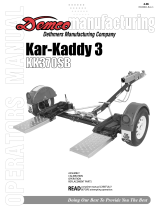
1. Engine coolant temperature gauge
2. Service reminder indicators and
indicator lights
3. Speedometer
4. Fuel gauge
5. Trip meter reset knob
6. Odometer and two trip meters
"Without tachometer

TUNDRA (34413U)
6
Indicator symbols on the instrument panel
Seat belt reminder light
∗
1
Low oil pressure warning light
∗
1
Low fuel level warning light
∗
1
Brake system warning light
∗
1
Discharge warning light
∗
1
Malfunction indicator lamp
∗
1
Anti−lock brake system warning light
∗
1
SRS warning light
∗
1
(type A)
(type B)
Automatic transmission fluid temperature warning
light
∗
1
Unengaged Park" warning light
∗
1
Low windshield washer fluid level warning
light
∗
1
Headlight high beam indicator light
Overdrive−off indicator light
Turn signal indicator lights
Open door warning light
∗
1
Passenger airbag off indicator light
Automatic transmission indicator lights

TUNDRA (34413U)
7
∗
1
:For details, see Service reminder indicators and warning
buzzers" in Chapter 1−5.
∗
2
:If this light flashes, see Four−wheel drive system" in
Chapter 1−6.
∗
3
:If this light flashes, see Cruise control" in Chapter 1−6.
Cruise control indicator light
∗
3
Low speed four−wheel drive indicator light
∗
2
Four−wheel drive indicator light
High speed four−wheel drive indicator light
∗
2

TUNDRA (34413U)
8

TUNDRA (34413U)
9
Part 1
OPERATION OF
INSTRUMENTS AND
CONTROLS
Chapter 1−2
Keys and Doors
D Keys
D Side doors
D Power windows
D Rear side windows
D Rear window
D Tailgate
D Hood
D Fuel tank cap
Keys
This key works in every lock.
Since the doors can be locked without a
key, you should always carry a spare key
in case you accidentally lock your key
inside the vehicle.
KEY NUMBER PLATE
Your key number is shown on the plate.
Keep the plate in a safe place such as
your wallet, not in the vehicle.
If you should lose your keys or if you
need additional keys, duplicates can be
made by a Toyota dealer using the key
number.
We recommend you to write down the key
number and keep it in safe place.

TUNDRA (34413U)
10
LOCKING AND UNLOCKING WITH KEY
Insert the key into the keyhole and turn
it.
To lock: Turn the key forward.
To unlock: Turn the key backward.
Vehicles with power door lock system
Both doors lock and unlock simultaneously
with either door. In the driver’s door lock,
turning the key once will unlock the driv-
er’s door and twice in succession will un-
lock the driver’s door and passenger’s
door simultaneously.
LOCKING AND UNLOCKING WITH
INSIDE LOCK KNOB
Move the lock knob.
To lock: Push the knob forward.
To unlock: Pull the knob backward.
Closing the door with the lock knob in the
lock position will also lock the door. Be
careful not to lock your keys in the ve-
hicle.
Vehicles with power door lock system
The door will not lock if the key is left in
the ignition switch when closing the front
doors.
Driver’s side
Passenger’s side
Side doors
Front doors

TUNDRA (34413U)
11
LOCKING AND UNLOCKING WITH
POWER DOOR LOCK SWITCH
Push the switch.
To lock: Push the switch on the front side.
To unlock: Push the switch on the rear
side.
Both doors lock or unlock simultaneously.
CAUTION
Before driving, be sure that the doors
are closed and locked, especially
when small children are in the ve-
hicle. Along with the proper use of
seat belts, locking the doors helps
prevent the driver and passengers
from being thrown out from the ve-
hicle during an accident. It also helps
prevent the doors from being opened
unintentionally.
For easy access to the rear seat, open
the access door (rear door).
To open: First, open the front door widely.
Then pull the outside handle or inside le-
ver of the access door.
If you try to open the front and rear doors
simultaniously, they will not open.
To close: First, close the access door
completely. Then close the front door.
You can open and close the access door
only when the front door is opened.
NOTICE
The front door and access door could
be damaged if they hit each other
when being opened or closed. Be
sure to follow the above instructions.
Access doors
(access cab models)

TUNDRA (34413U)
12
Power windows
The windows can be operated with the
switch on either front door.
The power windows work when the ignition
switch is in the ON" position.
Key off operation: If both front doors are
closed, they work for 43 seconds even
after the ignition switch is turned off. They
stop working when either front door is
opened.
OPERATING THE DRIVER’S WINDOW
Use the switch on the driver’s door.
Normal operation: The window moves as
long as you hold the switch.
To open: Lightly push down the switch.
To close: Pull up the switch.
Automatic operation (to open only):
Push the switch completely down and then
release it. The window will fully open. To
stop the window partway, lightly pull the
switch up and then release it.
Window
lock button

TUNDRA (34413U)
13
OPERATING THE PASSENGER’S
WINDOW
Use the switch on the passenger’s door
or the switch on the driver’s door that
controls the passenger’s window.
The window moves as long as you hold
the switch.
To open: Push down the switch.
To close: Pull up the switch.
If you push in the window lock button on
the driver’s door, the passenger’s window
cannot be operated.
CAUTION
To avoid serious personal injury, you
must do the following.
D Always make sure the head, hands
and other parts of the body of all
occupants are kept completely in-
side the vehicle before you close
the power windows. If someone’s
neck, head or hands gets caught in
a closing window, it could result in
a serious injury. When anyone
closes the power windows, be sure
that they operate the windows safe-
ly.
D When small children are in the ve-
hicle, never let them use the power
window switches without supervi-
sion. Use the window lock button to
prevent them from making unex-
pected use of the switches.
D Never leave small children alone in
the vehicle, especially with the igni-
tion key still inserted. They could
use the power window switches and
get trapped in a window. Unat-
tended children can become in-
volved in serious accidents.
To open the rear side window, pull the
latch handle toward you and swing it
fully out.
After closing the window, make sure it is
completely closed.
Rear side windows
(access cab models)

TUNDRA (34413U)
14
Rear window
To open the rear window, push the le-
ver and slide the window.
After closing the window, make sure it is
completely closed.
Tailgate
OPENING
To open the tailgate, pull the handle up.
The support cables will hold the tailgate
horizontal.
See Luggage stowage precautions" in
Part 2 for precautions to observe for load-
ing luggage.
After closing the tailgate, try pulling and
pushing it to make sure it is securely
closed.
NOTICE
Avoid driving with the tailgate open.
Support cable bracket
REMOVAL
1. Open the tailgate to the angle where
you can release the brackets on the
support cables from the lugs on
both sides.
To release the support cable bracket, lift
it up and slide it off.

TUNDRA (34413U)
15
2. Tilt the tailgate to about 30° from
vertical and pull up the right side of
the tailgate to unhook the right side.
3. Slide the tailgate a little to the right
to unhook the left side.
To attach the tailgate, follow the removal
procedure in reverse order.
After closing the tailgate, try pulling it to-
ward you to make sure it is securely
closed.
We recommend you keep the tailgate
closed when not in use.
NOTICE
Make sure the support brackets are
securely latched on both side panels
when installing the tailgate.
LOCKING AND UNLOCKING WITH KEY
Insert the key into the keyhole and turn
it to lock or unlock the tailgate.
To lock: Turn the key clockwise.
To unlock: Turn the key counterclockwise.
/