Page is loading ...

’02 L/C U (L/O 0108)
i
Foreword
Welcome to the growing group of value−conscious people who drive Toyotas. We are proud of the advanced engineering and
quality construction of each vehicle we build.
This Owner’s Manual explains the operation of your new Toyota. Please read it thoroughly and have all the occupants
follow the instructions carefully. Doing so will help you enjoy many years of safe and trouble−free motoring. For
important information about this manual and your Toyota, read the following pages carefully.
When it comes to service, remember that your Toyota dealer knows your vehicle best and is interested in your complete
satisfaction. He will provide quality maintenance and any other assistance you may require.
If there is not a Toyota dealer near you, or you need emergency assistance for any reason, please call the following number:
U.S. OWNERS: Toyota Customer Assistance Center Toll−free:1−800−331−4331
Please leave this Owner’s Manual in this vehicle at the time of resale. The next owner will need this information also.
All information and specifications in this manual are current at the time of printing. However, because of Toyota’s policy of
continual product improvement, we reserve the right to make changes at any time without notice.
Please note that this manual applies to all models and explains all equipment, including options. Therefore, you may
find some explanations for equipment not installed on your vehicle.
© 2001 TOYOTA MOTOR CORPORATION
All rights reserved. This material may not be reproduced or copied, in whole or in part, without the written permission of Toyota
Motor Corporation.

’02 L/C U (L/O 0108)
ii
Important information about this manual
Safety and vehicle damage warnings
Throughout this manual, you will see safety and vehicle
damage warnings. You must follow these warnings carefully
to aboid possible injury or damage.
The types of warnings, what they look like, and how they
are used in this manual are explained as follows:
CAUTION
This is a warning against something which may cause
injury to people if the warning is ignored. You are
informed about what you must or must not do in
order to avoid or reduce the risk to yourself and other
people.
NOTICE
This is a warning against something which may cause
damage to the vehicle or its equipment if the warning
is ignored. You are informed about what you must or
must not do in order to avoid or reduce the risk of
damage to your vehicle and its equipment.
Safety symbol
When you see the safety symbol
shown above, it means: “Do not”; “Do
not do this”; or “Do not let this hap-
pen”.

’02 L/C U (L/O 0108)
iii
Important information about your Toyota
New vehicle warranty
Your new vehicle is covered by the following Toyota
limited warranties:
New vehicle warranty
Emission control systems warranty
Others
For further information, please refer to the ”Owner’s
Warranty Information Booklet” or ”Owner’s Manual Sup-
plement”.
Your responsibility for maintenance
It is the owner’s responsibility to make sure the
specified maintenance is performed. Section 6 gives
details of these maintenance requirements. Also
included in Section 6 is general maintenance. For
scheduled maintenance information, place refer to the
”Scheduled Maintenance Guide” or ”Owner’s Manual
Supplement”.
Accessories, spare parts and
modification of your Toyota
A wide variety of non−genuine spare parts and accesso-
ries for Toyota vehicles are currently available in the
market. You should know that Toyota does not warrant
these products and is not responsible for their perfor-
mance, repair, or replacement, or for any damage they
may cause to, or adverse effect they may have on,
your Toyota vehicle.
This vehicle should not be modified with non−genuine
Toyota products. Modification with non−genuine Toyota
products could affect its performance, safety or durabili-
ty, and may even violate governmental regulations. In
addition, damage or performance problems resulting from
the modification may not be covered under warranty.

’02 L/C U (L/O 0108)
iv
Installation of a mobile
two−way radio system
As the installation of a mobile two−way radio system in
your vehicle could affect electronic systems such as
multiport fuel injection system/sequential multiport fuel
injection system, electronic throttle control system,
cruise control system, anti−lock brake system, SRS air-
bag system and seat belt pretensioner system, be sure
to check with your Toyota dealer for precautionary mea-
sures or special instructions regarding installation.
Scrapping of your Toyota
The SRS airbag and seat belt pretensioner devices in
your Toyota contain explosive chemicals. If the vehicle
is scrapped with the airbags and pretensioners left as
they are, this may cause an accident such as fire. Be
sure to have the systems of the SRS airbag and seat
belt pretensioner removed and disposed of by a qualified
service shop or by your Toyota dealer before you dis-
pose of your vehicle.
On−pavement and off−road
driving tips
This vehicle belongs to the utility vehicle class. Utility
vehicles have a significantly higher rollover rate than other
types of vehicles. This vehicle will handle and maneuver
differently from an ordinary passenger car because it is
designed for off−road use also. In addition, this vehicle
has a higher ground clearance and center of gravity than
that of an ordinary passenger car. This vehicle design
feature causes this type of vehicle to be more likely to
rollover. Failure to operate this vehicle correctly may result
in loss of control, accidents or vehicle rollover causing
death or serious injury. Be sure to read ”Off−road vehicle
precautions” in Section 2 and ”Off−road driving precautions”
in Section 3.

’02 L/C U (L/O 0108)
1
OPERATION OF INSTRUMENTS AND
CONTROLS
Overview of instruments and controls
Instrument panel overview 2. . . . . . . . . . . . . . . . . . . . . . . . . . . . . . . . . . . . .
Instrument cluster overview 5. . . . . . . . . . . . . . . . . . . . . . . . . . . . . . . . . . . .
Indicator symbols on the instrument panel 6. . . . . . . . . . . . . . . . . . . . . . .
SECTION 1− 1

’02 L/C U (L/O 0108)
2
1. Side vents
2. Side defroster outlets
3. Instrument cluster
4. Center vents
5. Electric moon roof switches and/or
personal lights
6. Glove box
7. Power door lock switches
8. Power window switches
9. Automatic transmission selector lever
10. Seat heater switches
11. Cup holder
12. Parking brake lever
13. Second start mode selector button and
driving pattern selector button
14. Four−wheel drive control lever
15. Lower vent
16. Hood lock release lever
17. Fuel filler door opener
18. Window lock switch
Instrument panel overview
View A

’02 L/C U (L/O 0108)
3
1. Headlight, turn signal and front fog
light switches
2. Cruise control switch
3. Ignition switch
4. Wiper and washer switches
5. Emergency flasher switch
6. Power antenna switch
7. Car audio
8. Clock and outside temperature display
9. Air conditioning controls
10. Outside rear view mirror heater switch
11. Rear air conditioning switch
12. Rear heater switch
13. Rear window defogger switch
14. Center differential lock switch
15. Manual tilt steering lock release lever
16. Power tilt and telescopic steering
switch
17. Instrument panel light control dial
18. Power rear view mirror control switches
19. Power quarter window switch (left−hand
side)
20. Power quarter window switch (right−
hand side)
View B

’02 L/C U (L/O 0108)
4
1. Ashtray
2. Cigarette lighter
3. Power outlet
Lower part of center cluster panel

’02 L/C U (L/O 0108)
5
Instrument cluster overview
1. Voltmeter
2. Speedometer
3. Service reminder indicators and
indicator lights
4. Tachometer
5. Engine oil pressure gauge
6. Engine coolant temperature gauge
7. Odometer and two trip meters
8. Trip meter reset knob
9. Fuel gauge

’02 L/C U (L/O 0108)
6
Indicator symbols on the instrument panel
Brake system warning light
∗
1
Malfunction indicator lamp
∗
1
Headlight high beam indicator light
Overdrive−off indicator light
Turn signal indicator lights
Center differential lock indicator light
Driver’s seat belt reminder light
∗
1
Front passenger’s seat belt reminder light
∗
1
Discharge warning light
∗
1
Anti−lock brake system warning light
∗
1
Open door warning light
∗
1
SRS warning light
∗
1
Low fuel level warning light
∗
1
Driving pattern (”POWER” mode) indicator
light
Automatic transmission second start indicator
light
Automatic transmission fluid temperature warning
light
∗
1
Unengaged ”Park” warning light
∗
1
Cruise control indicator light
∗
2

’02 L/C U (L/O 0108)
7
∗
1
: For details, see ”Service reminder indicators and warning
buzzers” in Section 1−5.
∗
2
: If this light flashes, see ”Cruise control” in Section 1−6.
Automatic transmission indicator lights
Vehicle skid control system off indicator light
∗
1
Vehicle skid control system and active traction
control system warning light
∗
1
Active traction control system indicator light
Slip indicator light

’02 L/C U (L/O 0108)
8

’02 L/C U (L/O 0108)
9
OPERATION OF INSTRUMENTS AND
CONTROLS
Keys and Doors
Keys 10. . . . . . . . . . . . . . . . . . . . . . . . . . . . . . . . . . . . . . . . . . . . . . . . . . . . . . .
Engine immobiliser system 12. . . . . . . . . . . . . . . . . . . . . . . . . . . . . . . . . . .
Side doors 13. . . . . . . . . . . . . . . . . . . . . . . . . . . . . . . . . . . . . . . . . . . . . . . . . .
Power windows 20. . . . . . . . . . . . . . . . . . . . . . . . . . . . . . . . . . . . . . . . . . . . . .
Power quarter windows 22. . . . . . . . . . . . . . . . . . . . . . . . . . . . . . . . . . . . . .
Back door 23. . . . . . . . . . . . . . . . . . . . . . . . . . . . . . . . . . . . . . . . . . . . . . . . . . .
Hood 25. . . . . . . . . . . . . . . . . . . . . . . . . . . . . . . . . . . . . . . . . . . . . . . . . . . . . . .
Theft deterrent system 26. . . . . . . . . . . . . . . . . . . . . . . . . . . . . . . . . . . . . . .
Fuel tank cap 27. . . . . . . . . . . . . . . . . . . . . . . . . . . . . . . . . . . . . . . . . . . . . . .
Electric moon roof 29. . . . . . . . . . . . . . . . . . . . . . . . . . . . . . . . . . . . . . . . . . .
SECTION 1− 2

’02 L/C U (L/O 0108)
10
Keys
Your vehicle is supplied with two kinds
of keys.
1. Master key (black)—This key works in
every lock. Your Toyota dealer will
need it to make you a new key with
built−in transponder chip.
2. Sub key (gray)—This key does not
work in the glove box.
A transponder chip for engine immobiliser
system has been filled in the head of the
master and sub keys. These chips are
needed to enable the system to function
correctly, so be careful not to lose these
keys. If you make your own duplicate key,
you will not be able to cancel the system
or start the engine.
To protect things locked in the glove box
when you have your vehicle parked, leave
the sub key with the attendant.
Since the side doors can be locked with-
out a key, you should always carry a
spare master key in case you accidentally
lock your keys inside the vehicle.
For information on use of the wireless
remote control key, see ”Side doors” in
this section.
NOTICE
When using a key containing a trans-
ponder chip, observe the following
precautions:
z When starting the engine, do not
use the key with a key ring resting
on the key grip and do not press
the key ring against the key grip.
Otherwise the engine may not start,
or may stop soon after it starts.

’02 L/C U (L/O 0108)
11
z When starting the engine, do not
use the key with other transponder
keys around (including keys of oth-
er vehicles) and do not press other
key plates against the key grip.
Otherwise the engine may not start,
or may stop soon after it starts. If
this happens, remove the key once
and then insert it again after taking
off other transponder keys (includ-
ing keys of other vehicles) from the
ring or while gripping or covering
them with your hand to start the
engine.
z Do not bend the key grip.
z Do not cover the key grip with any
material that cuts off electromagnet-
ic waves.
z Do not knock the key hard against
other objects.
z Do not leave the key exposed to
high temperatures for a long period,
such as on the dashboard and hood
under the direct sunlight.
z Do not put the key in water or
wash it in an ultrasonic washer.
z Do not use the key with electromag-
netic materials.

’02 L/C U (L/O 0108)
12
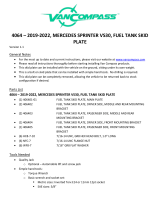
KEY NUMBER PLATE
Your key number is shown on the plate.
Keep the plate in a safe place such as
your wallet, not in the vehicle.
If you should lose your keys or if you
need additional keys, duplicates can be
made by a Toyota dealer using the key
number.
We recommend you to write down the key
number and keep it in safe place.
Engine immobiliser system
The engine immobiliser system is a
theft prevention system. When you in-
sert the key in the ignition switch, the
transponder chip in the key’s head
transmits an electronic code to the ve-
hicle. The engine will start, only when
the electronic code in the chip corre-
sponds to the registered ID code for
the vehicle.
The system is automatically set when the
key is removed from the ignition switch.
The indicator light will start flashing to
show the system is set.
If either of the following indicator condi-
tions occurs, contact your Toyota dealer.
The indicator light stays on except
when the theft deterrent system is set-
ting or activating. (See ”Theft deterrent
system”.)
The indicator light does not start flash-
ing when the key is removed from the
ignition switch.
The indicator light flashes unsteady.

’02 L/C U (L/O 0108)
13
Inserting the registered key in the ignition
switch automatically cancels the system,
which enables the engine to start. The
indicator light will go off.
For your Toyota dealer to make you a
new key with built−in transponder chip,
your dealer will need your key number
and master key. However, there is a limit
to the number of additional keys your
Toyota dealer can make for you.
If you make your own duplicate key,
you will not be able to cancel the sys-
tem or start the engine.
FCC ID: MOZ RI−7ATY
MADE IN JAPAN
This device complies with Part 15 of the
FCC Rules. Operation is subject to the
following two conditions:
(1) This device may not cause harmful
interference, and (2) this device must
accept any interference received, includ-
ing interference that may cause unde-
sired operation.
CAUTION
Changes or modifications not ex-
pressly approved by the party respon-
sible for compliance could void the
user’s authority to operate the equip-
ment.
Side doors—
LOCKING AND UNLOCKING WITH KEY
Insert the key into the keyhole and turn
it.
To lock: Turn the key forward.
To unlock: Turn the key backward.
All the side doors and back door lock and
unlock simultaneously with either front
side door. In the driver’s door lock, turn-
ing the key once will unlock the driver’s
door and twice in succession will unlock
all the side doors and back door simulta-
neously.

’02 L/C U (L/O 0108)
14
LOCKING AND UNLOCKING WITH
INSIDE LOCK KNOB
Move the lock knob.
To lock: Push the knob forward.
To unlock: Pull the knob backward.
Closing the side door with the lock knob
in the lock position will also lock the side
door. Be careful not to lock your keys in
the vehicle.
The front side doors cannot be locked if
you leave the key in the ignition switch.
Driver’s side
Passenger’s side
LOCKING AND UNLOCKING WITH
POWER DOOR LOCK SWITCH
Push the switch.
To lock: Push the switch on the front side.
To unlock: Push the switch on the rear
side.
All the side doors and back door lock or
unlock simultaneously.
When the front side doors are locked from
the outside, the switch will not work until
the either front door is unlocked with the
key.

’02 L/C U (L/O 0108)
15
REAR DOOR CHILD−PROTECTORS
Move the lock lever to the ”LOCK”
position as shown on the label.
This feature allows you to lock a rear
door so it can be opened from the outside
only, not from inside. We recommend us-
ing this feature whenever small children
are in the vehicle.
CAUTION
Before driving, be sure that the doors
are closed and locked, especially
when small children are in the ve-
hicle. Along with the proper use of
seat belts, locking the doors helps
prevent the driver and passengers
from being thrown out from the ve-
hicle during an accident. It also helps
prevent the doors from being opened
unintentionally.
—Wireless remote control
Locking operation
Unlocking operation

’02 L/C U (L/O 0108)
16
Your vehicle has a wireless remote
control system that can lock or unlock
all the side doors and back door from a
distance within approximately 1 m (3
ft.) of the vehicle.
LOCKING AND UNLOCKING THE SIDE
DOORS AND BACK DOOR
To lock and unlock all the side doors
and back door, push the switches slow-
ly and securely. At this time, the indica-
tor light on the key grip flashes once.
To lock: Push the ”LOCK” switch. All the
side doors and back door are locked si-
multaneously. At this time, parking lights
and tail lights flash once.
Check to see that all the side doors and
back door are securely locked.
If any of the side doors or back door is
not securely closed, or if the key is in the
ignition switch, locking cannot be per-
formed by the ”LOCK” switch.
To unlock: Push the ”UNLOCK” switch
once to unlock the driver’s door alone.
Pushing the switch twice within 3 seconds
unlocks all the side doors and back door
simultaneously. At this time, parking lights
and tail lights flash twice.
Together with the activation of unlocking,
the interior light comes on for 15 seconds
if the interior light switch is in “DOOR”
position. However, this function does not
work when the ignition key is in the “ON”
position. (For detailed information, see “In-
terior light” in Section 1−4.)
You have 30 seconds to open a door after
using the wireless remote unlock feature.
If a door is not opened by then, all the
side doors and back door will be automati-
cally locked again.
If the ”LOCK” or ”UNLOCK” switch is kept
pressed in, the locking or unlocking opera-
tion is not repeated. Release the button
and then push again.
”PANIC” SWITCH
Pushing the ”PANIC” switch for 1 sec-
ond blows the horn intermittently and
flashes the headlights and tail lights.
The ”PANIC” switch is used to deter ve-
hicle theft when you witness anyone at-
tempting to break into or damage your
vehicle.
The alarm will last for 1 minute. To stop
the alarm midway, push the ”PANIC” or
”UNLOCK” switch, or unlock any side door
or back door with key. You can also stop
the alarm by turning the ignition key from
”LOCK” to the ”ON” position.
/