
DETAILED
INSTRUCTIONS
DIGITAL VOICE
RECORDER
Thank you for purchasing an Olympus
Digital Voice Recorder.
Please read these instructions for information
about using the product correctly and safely.
Keep the instructions handy for future reference.
To ensure successful recording, we recommend that
you test the record function and volume before use.
EN

2
EN
Introduction
• The contents of this document are subject to change without notice. Contact our
Customer Support Center for the latest information relating to product names and model
numbers.
• Illustrations of the screen and the recorder shown in this manual may differ from the
actual product. The utmost care has been taken to ensure the integrity of this document
but should you happen to find a questionable item, error or omission, please contact our
Customer Support Center.
• Olympus does not accept any liability for passive damages or damage of any kind incurred
due to data loss resulting from a defect of the product, repair performed by a third party
other than Olympus or an Olympus authorized service station, or for any other reason.
Trademarks and registered trademarks
• IBM and PC/AT are trademarks or registered trademarks of International Business
Machines Corporation.
• Microsoft, Windows and Windows Media are registered trademarks of Microsoft
Corporation.
• Macintosh and iTunes are trademarks of Apple Inc.
• microSD and microSDHC are trademarks of SD Card Association.
• MPEG Layer-3 audio coding technology is licensed from Fraunhofer IIS and Thomson.
• The product was developed based on noise-canceling technology under license from NEC
Corporation.
• Voice Activity Detection technology is licensed from NTT Electronics Corporation.
Other product and brand names mentioned herein are the trademarks or registered
trademarks of their respective owners.

3
1
2
3
4
5
6
Introduction
Safety precautions ............................................ 4
1 Getting started
Main features .................................................... 8
Identification of parts ......................................10
Display (LCD panel) ..................................................11
Power supply ....................................................14
Inserting the battery ...............................................14
Battery settings .......................................................15
Charging by connecting to a computer via USB ......16
Connecting the USB-type AC adapter
(optional) to charge ..........................................17
Turning on/off the power ........................................19
HOLD ................................................................20
Setting the time and date [Time & Date] ...........21
Changing the time and date ....................................22
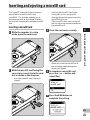
Inserting and ejecting a microSD card ...............23
Inserting a microSD card .........................................23
Ejecting a microSD card ...........................................24
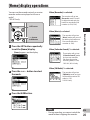
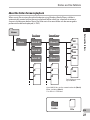
[Home] display operations ................................25
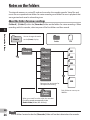
Notes on the folders .........................................26
About the folders for voice recordings ....................26
About the folders for music playback .....................27
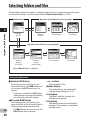
Selecting folders and files ................................28
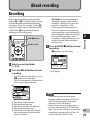
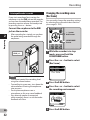
2 About recording
Record ing .........................................................29
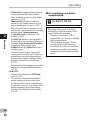
Changing the recording scene [Rec Scene] .............32
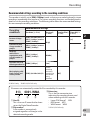
Recommended settings according to
the recording conditions ...................................33
Recording from an external microphone or
other device .......................................................34
3 About playback
Playback ..........................................................36
Searching for a file ..................................................40
Changing the playback sound .................................41
Setting an index mark or a temp mark ...................42
How to begin segment repeat playback .................43
Changing the playback scene [Play Scene] .............44
Era sin g .............................................................45
Erasing files .............................................................45
Erasing a folder ........................................................45
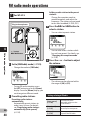
4 About the FM radio
(WS-813 only)
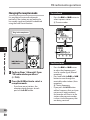
Using the FM radio ............................................47
FM radio mode operations ............................... 48
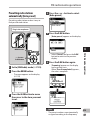
Presetting radio stations automatically
[Auto-preset] ....................................................49
Changing the reception mode ................................50
Adding a radio station .............................................51
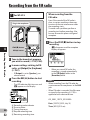
Recording from the FM radio.............................52
5 Menu setting
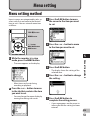
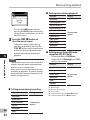
Menu setting method .......................................53
+ File Menu ............................................................55
, Rec Menu ............................................................56
- Play Menu ...........................................................61
. LCD/Sound Menu................................................64
/ Device Menu .......................................................65
FM Menu .............................................................67
Extract voice portions from file [Voice Detect] .......68
Rearranging files [Replace] .....................................69
Moving/Copying files [Move/Copy] ........................70
Dividing files [File Divide] .......................................72
Changing the USB class [USB Settings] ...................73
Formatting the recorder [Format] ..........................74
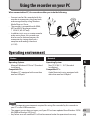
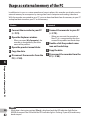
6 Using the recorder on your PC
Operating environment ....................................77
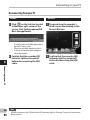
Connecting to your PC .......................................79
Disconnecting from your PC ....................................80
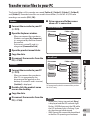
Transfer voice files to your PC ...........................81
Usage as external memory of the PC .................82
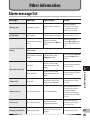
7 Other information
Alarm message list ...........................................83
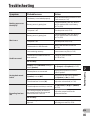
Trou ble shoot i ng ...............................................85
Accessories (optional) ...................................... 88
Specifications...................................................89
Technical assistance and support ......................94
7
EN
Table of contents

4
EN
Before using your new recorder, read this
manual carefully to ensure that you know
how to operate it safely and correctly.
Keep this manual in an easily accessible
location for future reference.
• The warning symbols indicate important
safety related information. To protect
yourself and others from personal injury
or damage to property, it is essential
that you always read the warnings and
information provided.
Cautions relating to the operating
environment
• To protect the high-precision
technology contained in this
product, never use or store the
recorder in any of the following
environments:
• Places where temperatures and/or
humidity are high or undergo extreme
changes, such as direct sunlight,
beaches, locked cars, or near other
heat sources (stove, radiator, etc.) or
humidifiers.
• In sandy or dusty environments.
• Near flammable items or explosives.
• In wet places, such as bathrooms or in
the rain.
• In places prone to strong vibration.
• Never drop the recorder or subject
it to severe shock or vibration.
• The recorder may malfunction
if it is used in a location where
it is subject to a magnetic/
electromagnetic field, radio waves,
or high voltage, such as near a
TV set, microwave, video game,
loud speakers, large monitor unit,
TV/radio tower, or transmission
towers. In such cases, momentarily
turn the recorder off before further
operation.
• Avoid recording or playing back
near cellular phones or other
wireless equipment, as they may
cause interference and noise. If
you experience noise, move the
recorder further away from such
equipment.
• Do not use organic solvents such
as alcohol and lacquer thinner to
clean the unit.
Safety precautions
f Danger
If the product is used without
observing the information given
under this symbol, serious injury
or death may result.
f Warning
If the product is used without
observing the information given
under this symbol, injury or
death may result.
f Caution
If the product is used without
observing the information
given under this symbol, minor
personal injury, damage to the
equipment, or loss of valuable
data may result.

5
EN
Safety precautions
Precautions relating to reception:
• Radio reception will vary substantially
depending on where you are using the
radio. If the reception is poor, try moving
the recorder near to a window and away
from electrical products such as cellular
phones, televisions, fluorescent lights etc.
Warning regarding data loss:
• Recorded content in memory may be
destroyed or erased by operating errors,
unit malfunction, or during repair work.
It is recommended to back up and save
important content to other media such as
a computer hard disk.
• Olympus does not accept any liability for
passive damages or damage of any kind
incurred due to data loss resulting from a
defect of the product, repair performed
by a third party other than Olympus or an
Olympus authorized service station, or
for any other reasons.
Handling the recorder
f Warning:
• Do not use the recorder near
flammable or explosive gases.
• Keep young children and infants
away from the recorder.
Always use and store the recorder out of
the reach of young children and infants
to prevent the following dangerous
situations which could cause serious
injury:
1 Becoming entangled in the recorder
strap, causing strangulation.
2 Accidentally swallowing the battery,
cards or other small parts.
3 Accidentally being injured by the
moving parts of the recorder.
• Do not use or store the recorder in
dusty or humid places.
• Do not disassemble, repair or
modify the unit yourself.
• Use microSD/microSDHC memory
cards only. Never use other types
of cards.
If you accidentally insert another type
of card into the recorder, contact an
authorized distributor or service center.
Do not try to remove the card by force.
• Do not operate the unit while
driving or riding a vehicle (such as
a bicycle, motorcycle, or car).
f Caution:
• Stop using the recorder
immediately if you notice any
unusual odors, noise, or smoke
emanating from it.
Never remove the batteries with bare
hands. Doing so may cause a fire or burn
your hands.
• Be careful with the strap.
Be careful with the strap when carrying
the recorder. It could easily catch on
something and cause serious damage.
• Do not leave the recorder where it
may be subject to extremely high
temperatures.
Doing so may cause parts to deteriorate
and, in some circumstances, cause the
recorder to catch fire. Do not cover (such
as with a blanket) the charger or AC
adapter while it is being used. This could
cause overheating, resulting in fire.
• Handle the recorder with care to
avoid getting a low-temperature
burn.
• If the recorder contains metal parts,
overheating can result in a low-
temperature burn. Note the following:
• When used for a long period, the
recorder will get hot. If you hold the
recorder while it is hot, you may suffer
a low-temperature burn.

6
EN
Safety precautions
• In places subject to extremely cold
temperatures, the temperature of
the recorder may be lower than the
ambient temperature. If possible, wear
gloves when handling the recorder in
cold temperatures.
Battery handling precautions
Follow these important guidelines
to prevent batteries from leaking,
overheating, burning, exploding, or
causing electrical shock or burns.
f Danger:
• Do not attempt to recharge
alkaline, lithium or any other non-
rechargeable batteries.
• Batteries should never be exposed
to flame, heated, short-circuited or
disassembled.
• Never heat or incinerate batteries.
• Take precautions when carrying or
storing batteries to prevent them
from coming into contact with any
metal objects such as jewelry, pins,
fasteners, etc.
• Never store batteries where they
will be exposed to direct sunlight,
or subjected to high temperatures
in a hot vehicle, near a heat source,
etc.
• To prevent causing battery leaks
or damaging their terminals,
carefully follow all instructions
regarding the use of batteries.
Never attempt to disassemble a
battery or modify it in any way by
soldering it, etc.
• Do not connect the battery directly
to a power outlet or the cigarette
lighter in an automobile.
• If battery fluid gets into your eyes,
flush your eyes immediately with
clean, cold running water and seek
medical attention immediately.
f Warning:
• Keep batteries dry at all times.
• If rechargeable batteries have
not been recharged within the
specified time, do not use them.
• Do not use a battery if it is cracked
or broken.
• Never subject batteries to strong
shock or continuous vibration.
• If a battery leaks, becomes
discolored or deformed, or
becomes abnormal in any other
way during operation, stop using
the recorder.
• If a battery leaks fluid onto your
clothing or skin, remove the
clothing and flush the affected
area with clean, cold running water
immediately. If the fluid burns
your skin, seek medical attention
immediately.
• Keep batteries out of the reach of
children.
• If you notice anything unusual
when using this product, such as
abnormal noise, heat, smoke, or a
burning odor:
1 remove the battery immediately,
taking care not to burn yourself, and;
2 call your dealer or local Olympus
representative for service.

7
EN
Safety precautions
f Caution:
• Please recycle batteries to help
save our planet’s resources. When
disposing of dead batteries, be
sure to cover their terminals and
always observe local laws and
regulations.
• Always charge a rechargeable
battery before using it for the first
time, or if it has not been used for a
long period.
• Rechargeable batteries have a
limited life. When the recorder's
operating time becomes
notably shorter even after the
rechargeable battery is fully
charged under the specified
conditions, replace the battery
with a new one.

8
1
EN
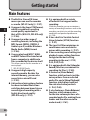
Main features
Main features
s The Built-in Stereo FM tuner
means you can use the recorder
as a radio (WS-813 only) ( ☞ P.47).
s It supports the linear PCM format,
which is capable of recording
sound quality equivalent to
that of CDs (WS-813, WS-812 only)
( ☞ P.56).
s It supports a wide range of
recording formats, including the
MP3 format (MPEG-1/MPEG-2
Audio Layer 3) and the Windows
Media Audio (WMA) format
( ☞ P.56).
s You can play back WAV*, WMA,
and MP3 format files transferred
from a computer in addition to
files recorded by the device itself.
This allows you to use this recorder as a
music player.
* WS-813, WS-812 only.
s It supports high capacity
recording media. Besides the
internal memory, you can also
record into a microSD card
( ☞ P.23).
s A directional microphone feature
has been included that allows
switching between broad stereo
recording and recording with a
highly directional quality
(WS-813 only) ( ☞ P. 57).
s It is equipped with a variety
of features that support audio
recording.
With this recorder you can customize a
variety of recording functions such as the
recording sensitivity to suit the recording
conditions and personal preferences
( ☞ P. 5 6) .
s It has a built-in Variable Control
Voice Actuator (VCVA) function
( ☞ P.57).
s The Low Cut Filter minimizes air
conditioner noise and similar
noises while recording ( ☞ P. 57).
s It has recording scene setting and
playback scene setting functions
to register the best setting
according to the use ( ☞ P.32,
P.4 4, P. 59, P.63).
s It is equipped with the [
Calendar
Search
] function, convenient for
searching for files ( ☞ P.40).
s It features a [
Voice Detect
]
function, which extracts just the
voice portions from a recorded
audio file, and a [
Voice Playback
]
function, which plays back just
the extracted voice portions
( ☞ P. 61, P. 68).
s It also features a [
Voice Balancer
]
function, which compensates
for the low-volume portions of a
recorded audio file, making them
louder and therefore easier to
understand ( ☞ P. 61).
Getting started

9
1
EN
Main features
Main features
s A Noise Cancel function ( ☞ P.61)
and a Voice Filter function*
( ☞ P.61) cut noise and enable
clear audio playback.
* WS-811 only.
s It features various repeat
functions ( ☞ P. 43, P.62).
s You can change the playback
equalizer settings ( ☞ P.62).
s You can move or copy files
between the internal memory
and microSD card, and within the
folders in the memory (WS-813,
WS-812 only) ( ☞ P.70).
s You can divide files (PCM*, MP3)
that have been recorded with this
recorder into two files ( ☞ P.72).
* WS-813, WS-812 only.
s Index mark and temp mark
features allow you to quickly find
desired locations ( ☞ P. 42).
s The playback speed and tone*
can be controlled ( ☞ P.41).
* WS-813, WS-812 only.
s This recorder is compatible
with USB 2.0, enabling fast data
transfer to a computer.
s It has a USB charging function
(WS-813, WS-812 only) ( ☞ P.16).
s It has a backlight full-dot display
(LCD panel).

10
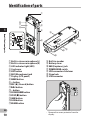
1
*
7
8
6
4
(
w
1
2
)
-
q
=
5
3
$
^
&
%
9
0
!
@
#
EN
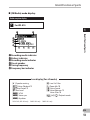
Identification of parts
Identification of parts
1 Built-in stereo microphone (L)
2 Built-in stereo microphone (R)
3 LED indicator light (LED)
4 Card cover
5
LIST
button
6
MIC
(Microphone) jack
7 Display (LCD panel)
8
MENU
button
9
+
button
0
REC
( s ) (Record) button
! 9 button
@
–
button
#
SCENE
/
INDEX
button
$
STOP
( 4 ) button
% 0 button
^ `
OK
button
&
ERASE
button
* Built-in speaker
( Battery cover
)
EAR
(Earphone) jack
-
POWER
/
HOLD
switch
= USB connector slide lever
q Strap hole
w USB connector
• Remove the screen protector from the
display.

11
1
12 3
4
7
5
6
8
9
0
!
EN
Identification of parts
4
12 3
4
12 3
Identification of parts
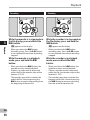
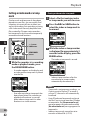
Display (LCD panel)
4 [
Recorder
] mode display:
Folder list display
1 Recording media indicator
[ l ]: Internal memory
[ m ]: microSD card
2 Current folder name
3 Battery indicator
4
Folder name
File list display
1 Recording media indicator
2 Current folder name
3 Battery indicator
4
File name
File display
1 Recording media indicator
2 Current file name
3 Battery indicator
4 Folder indicator, Recording mode
indicator, File Lock indicator
5 Recorder status indicator
[ K ]: Record indicator
[ ≠ ]: Pause indicator
[
]: Stop indicator
[ • ]: Play indicator
[ ß ]: Forwarding indicator
[ ™ ]: Rewinding indicator
[ N ]: F. Play indicator
[ M ]: S. Play indicator
[
]: Change playback tone indicator
(sharp)
[
]: Change playback tone indicator
(flat)
6 Remaining memory bar indicator,
Playback position bar indicator
7 Icon display ( ☞ P.13)
8 Current file number/ Total
number of recorded files in the
folder
9 Elapsed recording time,
Elapsed playback time
0 Remaining recording time,
File length
! Level meter,
Recording date and time

12
1
4
12 3
12 3
5
4
6
9
0
7
8
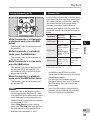
EN
Identification of parts
12 3
4
Identification of parts
1 Recording media indicator
[ l ]: Internal memory
[ m ]: microSD card
2 Current folder name
3 Battery indicator
4
Folder name, File name
File display
4 [
Music
] mode display:
List display 1
When there are files and
folders in the folder
List display 2
1 Recording media indicator
2 Current folder name
3 Battery indicator
4 File name
When there are only files in
the folder
1 Recording media indicator
2 Current file name
3 Battery indicator
4 Recorder status indicator
[ • ]: Play indicator
[
]: Stop indicator
[ ß ]: Forwarding indicator
[ ™ ]: Rewinding indicator
[ N ]: F. Play indicator
[ M ]: S. Play indicator
[
]: Change playback tone indicator
(sharp)
[ ]: Change playback tone indicator
(flat)
Current file number/ Total
number of recorded files in the
folder
5 T i t l e n a m e
6 Artist name
7 Album name
8 Playback position bar indicator
9 Elapsed playback time,
File length
0 Icon display ( ☞ P.13)

13
1
EN
Identification of parts
Identification of parts
4
3
5
6
1 2
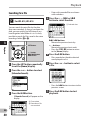
Icon display (For all modes)
[ Ø ]: Speaker muting
[
]: Voice Playback *1
[
]: Voice Detect *1
[ ? ]: Rec Level
[ û ]: VCVA
[ Æ ]: Voice sync
[ ù ]: Equalizer
*1 WS-813, WS-812 only. *2 WS-813 only. *3 WS-811 only.
1 Recording media indicator
2 Battery indicator
3 Recording mode indicator
4 Preset number
5 Tuning frequency
6 Frequency bar indicator
4 [ FM Radio ] mode display:
Radio reception display
[ 0 ]: Low Cut Filter
[ ≤ ]: Zoom Mic *2
[ % ]: Noise Cancel
[ $ ]: Voice Balancer *1
Voice Filter *3
[
] [ á ] [ ]: Playback mode
For WS-813:

14
1
EN
Power supply
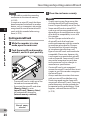
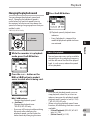
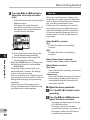
2 Insert the battery, observing the
= and - polarities.
3 Close the battery cover completely
by pressing down at A , then
sliding the cover towards B .
Power supply
Inserting the battery
This recorder can be used with either a
Ni-MH rechargeable battery or AAA alkaline
battery.
• When charging the recorder, make
sure that the supplied Ni-MH
rechargeable battery (BR404) is in
place.
• The supplied rechargeable battery
is not fully charged. Before using
the recorder or after long periods of
disuse, it is recommended that you
continuously charge the battery until
full ( ☞ P.16).
For WS-813, WS-812:
This recorder cannot charge the
rechargeable battery.
For WS-811:
1 Lightly press down on the arrow
and slide the battery cover open.
Notes
• A manganese battery cannot be used in
this recorder.
• When the battery is changed, a AAA
alkaline battery or Olympus Ni-MH
rechargeable battery is recommended.
• Be sure to stop the recorder before
replacing the battery. Unloading the
battery while the recorder is in use may
cause a malfunction resulting in the
corruption of the file, etc. If you take out
the battery during recording, you will
lose your currently recorded file because
the file header will not be able to close.

15
1
EN
Power supply
Power supply
Battery indicator
• When [ ] appears on the display,
charge or replace the battery as soon
as possible. When the battery has
insufficient power to operate the
recorder, [
] and [ Battery low ]
appear on the display and the
recorder shuts down.
Battery settings
Select the battery type to match the battery
you are using.
1 Replace the battery and turn on
the recorder ( ☞ P.14 , P.19).
2 Press the + or − button to change
the setting.
[ Ni-MH ] ( ):
Select when using the Olympus
Ni-MH rechargeable battery (BR404).
[ Alkaline ] (
):
Select when using an alkaline battery.
3 Press the `
OK
button to
complete the setting.
• If the “ Hour ” indicator flashes in the
display, see “ Setting the time and
date [ Time & Date ] ” ( ☞ P. 21).
The battery indicator on the display
changes as the battery loses power.
Battery type
Note
• When a voice/music file is played,
depending on the volume level the
recorder may be reset due to a drop in
the voltage output of the battery even if
[
] is displayed in the battery indicator.
In this case, lower the volume of the
recorder.
• If it takes longer than 15 minutes to
replace the dead battery or if you take
the battery in and out repeatedly at short
intervals, you may have to re-enter the
battery and time settings. In this case,
[ Battery ] screen will appear. For more
details, see “ Battery settings ”.
• Remove the battery if you are not going
to use the recorder for an extended
period of time.
• When replacing the rechargeable battery,
be sure to use a Ni-MH rechargeable
battery (optional). The use of other
manufacturers’ products can damage the
recorder and should be avoided.

16
1
EN
Power supply
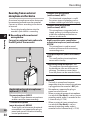
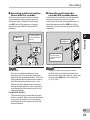
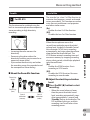
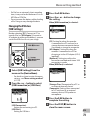
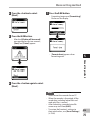
Power supply
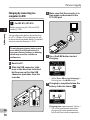
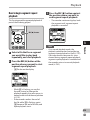
Charging by connecting to a
computer via USB
You can charge the battery by connecting
to a PC’s USB port. When charging, be sure
to place the rechargeable battery (supplied)
correctly into the recorder ( ☞ P.14).
1 Boot the PC.
2 Slide the USB connector slide
lever in the direction indicated
by the arrow so that the USB
connector protrudes from the
recorder.
Do not charge a primary battery such
as an alkaline or lithium battery. It
may cause battery leakage or heating,
which may cause the recorder to
malfunction.
For WS-813, WS-812:
3 Make sure that the recorder is in
stop mode, and connect to the
PC’s USB port.
4 Press the `
OK
button to start
charging.
• While [ Press OK to start charging ] is
flashing, press the ` OK button.
5 Charging is completed when the
battery indicator shows [ ].
Before connecting via USB, exit HOLD
mode ( ☞ P. 20).
Charging time: approximately 3 hours *
* This is the approximate time when
charging the rechargeable battery
fully from flat at room temperature.

17
1
EN
Power supply
Power supply
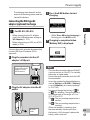
Connecting the USB-type AC
adapter (optional) to charge
You can charge the recorder by connecting
it to the USB-type AC adapter (A514)
(optional).
For WS-813, WS-812:
2 Plug the AC adapter into the AC
outlet.
To the AC
outlet
To the USB-type AC
adapter’s (A514)
USB connector
• Before connecting the AC adapter,
switch the USB connection setting to
[ AC Adapter ] ( ☞ P.73) .
• Before connecting via USB, exit HOLD
mode ( ☞ P. 20).
1 Plug the recorder into the AC
adapter’s USB port.
3 Press the `
OK
button to start
charging.
• While [ Press OK to start charging ] is
flashing, press the ` OK button.
4 Charging is completed when
[
Battery full
] is displayed.
The charging time depends on the
amount of remaining power and the
state of the battery.
Notes
• The recorder cannot be charged if the PC
is not turned on, or if the PC is in standby,
hibernate, or sleep mode.
• Do not charge the recorder with the USB
hub connected.
• Insert the supplied rechargeable battery
and set [ Battery ] to [ Ni-MH ]. If [ Battery ]
is set to [ Alkaline ], you cannot recharge
( ☞ P.15 , P. 6 5).
• You cannot charge the battery if [
] *1
or [
] *2 is blinking. Charge the battery
at a temperature in the range of 5°C to
35°C (41°F to 95°F).
*1 [
]: The surrounding temperature is
too low.
*2 [ ]: The surrounding temperature is
too high.
• When the recorder’s operating time
becomes notably shorter even after
the battery is fully charged, replace the
battery with a new one.

18
1
EN
Power supply
Power supply
Cautions concerning the rechargeable
battery
Read the following descriptions carefully
before using the Ni-MH rechargeable
battery.
Discharging:
The rechargeable battery self-discharges
while not in use. Be sure to charge it fully
before use.
Operating temperature:
The rechargeable battery is a chemical
product. The efficiency of the rechargeable
battery may fluctuate even when
the battery is operating within the
recommended temperature range. This is an
inherent nature of such products.
Recommended temperature range:
When operating the recorder:
0°C - 42°C/ 32°F - 107.6°F
Charging:
5°C - 35°C/ 41°F - 95°F
Storage for a long period:
–20°C - 30°C/ –4°F - 86°F
Using the rechargeable battery outside
the above temperature range may result in
declining efficiency and a shorter battery
life. In order to prevent battery leakage or
rust, remove the rechargeable battery from
the recorder when you will not be using it
for a long time, and store it separately.
Notes
• This recorder is designed to fully charge
the battery regardless of its energy level.
However, for best results when charging
a newly purchased rechargeable battery
or a battery that has not been used for
a long time (more than one month), it
is recommended to repeat the process
of fully charging the battery and then
letting it discharge 2 to 3 times.
• Use the dedicated USB cable. If any other
company’s cable is used, it may lead to
malfunction of the recorder. Also, never
use this dedicated cable with any other
company’s products.
• If you would like to charge the recorder
using the [ Composite ] setting, select
[ Optional ] in the USB connection
settings, then connect the recorder to a
PC. Selecting [ AC Adapter ] in the
[ USB Connection ] display will enable you
to charge the recorder ( ☞ P. 7 3).

19
1
EN
Power supply
Power supply
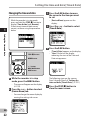
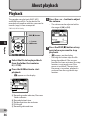
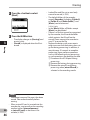
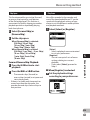
Turning on/off the power
When the recorder is not being used,
turn the power off to reduce battery
consumption. Existing data, mode settings,
and clock settings are not lost when the
power is turned off.
Turning on the power
While the recorder is turned off,
slide the
POWER
/
HOLD
switch in the
direction of the arrow.
• The power turns on.
Power save mode
If the recorder is on but is not used for 10
minutes or longer (default), the display
shuts off and the recorder goes into
power save mode ( ☞
P.65).
• To exit power save mode, press any
button.
Turning off the power
Slide the
POWER
/
HOLD
switch in the
direction of the arrow, and hold it
for 0.5 seconds or longer.
• The power turns off.
• The resume function remembers the stop
position before the power is turned off.
• When disposing of the rechargeable
battery, always observe the local laws and
regulations. Contact your local recycling
center for proper disposal methods.
• If the Ni-MH rechargeable battery is not
fully discharged, protect against short-
circuiting (e.g. by taping the contacts)
before disposal.
For customers in Germany:
Olympus has a contract with the GRS (Joint
Battery Disposal Association) in Germany to
ensure environmentally friendly disposal.

20
1
EN
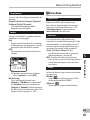
HOLD
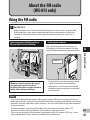
If you set the recorder to HOLD mode, the current settings will be preserved and all buttons
will be disabled. This feature is useful when the recorder has to be carried in a bag or pocket.
This mode can also prevent you from accidentally stopping recording.
Setting the recorder to HOLD mode
Slide the
POWER
/
HOLD
switch to the
[
HOLD
] position.
• After [ Hold ] appears on the display, the
recorder is set to HOLD mode.
Notes
• If you press any button while the recorder is in HOLD mode, the clock display lights for 2
seconds, but the recorder does not operate.
• If HOLD is applied during playback (recording), operation is disabled with the playback
(recording) state unchanged (When playback has ended or recording has ended due to
the remaining memory being used up, the recorder stops).
HOLD
Exiting HOLD mode
Slide the
POWER
/
HOLD
switch to the
A position.
Page is loading ...
Page is loading ...
Page is loading ...
Page is loading ...
Page is loading ...
Page is loading ...
Page is loading ...
Page is loading ...
Page is loading ...
Page is loading ...
Page is loading ...
Page is loading ...
Page is loading ...
Page is loading ...
Page is loading ...
Page is loading ...
Page is loading ...
Page is loading ...
Page is loading ...
Page is loading ...
Page is loading ...
Page is loading ...
Page is loading ...
Page is loading ...
Page is loading ...
Page is loading ...
Page is loading ...
Page is loading ...
Page is loading ...
Page is loading ...
Page is loading ...
Page is loading ...
Page is loading ...
Page is loading ...
Page is loading ...
Page is loading ...
Page is loading ...
Page is loading ...
Page is loading ...
Page is loading ...
Page is loading ...
Page is loading ...
Page is loading ...
Page is loading ...
Page is loading ...
Page is loading ...
Page is loading ...
Page is loading ...
Page is loading ...
Page is loading ...
Page is loading ...
Page is loading ...
Page is loading ...
Page is loading ...
Page is loading ...
Page is loading ...
Page is loading ...
Page is loading ...
Page is loading ...
Page is loading ...
Page is loading ...
Page is loading ...
Page is loading ...
Page is loading ...
Page is loading ...
Page is loading ...
Page is loading ...
Page is loading ...
Page is loading ...
Page is loading ...
Page is loading ...
Page is loading ...
Page is loading ...
Page is loading ...
Page is loading ...
-
 1
1
-
 2
2
-
 3
3
-
 4
4
-
 5
5
-
 6
6
-
 7
7
-
 8
8
-
 9
9
-
 10
10
-
 11
11
-
 12
12
-
 13
13
-
 14
14
-
 15
15
-
 16
16
-
 17
17
-
 18
18
-
 19
19
-
 20
20
-
 21
21
-
 22
22
-
 23
23
-
 24
24
-
 25
25
-
 26
26
-
 27
27
-
 28
28
-
 29
29
-
 30
30
-
 31
31
-
 32
32
-
 33
33
-
 34
34
-
 35
35
-
 36
36
-
 37
37
-
 38
38
-
 39
39
-
 40
40
-
 41
41
-
 42
42
-
 43
43
-
 44
44
-
 45
45
-
 46
46
-
 47
47
-
 48
48
-
 49
49
-
 50
50
-
 51
51
-
 52
52
-
 53
53
-
 54
54
-
 55
55
-
 56
56
-
 57
57
-
 58
58
-
 59
59
-
 60
60
-
 61
61
-
 62
62
-
 63
63
-
 64
64
-
 65
65
-
 66
66
-
 67
67
-
 68
68
-
 69
69
-
 70
70
-
 71
71
-
 72
72
-
 73
73
-
 74
74
-
 75
75
-
 76
76
-
 77
77
-
 78
78
-
 79
79
-
 80
80
-
 81
81
-
 82
82
-
 83
83
-
 84
84
-
 85
85
-
 86
86
-
 87
87
-
 88
88
-
 89
89
-
 90
90
-
 91
91
-
 92
92
-
 93
93
-
 94
94
-
 95
95


Olympus WS-812 User manual
- Category
- Dictaphones
- Type
- User manual
Ask a question and I''ll find the answer in the document
Finding information in a document is now easier with AI
Related papers
Other documents
-
Soundmaster CD9180 Datasheet
-
Sharper Image Olympus® WS‑853 Digital Voice Recorder Owner's manual
-
MEMUP SQUARE Datasheet
-
Panasonic RR-US950 User manual
-
Sony ICD-PX312 Operating instructions
-
Logitech Microcassette Recorder VN-1000 User manual
-
Sony ICD-AX412 Operating instructions
-
Sharper Image USB Discreet Voice Recorder User manual
-
-
Zoom H1n User manual