Inglis IME28300 Owner's manual
- Category
- Cookers
- Type
- Owner's manual
This manual is also suitable for

ELECTRICRANGE
oCUISINIERE
ELECTRIQUE
Table of Contents/Table des matieres .................. 2
Models/Modeles RME2330, IME2830
9757962A

TABLEOF CONTENTS
RANGE SAFETY ............................................................................. 3
The Anti-Tip Bracket .................................................................... 3
PARTS AND FEATURES ................................................................ 5
COOKTOP USE .............................................................................. 6
Cooktop Controls ......................................................................... 6
Coil Elements and Burner Bowls ................................................. 6
Lift-up Cooktop ............................................................................ 7
Home Canning ............................................................................. 7
Cookware ..................................................................................... 7
ELECTRONIC OVEN CONTROL ................................................... 8
Electronic Clock/Timer ................................................................. 8
Display .......................................................................................... 8
Clock ............................................................................................ 8
Timer ............................................................................................. 8
OVEN USE ....................................................................................... 8
Aluminum Foil............................................................................... 8
Positioning Racks and Bakeware ................................................ 8
Bakeware ...................................................................................... 9
Oven Vent ..................................................................................... 9
Baking and Roasting .................................................................... 9
Broiling ........................................................................................ 10
RANGE CARE ............................................................................... 11
General Cleaning ........................................................................ 11
Storage Drawer .......................................................................... 12
Oven Light .................................................................................. 12
Oven Door .................................................................................. 12
TROUBLESHOOTING .................................................................. 13
ASSISTANCE OR SERVICE ......................................................... 13
WAR RAN TY .................................................................................. 14
TABLEDESMATIERES
SECURITE DE LA CUlSINIERE ................................................... 15
La bride antibasculement ........................................................... t5
PIECES ET CARACTERISTIQUES .............................................. 18
UTILISATION DE LA TABLE DE CUISSON ................................ 19
Commandes de la table de cuisson .......................................... 19
121ementsen spirale et cuvettes de brQleur................................ 19
Table de cuisson relevable ......................................................... 20
Preparation de conserves & la maison ....................................... 20
Ustensiles de cuisson ................................................................ 20
COMMANDES g:LECTRONIQUES DU FOUR ............................ 21
Horloge electronique/Minuterie .................................................. 21
Affichage ..................................................................................... 21
Horloge ....................................................................................... 21
Minuterie ..................................................................................... 21
UTILISATION DU FOUR ............................................................... 21
Papier d'aluminium ..................................................................... 21
Positionnement des grilles et des ustensiles de cuisson .......... 21
Ustensiles de cuisson ................................................................ 22
Event du four .............................................................................. 22
Cuisson au four et r6tissage ...................................................... 22
Cuisson au gril ............................................................................ 23
ENTRETIEN DE LA CUlSINIERE ................................................. 24
Nettoyage general ...................................................................... 24
Tiroir de remisage ....................................................................... 25
Lampe du four ............................................................................ 25
Porte du four ............................................................................... 25
DEPANNAGE ................................................................................. 26
ASSISTANCE OU SERVICE ......................................................... 27
GARANTI E ..................................................................................... 28

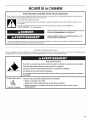
RANGESAFETY
Your safety and the safety of others are very important.
We have provided many important safety messages in this manual and on your appliance. Always read and obey all safety
messages.
This is the safety alert symbol.
This symbol alerts you to potential hazards that can kill or hurt you and others.
All safety messages will follow the safety alert symbol and either the word "DANGER" or "WARNING."
These words mean:
You can be killed or seriously injured if you don't immediately
follow instructions.
You can be killed or seriously injured if you don't follow
instructions.
All safety messages will tell you what the potential hazard is, tell you how to reduce the chance of injury, and tell you what can
happen if the instructions are not followed.
The range will not tip during normal use. However, the range can tip if you apply too much force or weight to the open door without
having the anti-tip bracket fastened down properly.
Tip Over Hazard
A child or adult can tip the range and be killed.
Connect anti-tip bracket to rear range foot.
Reconnect the anti-tip bracket, if the range is moved.
See the installation instructions for details.
Failure to follow these instructions can result in death or serious burns to children and adults.
Anti-Tip Bracket
Range Foot
Making sure the anti-tip bracket is installed:
• Slide range forward.
• Look for the anti-tip bracket securely attached to floor.
• Slide range back so rear range foot is under anti-tip bracket.

iMPORTANT SAFETY iNSTRUCTiONS
WARNING: To reduce the risk of fire, electrical shock,
injury to persons, or damage when using the range, follow
basic precautions, including the following:
[] WARNING: TO REDUCE THE RISK OF TIPPING OF
THE RANGE, THE RANGE MUST BE SECURED BY
PROPERLY INSTALLED ANTI-TIP DEVICES. TO CHECK
IF THE DEVICES ARE INSTALLED PROPERLY, SLIDE
RANGE FORWARD, LOOK FOR ANTI-TIP BRACKET
SECURELY ATTACHED TO FLOOR, AND SLIDE RANGE
BACK SO REAR RANGE FOOT IS UNDER ANTI-TIP
BRACKET.
[] CAUTION: Do not store items of interest to children in
cabinets above a range or on the backguard of a range -
children climbing on the range to reach items could be
seriously injured.
[] Proper Installation - Be sure the range is properly installed
and grounded by a qualified technician.
[] Never Use the Range for Warming or Heating the Room.
[] Do Not Leave Children Alone - Children should not be left
alone or unattended in area where the range is in use.
They should never be allowed to sit or stand on any part of
the range.
[] Wear Proper Apparel - Loose-fitting or hanging garments
should never be worn while using the range.
[] User Servicing - Do not repair or replace any part of the
range unless specifically recommended in the manual. All
other servicing should be referred to a qualified technician.
[] Storage in or on the Range - Flammable materials should
not be stored in an oven or near surface units.
[] Do Not Use Water on Grease Fires - Smother fire or flame
or use dry chemical or foam-type extinguisher.
[] Use Only Dry Potholders - Moist or damp potholders on
hot surfaces may result in burns from steam. Do not let
potholder touch hot heating elements. Do not use a towel
or other bulky cloth.
[] DO NOT TOUCH SURFACE UNITS OR AREAS NEAR
UNITS - Surface units may be hot even though they are
dark in color. Areas near surface units may become hot
enough to cause burns. During and after use, do not touch,
or let clothing or other flammable materials contact surface
units or areas near units until they have had sufficient time
to cool. Among those areas are the cooktop and surfaces
facing the cooktop.
[] Use Proper Pan Size - The range is equipped with one or
more surface units of different size. Select utensils having
flat bottoms large enough to cover the surface unit heating
element. The use of undersized utensils will expose a
portion of the heating element to direct contact and may
result in ignition of clothing. Proper relationship of utensil to
burner will also improve efficiency.
[] Never Leave Surface Units Unattended at High Heat
Settings - Boilover causes smoking and greasy spillovers
that may ignite.
[] Make Sure Reflector Pans or Drip Bowls Are in Place -
Absence of these pans or bowls during cooking may
subject wiring or components underneath to damage.
[] Protective Liners - Do not use aluminum foil to line surface
unit drip bowls or oven bottoms, except as suggested in
the manual. Improper installation of these liners may result
in a risk of electric shock, or fire.
[] Glazed Cooking Utensils - Only certain types of glass,
glass/ceramic, ceramic, earthenware, or other glazed
utensils are suitable for range-top service without breaking
due to the sudden change in temperature.
[] Utensil Handles Should Be Turned Inward and Not Extend
Over Adjacent Surface Units - To reduce the risk of burns,
ignition of flammable materials, and spillage due to
unintentional contact with the utensil, the handle of a
utensil should be positioned so that it is turned inward, and
does not extend over adjacent surface units.
[] Do Not Soak Removable Heating Elements - Heating
elements should never be immersed in water.
[] Do Not Cook on Broken Cooktop - If cooktop should
break, cleaning solutions and spillovers may penetrate the
broken cooktop and create a risk of electric shock. Contact
a qualified technician immediately.
[] Clean Cooktop With Caution - If a wet sponge or cloth is
used to wipe spills on a hot cooking area, be careful to
avoid steam burn. Some cleaners can produce noxious
fumes if applied to a hot surface.
[] Use Care When Opening Door - Let hot air or steam
escape before removing or replacing food.
[] Do Not Heat Unopened Food Containers - Build-up of
pressure may cause container to burst and result in injury.
[] Keep Oven Vent Ducts Unobstructed.
[] Placement of Oven Racks - Always place oven racks in
desired location while oven is cool. If rack must be moved
while oven is hot, do not let potholder contact hot heating
element in oven.
[] DO NOT TOUCH HEATING ELEMENTS OR INTERIOR
SURFACES OF OVEN - Heating elements may be hot even
though they are dark in color. Interior surfaces of an oven
become hot enough to cause burns. During and after use,
do not touch, or let clothing or other flammable materials
contact heating elements or interiorsurfaces of oven until
they have had sufficient time to cool. Other surfaces of the
appliance may become hot enough to cause burns - among
these surfaces are oven vent openings and surfaces near
these openings, oven doors, and windows of oven doors.
For self-cleaning ranges -
[] Do Not Clean Door Gasket - The door gasket is essential
for a good seal. Care should be taken not to rub, damage,
or move the gasket.
[] Do Not Use Oven Cleaners - No commercial oven cleaner
or oven liner protective coating of any kind should be used
in or around any part of the oven.
[] Clean Only Parts Listed in Manual.
[] Before Self-Cleaning the Oven - Remove broiler pan and
other utensils.
For units with ventilating hood -
[] Clean Ventilating Hoods Frequently - Grease should not
be allowed to accumulate on hood or filter.
[] When flaming foods under the hood, turn the fan on.
SAVE THESE iNSTRUCTiONS

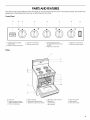
PARTSAND FEATURES
This manual covers several different models. The range you have purchased may have some or all of the items listed. The locations and
appearances of the features shown here may not match those of your model.
Control Panel
A B C D E F G
m_
ISURFACEtOVEN
A. Surface and oven heating
indicator light
B. Surface cooking area Iocator
Range
C. Left front control knob
D. Left rear control knob
E.Oven temperature knob
(or thermostat knob on some
models)
E Right rear control knob
G, Right front control knob
H. Manual oven light switch
I
J
K
L
A. Oven vent
B. Model and serial number
plate (underneath cooktop)
C. Surface cooking area
D. Anti-tip bracket
E.Removable storage drawer
F. Appliance outlet circuit breaker
G.Appliance outlet (120 volt)
H. Backguard
I. Control panel
J, Broil element
K. Oven door gasket
L. Bake element
M. Oven door window

COOKTOP USE
_' _/ '__ __'"_"_,'_/_ _
Fire Hazard
Turn off all controls when done cooking.
Failure to do so can result in death or fire.
The control knobs can be set to anywhere between HI and LO.
Push in and turn to setting. The surface cooking area Iocator
shows which element is turned on. Use the following chart as a
guide when setting heat levels.
SETTING RECOMMENDED USE
HI •
Medium High •
6-8
Medium •
5
Medium Low •
2-4
LO •
Start food cooking.
Bring liquid to a boil.
Hold a rapid boil.
Quickly brown or sear food.
Maintain a slow boil.
Fry or saute foods.
Cook soups, sauces and gravies.
Stew or steam food.
Simmer.
Keep food warm.
Melt chocolate or butter.
I
REMEMBER: When range is in use or (on some models)
during the Self-Cleaning cycle, the entire cooktop area may
become hot. I
Coil elements should be level for optimal cooking results. Burner
bowls, when clean, reflect heat back to the cookware. They also
help catch spills.
Cookware should not extend more than 1/2"(1.3 cm) over the coil
element. If cookware is uneven or too large, it can produce
excess heat, causing the burner bowl to change color. For more
information, see the "General Cleaning" section.
NOTE: Before removing or replacing coil elements and burner
bowls, make sure they are cool and the control knobs are in the
Off position.
To Remove:
1. Push in the edge of coil element toward the receptacle. Then
lift it enough to clear the burner bowl.
2. Pull the coil element straight away from the receptacle.
3. Lift out the burner bowl.
To Replace:
1. Line up openings in the burner bowl with the coil element
receptacle.
\
2. Holding the coil element as level as possible, slowly push coil
element terminal into the receptacle.
3. When the terminal is pushed into the receptacle as far as it
will go, push down the edge of the coil element opposite the
receptacle.

Thelift-upcooktopprovideseasyaccessforcleaningbeneath.
Donotdropthecooktop.Damagecouldoccurtothefinishand
thecooktopframe.Formoreinformation,seethe"General
Cleaning"section.
To Lift:
1. Lift the cooktop with one hand.
2. Insert the prop rod into the hole provided beneath the
cooktop.
To Replace:
1. Remove the prop rod from the hole.
2. Slowly lower the prop rod into its original position.
When canning for long periods, alternate the use of elements
between batches. This allows time for the most recently used
areas to cool.
• Center the canner on the element. Canners should not extend
more than 1/2"(1,3 cm) beyond the element,
• Do not place canner on 2 elements at the same time.
• For more information, contact your local agricultural
department. Companies that manufacture home canning
products can also offer assistance,
IMPORTANT: Do not leave empty cookware on a hot surface
cooking area, element or surface burner.
Ideal cookware should have a flat bottom, straight sides, and a
well-fitting lid, and the material should be of medium-to-heavy
thickness.
Rough finishes may scratch the cooktop. Aluminum and copper
may be used as a core or base in cookware. However, when used
as a base they can leave permanent marks on the cooktop or
grates.
Cookware material is afactor in how quickly and evenly heat is
transferred, which affects cooking results. A nonstick finish has
the same characteristics as its base material. For example,
aluminum cookware with a nonstick finish will take on the
properties of aluminum.
Use the following chart as a guide for cookware material
characteristics.
COOKWARE CHARACTERISTICS
Aluminum • Heats quickly and evenly.
• Suitable for all types of cooking.
• Medium or heavy thickness is best for
most cooking tasks,
Cast iron • Heats slowly and evenly.
• Good for browning and frying.
• Maintains heat for slow cooking.
Ceramic or • Follow manufacturer's instructions.
Ceramic glass • Heats slowly, but unevenly.
• Ideal results on low to medium heat
settings.
Copper • Heats very quickly and evenly.
Earthenware • Follow manufacturer's instructions.
• Use on low heat settings.
Porcelain • See stainless steel or cast iron.
enamel-on-
steel or cast
iron
Stainless steel • Heats quickly, but unevenly.
• A core or base of aluminum or copper
on stainless steel provides even
heating.

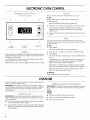
ELECTRONICOVEN CONTROL
D E
A. Timer C. Increase E.Decrease
B. Display D. Clock
When power is first supplied to the appliance, everything on the
display will light up for 5 seconds. Then, the time of day and "PF"
will appear on the display.
If "PF" appears at any other time, a power failure has occurred.
Reset the clock. See "Clock" section.
When the oven is not in use, the display will show the time of day.
This is a 12-hour clock and does not show a.m. or p.m.
To Set:
Before setting, make sure the oven and Timer are off.
1. Press CLOCK.
The colon will flash during Clock programming.
2. Press the "up" or "down" arrow pads to set the time of day.
The time can be changed in either small or 10-minute
increments by pressing a pad briefly or by pressing and
holding a pad.
3. Press CLOCK. The colon will stop flashing when the Clock is
active.
The Timer can be set in minutes and seconds or hours and
minutes and counts down the set time. The Timer does not start
or stop the oven.
To Set:
1. Press TIMER.
The colon will flash during Timer programming.
2. Press the "up" or "down" arrow pads to set length of time.
3. Press TIMER.
The Timer will begin counting down 5 seconds after the time
is set.
To display the time of day while the Timer is counting down,
press CLOCK. Time of day will be displayed 5 seconds
before returning to the Timer countdown.
When there is 1 minute of time remaining, a single tone will
sound and the display will begin counting down in seconds.
When the Timer reaches zero, the display will show "End"
and four 1-second tones will sound.
To Cancel:
Press TIMER twice in the Timer mode.
OVEN USE
Odors and smoke are normal when the oven is used the first few
times, or when it is heavily soiled.
IMPORTANT: The health of some birds is extremely sensitive to
the fumes given off. Exposure to the fumes may result in death to
certain birds. Always move birds to another closed and well-
ventilated room.
IMPORTANT: Do not line the oven bottom with any type of foil,
liners or cookware because permanent damage will occur to the
oven bottom finish.
• Do not cover entire rack with foil because air must be able to
move freely for best cooking results.
• To catch spills, place foil on rack below dish. Make sure foil is
at least 1/2"(1.3 cm) larger than the dish and that it is turned
up at the edges.
IMPORTANT: Do not place food or bakeware directly on the oven
door or bottom. Permanent damage will occur to the porcelain
finish.
RACKS
NOTES:
• Position racks before turning on the oven.
• Do not move racks with bakeware on them.
• Make sure racks are level.

Tomovearack,pullitouttothestopposition,raisethefront
edge,thenliftout.Usethefollowingillustrationandchartasa
guide.
4_
3 ........
I_zHHJ,,.
FOOD RACK POSITION(S)
Frozen pies, large roasts, turkeys, 1 or 2
angel food cakes
Bundt cakes, most quick breads, 2
yeast breads, casseroles, meats
Cookies, biscuits, muffins, cakes, 2 or 3
nonfrozen pies
BAKEWARE
Hot air must be able to circulate around food to cook evenly, so
allow 2" (5 cm) of space around bakeware and oven walls. Use
the following chart as a guide.
NUMBEROF POSITION ON RACK
PAN(S)
1 Center of rack.
2 Side by side or slightly staggered.
3 or 4 Opposite corners on each rack. Make sure
that no bakeware piece is directly over
another.
The bakeware material affects cooking results. Follow
manufacturer's recommendations and use the bakeware size
recommended in the recipe. Use the following chart as a guide.
BAKEWARE/RESULTS RECOMMENDATIONS
Light colored aluminum • Use temperature and time
• Light golden crusts recommended in recipe.
• Even browning
Dark aluminum and other •
bakeware with dark, dull
and/or nonstick finish
• Brown, crisp crusts
May need to reduce baking
temperatures 25°F (15°C).
Use suggested baking time.
For pies, breads and
casseroles, use temperature
recommended in recipe.
• Place rack in center of oven.
Insulated cookie sheets
or baking pans
• Little or no bottom
browning
• Place in the bottom third of
oven.
• May needto increase baking
time.
BAKEWARE/RESULTS RECOMMENDATIONS
Stainless steel • May need to increase baking
• Light, golden crusts time.
• Uneven browning
Stoneware/Baking Stone • Follow manufacturer's
• Crisp crusts instructions.
Ovenproof glassware, • May need to reduce baking
ceramic glass or ceramic temperatures 25°F (15°C).
• Brown, crisp crusts
A
\
A. Oven vent (ceramic
glass model)
A. Oven vent (coil
element model)
The oven vent releases hot air and moisture from the oven, and
should not be blocked or covered. Blocking or covering the vent
will cause poor air circulation, affecting cooking and cleaning
results. Do not set plastics, paper or other items that could melt
or burn near the oven vent.
On coil element models, the element can be used when the oven
is in use as long as the cookware does not extend more than
V2"(1.3 cm) over the element.
Before baking and roasting, position the racks according to the
"Positioning Racks and Bakeware" section. When roasting, it is
not necessary to wait for the oven to preheat before putting food
in, unless recommended in the recipe.
To Bake or Roast:
1. Push in and turn the oven control knob to the desired
temperature setting. The OVEN ON and OVEN HEATING
lights will turn on, and the set temperature will appear in the
display for 5 seconds.
On some models, set the oven selector to BAKE and turn the
oven temperature control knob to the desired temperature
setting. The OVEN ON indicator light will turn on and will turn
off once the oven is preheated.
2. Place food in oven.
The bake and roasting elements will turn on and off to keep
the oven temperature at the setting. The OVEN ON indicator
light(s) will turn on and off with the elements.
3. Push in and turn oven control knob to OFF when finished.
On some models, turn both the oven selector and oven
temperature control knob to OFF. The OVEN ON indicator
light will turn off.

Broilingusesdirectradiantheattocookfood.Changingthe
temperaturewhenbroilingallowsmoreprecisecontrol.Thelower
thetemperature,theslowerthecooking.Thickercutsand
unevenlyshapedpiecesofmeat,fishandpoultrymaycook
betteratlowerbroilingtemperatures.
• Forbestresults,useabroilerpanandgrid.Theyare
designedtodrainjuicesandhelpavoidspatterandsmoke.If
youwouldliketopurchaseabroilerpan,onemaybeordered.
See"AssistanceorService"sectiontoorder.AskforPart
Number4396923.
• Forproperdraining,donotcoverthegridwithfoil.The
bottomofthepanmaybelinedwithaluminumfoilforeasier
cleaning.
• Trimexcessfattoreducespattering.Slittheremainingfaton
theedgestoavoidcurling.
• Pulloutovenracktostoppositionbeforeturningorremoving
food.Usetongstoturnfoodtoavoidthelossofjuices.Very
thincutsoffish,poultryormeatmaynotneedtobeturned.
• Afterbroiling,removethepanfromtheovenwhenremoving
thefood.Drippingswillbakeonthepanifleftintheheated
oven,makingcleaningmoredifficult.
Beforebroiling,positionrackaccordingtoBroilingChart.Itisnot
necessarytopreheattheovenbeforeputtingfoodinunless
recommendedintherecipe.Positionfoodongridinthebroiler
pan,thenplaceitinthecenteroftheovenrack.Closethedoorto
thebroilstoppositiontoensureproperbroilingtemperature.
To Broil:
1. Push in and turn oven control knob to BROIL.
On some models, set the oven selector and oven temperature
control knob to BROIL. The OVEN ON indicator light will turn
on.
2. After broiling, turn the oven control knob to OFR
On some models, turn both the oven selector and oven
temperature control knob to OFF. The OVEN ON indicator
light will turn off.
To Broil at a Lower Temperature:
If food is cooking too fast, turn the oven temperature control
knob counterclockwise until the OVEN ON indicator light goes
off.
To broil food slower from the start of cook time, set the oven
temperature control knob between 170°F and 325°F (77°C and
163°C). These temperature settings let the broil elements cycle
and slow cooking results.
BROILING CHART
For best results, place food 3" (7 cm) or more from the broil
element. Times are guidelines only and may need to be adjusted
for individual foods and tastes. Recommended rack positions are
numbered from the bottom (1)to the top (5). For diagram, see the
"Positioning Racks and Bakeware" section.
COOK TIME
RACK (in minutes)
FOOD POSITION Side 1 Side 2
Steak
1" (2.5 cm) thick
medium rare 4 14-15 7-8
medium 4 15-16 8-9
well-done 4 18-19 9-10
Ground meat patties*
3/4"(2 cm) thick
well-done 4 13-14 7-8
Pork chops
1" (2.5 cm) thick 4 20-22 10-11
Ham slice, precooked
1/2"(1.25 cm) thick 4 8-10 4-5
Frankfurters 4 5-7 3-4
Lamb chops
1" (2.5 cm) thick 4 14-17 8-9
Chicken
bone-in pieces 3 17-20 17-20
boneless breasts 4 11-16 11-16
Fish
Fillets
1/4-1/2"(0.6-1.25 cm) thick 4 8-10 4-5
Steaks
3/4-1" (2-2.5 cm) thick 4 16-18 8-9
*Place up to 9 patties, equally spaced, on broiler grid.
10

RANGECARE
IMPORTANT: Before cleaning, make sure all controls are off and
the oven and cooktop are cool. Always follow label instructions
on cleaning products.
Soap, water and a soft cloth or sponge are suggested first unless
otherwise noted.
EXTERIOR PORCELAIN ENAMEL SURFACES
(on some models)
Food spills containing acids, such as vinegar and tomato, should
be cleaned as soon as the entire appliance is cool. These spills
may affect the finish.
Cleaning Method:
• Glass cleaner, mild liquid cleaner or nonabrasive scrubbing
pad: Gently clean around the model and serial number plate
because scrubbing may remove numbers.
• All-Purpose Appliance Cleaner Part Number 31662B (not
included):
See "Assistance or Service" section to order.
COOKTOP CONTROLS
Do not use steel wool, abrasive cleansers or oven cleaner.
Do not soak knobs.
When replacing knobs, make sure knobs are in the Off position.
On some models, do not remove seals under knobs.
Cleaning Method:
• Soap and water or dishwasher: Pull knobs straight away from
control panel to remove.
SURFACE UNDER COOKTOP (on some models)
To avoid product damage, do not remove the cooktop.
For more information, see "Lift-up Cooktop" section.
Cleaning Method:
• Steel-wool pad
OVEN DOOR EXTERIOR
Cleaning Method:
• Glass cleaner and paper towels or nonabrasive plastic
scrubbing pad: Apply glass cleaner to soft cloth or sponge,
not directly on panel.
• All-Purpose Appliance Cleaner Part Number 31662B (not
included): See "Assistance or Service" section to order.
CONTROL PAN EL
Do not use abrasive cleaners, steel-wool pads, gritty washcloths
or some paper towels. Damage may occur.
Cleaning Method:
• Glass cleaner and soft cloth or sponge: Apply glass cleaner
to soft cloth or sponge, not directly on panel.
• All-Purpose Appliance Cleaner Part Number 31662B (not
included): See "Assistance or Service" section to order.
OVEN CAVITY
COIL ELEMENTS (on some models)
Do not clean or immerse in water. Soil will burn off when hot.
For more information, see "Coil Elements and Burner Bowls."
Cleaning Method:
• Damp cloth: Make sure control knobs are off and elements
are cool.
BURNER BOWLS (on some models)
Cleaning Method:
• Solution of 1/2cup (125 mL) ammonia to 1 gal. (3.75 L) water:
Soak for 20 minutes, then scrub with stainless steel-wool
pad.
• Oven cleaner: Follow product label instructions.
• Mildly abrasive cleanser: Scrub with wet scouring pad.
Porcelain enamel only, not chrome
• Dishwasher
Gas Grate and Drip Pan Cleaner Part Number 31617B (not
included): See "Assistance or Service" section to order.
Do not use oven cleaners.
Food spills should be cleaned when oven cools. At high
temperatures, foods react with porcelain and staining, etching,
pitting or faint white spots can result.
Cleaning Method:
• Self-Cleaning cycle: See "Self-Cleaning Cycle" first.
OVEN RACKS AND ROASTING RACKS
Cleaning Method:
• Self-Cleaning cycle: See "Self-Cleaning Cycle" first. Remove
racks or they will discolor and become harder to slide. If this
happens, a light coating of vegetable oil applied to the rack
guides will help them slide.
• Steel-wool pad
BROILER PAN AND GRID (on some models)
Do not clean in the Self-Cleaning cycle.
Cleaning Method:
• Mildly abrasive cleanser: Scrub with wet scouring pad.
• Solution of 1/2cup (125 mL) ammonia to 1 gal. (3.75 L) water:
Soak for 20 minutes, then scrub with scouring or steel-wool
pad.
• Oven cleaner: Follow product label instructions.
Porcelain enamel only, not chrome
• Dishwasher
11

STORAGE DRAWER (on some models)
Make sure drawer is cool and empty before cleaning,
For more information, see "Storage Drawer" section,
Cleaning Method:
• Mild detergent
Drawer Liner (on some models)
Remove all stored items from drawer and lift out drawer liner.
• Clean with mild detergent.
• All-Purpose Appliance Cleaner Part Number 31662B (not
included): See "Assistance or Service" section to order.
The storage drawer can be removed. Before removing, make sure
drawer is cool and empty.
To Remove:
1. Pull drawer straight out to the first stop.
2. Lift up the back of the drawer and pull out.
To Replace:
1. Fit the ends of the drawer rails into the guides in the cavity.
2. Slide the drawer closed.
The oven light is a standard 40-watt appliance bulb. It will come
on when the oven door is open. The oven light will not work
during the Self-Cleaning cycle. On some models, when the oven
door is closed, press the manual oven light switch on the
backguard to turn on and off.
Before replacing, make sure the oven and cooktop are cool and
the control knobs are in the off position.
To Replace:
1. Unplug range or disconnect power.
2. Turn the glass bulb cover in the back of the oven
counterclockwise to remove.
3. Turn bulb counterclockwise to remove from socket.
4. Replace bulb, then bulb cover by turning clockwise.
5. Plug in range or reconnect power.
For normal range use, it is not suggested to remove the oven
door. However, if removal is necessary, make sure the oven is off
and cool. Then, follow these instructions. The oven door is heavy.
Before Removing:
1. Use a putty knife or screwdriver and insert it at the bottom
corner of the door stop clip.
2. Pry door stop clip free and remove from front frame hinge
slot. Be certain not to scratch finish.
3. Repeat procedure for other door stop clip.
To Remove:
1. Open the oven door. Insert door removal pins, included with
your range, into both hinge hangers. Do not remove the pins
while the door is removed from the range.
2. Slowly close the door until it rests against the door removal
pins.
3. Grasp the door on the sides with your fingers on the front of
the door and your thumbs on the inside surface.
4. Pull door straight up, then toward you. Hinge hangers will
slide out of front frame hinge slot. Do not remove door
removal pins until the door is replaced on the range.
To Replace:
1. Grasp the door on the sides with your fingers on the front of
the door and your thumbs on the inside surface.
2. Hold oven door so that the top edge of each hinge hanger is
horizontal. Insert hinge hangers into the front frame hinge
slots.
3. Tilt top of door toward range. Slide hinge hangers down onto
front frame support pins. Make sure the hinge hangers are
fully seated and engaged on the support pins.
4. Insert the door stop clip with the angular surface at the top of
the frame hinge slot, then push in the bottom of the clip until
flanges are flush with the front frame.
5. Open the door completely and remove the door removal pins.
Save door removal pins for future use.
6. Close the door.
12

TROUBLESHOOTING
Try the solutions suggested here first in order to avoid the cost of an unnecessary service call.
Nothing will operate
• Is the power supply cord unplugged?
Plug into a grounded outlet.
Has a household fuse blown, or has a circuit breaker
tripped?
Replace the fuse or reset the circuit breaker. If the problem
continues, call an electrician.
Cooktop will not operate
• Is the control knob set correctly?
Push in knob before turning to a setting.
• On coil element models, is the element inserted properly?
See "Coil Elements and Burner Bowls" section.
Excessive heat around cookware on cooktop
• Is the cookware the proper size?
Use cookware about the same size as the surface cooking
area, element or surface burner. Cookware should not extend
more than 1/2"(1.3 cm) outside the cooking area.
Cooktop cooking results not what expected
• Is the proper cookware being used?
See "Cookware" section.
• Is the control knob set to the proper heat level?
See "Cooktop Controls" section.
• Is the appliance level?
Level the appliance. See the Installation Instructions.
• On coil element models, is the element inserted properly?
See "Coil Elements and Burner Bowls" section.
Oven cooking results not what expected
• Is the appliance level?
Level the appliance. See the Installation Instructions.
• Is the proper temperature set?
Double-check the recipe in a reliable cookbook.
• Was the oven preheated?
See "Baking and Roasting" section.
• Is the proper bakeware being used?
See "Bakeware" section.
• Are the racks positioned properly?
See "Positioning Racks and Bakeware" section.
• Is there proper air circulation around bakeware?
See "Positioning Racks and Bakeware" section.
• Is the batter evenly distributed in the pan?
Make sure batter is level in the pan.
• Is the proper length of time being used?
Adjust cooking time.
• Has the oven door been opened while cooking?
Oven peeking releases oven heat and can result in longer
cooking times.
• Are baked items too brown on the bottom?
Move rack to higher position in the oven.
• Are pie crust edges browning early?
Use aluminum foil to cover the edge of the crust and/or
reduce baking temperature.
ASSISTANCEORSERVICE
Before calling for assistance or service, please check
"Troubleshooting." It may save you the cost of a service call. If
you still need help, follow the instructions below.
When calling, please know the purchase date and the complete
model and serial number of your appliance. This information will
help us to better respond to your request.
If you need replacement parts
If you need to order replacement parts, we recommend that you
use only factory specified parts. Factory specified parts will fit
right and work right because they are made with the same
precision used to build every new appliance.
To locate factory specifiec parts in your area, call us or your
nearest designated service center.
Call our Customer Interaction Centre toll free: 1-800-807-6777.
Our consultants provide assistance with:
• Features and specifications on our full line of appliances.
• Use and maintenance procedures.
• Accessory and repair parts sales.
• Referrals to local dealers, repair parts distributors, and
service companies. Designated service technicians are
trained to fulfill the product warranty and provide after-
warranty service, anywhere in Canada.
For further assistance
If you need further assistance, you can write with any questions
or concerns at:
Customer Interaction Centre
Whirlpool Canada LP
1901 Minnesota Court
Mississauga, Ontario L5N 3A7
Please include a daytime phone number in your correspondence.
13

RANGEWARRANTY
ONE-YEAR FULL WARRANTY
For one year from the date of purchase, when this appliance is operated and maintained according to instructions attached to or
furnished with the product, Whirlpool Canada LP will pay for factory specified parts and repair labor costs to correct defects in
materials or workmanship. Service must be provided by a Whirlpool designated service company.
Whirlpool Canada LP will not pay for:
1. Service calls to correct the installation of your appliance, to instruct you how to use your appliance, to replace house fuses or
correct house wiring or plumbing, or to replace light bulbs.
2. Repairs when your appliance is used in other than normal, single-family household use.
3. Pickup and delivery. Your appliance is designed to be repaired in the home.
4. Damage resulting from accident, alteration, misuse, abuse, fire, flood, improper installation, acts of God or use of products not
approved by Whirlpool Canada LR
5. Repairs to parts or systems resulting from unauthorized modifications made to the appliance.
6. Replacement parts or repair labor cost for units operated outside Canada.
WHIRLPOOL CANADA LP SHALL NOT BE LIABLE FOR INCIDENTAL OR CONSEQUENTIAL DAMAGES.
Some provinces do not allow the exclusion or limitation of incidental or consequential damages, so this exclusion or limitation may not
apply to you. This warranty gives you specific legal rights, and you may also have other rights which vary from province to province.
Outside Canada, this warranty does not apply. Contact your authorized appliance dealer to determine if another warranty
applies.
If you need service, first see the "Troubleshooting" section of this book. After checking "Troubleshooting," additional help can be found
by checking the "Assistance or Service" section or by calling the Customer Interaction Centre toll free at 1-800-807-6777 from
anywhere in Canada. You may also contact your authorized appliance dealer. 6/05
Keep this book and your sales slip together for future
reference. You must provide proof of purchase or installation
date for in-warranty service.
Write down the following information about your appliance to
better help you obtain assistance or service if you ever need it.
You will need to know your complete model number and serial
number. You can find this information on the model and serial
number label/plate, located on your appliance as shown in the
"Parts and Features" section.
Dealer name
Address
Phone number
Model number
Serial number
Purchase date
14

SECURITEDELACUISINIERE
Votre s_curit_ et celle des autres est tr_s importante.
Nous donnons de nombreux messages de securite importants dans ce manuel et sur votre appareil menager. Assurez-vous de
toujours lire tousles messages de securite et de vous y conformer.
Voici le symbole d'alerte de securit6.
Ce symbole d'alerte de securite vous signale les dangers potentiels de deces et de blessures graves & vous
et &d'autres.
Tousles messages de securite suivront le symbole d'alerte de securite et le mot "DANGER" ou
"AVERTISSEMENT". Ces mots signifient :
Risque possible de deces ou de blessure grave si vous ne
suivez pas immediatement lee instructions.
Risque possible de deces ou de blessure grave si vous
ne suivez pas lee instructions.
Tousles messages de securite vous diront quel est le danger potentiel et vous disent comment reduire le risque de blessure et
ce qui peut se produire en cas de non-respect des instructions.
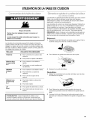
Dans lesconditionsde servicenormales,lacuisinierene Ioasculepas.EIIepeutcependant Ioasculersiune forceou un poidsexcessif
estapplique(e)surlaporteouvertealorsque labrideanti!oasculementn'estpas convenablement fi×ee.
La bride antibasculement
Le pied de lacuisini_re
Risque de basculement
Un enfant ou une personne adulte peut faire basculer la cuisini_re ce qui peut causer un deces.
Joindre la bride antibasculement au pied arri_re de la cuisiniere.
Joindre de nouveau la bride antibasculement si la cuisini_re est deplacee.
Voir details dans les instructions d'installation.
Le non-respect de ces instructions peut causer un decks ou des brQlures graves aux enfants et
aux adultes.
Assurez-vous qu'une bride antibasculement est installee :
• Glisser la cuisiniere vers I'avant.
• Verifier que la bride antibasculement est bien fixee au plancher.
• Glisser de nouveau la cuisini_re vers I'arri_re de sorte que le pied est sous la bride
antibasculement.
15

IMPORTANTES INSTRUCTIONS DE SC:CURIT¢:
AVERTISSEMENT : Pour reduire le risque d'incendie, de
choc 61ectrique, de blessures ou de dommages Iors de
I'utilisation de la cuisiniere, il convient d'observer certaines
precautions elementaires dont les suivantes :
• AVERTISSEMENT : POUR MINIMISER LE RISQUE
DE BASCULEMENT DE LA CUISINIERE, ELLE DOlT
Ft:TREBIEN IMMOBILISI_E PAR DES DISPOSITIFS
ANTIBASCULEMENT CORRECTEMENT INSTALLI_S.
POUR VI_RIFIER Sl LES DISPOSITIFS SONT
CORRECTEMENT INSTALLI_S, GLISSER LA CUISINIERE
VERS L'AVANT ET VI_RIFIER Sl LA BRIDE
ANTIBASCULEMENT EST BIEN FIXI_E AU PLANCHER,
ETGLISSER LA CUISINIERE VERS L'ARRIERE POUR
QUE LE PIED ARRIERE DE LA CUISINIERE SOIT SOUS
LA BRIDE ANTIBASCULEMENT.
• MISE EN GARDE : Ne pas remiser dans des armoires
au-dessus de la cuisiniere ou sur le dosseret d'une
cuisiniere, des objets que des enfants pourraient vouloir
atteindre. Les enfants pourraient se br01er ou se blesser en
grimpant sur la cuisiniere.
• Installation appropriee - S'assurer que la cuisiniere est
correctement installee et reliee #,la terre par un technicien
qualifie.
• Ne jamais utiliser la cuisiniere pour rechauffer ou chauffer
la piece.
• Ne pas laisser les enfants seuls - Les enfants ne doivent
pas 6tre laisses seuls ou sans surveillance dans la piece
ou la cuisiniere est en service. Ne jamais laisser les
enfants s'asseoir ou se tenir sur une partie quelconque de
la cuisiniere.
• Porter des v6tements appropries - Des v_tements amples
ou detaches ne doivent jamais _tre portes pendant
I'utilisation de la cuisiniere.
• Entretien par I'utilisateur - Ne pas reparer ni remplacer
toute piece de la cuisiniere si ce n'est pas specifiquement
recommande darts le manuel. Toute autre operation
d'entretien ou de reparation dolt _tre confiee & un
technicien qualifie.
• Remisage darts ou sur la cuisiniere - Des materiaux
inflammables ne doivent pas _tre remises dans un four ou
pres des elements de surface.
• Ne pas utiliser d'eau pour eteindre un feu de graisse -
Etouffer le feu ou les flammes ou utiliser un extincteur b,
produits chimiques secs, ou un extincteur & mousse.
• N'utiliser que des mitaines seches de four - Des mitaines
de four mouillees ou humides sur des surfaces chaudes
peuvent provoquer des brQlures provenant de la vapeur.
Ne pas laisser les mitaines de four toucher les elements
chauffants. Ne pas utiliser une serviette ou un tissu epais.
• NE PAS TOUCHER LES ELFtMENTS DE SURFACE OU
L'ESPACE PRES DES ELEMENTS - Les elements de
surface peuvent _tre chauds m_me Iorsqu'ils ont une teinte
foncee. Les endroits pres des elements de surface peuvent
devenir assez chauds pour causer des brQlures. Pendant
et apres I'utilisation, ne pas toucher les elements
chauffants et ne pas laisser les v_tements ou autres
materiaux inflammables entrer en contact avec ces
elements de surface ou les endroits pres des elements,
avant qu'ils soient suffisamment refroidis. Ces endroits
comprennent la table de cuisson et les surfaces pres de la
table de la cuisson.
• Utiliser des ustensiles de dimension appropriee - La
cuisiniere est munie d'un ou de plusieurs elements
chauffants de differentes grandeurs. Choisir les ustensiles
qui ont un fond plat assez grand pour couvrir I'element
chauffant de la surface de cuisson. L'utilisation d'ustensiles
trop petits exposera une pattie de I'element chauffant, ce
qui peut provoquer I'inflammation des v_tements.
L'utilisation d'un recipient de dimension correcte ameliore
aussi I'efficacite de la cuisson.
• Ne jamais laisser les elements de la table de cuisson sans
surveillance alors qu'ils chauffent b,la puissance maximale.
II pourrait en resulter une ebullition qui cause de la fumee
et des renversements de corps gras qui peuvent
s'enflammer.
• S'assurer que les cuvettes reflechissantes ou les bols de
renversement sont en place - L'absence de ces cuvettes
ou bols au cours de la cuisson peut causer des dommages
aux ills ou aux composants en dessous des elements.
• Garnissages protecteurs - Ne pas recouvrir les cuvettes
ou le fond du four de papier d'aluminium sauf tel que
suggere dans le manuel. L'installation incorrecte de papier
d'aluminium ou d'autre materiau peut causer un risque de
choc electrique ou d'incendie.
• Ustensiles de cuisson vitrifies - Seulement certains types
d'ustensiles de verre, vitroceramique, ceramique, faYence
ou autres surfaces vitrifiees conviennent pour le service
sur une table de cuisson, sans bris attribuables aux
changements soudains de temperature.
• Les poignees des ustensiles doivent _tre tournees vers
I'interieur et non vers le dessus des elements adjacents -
Pour reduire le risque de brQlures, d'inflammation de
produits inflammables et de renversements dus &
I'entrechoquement non intentionnel des ustensiles, la
poignee d'un ustensile dolt _tre positionnee de sorte
qu'elle est tournee vers I'interieur et non au-dessus des
elements de surface adjacents.
• Ne pas tremper les elements de chauffage amovibles -
Les elements de chauffage ne doivent jamais 6tre
immerges dans I'eau.
• Ne pas faire cuire sur une table de cuisson endommagee -
Si la table de cuisson est brisee, les solutions de nettoyage
et les renversements peuvent pen6trer darts la table de
cuisson brisee et creer un risque d'un choc electrique.
Contacter immediatement un technicien qualifie.
CONSERVEZ CES INSTRUCTIONS
16

IMPORTANTES INSTRUCTIONS DE SC:CURIT¢:
• Nettoyer la table de cuisson avec prudence - Si une
eponge ou un chiffon mouille est utilise pour essuyer les
renversements sur une surface de cuisson chaude, eviter
les brQlures causees par la vapeur chaude. Certains
nettoyants peuvent produire des emanations desagreables
Iorsqu'ils sent utilises sur une surface chaude.
• Exercer une grande prudence Iors de I'ouverture de la
porte - Laisser I'air chaud ou la vapeur s'echapper avant
d'enlever ou de replacer un plat.
• Ne pas faire chauffer des contenants fermes -
L'accumulation de pression peut causer une explosion du
contenant et des blessures.
• Ne jamais obstruer les ouvertures des events.
• Positionnement des grilles du four - Toujours placer lee
grilles du four en position desiree pendant que le four est
froid. Si la grille doit 6tre deplacee pendant que le four est
chaud, ne pas laisser les mitaines de four toucher I'element
chaud du four.
• NE PAS TOUCHER LES I_LI_MENTS CHAUFFANTS OU
LES SURFACES INTE_RIEURES DU FOUR - Les
elements chauffants peuvent 6tre chauds m6me s'ils ont
une teinte foncee. Lee surfaces interieures d'un four
deviennent assez chaudes pour causer des brQlures.
Pendant et apres I'utilisation, ne pas toucher ou laisser des
v6tements ou autres materiaux inflammables venir en
contact avec les elements chauds ou les surfaces
interieures chaudes du four avant qu'ils aient eu assez de
temps pour refroidir. D'autres surfaces de I'appareil
peuvent devenir assez chaudes pour causer des brQlures.
Ces surfaces comprennent lee ouvertures de I'event du
four et lee surfaces pres de ces ouvertures, les pertes du
four, et lee hublots des pertes du four.
Pour lee cuieini_res avec programme d'autonettoyage -
• Ne pas nettoyer le joint de la porte - Le joint de la porte
est essentiel pour I'etancheite. Veiller & ne pas frotter,
endommager ou deplacer le joint.
• Ne pas utiliser des produits commerciaux de nettoyage du
four - On ne doit pas utiliser un produit commercial de
nettoyage de four ou un enduit de protection des surfaces
internes du four quel qu'en soit le type, sur lee surfaces du
four ou lee surfaces voisines.
• Nettoyer uniquement lee pieces indiquees dane le manuel.
• Avant d'executer le programme d'autonettoyage du four -
Oter la lechefrite et son plat et les autres ustensiles.
Pour lee appareile avec hotte de ventilation -
• Nettoyer les hottes de ventilation frequemment - La
graisse ne doit pas s'accumuler sur la hotte ou le filtre.
• Lorsque vous flambez des aliments sous la hotte, mettre le
ventilateur en marche.
CONSERVEZ CES INSTRUCTIONS
17

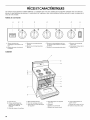
PIECESETCARACTERISTIQUES
Ce manuel couvre plusieurs modeles differents. La cuisiniere que vous avez achetee peut comporter quelques-unes ou toutes les
pieces et caracteristiques enum@ees. L'emplacement et I'apparence des caracteristiques illustrees peuvent ne pas correspondre
ceux de votre modele.
Tableau de commande
A B C D E F G
m_
OVEN
Im
A. TEmoin lumineux de
chauffage de la surface et du
four
B. Repere de zone de cuisson
la surface
Cuisini_re
C. Boutondecommandeavant
gauche
D. Boutondecommandearriere
gauche
E.Bouton de la temperature du four
(eu bouton thermostat sur certains
modeles)
F, Bouton de commande arriere droit
G. Bouton de commande
avant droit
H. Interrupteur manuel de la
lampe du four
,F
G
H
I
J
K
L
A. Event du four
B. Plaque signalEtique des
numEros de modele et de
sErie (sous la table de
cuissoB)
C. Zone de cuisson # la surface
D. Bride antibasculement
E. Tiroir de remisage amovible
E Disjoncteur de prise Electrique
de I'apparefl
G. Prise Electrique de I'appareil
(120 volt)
H. Dosseret
L Tableau de commande
J. ElEment de cuisson au gril
K. Joint d'EtanchEitE de la
porte du four
L. ElEment de cuisson au four
M. Hublot de la porte du four
18

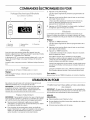
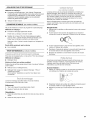
UTILISATIONDELATABLEDECUISSON
Risque d'incendie
Fermer tous les reglages Iorsque la cuisson est
terminee.
Le non-respect de cette instruction peut causer un
deces ou un incendie.
Les boutons de commande peuvent _tre regles & n'importe
quelle position entre HI et LO. Pousser et tourner le bouton au
reglage. Le repere de zone de cuisson a la surface indique quel
element est allum& Utiliser le tableau suivant comme guide Iors
du reglage des niveaux de chaleur.
REGLAGE UTILISATION RECOMMANDEE
HI (_lev_) • Pour commencer la cuisson des
aliments.
• Pour porter un liquide & ebullition.
Medium High • Pour maintenir une ebullition
(moyen _lev_) rapide.
6-8
• Pour brunir ou saisir rapidement
les aliments.
MEDIUM • Pour maintenir une ebullition lente.
(moyen) • Pour faire frire ou sauter les
5
aliments.
• Pour cuire les soupes et les
sauces.
Medium Low
(moyen bas)
2-4
Pour faire mijoter ou etuver les
aliments.
Pour faire mijoter.
LO • Pour garder les aliments au chaud.
(bas) • Pour faire fondre le chocolat ou le
beurre.
I
N'OUBLIEZ PAS : Quand I'appareil est utilise ou (sur
certains modeles) durant le programme d'autonettoyage,
toute la surface de la table de cuisson peut devenir chaude.
Les _l_ments en spirale doivent _tre de niveau pour une cuisson
ideale. Les cuvettes de brQleur, Iorsqu'elles sont propres,
reflechissent la chaleur sur I'ustensile de cuisson. Elles aident
egalement a contenir les renversements.
Les ustensiles de cuisson ne doivent pas depasser I'element en
spirale de plus de W' (1,3 cm). Si I'ustensile de cuisson est de
forme irreguliere ou trop gros, il peut produire une chaleur
excessive causant la decoloration des cuvettes de br@eur. Pour
plus de renseignements, voir la section "Nettoyage general".
REMARQUE : Avant d'enlever ou de reinstaller les elements en
spirale et les cuvettes de brQleur, s'assurer qu'ils sont froids et
que les boutons de commande sont en position d'arr_t.
Enl_vement :
1. Pousser le bord de I'el_ment en spirale vers la prise. Puis le
soulever assez pour eviter la cuvette du brQleur.
2. Tirer I'element en spirale tout droit hors de la prise.
3. Soulever la cuvette du brQleur.
R6installation :
1. Aligner les ouvertures de la cuvette du breleur avec la prise
de I'element en spirale.
\
2. Tenir I'element en spirale le plus possible de niveau et
pousser doucement la fiche de I'element en spirale dans la
prise.
3. Lorsque la fiche de I'element est enfoncee jusqu'au fond,
appuyer sur le rebord de I'element en spirale a I'oppose de la
prise.
19

La table de cuisson relevable permet d'acceder facilement en-
dessous pour le nettoyage. Ne pas I'echapper ce qui risque
d'endommager le fini et le ch&ssis de la table de cuisson. Pour
plus de renseignements, voir la section "Nettoyage general".
Pour soulever :
1. Soulever la table de cuisson d'une main.
2. Inserer la tige de support dans le trou prevu a cet effet sous la
table de cuisson.
Pour r_installer :
1. Retirer la tige de support du trou.
2. Abaisser doucement la tige de support a sa position
originale.
Lors de la preparation de conserves pendant de Iongues
periodes, alterner I'utilisation des elements entre les quantites
preparees. Cette alternance permet aux dernieres surfaces
utilisees de refroidir.
• Centrer I'autoclave sur le plus grand element. Sur les tables
de cuisson electriques, I'autoclave ne dolt pas depasser
I'element de plus de Yd'(1,8 cm}.
• Ne pas placer I'autoclave sur deux surfaces de cuisson, deux
elements a la fois.
Pour plus de renseignements, communiquez avec votre
service local d'agriculture. Les compagnies qui fabriquent
des produits pour la preparation de conserves peuvent aussi
offrir de I'aide.
IMPORTANT : Ne pas laisser un ustensile de cuisson vide sur la
surface chaude d'une table de cuisson, d'un element ou d'un
br@eur de surface.
Les ustensiles de cuisson ideals doivent avoir un fond plat, des
parois droites, un couvercle qui ferme bien et le mat@iau dolt @tre
d'epaisseur moyenne aforte.
Les surfaces rudes peuvent egratigner la table de cuisson.
L'aluminium et le cuivre peuvent atre employes comme fond ou
base dans un ustensile de cuisson. Cependant, utilises comme
base, ils peuvent laisser des marques permanentes sur la table
de cuisson ou les grilles.
Le materiau d'un ustensile de cuisson affecte la rapidite et
I'uniformite de la transmission de la chaleur, et contribue aux
resultats de cuisson. Un fini antiadhesif ales mames
caract@istiques que son materiau de base. Par exemple, un
ustensile de cuisson en aluminium avec un fini antiadhesif aura
les proprietes de I'aluminium.
Utiliser le tableau suivant comme guide pour les caract@istiques
du materiau de I'ustensile de cuisson.
USTENSILE CARACTERISTIQUES
Aluminium • Chauffe rapidement et uniformement.
• Convient a tousles genres de
cuisson.
• Uepaisseur moyenne ou forte
convient le mieux pour la plupart des
t&ches de cuisson.
Fonte • Chauffe lentement et uniformement.
• Convient pour le brunissage et la
friture.
• Maintient la chaleur pour une cuisson
lente.
C_ramique ou
vitroc_ramique
• Suivre les instructions du fabricant.
• Chauffe lentement mais inegalement.
• Les meilleurs resultats sont obtenus
sur les reglages de chaleur basse
moyenne.
Cuivre • Chauffe tres rapidement et
egalement.
Terre cuite • Suivre les instructions du fabricant.
• Utiliser des reglages de temp@ature
basse.
Acier _mail- • Voir acier inoxydable ou fonte.
porcelaine ou
fonte
Acier • Chauffe rapidement, mais
inoxydable inegalement.
• Un fond ou une base d'aluminium ou
de cuivre sur I'acier inoxydable
procure un chauffage egal.
20
Page is loading ...
Page is loading ...
Page is loading ...
Page is loading ...
Page is loading ...
Page is loading ...
Page is loading ...
Page is loading ...
-
 1
1
-
 2
2
-
 3
3
-
 4
4
-
 5
5
-
 6
6
-
 7
7
-
 8
8
-
 9
9
-
 10
10
-
 11
11
-
 12
12
-
 13
13
-
 14
14
-
 15
15
-
 16
16
-
 17
17
-
 18
18
-
 19
19
-
 20
20
-
 21
21
-
 22
22
-
 23
23
-
 24
24
-
 25
25
-
 26
26
-
 27
27
-
 28
28


Inglis IME28300 Owner's manual
- Category
- Cookers
- Type
- Owner's manual
- This manual is also suitable for
Ask a question and I''ll find the answer in the document
Finding information in a document is now easier with AI
in other languages
Related papers
-
Inglis IRP33800 Owner's manual
-
-
Inglis IRE82302 Owner's manual
-
Inglis IRP33801 Owner's manual
-
-
Whirlpool REE22303 Owner's manual
-
-
-
Whirlpool IES355RQ2 User manual
-
Whirlpool WHP32812 Owner's manual
Other documents
-
-
-
Estate TME30101 Owner's manual
-
-
-
-
-
-
-