GE EDW5100N00BB Owner's manual

Category
Dishwashers
Type
Owner's manual
ge.com
Safety Instructions ...... 2,s
Operating Instructions
Care and Cleaning ............ 12
Control Panel and Settings ... 4-7
Loading Place Settings ........ 11
Loading the Racks ............ 10
Optional Accessories .......... 11
Using the Dishwasher ........ 8, 9
Troubleshooting Tips .. 13,14
Consumer Support
Consumer Support ..... Back Cover
Warrants .................... 1S
165D4 700P339
EDWSO00 Series
EDW6000 Series
GHDA400 Series
GHDA650 Series
GLD4100 Series
GLD4200 Series
GLD4300 Series
GLD5500 Series
GLD5800 Series
GLD6200 Series
GLD6300 Series
GLD6500 Series
HLD4000 Series
Write the model and serial
numbers here:
Model #
Serial #
Youcan find them on the tub wall
just insidethe door
49-55019 03-06JR
IMPORTANT SAFETYINFORMATION.
READ ALL INSTRUCTIONS BEFORE USING --
SAVE THESE INSTRUCTIONS
WARNING!
For your safety, the information in this manual must be followed to minimize the risk of fire
or explosion, electric shock, and to prevent property damage, personal in]ur 9, or death,
_tls
A WARNING! WATERHEATERSAFETY
f _,,J',_ "_ Under certain conditions hydrogen gas may beproduced in o water heater that has not been used
for two weeks or more. HYDROGEN GAS IS EXPLOSIVE.
Ifthe hot water has not been usedfor two weeksor more, prevent the possibility of damage or injury
bgturning on all hot water faucets and allow them to run for several minutes.Dothis before using ang
electrical appliance which is connected to the hot water sgstem.Thissimple procedure will allow ang built-
up hgdrogen gasto escape.Sincethe gas isflammable, do not smoke or usean open flame or appliance
during this process.
%
PROPERINSTALLATIONAND MAINTENANCE
This dishwasher must be properly installed and located in accordance with the Installation
Instructions before it is used. If you did not receive on Installation Instructions sheet with
your dishwasher, you con receive one bg visiting our website at ge.com.
Connectto a grounded metal, permanent wiring
sgstem;or run an equipment-grounding
conductor with the circuit conductors and
connect to the equipment-grounding terminal
or lead of the appliance.
Improperconnection of the equipment-grounding
conductor can result in arisk of electric shock.
Checkwith a qualified electrician or service
representative if you arein doubt whether the
appliance is properly grounded.
Disposeof discarded appliancesand shipping
or packing material properly.
Donot attempt to repair or replaceany part
of your dishwasher unlessit isspecifically
recommended in this manual. Allother servicing
should be referredto a qualifiedtechnician.
Tominimize the possibility of electric shock,
disconnect this appliance from the power supply
beforeattempting any maintenance.
NOTE:Turningthedishwasher off does not
disconnect theappliance fromthe power supply.
Werecommendhaving o qualified technician
serviceyour appliance.
A CAUTION: To prevent minor injurg or propertg damage
Contentswashed in Anti-bacterial mode,if
available,may be hot to the touch. Usecare
before handling.
Usinga detergent that is
not specifically designed
for dishwashers will cause
the dishwasherto fillwith
suds.
If your dishwasher is connected to a
wall switch, ensure that the switch is
on prior to use.
Ondishwashers with electronic controls,
if you choose to turn the switch off
between wash cycles,allow 5-10
secondsafter tuming the switch on before
touching START/RESETto allow the control to
reboot.
Non-DishwareItems: Donot wash items such
aselectronic air cleanerfilters, furnace filters and
paint brushes inyour dishwasher.Damage to
dishwasher and discoloration orstaining of
dishwasher may result.
Closesupervision isnecessary if this appliance
isusedby or near children.
Load light, plastic items so they will not
become dislodged and drop to the bottom
of the dishwasher-they might come into
contact with the heating element and be
damaged.
ge.com
.t_WARNING! RISK OF CHILD ENTRAPMENT
PROPERDISPOSAL OF THEDISHWASHER
Junked or abandoned dishwashers are
dangerous...even if they will sit for '_justa
few days." If you are getting rid of your old
dishwasher, please follow the instructions
below to help prevent accidents.
Before You Throw Away Your Old
Dishwasher:
mTake off the door of the washing compartment
or remove the door latch keeper (as shown).
Door latch keeper
WARNING!
When using your dishwasher, follow basic precautions,
including the following:
Usethis appliance only for its intended purpose Donot operate your dishwasher unless all
asdescribed inthis Owner's Manual. enclosure panelsare properly in place.
Useonly powder,tabs, liquid detergents or rinse Donot tamper with controls.
agents recommended for useina dishwasher and Donot abuse,sit on or stand on the door or dish
keepthem out of the reachof children. Cascade@, rack of the dishwasher`
Cascade @ Complete and Electrasol @ Automatic
Dishwashing Deter_nts, andJet-Dr&l@and
CascadeRinseAidw rinseagents have been
approved for usein allGEdishwashers.
Locatesharp items sothat they are not likely
to damage the door seal.
Loadsharp kniveswith the handles upto reduce
the risk of cut-type injuries.
Donot wash plastic items unless marked
dishwasher safe orthe equivalent. Forplastic
items not so marked, checkthe manufacturer's
recommendations.
Donot touch the heating element during or
immediately after use.
Donot allow children to play around dishwasher
when opening or closing door due to the possibility
of small fingersbeing pinched in door.
Donot discard a dishwasherwithout first removing
the door ofthe washing compartment.
Donot store or usecombustible materials, gasoline
or other flammable vapors and liquidsin the
vicinity of this or any other appliance.
Donot allow children to play with, on or insidethis
appliance or any discarded appliance.
READAND FOLLOW THISSAFETYINFORMATION
CAREFULLY.
SAVETHESE INSTRUCTIONS
About the dishwasher control
paneu.IFormodelswith sensor:EDWGO00Series,
GHDA650 Series, GLD6200 Series, GLD6300 Series, and GLD6500 Series)
You can locate your model number on the tub wall just inside the doon Throughout this manual, features and
appearance may vary from your model.
I11
B Status Indicator Lights
TheStatusdisplaytellsyouwhat'shappeningwhilethedishwasherisin operationand mayflash,indicatinga
malfunction(seepage8).ThelightswillcomeONindicatingthesequenceofoperationthedishwasherisin.
SENSING Displayedwhilethesensorismeasuringtheamountofsoilandtemperatureofwate_
(onsomemodels) ThedishwasherwilladJusttheselectedcycletoachieveoptimalperformance.
WASHING Displayedduringprewashandmainwashperiods.
(onsomemodels)
RINSING Displayedduringrinseperiods.
(onsomemodels)
DRYING DisplayedduringHEATEDDR'/.
(onsomemodels)
SANITIZED Displayedwhencyclehasmetsonitizationconditions.LightremainsONuntildoorisopened.
CLEAN Displayedwhenawashcycleiscomplete.ThelightstaysONasa reminderthat thedishesare
cleanuntilthedoorisrelatchedor untilanothercycleisselected.
_'_ TimeRemaining Display Ionsomemodels)
Duringoperation,thedisplayshowstheminutesremaininguntilthecycleiscomplete.Thedisplaymayadjustthe
remainingtimewhilethe sensinglightison.Thetime displayedatthestartofeachcyclemaychangefromthe
factorysettingastheunitcustomizesitselfto homeuse.Duringa delaystart,thedisplaywillshowhoursoftime
remaininguntilthecyclestarts.
D Cycles
ThelightabovetheselectedpadwillbeONto indicatewhichcyclehasbeenselected.
Thisdishwasherisequippedwith adirt andtemperaturesensor.Cyclelengthandtimewillvarydependingonthe
soillevelandtemperature.
ANTI-BACTERIA
or SANIWASH
Heavy8.5gal.,84 min.
Medium7.3gal.,78min.
Light6.1gal.,75 min.
Thiscycleraisesthewatertemperatureinthefinalrinseto sanitizeyourdishware.Thecycle
lengthwillvary dependingonthetemperatureofyourinletwaten
NOTE:TheAnti-Bacteriacycleismonitoredforsanitizationrequirements.Ifthecycleis
interruptedduringor afterthemainwashportionorifthe incomingwatertemperatureissolow
that adequatewaterheatingcannotbeachieved,thesanitizingconditionsmaynotbemet.In
thesecases,thesanitizedlightwillnotilluminateattheendofthecycle.
NOTE:NSFcertifiedresidentialdishwashersarenotintendedforlicensedfoodestablishments.
POTS
& PANS
NORMALWASH
Heavg10.9gal.,102min.
Medium8.5gal.,78min.
Light7.3gal.,73 min.
Thiscycleismeantfor heavilysoileddishesorcookwarewithdried-onor baked-onsoils.
Everydaydishesaresafeto beusedinthiscycle.
Heavy8.5gal.,65min.
Medium7.3gal.,60min.
Light4.9gal.,49 min.
Thiscycleisformedium/heavilysoileddishesandglassware.
ge.com
SPEEDCYCLE
or
SPEEDWASH
(onsomemodels)
7.3gal.,35min.
Thiscycleisforeverydaydishesandglassware.
CHINACRYSTAL 7.3gal.,48 min.
(onsomemodels) Thiscycleisforlightlysoiledchinaandcrystal.
RINSEONLY 2.5gal.,12min.
Forrinsingpartialloadsthat willbewashedlater.Donotusedetergentwiththiscycle.
NOTE:OnlytheAnti-Bacteriacyclehasbeendesignedto meetthe requirementsof Section6,NSF184for
soilremovalandsanitizationefficacy.
_ Options
Thelight abovetheselectedpad willbeONto indicatewhichoptionhasbeenselected.
PRESCRUB Forusewithheavilysoiledand/ordried-on,baked-onsoils.ThisoptionMUSTbeselectedPRIORto
(onsomemodels) startingthecycle.Thisoptionadds16minutesto thecycletime.NOTE:Cannotbeselectedwith
RINSEONLYcycle.
HEATEDDRY Shutsoff thedryingheatoption.Dishesairdry naturallyand energyissaved.Forfasterair dry,
LightOFF youcanpropthedooropenaftertheCLEANlightilluminates.
HEATEDDRY Turnstheheateronforfastdrying.Thiswillextendthetotal runtimeby8 minutesfortheSPEED
LightON CYCLE,38minutesfor NORMALandPOTS/PANS,and30minutesforallothercycles.
NOTE:CannotbeselectedwithRINSEONLYcycle.
LOCK
Youcanlockthecontrolstopreventangselectionsfrombeingmade.Oryoucanlockthecontrols
afteryouhavestarteda cycle.
Childrencannotaccidentallystartdishwasherbytouchingpadswiththisoptionselected.
ToLOCKthe dishwashercontrol,touchandholdthe HEATEDDRYpadfor 3seconds.Thelight
belowtheHEATEDDRYpadwillturnon.ToUNLOCKthe dishwashercontrol,touchandholdthe
HEATEDDRYpadfor3 seconds.TheLOCKlightwillturnoff.
ADDED Whenselected,thecyclewillrun longerwiththeheatingelementontoimprovebothwashand
HEAT dry performance.NOTE:Cannotbeselectedwith RINSEONLYcycle.
DELAYHOURS Youcandelaythestartofawashcyclefor upto 9 hours.Touchthe DELAYHOURSpadto choose
thenumberofhoursyouwantto delaythestartofthecycle;thentouchSTART/RESETonetime.
Thedishwasherwillcountdownandstartautomaticallyatthecorrecttime.Touching
START/RESET a secondtime will canceltheDELAYSTARTselection.
RESET Tochangea cycleafterwashingstarts,touchtheSTART/RESETpadto cancelthecycle.The
START/RESETlightwillflashwhilethewaterispumpedoutifneeded.Thistakesapproximately
90 seconds.Whenthelightstopsflashing,thedishwashercanbereprogrammedand restarted.
_t Start
Closeand latchthedishwasherdoorandselectthecycleanddesiredenhancements.TouchtheSTART/RESETpad
onceto beginthecycle.Waterbeginstofillthedishwasher,andapproximately60secondslaterthewashaction
begins.TouchingtheSTART/RESETpada secondtimewillcancelthe cycleandcausethewaterto drainout.Thiswill
takeapproximately2minutes.
NOTE:Thedishwasherremembersyourlastcyclesoyoudon'thaveto reprogrameachtime.Whenthe dishwasher
doorisfullyclosed,thecontrolpanellightswilldisplaythelastsettingsyouselected.
Ifyoudon'twantto changeanyofthesettings,simplytouchtheSTART/RESETpadonceto beginthecycle.
Ifthedoorisclosed,the indicatorlightswillturnoff iftheSTART/RESETpadisnotpressedwithintwo minutes.
Toactivatethedisplay,openandclosethedoorortouchanypad.
Also,if a power failure occurs, NORMALand HEATEDDRYwill automatically be programmed.
About the dishwasher control panel. C ormodelswithoutosensor:EDWSO00Series,
GHDA400 Series, GLD4100 Series, GLD4200 Series, GLD4300 Series, GLD5500 Series, GLD5800 Series and HLD4000 Series)
You can locate your model number on the tub wall just inside the doon Throughout this manual, features and
appearance may vary from your model.
!!
I " k._
e SANITIZ_O
r-_,_?_/ ,_,A " Cycles
It. -J(-S _ ....
WASH NORMAL
-------.... £ C_'A's.JLw,,Hj
n
Control Settings
H Status Indicator Lights
The Status displag tells gou what's happening while the dishwasher is in operation and mag flash,
indicating a malfunction (see page 8).The lights will come ON indicating the sequence
of operation the dishwasher is in.
SANITIZED
(on some
models)
CLEAN
(onsome
models)
Disploged when cycle has met sanitization conditions. Light remains ON until
door is opened.
Displayed when a wash cgcle is complete. The light stags ON as a reminder that
the dishes are clean until the door is opened or until another cgcle is selected.
Q/des
The light above the selected pad will be ON to indicate which c£1clehas been selected.
SANI WASH 7.3 gal., 97 min.
(on some This cgcle raises the water temperature in the final rinse to sanitize gour dishware.
models) The cgcle length will va% depending on the temperature of your inlet water.
NOTE: The SANI-WASH cgcle is monitored for sanitization requirements, If the
cgcle is interrupted during or after the main wash portion or if the incoming water
temperature is so low that adequate water heating cannot be achieved, the
sanitizing conditions mag not be met. In these cases, the sanitized light will not
illuminate at the end of the cgcle,
NOTE: NSF certified residential dishwashers are not intended for licensed food
establishments.
POTS& PANS 8.5 gal., 89 min.
or HEAVY This cgcle is meant for heavily soiled dishes or cookware with dried-on or baked-
WASH on soils. Evergdag dishes are safe to be used in this cgcle.
NORMALWASH 5.9 gal., 56 rain.
This cgcle is for medium/heavily soiled dishes and glassware.
LIGHT WASH 6.1 gal., 36 min.
(on some This cgcle is for everudag dishes and glassware.
models)
CHINA CRYSTAL 6.1 gal., 39 min.
(on some This cgcle is for lightly soiled china and crustal.
models)
m
RINSE ONLY 1.2 gal., 6 min.
For rinsing partial loads that will be washed lateE Do not use detergent with
this cgcle.
NOTE: OnlU the SANI-WASH cgcle has been designed to meet the requirements of Section 6,
NSF 184 for soil removal and sanitization efficacg.
ge.com
_l Options
Thelight above the selected pad will be ON to indicate which OPTIONhas been selected.
HOT START For use with heavily soiled and/or dried-on, baked-on soils.This option MUST be
(on some selected PRIORto starting the cycle. This option will improve both wash and dry
models) performance. This option adds 20 minutes to the cycle time.
NOTE:Cannot be selected with RINSEONLYcycle.
HEATEDDRY Shuts off the drying heat option. Dishes air dry naturally and energy is saved.
Light OFF Forfaster air dry you can prop the door open after the CLEAN light illuminates.
HEATEDDRY Turns the heater on for fast drying. This will extend the total run time by B8 minutes.
Light ON NOTE:Cannot be selected with RINSEONLYcycle.
LOCK
(on some
models)
Youcan lock the controls to prevent any selections from being mode. Or you con lock
the controls after you have started a cycle.
Children cannot accidentally start dishwasher by touching pads with this option
selected.
ToLOCKthedishwashercontrol,touchandholdtheHEATEDDRYpadfor3 seconds.Thelightbelow
theHEATEDDRYpadwillturnon.ToUNLOCKthe dishwashercontrol,touchand holdtheHEATED
DRYpadfor 3seconds.TheLOCKlightwillturnoff.
HOT WASH When selected, the cycle will run longer with the heating element on to improve both
wash and dry performance. NOTE: Cannot be selected with RINSE ONLY cycle.
DELAY HOURS You can delay the start of a wash cycle for 2, 4 or 8 hours {delay time options may
vary by model). Touch the DELAY HOURS pad to choose the number of hours you want
to delay the start of the cycle; then touch START/RESET one time. The dishwasher will
count down and start automatically at the correct time. Touching START/RESETa
second time will cancel the DELAY START selection.
RESET
To change a cycle after washing starts, touch the START/RESETpad to cancel the
cycle. The START/RESETlight will flash while the water is pumped out if needed. This
takes approximately 90 seconds. When the light stops flashing, the dishwasher can be
reprogrammed and restarted.
Start
Close and latch the dishwasher door and select the cycle and desired enhancements. Touch the
START/RESETpad once to begin the cycle. Water begins to fill the dishwasher, and approximately 60
seconds later the wash action begins. Touching the START/RESETpad a second time will cancel the
cycle and cause the water to drain out. This will take approximately 2 minutes.
NOTE:The dishwasher remembers your last cycle so you don't have to reprogram each time. When
the dishwasher door is fully closed, the control panel lights will display the last settings you selected.
If you don't want to change any of the settings, simply touch the START/RESETpad once to begin
the cycle.
If the door is closed, the indicator lights will turn off if the START/RESETpad is not pressed within two
minutes. To activate the display, open and close the door or touch any pad.
Also, if a power failure occurs, NORMAL and HEATEDDRYwill automatically be programmed.
Using the dishwasher.
Check the Water Temperature
The entering water should be at least 120°F and water faucet nearest the dishwasher, place the
not more than 150°F_for effective cleaning and to thermometer in a glass and let the water run
prevent dish damage. Check the water temperature continuously into the glass until the temperature
with a candg or meat thermometer Tum on the hot stops rising.
®or Cascade Clear®Rinse
Jet-Dry ®or Cascade Crystal Clear _°_rinse agents remove spots and prevent new film buildup on
your dishes, glasses, flatware, cookware and plastic.
Filling the Dispenser
The rinse agent dispenser holds 3.5 oz. of rinse agent. Under normal
conditions, this will last approximately one month. Refill when rinse agent
is not visible in the indicator. Do not overfill.
i-1"1Hake sure the dishwasher door is fully open.
r-Ti Turn the dispenser cap to the left and lift it out.
E_] Add rinse agent until the indicator window looks full. Do not overfill.
rz_-iClean up ang spilled rinse agent with a damp cloth to prevent foam.
[_] Replace the dispenser cap.
Indicator
_ D__pt!!g dial
Dispenser cap
Rinse Aid Setting
The amount of rinse agent released into the final wash can be
adjusted. The factorg setting is at the midpoint. If there are rings of
calcium (hard water) spots on dishes, try a higher setting. If you
observe foam in the final rinse, try a lower setting.
To adjust the setting
Remove the dispenser cap, then turn the adjustable setting dial
counterclockwise to increase the amount of rinse agent or clockwise
to reduce the amount of rinse agent dispensed.
Dish Preparation Prior to Loading
No pre-rinsing of normal food soil is required,
Scrape off hard soils,including bones,
toothpicks, skins and seeds.
Remove large quantities of any remaining
food.
Remove leafy vegetables, meat trimmings
and excessive amounts of grease or oil,
Remove acidic food soils that can discolor
stainless steel.
Using the dishwasher, gecom
Proper Use of Detergent
Use onlUdetergent specificall Umade for use
in dishwashers. Cascade_and ElectrasoP
Automatic Dishwashing Detergents have been
approved for use in all GEdishwashers. Keep
gour detergent fresh and drg. Don't put powder
detergent into the dispenser until gou're readg
to wash dishes.
The amount of detergent to use depends on
whether gour water is hard or soft. With hard
water, you need extra detergent. With soft water,
you need less detergent.
Open f/
cup_
/-
(on some models)
For heovilg-soiled loads, use the Pots and Pans or
Hearst Wash cgcle and odd o little extra detergent.
Protect your dishes and dishwasher by
contacting your water department and asking
how hard your water is.Twelve or more grains
is extremely hard water. A water softener is
recommended. Without it, lime can build up
in the water valve, which could stick while open
and cause flooding. Too much detergent with
soft water can cause a permanent cloudiness
of glassware, called etching.
Use the information in the table below as a
guideline to determine the amount of automatic
dishwasher detergent to place in the dispenser.
Number
of Groins Detergent Cups to Fill
Lessthan 4 15 cup orfill cup to first line
4 to 8 25 cup orfill cup to second line
8 to 12 15and 25 cupsorfill mainwash cup
Greater 15,25 cups and the open cup or fill
than 12 both Main Wash and PreWash cup
DO NOT USE HAND DISH DETERGENT
m
m
NOTE:Usinga detergent that is not specificall_l
designedfordishwashers will causethe dishwasher
to fill with suds.Duringoperation, these sudswill spill
out of thedishwasher vents,coveringthe kitchen
floor and making the floor wet.
Becauseso mang detergent containers lookalike,
store the dishwasher detergent in a separate space
from all other cleaners.Showangone who may use
the dishwasherthe correct detergent and where
it isstored.
Whilethere will be nolasting damage to the
dishwasher,your disheswill not get clean using a
dishwashing detergent that is notformulated to
work with dishwashers.
(on some models)
Medium Medium Extremelg
Soft Soft Hard Hard
(on some models)
Forget to Add o Dish?
A forgotten dish can be added ang time before
the main wash.
FT1 Squeeze the door latch to release the door.
r'_Do not open the door until the water sprag
action stops. Steam may rise out of the
dishwasher.
r_ Add forgotten dishes.
[] Close the door.
Loading the dishwasher racks.
For best dishwashing results, follow these loading guidelines. Features and appearance of racks and silverware
baskets mag varg from gout model.
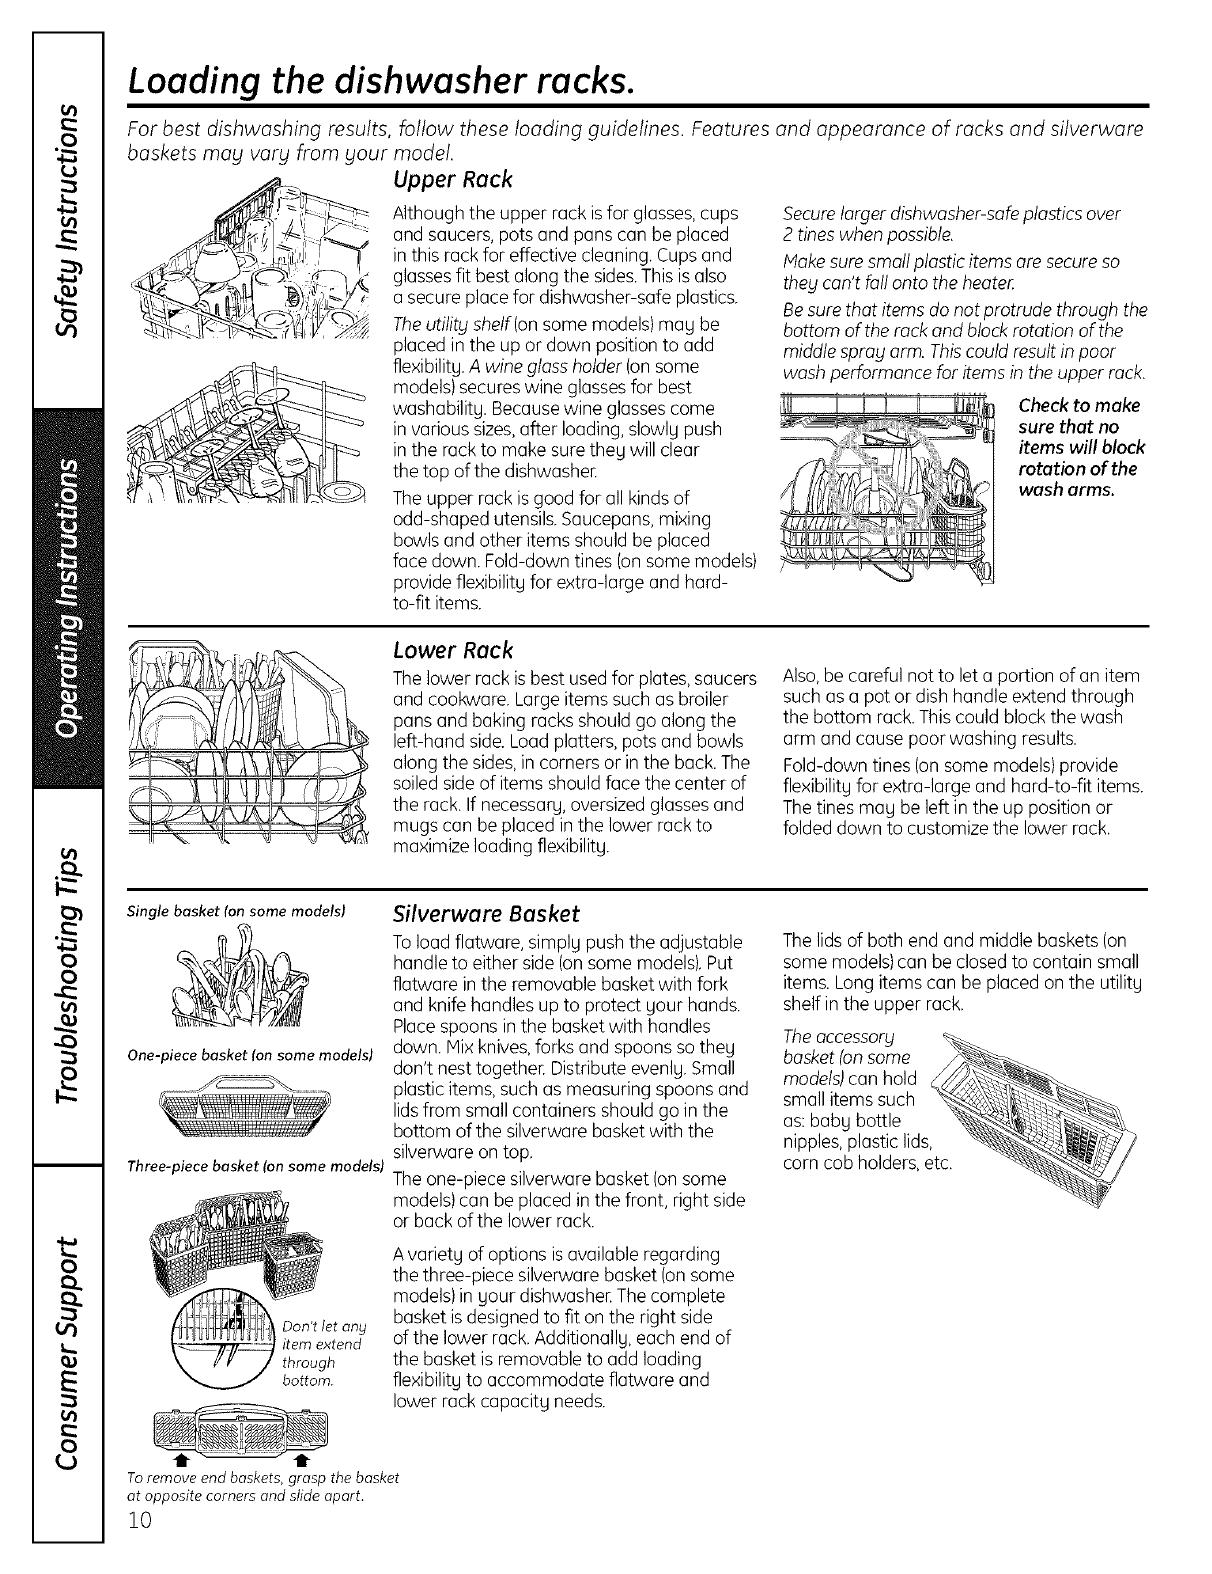
Upper Rack
Although the upper rack isfor glasses,cups
and saucers,pots and pans can be placed
in this rack for effective cleaning.Cupsand
glassesfit best along the sides.Thisis also
a secureplace for dishwasher-safe plastics.
Theutility shelf(on some models)may be
placed in the upor down position to add
flexibility.A wine glossholder (onsome
models)secureswine glossesfor best
washabilitu. Becausewine glassescome
in various sizes,after loading,slowlu push
in the rackto make surethey will clear
the top of the dishwashen
Theupper rack isgood for all kindsof
odd-shaped utensils.Saucepans,mixing
bowls and other items should beplaced
face down. Fold-down tines (onsome models)
provide flexibility for extra-large and hard-
to-fit items.
Securelarger dishwasher-safeplastics over
2 tineswhen possible.
Hake suresmallplastic items ore secureso
theg can't fallonto the heoten
Besurethat items do not protrude through the
bottom of therack and block rotation of the
middle sprogarm. Thiscould result inpoor
wash performance for itemsin theupper rock.
Checkto make
sure that no
items will block
rotation of the
wash arms.
Lower Rack
Thelower rack isbest usedfor plates,saucers
and cookware. Largeitems such as broiler
puns and baking racks shouldgo along the
left-hand side.Loud platters, potsand bowls
along the sides,in corners or in the back.The
soiledsideof items shouldface the center of
the rack. If necessary,oversizedglassesand
mugs can be placed inthe lower rack to
maximize loading flexibilitg.
Also,be careful not to let a portion of an item
such as apot or dish handle extend through
the bottom rack.Thiscould block the wash
arm and cause poor washing results.
Fold-down tines (onsome models)provide
flexibilitgfor extra-large and hard-to-fit items.
Thetines mag beleft in the up position or
folded down to customize the lower rack.
Single basket Ion some models)
One-piece basket Ion some models)
Three-piece basket ton some models)
Silverware Basket
Toload flatware, simply push the adjustable
handle to either side(on some models).Put
flatware in the removablebasket with fork
and knife handles upto protect your hands.
Placespoons inthe basket with handles
down. Mix knives,forks and spoons sothey
don't nest togethe_ Distribute evenly.Small
plastic items, suchas measuring spoons and
lidsfrom small containers should go in the
bottom ofthe silverware basketwith the
silverware on top.
Theone-piece silverwarebasket (onsome
models)can be placed in the front, right side
or back of the lower rack.
Don't let ang
item extend
through
bottom.
Avariety of options isavailable regarding
the three-piece silverware basket(on some
models)in your dishwashenThecomplete
basket isdesignedto fit on the right side
of the lower rack.Additionally, each end of
the basket is removable to add loading
flexibility to accommodate flatware and
lower rack capacity needs.
To remove end baskets, grasp the basket
at opposite corners and slide apart.
10
Thelidsof both end and middle baskets (on
some models)can be closedto contain small
items. Longitems can be placed on the utility
shelf inthe upper rack.
The accessory!
basket(onsome
models)can hold
small itemssuch
as: baby bottle
nipples,plastic lids,
corn cob holders, etc.
Loading place settings.., ge.com
Follow these guidelines for loading 10 place settings. Features and appearance of racks and silverware baskets
mag varg from gour model.
Upper Rack--lO place settings Lower Rack--lO place settings Lower Rack--lO place settings
Follow these guidelines for loading 12 place settings. Features and appearance of racks and silverware baskets
mag vorg from gour model.
Upper Rack--12 place settings Lower Rack--12 place settings
Optional
accessories.
You can change the appearance of gour
dishwasher bg adding a custom panel trim kit.
Wood panel trim kit--This accessorg contains
trim and instructions for gou to supplg and install
a 1/4" thick decorative wood door:
GPF525B (Black)
GPF525W (White)
GPF525C (Bisque)
Trimless wood panel kit--This accessorg
contains parts and instructions for gou to supplg
and install a 3/4" thick decorative wood door:
GPF575
Non-wood countertop bracket kit--This is for
installations which have non-wood countertops
and includes side-mounting brackets and
instructions for securing the dishwasher.
GPF65
These accessories are available at extra cost from
GE. Coil 800.626.2002 to order. Visa, Hastercord
or Discover cords ore accepted.
Specif_] accessoq] number when ordering.
ll
Caring for the dishwasher.
Cleaning the Door Panel
Before cleaning the front panel, make sure
gou know what tgpe of panel gou have.
Refer to the last two letters of gour model
number. You can locate gour model
number on the left-hand tub wall just
inside the door. If gour model number ends
with BB,WW, CC,SAor BG,then gou have
a Painted Door panel. If gour model
number ends with SS,then gou have a
Stainless Steel Door panel. If gour model
number ends with CS,then gou have a
CleanSteel Door panel.
Follow the instructions below for cleaning
the door panel for gour specific model.
Painted Door Panel (model numbers
ending in BB-black, WW-white, CC-bisque,
SA-silver metallic or BG-graphite metallic)
Use a clean, soft, lightlg dampened cloth,
then drg thoroughlg. You mag also use a
good appliance wax or polish.
Stainless Steel Door Panel (model
numbers ending in SS)
The stainless steel panels can be cleaned
with Stainless Steel Hogic or a similar
product using a clean, soft cloth. Do not
use appliance wax, polish, bleach or
products containing chlorine on Stainless
Steel doors.
You can order Stainless Steel Hagic
#WXIOX1S through GEParts bg calling
800.626.2002.
CleanSteel Door Panel (model numbers
ending in CS)
Use a clean, soft, lightlg dampened cloth,
then drg thoroughlg. Do not useappliance
wax, polish or ang chemical agent on
CleanSteel doors.
Do not wipe the dishwasher with a soiled
dish cloth or wet towel. Thesemay leave
a residue. Do not use scouring pads or
powdered cleaners because these
products can scratch the finish.
Cleaning the Control Panel
To clean the control panel, use a lightly
dampened cloth. Then drg thoroughlg.
Protect Against Freezing
If gour dishwasher is left in an unheated
place during the winter, ask a service
technician to:
[3_] Cut off electrical power to the
dishwasher. Remove fuses or trip
circuit breaker.
m Turn off the water supplg and
disconnect the water inlet line from
the water valve.
['_1 Drain water from the water inlet line
and water valve. (Use a pan to catch
the water.)
E] Reconnect the water inlet line to the
water valve.
Airgap
Checkthe airgap ang time
Does Your Dishwasher Have an Air Gap?
An air gap protects gour dishwasher
against water backing up into it if a drain
clogs. The air gap is not a part of the
dishwasher. It is not covered bg gour
warrantg. Not all plumbing codes require
air gaps, so gou mag not have one.
The air gap is easy to clean.
[] Turn off the dishwasher and lift off the
cover
r-_l Remove the plastic cap and dean with
a toothpick.
_!ourdishwasher isn't draining
well.
12
Before you call for service.., gecom
_,_ roubleshooting Tips
Save time and money! Review the charts on the following
pages, or visit ge.com. You may not need to call for service.
Error Messages Possible Causes What To Do
START/RESETstatus Youhove pressedthe PresstheSTART/RESETpadonlgwhengouwantto restartthe
indicator light flashing START/RESETpod while the dishwasher.
dishwasher is running. This will
cancel the cgcle.Thelight will stop
flashing after the dishwasherdrains
(about 90 seconds).
This iso reminder that gour Closeand latchthedoorafteropeningitmid-cgcle.
dishwasher door hasbeen left
open during operation. It will
continue beeping until gouclose
the door.
Dishwasher BEEPS
onceevery 30seconds
Problem Possible Causes What To Do
Dishesandflatware Lowinletwater temperature * Hakesureinletwatertemperatureiscorrect(seepage8).Turnon
notclean thehotwaterfaucetnearestthedishwasher,letrununtilthewater
temperaturestopsrising.Thenstartthedishwasherandturnoff
thefaucet.Thisinsurestheenteringwaterishot.
Water pressureistemporarilg low * Turnon afaucet.IswatercomingoutmoreslowlUthan usual?
Ifso,waituntilpressureisnormalbeforeusinggourdishwasher
Airgap or disposerisclogged Cleantheairgap orflushthedisposer.
Improperrackloading Hakesurelargedishwaredoesnotblockthedetergentdispenser
orthewasharms.Seethe Loadingthedishwasherrackssection.
Noair gapor highdrain loop Verifgthat gouhaveanair gapora highdrainloop.Referto
theInstallationInstructions.
Spotsandfilming
onglassesand
flatware
Extremelghardwater
Lowinletwater temperature
Overloadingthedishwasher
Improperloading
Oldor damppowderdetergent
Rinseagentdispenseremptg
Toolittle detergent
UseJet-Dry®orCascadeCrystalCleaPrinseagentstoremovespotsand
preventnewfilm buildup.
Toremovestubbornspotsand pre-existingfilmfrom glassware:
1 Removeall metalutensilsfromthedishwasher
2 Donotadddetergent.
3 SelectthePOTS&PANSor HEAVYWASHcgcle.
4 Startthedishwasherandallowtorunfor 18to 22minutes.Dishwasher
willnowbeinthemainwash.
5 Openthedoorandpour2cups(500ml)ofwhitevinegarintothe
bottomofthedishwasher.
6 Closethedoorandallowto completethecgcle.Ifvinegarrinsedoesn't
work:Repeatasabove,exceptuse1/4cup(60ml)ofcitricacidcrgstals
insteadofvinegar.
Cloudinesson Combinationofsoftwater and Thisiscalledetchingandispermanent.Topreventthisfrom happening,
glassware too muchdetergent uselessdetergentif gouhavesoftwater.Washglasswareintheshortest
cgclethatwillgetthemclean.
Water temperatureentering Thiscouldbeetching.Lowerthewaterheatertemperature.
the dishwasherexceeds150°F
Sudsin thetub Correctdetergent Useonlgautomaticdishwasherdetergentstoavoidsudsing.
wasn'tused Cascade®andElectrasoPAutomaticDishwashingDetergents
___ havebeenapprovedforuseinallGEdishwashers.
Toremovesudsfromthetub,openthedishwasherandlet
sudsdissipate.CloseandlatchthedishwashenPumpoutwater
bgtouchingtheSTART/RESETpadonce;then30secondslater,
touchtheSTART/RESETpadagain.Repeatifnecessarg.
Rinseagentwasspilled Alwagswipeuprinseagentspillsimmediatelg. 15
Beforegou callfor service...
Problem Possible Causes What To Do
Detergent left in
dispensercups
Blackor gray
marksondishes
Dishesdon'tdry
Dishesare blocking the
detergent cup
Aluminumutensilshave
rubbedagainstdishes
Lowinletwater temperature
Repositionthedishes,sothe water from the lowersprag armcan
flush the detergentcup. Seethe Loadingthedishwashersection.
Removemarkswitha mild,abrasivecleaner.
Hakesureinletwatertemperatureisat least120oR
SelectHEATEDDRY.
UseHOTSTART,HOTWASHorADDEDHEAToptions.
Selecta highercgcle,suchasANTI-BACTERIA,SANIWASH,POTS&PANS
or HEAWWASH.
Rinseagentdispenserisemptg
ControlpanelrespondedDoorlatchmagnot beproperlg
toinputsbutdishwasher seated
neverfilledwith water
Stained tub interior
Dishwasherwon't run
Checktherinseagentdispenserandfillasrequired.
Makesurethedoorisfirmlgclosed.
Water valvemagbeturnedoff
Sometomato-basedfoodscan
causereddishstains
Tea or coffee stains
Anoverallgelloworbrownfilmcan
becausedbgirondepositsinwater
White filmoninsidesurface-
hardwater minerals
Fuseisblownor circuitbreaker
istripped
Hakesurewatervalve(usuallglocatedunderthesink)isturnedon.
UseoftheRINSEONLYcgcleafteraddingthedishtothe load
candecreasethelevelofstaining.GErecommendsCascade®
PlasticBoasterto helpremovethesetapesofstains.
Removethestainbghand,usinga solutionof 1/2cupbleach
and3 cupswarmwaten
WARNING
Beforecleaninginterior,waitat least20minutesaftera cgclefor the
heatinqelementstocooldown.Failureto dosocanresultin burns.
Aspecialflter inthewatersupplglineisthe onlgwagto correct
this problem.Contacta watersoftenercompang.
GErecommends Jet-Dry ®or Cascade Crystal Clear_to help
prevent hard water mineraldeposits fromforming.
Rundishwasherwith citricacidto removemineraldeposits.Citricacid
(Partnumber:WD3SX151)canbeorderedthroughGEParts.Seeback
coverfororderinginformation.
Replacefuseorresetcircuitbreaker.Removeangotherappliancesfrom
the circuit.
Poweristurned off
Insomeinstallations,thepowertothedishwasherisprovidedthrougha
wallswitch,oftenlocatednextto thedisposerswitch.Hakesureitison.
Controlpanelislocked Unlockcontrolpanel.Seepage5or 7.
Control panel lights
go off when you're
setting controls
Water standing in
the bottom of the tub
Water won't pump
out of the tub
Steam
Sanitized light does
not illuminate at the
end of the cgde
(Anti-Bacteria
cycleonly)
Noise
Reboot gour control
Time too long between
touching of selected pads
Turnoff powertothedishwasher(circuitbreakerorwallswitch)for
30seconds;thenturn backon.
Eachpad must betouched within 30 secondsof the others.
Torelight,touch ang pad again,or unlockand relatchdoor.
This isnormal
Drainisclogged
Thisisnormal
Thedoorwasopenedand the
cgclewasinterrupted during
or afterthe mainwashportion
Theincomingwater
temperaturewastoo low
Normal operating sounds
Asmall amountof cleanwater aroundthe outlet onthe tub
bottom at the backof thetub keepsthe water seallubricated.
Ifgouhaveanair gap,cleanit.Seepage12.
Ifthedishwasherdrainsintoadisposer,rundisposerclear.
Checktoseeifgourkitchensinkisdrainingwell.If not,gou
magneeda plumben
Warm,moistaircomesthroughtheventbgthedoorlatchduringdrging
andwhenwaterisbeingpumpedout.Thisisnecessargfordrging.
Donotinterruptthecgcleangtimeduringoraftermainwash.
Raisethe water heater temperature to between 120% and 140°R
Detergentcupopening.
Waterenteringdishwasher.
Themotor stopsand startsat varioustimesduring thecgcle.
Drainpumpsoundsdurinqthe pumpout.
Hakesuredishesare properlgloaded.Seethe Loadingthe
dishwasherrackssection.
Rattling disheswhen the sprag
14 arm rotates
GEDishwasher Warrants.
All warranty serviceprovidedby our FactoryServiceCenters,
oran authorized CustomerCare_ technician.Toschedule
service,on-line,24hours a day,visitus atgo.cam,or call
800.GE.CARES(800.432.2737).Pleasehaveserial number
and model number availablewhen coilingfor service.
Staple your receipt here.
Proof of the original purchase
date is needed to obtain service
under the warranty.
For The Period Of: GE Will Replace:
One Year Any part of the dishwasher which fails due to a defect in materials or workmanship. During this
From the dote of the limited one-year warranty, GEwill also provide, free of charge, all labor and related service to
original purchase replace the defective part.
What GE Will Not Cover:
Service trips to gour home to teach gou how to use
the product.
Improper installation, deliverg or maintenance.
Failure of the product if it is abused, misused, or used for
other than the intended purpose or used commerciallg.
Replacement of house fuses or resetting of circuit
breakers.
Damage to the product caused bg accident, fire, floods
or acts of God.
Incidental or consequential damage caused bg possible
defects with this appliance.
Cleaning or servicing of the air gap device in the
drain line.
Damage caused after deliverg.
Product not accessible to provide required service.
EXCLUSION OF IMPLIED WARRANTIES--Your sole and exclusive remedy is product repair as provided in this Limited
Warranty. Any implied warranties, including the implied warranties of merchantability or fitness for a particular
purpose, are limited to one year or the shortest period allowed by law.
I
This warrantF is extended to the original purchaser and any succeeding owner for products purchased for
home use within the USA. Ifthe product is located in an area where service by a GE Authorized Servicer is not
available, you may be responsible for a trip charge or you may be required to bring the product to an Authorized GE
Service location for service. Proof of original purchase date is needed to obtain service under the warranty. In
Alaska, the warranty excludes the cost of shipping or service calls to your home.
Some states do not allow the exclusion or limitation of incidenta! or consequential damages. This warranty
gives you specific legal rights, and you may also have other rights which vary from state to state. To know
what your legal rights are, consult your local or state consumer affairs office or your state's Attorney General.
Warrantor: General Electric Compang. Louisville, KY 40225
15
Consumer Support.
GEAppliances Website ge.com
Have a question or need assistancewith uour appliance?Tru the GEAppliances Website 24 hours a dau,
anu dau ofthe uead Forgreater convenience and faster service,UOUcan now download Owner's Manuals,
order parts,catalogs, or evenschedule serviceon-line. Youcan also "AskOurTeam of Experts""uour questions,
and so much more...
ScheduleService go.corn
ExpertGErepairserviceisonluone step awaufrom uour door Geton-line and scheduleuourserviceat
uour convenience24hoursanu dag ofthe uear!Or call800.GECARES(800.43Z2737)duringnormal businesshours.
RealLifeDesignStudio go.cam
GEsupports the UniversalDesignconcept-products, services andenvironments that can be usedbu
people of all ages,sizesand capabilities.We recognizethe need to design for a wide range of phusical and
mental abilities and impairments. Fordetails of GE'sUniversalDesignapplications, including kitchen designideas
for peoplewith disabilities,check out our Website todau. Forthe hearing impaired, pleasecall 800.TDD.GEAC
(800.833.4322).
ExtendedWarranties
Purchasea GEextended warrantu and learn about special discountsthat are available while uour warrantu
isstill ineffect. You can purchase it on-line anutime, or call800.626.2224during normal businesshours.
GEConsumer Home Serviceswill still be there after uour warrantu expires.
ge.com
Parts and Accessories go.corn
Individuals qualifiedto servicetheir own appliances can haveparts or accessoriessent directlg to their homes
(VISA,MasterCardand Discovercards are accepted).Order on-linetodag, 24 hours everg dagor bg phone at
800.626.2002during normal businesshours.
Instructions contoined in this menuo! cover procedures to be performed by any user. Other servicing
generally should be referred to quelified service personnel. Caution must be exercised, since improper
servicing mey cause unsefe operation.
Contact Us
If gou are not satisfied with the service you receive from GE,contact us on our Website with all the details
including gour phone number, or write to: General Manager, Customer Relations
GEAppliances, Appliance Park
Louisville, KY40225
ge.com
Register YourAppliance
Register sour new appliance on-line--at sour convenience! Timelg product registration will allow for
enhanced communication and prompt service under the terms of gourwarrantg, should the need arise.
Youmug also mail in the pre-pfinted registration card included in the packing material, or detach and
usethe form in this Owner's Manual.
ge.com
_ Printed in the United States
_ Printed on Recycled Paper
  • Page 1 1
  • Page 2 2
  • Page 3 3
  • Page 4 4
  • Page 5 5
  • Page 6 6
  • Page 7 7
  • Page 8 8
  • Page 9 9
  • Page 10 10
  • Page 11 11
  • Page 12 12
  • Page 13 13
  • Page 14 14
  • Page 15 15
  • Page 16 16

GE EDW5100N00BB Owner's manual

Category
Dishwashers
Type
Owner's manual

Ask a question and I''ll find the answer in the document

Finding information in a document is now easier with AI