Page is loading ...

English
Portable CD Cassette Boom Box
with USB& SD card slot
U ER MANUALS
MODEL :SL1010
CD/USB/CARD
INTRO
MODE
MODE
DIR-
DIR+
PROG.

1
2
Thank you for choosing the Box from AmpliVox
Portable Sound Systems.
We are excited in introducing this truly unique system. Our system combines
flexibility with functionality. Please refer to this user guide as you enjoy the unique
capabilities of another quality product from AmpliVox Portable Sound Systems.
We encourage you to visit our website www.ampli.com to register your product for
its warranty coverage, sign up to receive our newsletter, download our catalog, and
learn more about the complete line of AmpliVox audio visual products, including
portable PA systems, and lecterns.
IMPORTANT SAFETY INSTRUCTIONS
Before using this product, read the instruction manual for important safety
information. Please retain this manual for future reference and warranty information.
Troubleshooting & Servicing
Do not attempt to service or repair the device yourself. Refer all servicing to qualified
service personnel. Do not attempt to modify the device in anyway. Doing so could
invalidate your warranty.
Moisture and heat sources
Do not use this apparatus near water (for example, sinks, baths, pools) or expose it to
rain, moisture, dripping or splashing liquids. Do not expose the unit to high
temperatures, high humidity or direct sunlight.
Cleaning
When cleaning the device, please use a soft, dry cloth. Never use benzene, paint-
thinner, or other chemicals on the device.
Location
Place the device in stable location, so it will not fall causing damage to the device or
bodily harm.
SL1010 Portable CD Cassette Boom
Intended use
The product may only be used with the original parts intended for it. The intended use
includes adherence to the specified installation instructions. The manufacturer accepts
no liability for damage arising due to improper use.
WARNING: Changes or modifications to this unit not expressly approved by the party
responsible for compliance could void the user’s authority to operate the equipment.
IMPORTANT
This device complies with Part 15 of the FCC Rules. Operation is subject to the
following two conditions:
(1) This device may not cause harmful interference, and (2) this device must accept
any interference received, including interference that may cause undesired operation.
The unit’s circuitry may cause interference to nearby radios. To prevent interference,
either switch the unit off or move away from the affected radio.
NOTE: This equipment has been tested and found to comply within the limits for a
class B digital device, pursuant to Part 15 of the FCC Rules. These limits are designed
to provide reasonable protection against harmful interference in a residential
installation. This equipment generates, uses and can radiate radio frequency energy
and, if not installed and used in accordance with the instructions, may cause harmful
interference to radio communications. However, there is no guarantee that
interference will not occur in a particular installation. If this equipment does cause
harmful interference to radio or television reception, which can be determined by
turning the equipment off and on, the user is encouraged to try to correct the
interference by one or more of the following measures:
• Reorient or relocate the receiving antenna.
• Increase the separation between the equipment and receiver.
• Connect the equipment into an outlet on a circuit different from that to which the
receiver is connected.
• Consult the dealer or an experienced radio / TV technician for help.
NOTE: Shielded cables may be required to be used with this unit to ensure compliance
with the Class B FCC limits.

3
4
CAUTION: DO NOT scrape the head surface with hard, sharp or abrasive objects.
This will permanently damage the heads.
4. Clean the pinch roller by scrubbing the surface of the roller with the moistened
swab. Rotate the roller by hand until the entire surface is clean.
5. Clean external case surfaces with a moist, soft cloth. Use only a mild detergent
water solution.
HEAD DEMAGNETIZATION
It is recommended that the tape heads be demagnetized after 20 to 30 hours. This
eliminates residual magnetism which degrades sound reproduction. Be sure that the
unit is turned off while you demagnetize.
1. After cleaning the heads and capstan, place the demagnetizer several feet away
from the cassette unit and plug it into an AC outlet.
2. Follow the manufacturer’s operating instructions supplied with the demagnetizer.
MAINTENANCE
SPECIFICATIONS
Power Supply: AC: 110V / 60 Hz DC: 12V "C" Batteries (8) NOT INCLUDED
Output Power: 1.2W + 1.2W
Speakers: Full Range, cone type, 3" Stereo (2), 4 ohm
Radio: FM: 76 - 108 MHZ AM: 530 - 1600 Khz
Antenna: FM: Telescopic AM: Built-in
Inputs: Headphone: 3.5 mm (1/8") Aux: 3.5mm (1/8")
Dimensions: 11" W x 5 3/4" H x 9 1/2" D
Weight: 5.9 lb.
HANDLING CASSETTE TAPES
• If the tape is loose in its cassette, take up the slack by inserting a pencil in one of the
reels and rotating. If the tape is loose it may get stretched, cut, or caught in the
cassette.
• Do not touch the tape surface.
• To prevent recording from being erased accidentally, remove the tab(s) A and B.
• To record after the tabs have been broken off reseal the slots A and B with a piece of
adhesive tape.
CASSETTE DECK MAINTENANCE
The heads, capstan and pinch roller should be cleaned from time to time to prevent
buildup of tape oxide, which degrades performance. We recommend cleaning after
every 20-30 hours of operation.
1. Press the Stop/Eject key to open the deck door.
2. Remove cassette tape before cleaning.
3. Clean the head of all visible, reddish-brown oxide with a cotton-tipped swab
moistened with a methyl alcohol or any solution specifically manufactured for this
purpose.

AC~ IN
AUX IN
MIC
FM ST.
POWER
PORTAB LE CD/M P3 RADI O CASSE TTE PLAYE R
PUSH
CLOSE
FM ST.
POWER
CD/USB/CARD
MODE
PORTA BLE CD/ MP3 RAD IO CASS ETTE PL AYER
SL 10 10
5
6
OPERATION
AC OPERATION
Before operation please be sure that the voltage on the power adapter corresponds to
the AC voltage of your local area. Unravel the AC Line Cord, insert one end into the
DC INPUT JACK (32) on the back of the unit and the other end into a standard AC
outlet
BATTERY OPERATION
IMPORTANT: Disconnect the power adapter from the AC outlet.
Open the BATTERY COMPARTMENT DOOR (31), located on bottom of unit, and
insert eight "C" (not included) batteries, making sure that the indicated battery
polarity is observed.
RADIO OPERATION
1.Set the FUNCTION SWITCH (29) to the RADIO position.
2.Select AM/FM Band by sliding BAND BUTTON (26) to the desired position.
3.Select desired Radio Station using the TUNING DIAL (25). For FM, extend the FM
ANTENNA (1) for better signal strength. If a stereo channel, the STEREO
INDICATOR (14) will light.
4.Adjust VOLUME using the VOLUME DIAL (30).
CASSETTE OPERATION
PLAY:
1.Set the FUNCTION SWITCH (29) to the TAPE position.
2.Press STOP/OPEN BUTTON (18) which opens the cassette door. Insert tape and
push close the door.
3.Press PLAY BUTTON (21) to start playing tape. Adjust volume using the
VOLUME KNOB (30).
4.To pause tape, press PAUSE BUTTON (17). To continue playing, press PAUSE
BUTTON (17) again.
5.To FAST FORWARD press button (19) or to BACK-UP press button (20).
6.Tape will automatically stop when reaching the end or press the STOP BUTTON
(18).
RECORDING:
From CD/Radio
1.Place a blank tape into cassette door.
2.Set the FUNCTION SWITCH (29) to position CD/MP3/USB/CARD/RADIO.
3.Insert CD into disc player or turn on radio to the desired program you wish to record.
4.To start recording from the CD/Radio, press PLAY BUTTON (21) and REC
BUTTON (22) at the same time. Press the STOP BUTTON (18) to stop the recording.
Voice
1.Place a blank tape into cassette door.
2.To start recording press PLAY BUTTON (21) and REC BUTTON (22) at the same
time. Speak toward MICROPHONE (23) on front of Boombox. Press the STOP
BUTTON (18) to stop the recording.
6
12
9
15
10
11
13
14
25
26
27
28
29
30
31
17
22
16
18
19
20
21
23
24
32
7
8
1
2
3
4
5
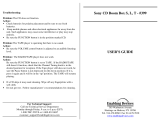
MODE
CD/USB/CARD
INTRO
MODE
DIR- DIR+
PROG.
Intro USB/CD/CARD
Switch Button
Number Button
10+ Button
10- Button
Play/Pause Button
Previous /Rew Button
Next / F.F Button
Stop Button
Mode Button
DIR+ DIR-
Program Button
CONTROLS
1. FM Antenna
2. Handle
3. USB Port
4. SD / MMC Port
5. Play / Pause Button
6. Stop / Forward Button
7. Skip / Forward Button
8. CD Open / Close Door
9. Function Button
10. Repeat Button
11. Previous / Backward Button
12. LCD Display Panel
13. Power LED
14. Stereo Indicator
15. Left Speaker
16. Cassette Close Door
17. Cassette Pause Button
18. Cassette Stop/Open Button
19. Cassette Forward Button
20. Cassette Backward Button
21. Cassette Play Button
22. Cassette Record Button
23. Built-in Microphone
24. Right Speaker
25. Tuning Dial
26. Band Switch
27. Aux In Jack
28. Earphone Jack
29. Function Select Switch
30. Volume Adjust Dial
31. Battery Door
32. DC Connection

CD/MP3/USB/SD CARD OPERATION
1.Set the FUNCTION SWITCH (29) to the CD/MP3/USB/CARD position.
2.Press SELECTION BUTTON (9) to select the function that you want to use,
CD / MP3 / USB / SD CARD.
CD / MP3 (DISC)
1.Open CD DOOR (8) by pressing on corner marked "PUSH".
2.Insert CD and close door. Several seconds later the CD will start to play.
3.To stop CD, press STOP BUTTON (6), to advance to next song press
S K I P / F O R W A R D B U T T O N ( 7 ) , t o s e l e c t p r e v i o u s s o n g p r e s s
PREVIOUS/BACKWARD BUTTON (11), to pause or to start play again press
PLAY/PAUSE BUTTON (5).
4.During playback of song, if you wish to repeat, press the MODE BUTTON (10) one
time. You will see the repeat symbol appear in the LCD window. If you want to repeat
the entire disc, press MODE BUTTON twice. To random play all songs press MODE
BUTTON three times. To cancel, press four times.
USB / SD CARD
1.Insert a USB -THUMBDRIVE (3) or a SD CARD (4) into the appropriate slot on top
of unit.
2.Press SELECTION BUTTON (9) to select the function that you want to use,
USB / SD CARD.
3.Use same buttons to play as the CD.
AUX INPUT
1.You can connect any sound source to the Boombox using the appropriate cord for
your device. One end must have a 3.5mm plug on one end that plugs into the AUX IN
JACK (27).
2.Set the FUNCTION SWITCH (29) to the RADIO/AUX position.
3.Boombox speakers will now output all sounds from your Audio Device connected to
the AUX IN. Only VOLUME DIAL on Boombox works in this mode.
HEADPHONES / EARPHONES
1.Plug in your headphones or earphones into the 3.5mm JACK (28) located on
backside of Boombox. Speakers will be automatically turned off.
REMOTE CONTROL
REMOTE CONTROL CAN ONLY BE USED FOR CD/MP3/USB/SD CARD
OPERATION
The REMOTE CONTROL can be use to program random song selections for CD's and
MP3 CD's.
Press PROGRAM BUTTON on the remote control. LCD display on Boombox will be
flashing. You can program max. 20 songs on CD and 99 songs on MP3 CD. Use the
numeric keypad to enter the number of the song to be played. After each number
entered press PROGRAM BUTTON to save. After you are done programming, press
PLAY BUTTON.
UNIQUE FUNCTIONS
INTRO: Press INTRO BUTTON first, then press PLAY/PAUSE BUTTON, the player
will play the beginning of each song in order for about 10 seconds.
DIRECT PLAY: Press the number of the song you wish to play.
7
8

WARRANTY
Limited One (1) -Year Warranty
AmpliVox warrants this product to be free from defects in materials and workmanship
(subject to the terms set forth below) for a period of one (1) years from the date of
purchase (“Warranty Period”).
During the Warranty Period, AmpliVox will repair or replace (at AmpliVox’s
discretion) this product or any defective parts (“Warranty Service”).
Repair or replacement under the terms of this warranty does not give right to any
extension or a new beginning of the period of warranty.
CLAIMS UNDER THE WARRANTY
To obtain Warranty Service, contact AmpliVox (800-267-5486) to be assigned a
Return Authorization number (RA#). After receiving a RA#, the defective unit is to be
returned to AmpliVox in either its original packaging or packaging affording an equal
degree of protection. You will bear the cost of shipping the product to AmpliVox. If
the product is covered by the warranty, AmpliVox will bear the cost of shipping
product back to you after the completion of service under this warranty.
Return shipping will be charged to you for products not covered by the warranty or
requiring no warranty repair.
The following information must be presented to obtain Warranty Service: (a) the RA#
must be clearly and legibility marked on the outside of shipping carton, (b) proof of
purchase, which clearly indicates the name and address of the seller, the date of
purchase and the product type, which is evidence that this product is within the
Warranty Period. Please further include (c) your return address, (d) daytime telephone
number, and (e) reason for return.
LIMITATION OF WARRANTY
This warranty is only valid for the original purchaser and will automatically terminate
prior to expiration if this product is sold or otherwise transferred to another party. The
warranty provided by AmpliVox in this statement applies only to products purchased
for use, and not for resale. It does not apply to open box purchases, which are sold “as
is” and without any warranty. Specifically exempt from warranty are limited-life
consumable components subject to normal wear and tear, such as microphone
windscreens, ear cushions, modular plugs, ear tips, decorative finishes, batteries, and
other accessories. This warranty is invalid if the factory-applied serial number, date
code label, or product label has been altered or removed from this product. This
Warranty does not cover cosmetic damage or damage due to misuse, abuse,
negligence, Acts of Nature, accident, disassembling or modification of, or to any part
of, the product. This Warranty does not cover damage due to improper operation,
maintenance or installation, or attempted repair by anyone other than AmpliVox. Any
unauthorized repairs will void this warranty.
REPAIRS OR REPLACEMENTS AS PROVIDED UNDER THIS WARRANTY ARE
THE EXCLUSIVE REMEDY OF THE CONSUMER. AMPLIVOX SHALL NOT BE
LIABLE FOR ANY INCIDENTAL OR CONSEQUENTIAL DAMAGES FOR
BREACH OF ANY EXPRESS OR IMPLIED WARRANTY ON THIS PRODUCT.
EXCEPT TO THE EXTENT PROHIBITED BY LAW, THIS WARRANTY IS
EXCLUSIVE AND IN LIEU OF ALL OTHER EXPRESS AND IMPLIED
WARRANTIES WHAT SO EVER, INCLUDING BUT NOT LIMITED TO THE
WARRANTY OF MERCHANTABILITY AND FITNESS FOR A PRACTICAL
PURPOSE.
NOTE! This warranty gives you specific legal rights. You may have other rights
which vary from location to location. Some jurisdictions do not allow the exclusion or
limitation of incidental or consequential damages or implied warranties, so the above
exclusions may not apply to you. This warranty does not affect your legal (statutory)
rights under your applicable national or local laws.
AmpliVox • 650 Anthony Trail Suite D, Northbrook, IL 60062 • Phone: (800)267-
5486 • Fax: (800)267-5489 www.ampli.com
9
10
/