Philips NORELCO 2 User manual
- Category
- Security cameras
- Type
- User manual

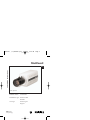
NetCam2
Installation Instructions
Eng
Philips
Communication,
Security & Imaging
Lens optional
Default IP address: 211.53.133.92
Administrator login: Password: admin
ID: admin
User login: Password: guest
ID: guest
NetCam2 _ii_00592en.qxd 1/23/03 2:22 PM Page 1

IMPORTANT SAFEGUARDS
1. Read Instructions: All the safety and operating instructions should be read
before the unit is operated.
2. Retain Instructions: The safety and operating instructions should be
retained for future reference.
3. Heed Warnings: All warnings on the unit and in the operating instructions
should be adhered to.
4. Follow Instructions: All operating and use instructions should be followed.
5. Cleaning: Unplug the unit from the outlet before cleaning. Do not use
liquid cleaners or aerosol cleaners. Use a damp cloth for cleaning.
6. Power Sources: This unit should be operated only from the type of power
source indicated on the marking label. If you are not sure of the type of
power supply you plan to use, consult your appliance dealer.
7. Power-Cord Protection: Power-supply cords should be routed so that they
are not likely to be walked on or pinched by items placed upon or against
them, paying particular attention to cords and plugs, convenience
receptacles, and the point where they exit from the appliance.
8. Power Line: An outdoor system should not be located in the vicinity of
overhead power lines or other electric light or power circuits, or where it can
fall into such power lines or circuits.
9. Overloading: Do not overload outlets and extension cords as this can result
in a risk of fire or electric shock.
10. Object and Liquid Entry: Never push objects of any kind into this unit
through openings as they may touch dangerous voltage points or short-out
parts that could result in a fire or electrical shock. Never spill liquid of any
kind on the unit.
11. Servicing: Do not attempt to service this unit yourself as opening or
removing covers may expose you to dangerous voltage or other hazards.
Refer all servicing to qualified service personnel.
2
NetCam2 Safety
NetCam2 _ii_00592en.qxd 1/23/03 2:22 PM Page 2

12. Damage Requiring Service: Unplug the unit from the outlet and refer
servicing to qualified service personnel under the following conditions.
If liquid has been spilled, or objects have fallen into the unit.
If the unit has been exposed to train or water.
If the unit does not operate normally by following the operating
instructions. Adjust only those controls that are covered by the operating
instructions, as an improper adjustment of other controls may result in
damage and will often require extensive work by a qualified technician to
restore the unit to its normal operation.
If the unit has been dropped or the cabinet has been damaged.
When the unit exhibits a distinct change in performance - this indicates a
need for service.
13. Replacement Parts: When replacement parts are required, be sure the
service technician has used replacement parts specified by the manufacturer
or have the same characteristics as the original part. Unauthorized
substitutions may result in fire, electric shock or other hazards.
14. Safety Check: Upon completion of any service or repairs to this unit, ask
the service technician to perform safety checks to determine that the unit is
in proper operating condition.
FCC INFORMATION
Caution: Any changes or modifications to construction of this device which are not
expressly approved by the party responsible for compliance could void the user’s
authority to operate the equipment.
Note: This equipment has been tested and found to comply with the limits for a Class B
digital device, pursuant to part 15 of the FCC Rules. These limits are designed to
provide reasonable protection against harmful interference in a residential installation.
This equipment generates, uses and can radiate radio frequency energy and, if not
installed and used in accordance with the instructions, may cause harmful interference
to radio communications. However, there is no guarantee that interference to radio or
television reception, which can be determined by turning the equipment off and on,
the user is encouraged to try to correct the interference by one or more of the following
measures:
Reorient or relocate the receiving antenna.
Increase the separation between the equipment and receiver.
Connect the equipment into an outlet on a circuit different from that to which the
receiver is connected.
Consult the dealer or an experienced radio/TV technician for help.
3
NetCam2 Safety
NetCam2 _ii_00592en.qxd 1/23/03 2:22 PM Page 3

SAFETY PRECAUTIONS
This label may appear on the bottom of the unit due to space limitations.
The lightning flash with an arrowhead symbol, within an equilateral
triangle, is intended to alert the user to the presence of un-insulated "
dangerous voltage" within the product's enclosure that may be of
sufficient magnitude to constitute a risk of electric shock to persons.
The exclamation point within an equilateral triangle is intended to alert
the user to presence of important operating and maintenance (servicing)
instructions in the literature accompanying the appliance.
Attention: Installation should be performed by qualified service
personnel only in accordance with the National Electrical Code or
applicable local codes.
4
NetCam2 Safety
CAUTION
RISK OF ELECTRIC
SHOCK. DO NOT OPEN!
CAUTION:TO REDUCE THE RISK OF ELECTRICAL SHOCK,
DO NOT OPEN COVERS. NO USER SERVICEABLE PARTS
INSIDE. REFER SERVICING TO QUALIFIED SERVICE
PERSONNEL.
ATTENTION: INSTALLATION SHOULD BE PERFORMED BY
QUALIFIED SERVICE PERSONNEL ONLY IN ACCORDANCE
WITH THE NATIONAL ELECTRICAL CODE OR APPLICABLE
LOCAL CODES.
NetCam2 _ii_00592en.qxd 1/23/03 2:22 PM Page 4

TABLE OF CONTENTS
IMPORTANT SAFEGUARDS . . . . . . . . . . . . . . . . . . . . . . . . . . . . . . . . . . . . . . . . . . .2
FCC INFORMATION . . . . . . . . . . . . . . . . . . . . . . . . . . . . . . . . . . . . . . . . . . . . . . . . .3
SAFETY PRECAUTIONS . . . . . . . . . . . . . . . . . . . . . . . . . . . . . . . . . . . . . . . . . . . . . .4
TABLE OF CONTENTS . . . . . . . . . . . . . . . . . . . . . . . . . . . . . . . . . . . . . . . . . . . . . . .5
1 Introduction . . . . . . . . . . . . . . . . . . . . . . . . . . . . . . . . . . . . . . . . . . . . . . . . .7
1.1 Description . . . . . . . . . . . . . . . . . . . . . . . . . . . . . . . . . . . . . . . . . . . . . . . . . .7
1.2 Unpacking . . . . . . . . . . . . . . . . . . . . . . . . . . . . . . . . . . . . . . . . . . . . . . . . . . .8
1.3 NetCam2 Rear View and Descriptions . . . . . . . . . . . . . . . . . . . . . . . . . . . . .8
2 Installation . . . . . . . . . . . . . . . . . . . . . . . . . . . . . . . . . . . . . . . . . . . . . . . . .11
2.1 Installation summary . . . . . . . . . . . . . . . . . . . . . . . . . . . . . . . . . . . . . . . . . .11
2.1.1 System requirements . . . . . . . . . . . . . . . . . . . . . . . . . . . . . . . . . . . . . . . . . .11
2.1.2 Recommended PC display settings . . . . . . . . . . . . . . . . . . . . . . . . . . . . . . .11
2.1.3 Connecting Ethernet and power cables . . . . . . . . . . . . . . . . . . . . . . . . . . . .11
2.1.4 Connecting NetCam2 to a PC using crossover cable . . . . . . . . . . . . . . . . . .12
2.1.5 Connecting NetCam2 to a PC via a HUB . . . . . . . . . . . . . . . . . . . . . . . . .12
2.1.6 PSTN dial-in connection . . . . . . . . . . . . . . . . . . . . . . . . . . . . . . . . . . . . . .13
2.1.7 Location . . . . . . . . . . . . . . . . . . . . . . . . . . . . . . . . . . . . . . . . . . . . . . . . . . .13
2.2 Installing NetCam2 Setup program . . . . . . . . . . . . . . . . . . . . . . . . . . . . . . .13
2.3 Assigning IP Address and Starting Configuration . . . . . . . . . . . . . . . . . . . .14
2.4 Configuring NetCam2 . . . . . . . . . . . . . . . . . . . . . . . . . . . . . . . . . . . . . . . .14
2.5 Assigning IP Address with ARP command . . . . . . . . . . . . . . . . . . . . . . . . .14
3. Operation . . . . . . . . . . . . . . . . . . . . . . . . . . . . . . . . . . . . . . . . . . . . . . . . . .17
3.1 Starting Web browser . . . . . . . . . . . . . . . . . . . . . . . . . . . . . . . . . . . . . . . . .17
3.2 Installing NetCam2 Plug-in . . . . . . . . . . . . . . . . . . . . . . . . . . . . . . . . . . . .17
3.2.1 Netscape Users . . . . . . . . . . . . . . . . . . . . . . . . . . . . . . . . . . . . . . . . . . . . . .17
3.2.2 Microsoft Explorer Users . . . . . . . . . . . . . . . . . . . . . . . . . . . . . . . . . . . . . . .17
3.3 Various viewers in NetCam2 homepage . . . . . . . . . . . . . . . . . . . . . . . . . . .18
3.3.1 Login and homepage . . . . . . . . . . . . . . . . . . . . . . . . . . . . . . . . . . . . . . . . . .18
3.3.2 Real-time monitoring through Full viewer (single view) . . . . . . . . . . . . . . .20
3.3.3 Real-time monitoring through Full viewer (dual image) . . . . . . . . . . . . . . .23
3.3.4 Real-time monitoring through Lite Viewer (single view) . . . . . . . . . . . . . . .24
3.3.5 Real-time monitoring through Lite viewer (dual image) . . . . . . . . . . . . . . .25
3.3.6 Real-time monitoring through Server-push viewer . . . . . . . . . . . . . . . . . . .26
3.3.7 Real-time monitoring through Java applet Viewer . . . . . . . . . . . . . . . . . . . .27
4 Configuring Administrator’s Options . . . . . . . . . . . . . . . . . . . . . . . . . . . . .28
4.1 Login . . . . . . . . . . . . . . . . . . . . . . . . . . . . . . . . . . . . . . . . . . . . . . . . . . . . . .28
4.1.1 Accessing Administration from Setup program . . . . . . . . . . . . . . . . . . . . . .28
4.1.2 Accessing through Web browser . . . . . . . . . . . . . . . . . . . . . . . . . . . . . . . . .28
5
NetCam2 Contents
NetCam2 _ii_00592en.qxd 1/23/03 2:22 PM Page 5

TABLE OF CONTENTS
4.2 Administrator’s page . . . . . . . . . . . . . . . . . . . . . . . . . . . . . . . . . . . . . . . . . .29
4.2.1 System Configuration . . . . . . . . . . . . . . . . . . . . . . . . . . . . . . . . . . . . . . . . .29
4.2.2 User Configuration . . . . . . . . . . . . . . . . . . . . . . . . . . . . . . . . . . . . . . . . . . .31
4.2.3 Network Configuration . . . . . . . . . . . . . . . . . . . . . . . . . . . . . . . . . . . . . . . .32
4.2.4 Dynamic IP Registration Service for ISDN, XDSL Users . . . . . . . . . . . . . .35
4.2.5 Security Configuration . . . . . . . . . . . . . . . . . . . . . . . . . . . . . . . . . . . . . . . .35
4.2.6 Video Configuration . . . . . . . . . . . . . . . . . . . . . . . . . . . . . . . . . . . . . . . . .38
4.2.7 Application Configuration . . . . . . . . . . . . . . . . . . . . . . . . . . . . . . . . . . . . .41
4.2.8 Pan/Tilt/Zoom Configuration . . . . . . . . . . . . . . . . . . . . . . . . . . . . . . . . . .43
4.2.9 Serial Configuration . . . . . . . . . . . . . . . . . . . . . . . . . . . . . . . . . . . . . . . . . .44
4.2.10 Digital Input Configuration . . . . . . . . . . . . . . . . . . . . . . . . . . . . . . . . . . . .45
4.2.11 Alarm Configuration . . . . . . . . . . . . . . . . . . . . . . . . . . . . . . . . . . . . . . . . .46
4.2.12 User Custom Configuration . . . . . . . . . . . . . . . . . . . . . . . . . . . . . . . . . . . .47
5 Convenient Functions of Mouse . . . . . . . . . . . . . . . . . . . . . . . . . . . . . . . . .48
6 Adjusting Focus . . . . . . . . . . . . . . . . . . . . . . . . . . . . . . . . . . . . . . . . . . . . .50
6
NetCam2 Contents
NetCam2 _ii_00592en.qxd 1/23/03 2:22 PM Page 6

1 INTRODUCTION
NetCam2 is a network-based high-resolution digital network camera for CCTV
applications. It contains an integrated Internet server and connects directly to an
Ethernet network. No other hardware is necessary. NetCam2 provides real-time
color pictures from up to two cameras over the Internet using an image
compression format.
1.1 Description
The microprocessor-based NetCam2 contains a digital color camera, web server
functionality, image compression hardware and physical Ethernet connection. It
requires power and a LAN cable connection.
Wavelet image format
Images are generated in Wavelet format, which progressively generates pictures
from low rates of resolution to reduce waiting time for users. The only software
required is Netscape Navigator 4.7 or above and Microsoft Internet Explorer 5.x
or above.
Compatible with most systems and protocols
NetCam2 supports TCP/IP networking, SMTP e-mail, HTTP and other
Internet related protocols; and can be used in mixed operating system
environments such as Windows, Unix, Macintosh and OS/2. It integrates with
other WWW/Intranet applications.
Web-based system management
Using a standard Web browser, NetCam2 is configured and managed directly
from its own Web pages. As new firmware release becomes available, NetCam2
camera products can be upgrade remotely via the network.
Indoor/Outdoor use
The operating temperature range of the camera supports indoor application only.
Recommendation:
Use a dedicated outdoor camera that connect to the NetCam2’s input for serving
an external cameras. Also the internal camera can be disabled. That channel is
then available for a second external camera.
7
NetCam2 Section 1
NetCam2 _ii_00592en.qxd 1/23/03 2:22 PM Page 7

1.2 Unpacking
Unpack carefully and handle all electronic equipment with care to prevent
damage. Check for the following items:
• NetCam2 - Web Camera Server
• Crossover cable, 1 m (red)
• Direct cable 2 m (white)
• Adapter & Power cable (12V DC, 1.5 A)
• Software
• Manual
Note: Save the packaging materials for future use if the unit needs to be shipped for
service or repair.
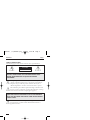
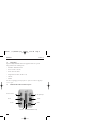
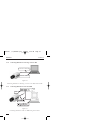
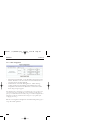
1.3 NetCam2 Rear View and Descriptions
8
NetCam2 Section 1
DC 12V
RS232/RS422/RS485/Sensor InputDIP switch
Zoom lens connector
AC 24V
Network
Video input/output
Iris Lens
NetCam2 _ii_00592en.qxd 1/23/03 2:22 PM Page 8

RS232/RS422/RS485/Sensor Input
9
NetCam2 Section 1
Connector Description Remark
name
Video Output of internal camera or input for channel 2
as set by DIP switch
Zoom Lens To control zoom and focus adjustment. +/-6V drive
voltage with common ground
Network To connect 10 Base-T Ethernet cable
Iris Lens Video Iris lens connector
DIP switch Left:To designate video signal termination of
‘Video Input’ BNC connector
Right:To select BNC function as input or output
AC 24V/DC 12 V
To connect a power supply unit of 24V AC +/-10% or 12 V DC +/-10%
DC 12V To connect a power supply unit of 12V DC
+/-10%
RS232/RS422/RS485/
Sensor Input To connect external devices (see detail below)
Connector Description
name
SEN -,SEN + To connect external sensor
POW Power supply output (12 Vdc)
RS-232 These pins are for devices that satisfy
RS-232C protocol, and they
consist of TX, RX, and GND.
RS-422 Satisfies RS-422 protocol.They are
half-duflex. It consists of R+, R-,
T+, and T-.
RS-485 Satisfies RS-485 protocol.They
consist of 485+ and 485-. Short R+
and R- with a wire to get RS422+ and
short T+ and T- to get RS422-.
Sensor
Power
RS-422
RS-232
NetCam2 _ii_00592en.qxd 1/23/03 2:22 PM Page 9

Description on LED of Ethernet Port
Yellow LED: This LED indicates the status of
data transmission. After power is supplied, it is
on for the first 4-5 seconds and then it goes off.
It blinks continuously when NetCam 2 transmits
data.
Green LED: This LED indicates the status of
networking. After power is supplied, it is on for
the first 1-2 seconds, and then it blinks once at
every one second as long as the network is
connected.
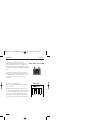
Description of DIP Switches
This is to designate the function of the BNC
video connector.
With the right hand dip switch in position V-
out, the internal camera video output is supplied
to the video BNC. With this dip switch in the
V-in position, the video BNC is the input for
video channel 2. The right hand dip switch sets
the video input to 75 Ohm or high impedance.
10
NetCam2 Section 1
V-OUT
HI-Z V-IN
77
77
55
55
oo
oo
hh
hh
mm
mm
DIP Switch
Yellow LED
Green LED
NetCam2 _ii_00592en.qxd 1/23/03 2:22 PM Page 10

2 INSTALLATION
2.1 Installation summary
• Connect Ethernet and power to the NetCam2 on a local network for
configuration (see 2.1.3).
• Install the setup program for NetCam2 (see 2.2).
• Assign an IP address to NetCam2 and configure its network settings (see
2.3).
• Configure the operational settings (see 2.4).
• Install NetCam2 in its location, and re-connect the power and Ethernet.
• Adjust the focus (see section 6).
2.1.1 System requirements
• Operating system: Windows 98, ME, NT4 or 2000
• CPU: Pentium II or above
• Minimum RAM: 128MB (Windows 98 and ME), 192MB (windows NT4
and 2000)
• Ensure that either Internet Explorer 5.0 (or above) or Netscape Navigator
4.7 (or above) web browsers are available
2.1.2 Recommended PC display settings
Using the Windows ‘Setting / Control Panel / Display’ options, set:
• Color option to ‘High color’ (16-bit) or above.
• Screen resolution to 1024x768 pixels.
2.1.3 Connecting Ethernet and power cables
• Connect an Ethernet LAN cable to the ‘Ethernet’ port (RJ-45 connector) on
the rear panel.
• Connect the power supply (12V, 1.5 A adaptor, supplied) to the connector
marked ‘DC 12 V’ or use an alternative power supply unit on the AC 24 V
or the DC 12 V connector.
• Confirm that the green LED on the Ethernet port flashes every 1 to 2
seconds. Note it starts flashing 5 to 6 seconds after applying power.
11
NetCam2 Section 2
NetCam2 _ii_00592en.qxd 1/23/03 2:22 PM Page 11

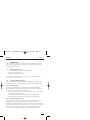
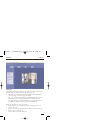
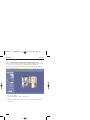
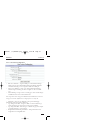
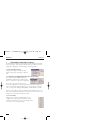
2.1.4 Connecting NetCam2 to a PC using crossover cable
FIgure 2-2
Connecting NetCam2 to a PC using a crossover (cross link) Network cable.
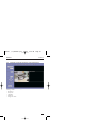
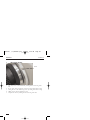
2.1.5 Connecting NetCam2 to a PC via a HUB
FIgure 2-3
Connecting NetCam2 to a PC via a HUB, using ‘Direct’ cables.
12
NetCam2 Section 2
Crossover cable (red)
Select 'IP Address'
HUB
2
NetCam2 _ii_00592en.qxd 1/23/03 2:22 PM Page 12

2.1.6 PSTN dial-in connection
1. Connect a PSTN modem to the NetCam’s RS232 serial port.
2. Ensure that the modem is selected as connected device in the Serial
Configuration screen of the Administrator’s pages.
3. On the client side use a recommended browser with dial-up connection.
4. In the dial screen enter username/password of the NetCam. (default is guest
or admin).
5. To view the NetCam pages enter IP address 10.0.0.10 in the address bar.
2.1.7 Location
• Place NetCam2 appropriately for your purpose.
Caution: Do not expose the camera lens to direct sunlight. When operating
NetCam2 in outdoor light, an auto iris lens is recommended.
2.2 Installing NetCam2 Setup program
• Insert the software CD-ROM (supplied) into the drive.
• Copy ‘NetCamSetup.exe’ to the PC’s desktop.
• Double click on ‘NetCamSetup.exe’ to activate the setup program.
• Follow the screen instructions.
13
NetCam2 Section 2
NetCam2 _ii_00592en.qxd 1/23/03 2:22 PM Page 13

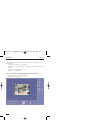
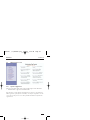
2.3 Assigning IP Address and Starting Configuration
It is possible to setup a NetCam2 that is either connected to a local network or
directly connected to a PC using the red-colored crossover cable (supplied).
When setup is executed, the table lists all NetCam2s connected to the local
network.
• Select the ‘MAC address’ of the NetCam2 requiring an IP address.
• When a NetCam2 is selected, the ‘selected IP address’ is displayed the
default IP address is ‘211.53.133.92’).
• Enter a password in the ‘Admin’s Password’ box (the default password is
‘admin’).
• To change the IP address, click the ‘Change IP Addr’ button.
• Enter the new IP address and confirm it with the ‘OK’ button.
Note: If NetCam2 has a problem, you can reboot it by clicking "Reboot".
2.4 Configuring NetCam2
After assigning a new IP address to the NetCam2, it is possible to enter the
configuration options.
• Click ‘Start Configuration’ button to be connected to the Administrator
pages in the NetCam (see Chapter 4).
2.5 Assigning IP Address with ARP command
If you fail to assign an IP address with the setup program, carry out the process
with ARP command.
NetCam2 IP address = IP address to be assigned to the NetCam2.
NetCam2 Ethernet address = MAC printed on the bottom of the NetCam2.
My PC IP address = IP address of the Network Interface Card in your PC>
Note: The NetCam2 and PC IP addresses must be within the same IP address class.
14
NetCam2 Section 2
NetCam2 _ii_00592en.qxd 1/23/03 2:22 PM Page 14

1. Using ARP in Windows 98 and NT
• Start a DOS window and type the following commands.
• Example
2. Using ARP in Windows 95
• Start a DOS window and type the following commands.
• Example
3. Verifying installation
After completion, the following message (or similar) will be displayed after the
ping command:
• If you cannot receive the reply by the 'ping' command, try again by pressing
'F3' and 'Enter' keys again. Normally ‘Request timed out’ messages appear 7
times before you receive proper reply.
15
NetCam2 Section 2
arp -s <NetCam2 IP address> <NetCam2 _________ address>
ping -t <NetCam2 IP address>
arp -s 200.243.232.178 00-40-8c-10-00-86
ping -t 200.243.232.178
arp -s <NetCam2 IP add.> <NetCam2 Ethernet add.> <my PC IP add.>
ping <NetCam2 IP address>
arp -s 200.243.232.178 00-40-8c-10-00-86 200.243.232.130
ping 200.243.232.178
Request timed out
:
Request timed out
Reply from 200.243.232.178: bytes=32 time=2ms TTL=255
Reply from 200.243.232.178: bytes=32 time=2ms TTL=255
Ping statistics for 200.243.232.178:
Packets: Sent = 4, Received = 4, Lost = 0 (0% loss),
Approximate round trip times in milliseconds:
Minimum = 1ms, Maximum = 2ms, Average = 1ms
NetCam2 _ii_00592en.qxd 1/23/03 2:22 PM Page 15

• If you succeed in utilizing the above commands, you will receive a
continuous connection. Stop the process by pressing <Ctrl>+<C> keys.
• If the statistic shows ‘100% loss’, you should check that the network line
and connection status are stable; the IP address which is assigned to
NetCam2; and whether a PC has the same local IP address as the NetCam2.
(Same local IP address of C grade network means that the first 3 numbers
are same but the fourth is different. For example 203.243.232.111 and
203.243.232.112 are the same local network IP addresses).
MAC address
The 12 digit MAC address of the NetCam is on a label on the bottom. For
correct entering of this address using the ARP command, enter the “-” as
separator to form a string of 6 two digit characters, i.e. 00408C100086 becomes
00-40-8C-10-00-86.
16
NetCam2 Section 2
NetCam2 _ii_00592en.qxd 1/23/03 2:22 PM Page 16

3. OPERATION
This section looks at accessing the NetCam2’s homepage and monitoring real-
time images. The NetCam2’s own web pages are accessed through one of the
recommended Web browsers.
3.1 Starting Web browser
• Start the browser and enter the NetCam2 IP address:
http://<NetCam2 IP address>/
• Example – http://200.243.232.178/
Note: NetCam2 simultaneously supports up to 100 users. Additional users will
receive the message ‘Server is full’.
3.2 Installing NetCam2 Plug-in
The Plug-in and Active-X Control (licensed by WebGate Inc. and approved by
Verisign) are required to enable a browser to read NetCam2’s image file format.
3.2.1 Netscape Users
To view images transferred from a NetCam2, install the NetCam2 Plug-in.
When NetCam2 is connected for the first time (or an old version of Plug-in is
present) it is necessary to download the Plug-in.
• The Plug-in Download screen is accessible from the various viewers and log-
in screens by clicking on 'Plug-in'.
• In the Plug-in Download screen, click on ‘Download Plug-In Now’.
• Then click ‘Grant’ and ‘Install’ buttons respectively when prompted.
3.2.2 Microsoft Explorer Users
Active-X Control is prepared for MS Explorer Users. It is installed as soon as
NetCam2 is connected (by clicking ‘Yes’ when prompted for Active-X
installation). If the NetCam2 Control file is not installed, repeat the installation
procedure. If the file is already installed but an image is not seen, remove the file
and re-install it. If images are not visible, check if the Active-X Control file is
installed correctly in the C:\Windows\Download Program Files directory.
17
NetCam2 Section 3
NetCam2 _ii_00592en.qxd 1/23/03 2:22 PM Page 17

Note: Program installation takes less than 1 minute. Do not click any button until
the ‘Active-X Control’ installation is completed.
3.3 Various viewers in NetCam2 homepage
3.3.1 Login and homepage
On the NetCam2 Login Page:
• Enter your user name and password to log in (max 9 characters).
• Click on 'Login' to connect the default viewer page (as set by the
administrator) or click on one of the viewer links (see 'Home page' for a
description of the viewers).
• Enter the administrator's name and password and click on 'Administration'
to connect directly to the administration pages.
• Click on 'Home Page' to connect to the NetCam2's Home page.
Note: The default user ID and password are ‘guest’. The administrator can change
them at Admin page (refer to section 4).
18
NetCam2 Section 3
NetCam2 _ii_00592en.qxd 1/23/03 2:22 PM Page 18

Homepage
On the NetCam2 Homepage there are four viewing options. Users may monitor
real-time images via these main viewers. The four viewers are:
• Lite viewer: for real-time monitoring with simplified viewer with limited
camera and image control (faster page download).
• Full viewer: for real-time monitoring with full camera and image control.
• Server-Push viewer: for real-time monitoring from behind a fire wall.
• Java Applet viewer: for real-time monitoring on a computer that does not
use a Microsoft Windows operating system (such as Macintosh).
Further on the homepage, access is provided to:
• Administration: goes to administration pages for setting passwords, etc.
(refer to section 4).
• Plug-in: loads a plugin required for Netscape Navigator (refer to section 3.2).
• Help: connects to the help page.
• Version: (details of software release level).
19
NetCam2 Section 3
NetCam2 _ii_00592en.qxd 1/23/03 2:22 PM Page 19

The homepage displays one image. The following can be selected using pull-
down menus:
• Select View – camera 1, 2 or all cameras.
• Resolution – set image resolution to 720x486, 720x243, 360x243, 180x121
or 90x60.
• Expansion – expand image 1x, 2x or 4x.
• Frame rate – set frame rate.
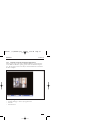
3.3.2 Real-time monitoring through Full viewer (single view)
• From the home page, click on ‘Full Viewer’.
• The default view is shown.
20
NetCam2 Section 3
NetCam2 _ii_00592en.qxd 1/23/03 2:22 PM Page 20
Page is loading ...
Page is loading ...
Page is loading ...
Page is loading ...
Page is loading ...
Page is loading ...
Page is loading ...
Page is loading ...
Page is loading ...
Page is loading ...
Page is loading ...
Page is loading ...
Page is loading ...
Page is loading ...
Page is loading ...
Page is loading ...
Page is loading ...
Page is loading ...
Page is loading ...
Page is loading ...
Page is loading ...
Page is loading ...
Page is loading ...
Page is loading ...
Page is loading ...
Page is loading ...
Page is loading ...
Page is loading ...
Page is loading ...
Page is loading ...
Page is loading ...
Page is loading ...
-
 1
1
-
 2
2
-
 3
3
-
 4
4
-
 5
5
-
 6
6
-
 7
7
-
 8
8
-
 9
9
-
 10
10
-
 11
11
-
 12
12
-
 13
13
-
 14
14
-
 15
15
-
 16
16
-
 17
17
-
 18
18
-
 19
19
-
 20
20
-
 21
21
-
 22
22
-
 23
23
-
 24
24
-
 25
25
-
 26
26
-
 27
27
-
 28
28
-
 29
29
-
 30
30
-
 31
31
-
 32
32
-
 33
33
-
 34
34
-
 35
35
-
 36
36
-
 37
37
-
 38
38
-
 39
39
-
 40
40
-
 41
41
-
 42
42
-
 43
43
-
 44
44
-
 45
45
-
 46
46
-
 47
47
-
 48
48
-
 49
49
-
 50
50
-
 51
51
-
 52
52


Philips NORELCO 2 User manual
- Category
- Security cameras
- Type
- User manual
Ask a question and I''ll find the answer in the document
Finding information in a document is now easier with AI

