Russell Hobbs RHBM2001 800W Built in Microwave User manual
- Category
- Microwaves
- Type
- User manual
This manual is also suitable for

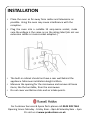
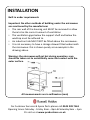
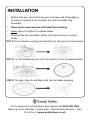
• Place the oven as far away from radios and televisions as
possible. Using the oven may cause interference with the
reception.
• Plug the oven into a suitable 13 amp mains socket, make
sure the voltage is the same as on the rating label (do not use
extension cables or mains socket adaptors.)
• The built-in cabinet should not have a rear wall behind the
appliance. Minimum installation height is 85cm.
• Measure the opening for the microwave and remove all loose
items, like the turntable, from the microwave
• Do not cover ventilation slots and air intake points.
For Customer Services & Spare Parts please call 0345 209 7461
Opening times: Monday - Friday 8am – 8pm & Saturday 9am – 1pm
Or visit us at www.productcare.co.uk
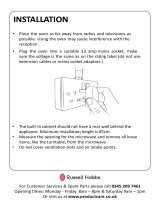
INSTALLATION

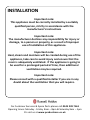
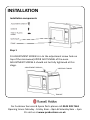
Important note:
This appliance must be correctly installed by a suitably
qualified person, strictly in accordance with the
manufacturer’s instructions
Important note:
The manufacturer declines any responsibility for injury or
damage, to a person or property, as a result of improper
use of installation of this appliance.
Important note:
Heat, steam and moisture will be created during use of the
appliance, take care to avoid injury and ensure that the
room is adequately ventilated. If the appliance is going to
be used for a prolonged period of time, then additional
ventilation may be required.
Important note:
Please consult with a qualified installer if you are in any
doubt about the ventilation that you will require.
For Customer Services & Spare Parts please call 0345 209 7461
Opening times: Monday - Friday 8am – 8pm & Saturday 9am – 1pm
Or visit us at www.productcare.co.uk
INSTALLATION

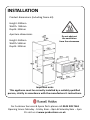
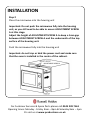
Product dimensions (including frame kit)
Height: 382mm
Width: 594mm
Depth: 330mm
Aperture dimensions
Height: 362mm
Width: 560mm
Depth: 320mm
Do not obstruct
the ventilation
from the microwave
Important note:
This appliance must be correctly installed by a suitably qualified
person, strictly in accordance with the manufacturer’s instructions.
For Customer Services & Spare Parts please call 0345 209 7461
Opening times: Monday - Friday 8am – 8pm & Saturday 9am – 1pm
Or visit us at www.productcare.co.uk
INSTALLATION

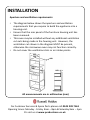
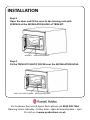
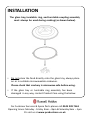
Aperture and ventilation requirements
• The diagram below shows the aperture and ventilation
requirements that you require to build the appliance into a
housing unit.
• Ensure that the rear panel of the furniture housing unit has
been removed.
• This oven may be installed without any additional ventilation
cut outs being made in the housing unit. However, the
ventilation cut shown in the diagram MUST be present,
otherwise the microwave oven may not function correctly.
• Do not cover the ventilation slots or air intake points.
All measurements are in millimetres (mm)
For Customer Services & Spare Parts please call 0345 209 7461
Opening times: Monday - Friday 8am – 8pm & Saturday 9am – 1pm
Or visit us at www.productcare.co.uk
INSTALLATION

Built in under requirements
Important: No other methods of building under the microwave
are sanctioned by the manufacturer
• The rear wall of the housing unit MUST be removed to allow
there to be the correct amount of ventilation
• The ventilation gaps below the support shelf and below the
worktop must be adhered to.
• An induction hob MUST NOT be fitted above the microwave.
• It is not necessary to have a storage drawer fitted underneath
the microwave: this is shown purely as an example in the
drawing above.
Warning: the microwave will get hot during operation: care
should be taken not to accidentally come into contact with the
outer surface.
All measurements are in millimetres (mm)
For Customer Services & Spare Parts please call 0345 209 7461
Opening times: Monday - Friday 8am – 8pm & Saturday 9am – 1pm
Or visit us at www.productcare.co.uk
INSTALLATION

Installation components
Step 1
Fit ADJUSTMENT SCREW A in to the adjustment screw hole on
top of the microwave/UPPER AIR TUNNEL of the oven.
ADJUSTMENT SCREW A should not be fully tightened at this
stage.
UPPER AIR TUNNEL
TRIM KIT
ADJUSTMENT SCREW A
For Customer Services & Spare Parts please call 0345 209 7461
Opening times: Monday - Friday 8am – 8pm & Saturday 9am – 1pm
Or visit us at www.productcare.co.uk
INSTALLATION

Step 2
Place the microwave into the housing unit
Important: Do not push the microwave fully into the housing
unit, as you still need to be able to access ADJUSTMENT SCREW
A at this stage.
Adjust the height of ADJUSTMENT SCREW A to keep a 1mm gap
between ADJUSTMENT SCREW A and the underneath of the top
surface of the housing unit.
Push the microwave fully into the housing unit
Important: do not trap or kink the power cord and make sure
that the oven is installed in the centre of the cabinet.
For Customer Services & Spare Parts please call 0345 209 7461
Opening times: Monday - Friday 8am – 8pm & Saturday 9am – 1pm
Or visit us at www.productcare.co.uk
INSTALLATION

Step 3
Open the door and fit the oven to the housing unit with
SCREW B at the INSTALLATION HOLE of TRIM KIT.
SCREW B
INSTALLATION HOLE
Step 4
Fit the TRIM-KIT PLASTIC COVER over the INSTALLATION HOLE.
For Customer Services & Spare Parts please call 0345 209 7461
Opening times: Monday - Friday 8am – 8pm & Saturday 9am – 1pm
Or visit us at www.productcare.co.uk
INSTALLATION
INSTALLATION HOLETRIM –KIT PLASTIC COVER

STEP 1) The turntable coupling should slot into the centre of microwave
STEP 2) T he turntable ring slots into the indents in the microwave base
STEP 3) The glass tray should align with the turntable coupling
• Before first use, check that any securing tape and all packaging
has been removed from the glass tray and turntable ring
assembly.
• These parts must never be restricted from rotating.
• Never place the glass tray upside down.
• To assemble the turntable, follow the steps below in number
order.
INSTALLATION
For Customer Services & Spare Parts please call 0345 209 7461
Opening times: Monday - Friday 8am – 8pm & Saturday 9am – 1pm
Or visit us at www.productcare.co.uk

The glass tray, turntable ring, and turntable coupling assembly
must always be used during cooking (as shown below).
• Do not place the food directly onto the glass tray, always place
on or in suitable microwaveable cookware.
Please check that crockery is microwave safe before using.
• If the glass tray or turntable ring assembly has been
damaged in any way, contact Product Care using the below:
For Customer Services & Spare Parts please call 0345 209 7461
Opening times: Monday - Friday 8am – 8pm & Saturday 9am – 1pm
Or visit us at www.productcare.co.uk
INSTALLATION
-
 1
1
-
 2
2
-
 3
3
-
 4
4
-
 5
5
-
 6
6
-
 7
7
-
 8
8
-
 9
9
-
 10
10


Russell Hobbs RHBM2001 800W Built in Microwave User manual
- Category
- Microwaves
- Type
- User manual
- This manual is also suitable for
Ask a question and I''ll find the answer in the document
Finding information in a document is now easier with AI
Related papers
-
 Russell Hobbs R HOBBS RHBM3201 BI MWAVE SS User manual
-
 Russell Hobbs RHBM2003MB User manual
-
 Russell Hobbs RUS HOBBS LUNA RHMDL801R 23L 800W ET RE User manual
-
 Russell Hobbs Luna 800W Standard Microwave RHMDL801CP Copper User manual
-
 Russell Hobbs Luna 800W Standard Microwave RHMDL801G User manual
-
 Russell Hobbs R HOBBS AMERICAN FFREEZER RED User manual
-
 Russell Hobbs RHSV1801 User manual
-
 Russell Hobbs RHMM701 User manual
-
 Russell Hobbs RH60GH403B Cast Iron Support Gas Hob User manual
-
 Russell Hobbs R HOBBS SS 59CM 4 BURNER GAS HOB User manual


Other documents
-
Bellini BMW625TKX Installation guide
-
GE Appliances JVM3160DFWW User guide
-
Terzismo RHBI7140WM1 User manual
-
 Holme G2SMO3001 User manual
-
Abode G2SHO5001 User manual
-
-
Lenovo ThinkVision 9417-AB7 User manual
-
Thrustmaster EPIC MICKEY PAINTBRUSH AND THINNER PROTECTION PACK Owner's manual
-
Hercules DJ Console MK4 User manual
-
Lenovo L171p - ThinkVision - 17" LCD Monitor User manual
