Thermador DWI246UW Owner's manual

Category
Dishwashers
Type
Owner's manual

This manual is also suitable for

J
Models:
DW244UB / DW244UW
DW245UB / DW245UW
DW246UB / DW246UW / DW246US
DWI246UB / DWI246UW
Thermador _
CORPORATION
A Special Message to Our Customers
Thank you for buying aThermador _ dishwasher. We recom-
mend that you take the time to read this entire booklet before using
your new appliance.
We hope that the information in this manual will help you
easily operate and care for your dishwasher for years of satisfaction.
Please contact us if you have any questions or comments.
Call 1-800-735-4328, or write to us at:
Customer Support Call Center, Thermador, 5551 McFadden
Avenue, Huntington Beach, CA 92649.
Sincerely,
Test Kitchen Consumer Scientists
C2
QUICK REFERENCE INDEX
Important Safety Instructions ..............2
Grounding Instructions .........................2
About Your Dishwasher ........................3
Getting to Know your Dishwasher ...3
Before Using the First Time .................4
Getting Started .......................................4
Dishwasher Safe Items, Table I ...........5
Preparations for Washing .....................6
Loading
Single Rack Washing ......................6
Loading the Top Rack ....................6
Loading the Lower Rack ...............7
Unloading .................................................7
Rack Height Adjustment .......................8
Extra Tall Items ........................................ 8
Using the Dispensers
Detergent Use ................................9
Detergent Dispenser ....................9
Rinse Aid Indicator ..................... 10
Rinse Aid Dispenser ................... 10
Rinse Aid Regulator .................... 10
Cycle Selection .................................... 10
Cycle Selection Chart Table 2 .......... 11
Cycle Selection Chart Table 3 .......... 12
Operation
Immediate Start ........................... 13
Delayed Start ................................ 13
To Interrupt or Reset Cycle ..... 13
Soil Sensor ............................................13
Care & Cleaning .................................. 14
Self-Help,Table4..................................15
Service and Repair .............................. 16
Warranty ............................................... 16
IMPORTANT SAFETY INSTRUCTIONS
SAVE THESE INSTRUCTIONS
WARNING -- When using your dishwasher, basic safety precautions should always be followed to reduce the
risk of fire, electric shock, and/or injury to persons, including the following:
AVERTISSEMENT --Lorsque I'on utilise le lave-vaisselle, il faut observer les precautions de securite de base
afin de reduire tout risque d'incendie, de choc electrique et/ou de blessures, ainsi que les directives suivantes:
I. THERMADOff '_dishwashers are provided with two manuals; one, Installation Instruction Manual and one, Care
and Use Manual, Read all instructions before using the dishwasher.
2. Use the dishwasher only for its intended function.
3. Use only detergents or wetting agents recommended for use in adishwasher and keep them out of the reach of
children.
,
,
When loading items to be washed:
a, Locate sharp items so that they are not likely to damage the door seal, and
b, Load sharp knives with the handle up to reduce the risk of cut-type injuries,
Do not wash plastic items unless marked "dishwasher safe" or the equivalent. For plastic items not so marked,
check the manufacturer's recommendations.
6. Do not operate your dishwasher unless all the enclosure panels are properly in place.
7. Do not tamper with controls.
8. Do not abuse, sit on, or stand on the door or dish rack of the dishwasher.
,
10,
To reduce the risk of injury, do not allow children to play in or on the dishwasher.
Under certain conditions, hydrogen gas may be produced in a hot water system that has not been used for two
weeks or more. Hydrogen gas is explosive. If the hot water system has not been used for such a period, before
using the dishwasher turn on all hot water faucets and let the water flow from each for several minutes.This will
release any accumulated hydrogen gas.As the gas is flammable, do not smoke or use an open flame during this
time.
11, Remove the door to the washing compartment when removing an old dishwasher from service or discarding,
WARNING -- This dishwasher must be grounded in accordance with the National Electrical Code and/or local
codes.These must be carefully followed in all cases. See Installation Instructions provided with this dishwasher for
complete installation information. Make sure this dishwasher has been properly grounded and installed by a
qualified installer before using.
AVERTISSEMENT -- Ce lave-vaisselle doit etre mis a la terre conformement au code national d'electricite et/
ou a tousles codes Iocaux qui doivent etre observes soigneusement. Consulter les instructions d'installation
fournies avec le lave-vaisselle concernant les informations pertinentes a I'installation. S'assurer que ce lave-vaisselle
soit mis a la terre de fa(;on appropriee et installe par un technicien qualifie avant de I'utiliser.
GROUNDING INSTRUCTIONS
This appliance must be connected to a grounded metal, permanent wiring system; or an equipment grounding
conductor must be run with the circuit conductors and connected to the equipment grounding terminal or lead
on the dishwasher.
HOUSEHOLD USE ONLY
ABOUTYOUR DISHWASHER
Congratulations on having selected aThermadoF _'dishwasher, the choice of those
that demand quiet and exceptional cleaning performance from their dishwasher.
The DW244, DW245, DW246 and DWl246 electronic dishwashers offer the following standard features:
Stainless steel inner liner and inner door
Exceptionally low water consumption
Soil Sensor (exceptDW244 models)
Four spraying levels
Height adjustable upper rack
(exceptDW244 models)
Multifunctional upper and lower rack
Heated water chamber for temperature boosting
Triple filter system
Rinse agent indicator lamp
GETTING TO KNOWYOUR DISHWASHER
Figure 1. This illustration calls out features of the dishwasher,
For an explanation of the feature turn to the page indicated,
Upper Rack
(Page 6)
Lower Spray Arm __
(Pages4,13, 14)
Filters - below basket
(Page 14)
Lower Rack
(Page7)
Rinse Aid
Dispenser
(Page 10)
\
Door Gasket
(Page 14)
Upper Spray Arm
(Pages4, 13, 14)
Silverware Basket
(Page 7)
Vent
Detergent
Dispenser
(Page 9)
Name/Rating Plate
(at top or side of door,
as indicated)
BEFORE USING FORTHE FIRSTTIME
Before beginning to use your dishwasher for the first time:
1. Check to make sure that the voltage on which the
dishwasher is to operate is the same as shown on the
rating plate.
2. Check to make sure that the water valve to the dishwasher
is open. The installer may have closed the valve upon
completing the installation.
3. Thoroughly inspect unit for cosmetic damage. Cosmetic
damage must be reported within 5 days
Figure 2. Identifying the controls
Models: DW246UB / DW246UW / DW246US* / DWI246UB / DWI246UW
On/011
On/Off Button
/
/
/
,/
Handle
Cycle Status Bar_
*Stainless finish will have flat anodized push-button
Pots& HeavyNormal Light EconoRinse Rinse
Pans Wash Wash Wash Wash Only Agent
Wash Cycle
Rinse/ Status
Dry
Hold
O o ooooo
Cycle_ Cycles
Delay\_
Hours L.ycle Delay Button
Models: DW245UB / DW245UW
Cycle Status Bar
Pots& Heavy Normal Light Rinse
Pans Wash Wash Wash Only
iOlOlOlOlOl
Cycle Cycles
Delay
Hours
Rinse
Agent
Models: DW244UB / DW244UW
Wash _ Status Bar
Rinse/_ Pots& Heavy Normal Rinse
Dry Pans Wash Wash Only
Hold
Rinse
Agent
I°1°1°1°1
Cycle Cycles
Delay
Hours
GETTING STARTED
The operation of your Thermador dishwasher is summarized below:
1. Load the dishwasher,
Refer to Table I for items suitable for washing in the
dishwasher.The dishwasher should be loaded with pots,
pans, dishes and silverware according to the instructions
provided under the following section titled LOADING.
2. Add detergent and rinse aid.
Detergent must be placed in the detergent dispenser
compartment as described in the following section titled
DETERGENT USE.The use of a rinse aid such as Jet-
Dry® is required to ensure good cleaning and drying
results. See section titled RINSEAID DISPENSER.
3, Check motion of wash arms,
The wash arms must be free to move and should not be
blocked by any item extending so far above lower rack
as to block upper arm or by any items hanging below
either the upper or lower rack to obstruct the motion
of the wash arms. See following section titled
.
,
Close the door of the dishwasher.
Make sure that the door is completely closed and latched.
Start the dishwasher.
If delayed start is not being selected; depress the
on/off button, then select the wash cycle desired, see Table
2, Page 11. Depress the corresponding cycle button, see
Figure 2.The light above the button will become illuminated
to indicate the selected cycle.The dishwasher will start.
NOTES:
a. If you have inadvertently depressed the
wrong cycle button, simply depress the
button of the desired cycle twice.
b. For information on how to operate the
dishwasher using delayed start see subsection
DELAYED START in following section titled
OPERATION.
6. To stop dishwasher, depress the on/off button.
Table 1. Suitable Items for Dishwasher
MATERIAL
ADHESIVE
JOINED ITEMS
ALUMINUM
BONE
HANDLED
UTENSILS
CHINA &
STONE WARE
CRYSTAL
DISHWASHER
USE
NOT
RECOMMENDED
USUALLYSAFE
NOT
RECOMMENDED
USUALLYSAFE
USUALLYSAFE
COMMENTS AND/OR SPECIAL INSTRUCTIONS
Items joined by adhesives, whether plastic, wood, bone,
steel, copper or tin, etc, may be loosened,
Colored anodized aluminum may fade over time. Minerals in the
water may cause spotting or darkening of aluminum.
Handles may separate.
It is highly recommended however that "on-glaze" (china with decora-
tion on top of glaze), hand painted and gold or platinum trimmed, or
antique china or stoneware be hand washed. If there is any doubt,
please check with the manufacturer of your set or test by washing one
piece with each load for a month and comparing this piece with the
rest of the set to determine if there has been any fading or discolora-
tion.
Decorated crystal, those hand painted,"on-glaze" or metal trimmed,
may discolor, fade, or spot. It is recommended that these be hand
washed.Also, fragile glassware is highly breakable. BESUREto set the
pieces so that they do not topple during washing or shift position or
knock against other pieces.
GLASS USUALLY SAFE Milk glass may yellow. Some glass may appear hazy.This is referred to as
etching when it is permanent. See Page 9,Water Hardness.
NON-STICK USUALLY SAFE After the dry cycle, the nonstick coating should be covered with a light
COATINGS coating of vegetable oil.
IRON NOT Iron will rust.Wash by hand and dry immediately.
RECOMMENDED
PEWTER NOT Pewter will tarnish.Wash by hand and dry immediately.
RECOMMENDED
PLASTIC USUALLY SAFE Only wash "dishwasher safe" plastic items.
STAINLESS USUALLY SAFE Do not let stainless steel items contact copper or sterling silver or
STEEL silver plate items.
STERLING USUALLY SAFE Do not allow to come in contact with stainless steel or copper items.
SILVER &
SILVER PLATE
TIN NOT Tin will rust.Wash by hand and dry immediately.
RECOMMENDED
WOOD NOT Wooden bowls, wooden utensils and wood handled utensils can warp,
RECOMMENDED crack or lose their finish.
NON- NOT The Thermador _" dishwasher is only intended for use in cleaning
DISHWARE RECOMMENDED standard household dishware items.
ITEMS
5
PREPARATIONS FOR WASHING
Very little preparation is required before placing dishes, pots,
pans, etc. into the dishwasher. Some preparation is required:
Large solid items, such as bones, large seeds, shells, skins,
leafy vegetables, meat trimmings etc., should be removed
either by scraping into a wastebasket or into your food
disposer.
Large amounts of any type of leftover food should also
be scraped into a wastebasket or into your food disposer.
Pots and pans that have burned-on food, the food is
blackened, should be presoaked and scoured. The
dishwasher cannot remove burned-on food.
Do not place the following items in the dishwasher:
> toothpicks
> small bones and bone slivers
> paper products such as paper plates, paper napkins,
containers with labels.
> plastic bags or plastic packaging material.
In general, try to remove food scraps and place the items to
be washed in the dishwasher before the food has had a chance
to dry-on. Dried-on food is more difficult to remove and you
may find that the DELICATE/ECONOMY or lighter washing
cycles will not provide a satisfactory result when food has
dried on.
If there will be an extended period of time before the
dishwasher will be run it is recommended that the RINSE&
HOLD cycle be used.
Other than the above, no special preparation or pre-rinsing
is required for dishes, pots and pans or utensils with normal
amounts of food soil.
LOADING
LOADINGTHETOP RACK
The upper rack of the dishwasher has been designed with
flexibilityin mind. Glasses, cups,plates,bowls and small pots
may be loaded in many differentpositionsto fityour needs.
_'_ _II 9/I
Figure 3. Upper Rack with Mixed Load
The upper rack height is adjustable to allow more height for
tall items in the upper rack (low level) or for tall items in
lower rack (high levels). Refer to Page 8 for changing rack
position.
Figure 4. Upper Rack Using Flip-Down Shelf
Regular Wash Load
The dishwasher should be loaded so that water can circulate
freely and reach every part of every item that is to be cleaned:
Cups, glasses and containers should be placed in upper
rack upside down so that water does not collect in them.
Tall narrow vessels, such as a vase or tall glass, should be
placed in the lower rack, near the middle, for the best
cleaning result.
The Thermador _'_dishwashers have a special feature
incorporated into the flip-down cup shelves on the side
of the upper rack, as shown in Figure 4. The ends of
these shelves are specially formed to help maintain
spacing between stemmed glasses. When in the flipped
down position, long-stemmed glasses may be placed in
the second row from the edge and placed so their stems
rest in the "V" formed ends of the shelves. When the
cup shelves are in the up position long stemmed glasses
may be placed in the first row with their stems placed to
rest between the tooth like projections of the shelves.
China, crystal and other delicate items must be placed
so that they do not touch each other during dishwasher
operation. Chipping or other damage may occur.
At completion of loading of the upper rack check to
make sure that nothing is protruding through or hanging
beneath the bottom of the rack, which could block the
rotation of the spray arm.
LOADING THE LOWER RACK
Figure 5. Lower Rack with Heavier Soiled Fans
Large and/or heavily soiled items should be placed in
the lower rack of the dishwasher. Heavily soiled pots
and pans should be placed face down, See Figures 5
and 6.
Front
of
Rack
/
(Side View)
Figure 6. Lower Rack with RearTines Folded Flat
Figure 7. Lower Rack with Mixed Load
Silverware should be mixed when placed in the silverware
basket, The purpose of mixing the silverware is to avoid
having them nest together, for example if spoons would
be placed together they could nest together so that water
could not properly circulate across them to clean the
surfaces,
Silverware should be placed in the silverware basket with
the handles clown,with the exception of the knives, which
in order to avoid accidentally cutting oneself, should be
placed with the handles up,
If you do inadvertently load the silverware basket with the
knife blades up, to avoid cutting yourself when unloading, it is
recommended that you remove the silverware basket from
the dishwasher and tip the contents out onto a cutting board,
If more space is needed for pots and pans, the rear two
sets of tines can be folded to the clown position, on all
models, or the rear three sets of tines, on some models,
Figure 6 shows lower basket with rear three sets of
tines in the clown position to accommodate large pots,
UNLOADING
When unloading the dishwasher, always unload the lower
rack first and then unload the upper rack, This will minimize
the chance of drops from the upper rack falling on the dishes
in the lower rack, The silverware basket of the Thermador _'
dishwasher may be removed for easy unloading,
Also, when unloading, it is recommended that the dishes be
allowed to cool before handling, The dishes will cool more
quickly if the door is opened slightly,
RACK HEIGHT ADJUSTMENT
(Except DW244)
The upper rack height of theThermador <'_dishwasher, except
the DW224UB and DW244UW models, is adJustable.There
are two positions: the upper and lower roller alignment.
1. The upper position is used to provide more room for
items to be placed in the lower rack.
2. The lower position is used to provide more room for
items to be placed in the upper rack.
Figure 8. Top drawing: Upper Rack Removal.
Lower drawing: Upper Rack Replacement.
Figure 9. Installation of theTall Item Sprinkler.
To install the tall item sprinklers:
1. With upper rack empty, remove it from the dishwasher
by pulling the rack partially out to the point where rack
can be lifted upward and out to disengage the wheels
from the side rails.
2. Place the "Tall Item Sprinkler" over the upper rack spray
outlet at the back of the dishwasher tub, Figure 9, and
turn clockwise to lock sprinkler head in place.
To reposition rack:
a. First empty upper rack and pull rack partially out to
point where rack can be lifted upward as shown in upper
illustration of Figure 8.
b. Pull the rack forward and then up until rollers are
completely free of channels.
c. Reinsert the rack with the other set of rollers on the
channel.
Tall Item Sprinkler
If you have extra tall items that cannot fit in the lower rack
without interfering with the upper spray arm or without
hitting the upper rack, the upper rack may be removed.
A special "Tall Item Sprinkler" is provided with the dishwasher
to allow use of the dishwasher with upper rack removed.
See Figure 9.
Figure 10. Examples of a Mixed Load of Tall Items.
Extra tall items may now be placed in lower rack for
washing, as shown in Figure 10. To remove "Tall Item
Sprinkler," to again allow use of upper rack, reverse actions
used to insert it,
USING THE DISPENSERS
For the best washing result it is important to use the correct
amount of detergent and rinse aid,
DETERGENT USE
Use only fresh dishwashing detergent (powder is
recommended) manufactured specifically for dishwasher use,
Use of other types of detergents will result in excessive suds,
Be sure to check the phosphate content of the detergent to
be used, Phosphate helps prevent the minerals in hard water
from forming a film or spots on dishes, Hard water requires
your detergent to work harder. In hard water areas you will
find that detergents with high phosphate levels will provide a
better result, If the phosphate level is low, below 8,7%, you
may have to use extra detergent in hard water areas,
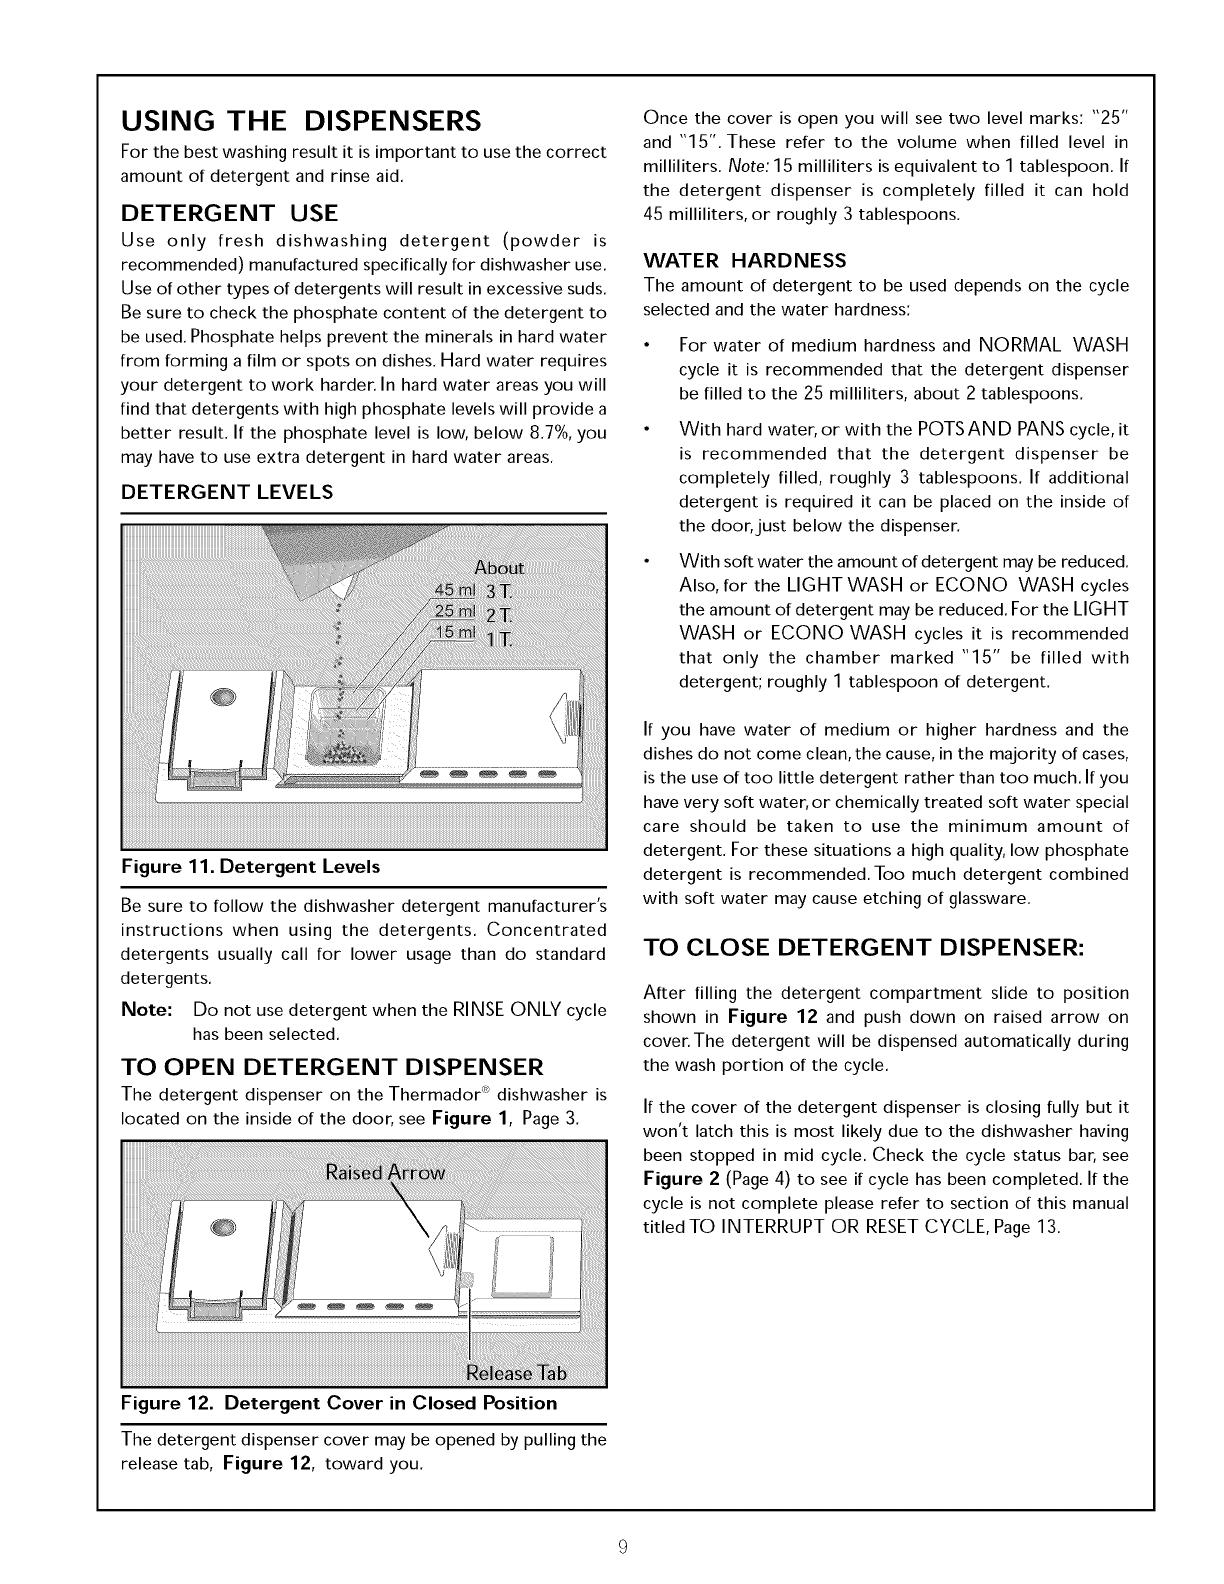
DETERGENT LEVELS
Figure 11. Detergent Levels
Be sure to follow the dishwasher detergent manufacturer's
instructions when using the detergents, Concentrated
detergents usually call for lower usage than do standard
detergents,
Note: Do not use detergent when the RINSE ONLY cycle
has been selected,
TO OPEN DETERGENT DISPENSER
The detergent dispenser on the ThermadoP '_ dishwasher is
located on the inside of the door, see Figure 1, Page 3,
Once the cover is open you will see two level marks: "25"
and "15". These refer to the volume when filled level in
milliliters. Note; 15 milliliters is equivalent to 1 tablespoon. If
the detergent dispenser is completely filled it can hold
45 milliliters, or roughly 3 tablespoons.
WATER HARDNESS
The amount of detergent to be used depends on the cycle
selected and the water hardness:
For water of medium hardness and NORMAL WASH
cycle it is recommended that the detergent dispenser
be filled to the 25 milliliters, about 2 tablespoons.
With hard water, or with the POTSAN D PANScycle, it
is recommended that the detergent dispenser be
completely filled, roughly 3 tablespoons. If additional
detergent is required it can be placed on the inside of
the door, just below the dispenser.
With soft water the amount of detergent may be reduced.
Also, for the LIGHT WASH or ECONO WASH cycles
the amount of detergent may be reduced. For the LIGHT
WASH or ECONO WASH cycles it is recommended
that only the chamber marked "15" be filled with
detergent; roughly 1 tablespoon of detergent.
If you have water of medium or higher hardness and the
dishes do not come clean, the cause, in the majority of cases,
is the use of too little detergent rather than too much, If you
have very soft water, or chemically treated soft water special
care should be taken to use the minimum amount of
detergent, For these situations a high quality, low phosphate
detergent is recommended, Too much detergent combined
with soft water may cause etching of glassware,
TO CLOSE DETERGENT DISPENSER:
After filling the detergent compartment slide to position
shown in Figure 12 and push down on raised arrow on
cover.The detergent will be dispensed automatically during
the wash portion of the cycle.
If the cover of the detergent dispenser is closing fully but it
won't latch this is most likely due to the dishwasher having
been stopped in mid cycle. Check the cycle status bar, see
Figure 2 (Page 4) to see if cycle has been completed. If the
cycle is not complete please refer to section of this manual
titled TO INTERRUPT OR RESET CYCLE, Page 13.
Figure 12. Detergent Cover in Closed Position
The detergent dispenser cover may be opened by pulling the
release tab, Figure 12, toward you.
RINSE AID INDICATOR
There is a rinse aid indicator light on the right hand side of
the front panel of the Thermador <°>dishwasher, see Figure 1
(Page 3),
Figure 13. Rinse Aid and Detergent Dispenser.
To fill the rinse aid reservoir (refer to Figure 14):
Open the dishwasher door fully,
Open the cover of the rinse aid dispenser.
Add rinse aid to the reservoir until the clear level
indicator turns completely dark,The reservoir is full when
the level indicator is dark,
Close the cover of the rinse aid dispenser. Make sure
that it is firmly snapped closed,
RINSE AID DISPENSER REGULATOR
There is also level indicator on the dispenser, see Figure
13, This indicator shows the level of rinse aid that is in the
rinse aid reservoir,As received, and when empty the indicator
light on the front panel will be illuminated and the level
indicator on the dispenser will appear blank,When the rinse
aid reservoir is full, the indicator light will not be illuminated
and the level indicator on the dispenser will appear dark,
RINSE AID DISPENSER
Rinse aid,or a rinse agent such as Jet-Dry ®, is used to diminish
water spotting and to provide optimum drying results, It is
recommended that a rinse aid be used at all times with the
Thermador dishwasher, The rinse aid not only serves to
rinse the dishware, but also serves to rinse the tank and
inner door of the dishwasher,The tank and inner door will
begin to take on a dull, unpolished look, if rinse aid is not
used,
Figure 15. Rinse Aid Regulator
The rinse aid reservoir of the Thermador dishwasher is
provided with a regulator calibrated from I to 6, Figure 15,
This regulator controls the amount of rinse aid dispensed,
The dishwasher leaves the factory preset to 3-I/2. This has
been chosen as the average setting, however:
if you see streaks, it is recommended that the regulator
be turned to a lower number.
if water spots appear, it is recommended that the
regulator be turned to a higher number.
To AdJust Setting:
Open the cover of the rinse aid dispenser.
Turn the setting indicator to desired setting, see
Figure 15.
Figure 14. Filling Rinse Aid Dispenser
The rinse aid dispenser is located next to the detergent
dispenser. See Figure 13. Rinse aid is available in liquid or
solid form. Do not use the solid type of rinse aid in the
Thermador dishwasher,
CYCLE SELECTION
The dishwasher will wash and dry the contents based on
cycle selection made, Refer to the CYCLE SELECTION
CHART, Tables 2 or 3 (Pages 11-12), The most appropriate
cycle for the load to be washed can be selected from one of
these tables, Compare the load type and the amount and
condition of the food on the items to the chart
recommendations,
I0
Table 2. CYCLE SELECTION CHART for DW245, DW246" and DWI246" MODELS
Type of dishware Noni ] i
e.g.china, delicate Mixed
pots/pans,
Type of food
remains
Amount of
food remains
Condition of
food remains
Wash cycle
Cycle sequence
CYCLE DETAILS
Delicate ] Mixed
4 4
Soups, casseroles,
sauces, potatoes,
pasta, rice, eggs,
roast or fried food
Soups, potatoes,
pasta, rice, eggs,
roast or fried food
Coffee, cakes, milk,
salami, cold drinks,
salads
I
I
4
a lot
,g,
stuck on hard
1
11
II"
a little a little
'g" 'U"
loosely attached
4
1ver 'i-'e1
II"
II" II" II"
Pots
and
Pans
4
Pre-rinse
Heavy
Wash
4
Pre-rinse
Normal
Wash
--4--
Pre-rinse
Pre-wash
125°F
'9"
Wash
161°F
,9,
First rinse
,9,
Second
rinse
II"
Rinse-aidI161°F
I Drying I
Wash
150°F
'U"
First rinse
'U"
Second
rinse
,9,
Rinse-aid
161°F
t
Drying
Wash
140°F
'U"
Rinse
'U"
Rinse-aid
161°F
'u"
Drying
'U"
Light
Wash
!
Wash
140°F
,9,
Rinse
Rinse-aid
155°F
'9"
Drying
II"
Econo*
Wash
!
Wash
104°F
'U"
Rinse
'U"
Rinse-aid
140°F
'B"
Drying
,9,
Rinse
Only
4
Pre-rinse
Duration in
minutes
Water consumption
in gallons
Water consumption
in litres
91
7.1/5
26.9/18.9
80
6/4.2
22.7/15.9
91
5.4/3.8
20.4/14.4
72
3.6/2.5
13.5/9.5
29
2.7/1.9
10.5/7.4
9
1.2/0.8
4.5/3.2
Thermador Soil Sensor will reduce water consumption by approximately 20%, in case of lightly soiled dishes. Shown above
are the range of values that may be obtained while running the dishwasher under normal conditions.Actual values may vary.
The actual cycle duration, water and energy usage depend upon temperature and amount of soil on dishware.
* Available on 6 program models only.
11
Table 3. CYCLE SELECTION CHART for DW244UB or DW244UW
Type of dishware
e.g. china,
pots/pans,
cutlery,
glasses,
Type of food
remains
Amount of
food remains
Condition of
food remains
Wash
cycle
Cycle
sequence
CYCLE DETAILS
Duration in
minutes
Water consumption
in gallons
Water consumption
in litres
Non-delicate
!
!
Soups, casseroles, sauces,
potatoes, pasta, rice, eggs,
roast or fried food
a lot
4
Mixed
!
Soups, potatoes, pasta,
rice, eggs, roast or fried
food
a lot
4
Delicate Mixed
Coffee, cakes, milk, salami,
cold drinks, salads
!
very little
4
stuck on hard
4 4 4
loosely attached
4
Pots
and
Pans
4
Pre-wash
125°F
Wash
161°F
Heavy
Wash
4
Pre-rinse
'U"
I Wash
150°F
First rinse
Normal
Wash
4
Pre-rinse
Wash
140°F
,g,
Rinse
Rinse-aid
161°F
Second
rinse
Rinse-aid
161°F
Drying
First rinse
II"
Second
rinse
'U"
Rinse-aid
161°F
Drying
Drying
Rinse Only
4
Pre-rinse
91
7.1/5
26.9/18.9
8O
6/4.2
22.7/15.9
91
5.413.8
20.4114.4
9
1.2/0.8
4.5/3.2
Thermador Soil Sensor will reduce water consumption by approximately 20%, in case of lightly soiled dishes, Shown
above are the range of values that may be obtained while running the dishwasher under normal conditions, Actual values may
vary, The actual cycle duration, water and energy usage depend upon temperature and amount of soil on dishware,
12
OPERATION
Once detergent has been added and before closing the door
of the dishwasher check the wash arms to ensure that they
are free to move.With the detergent in the dishwasher and
arms free to move:
IMMEDIATE START
Close the door of the dishwasher making sure that door
latches closed.
Depress the on/off switch. The indicator light for the
cycle that was last selected will become illuminated.
Depress the button for the cycle you desire TWO TIMES
if different than the illuminated cycle.
The dishwasher will start automatically and continue to
the end of the selected cycle.
At the end of the cycle the dishwasher will stop and the
display will point to "END".
NOTE: Your dishwasher (except DW244) features a new
sophisticated sensor technology package, which is
designed to constantly scan and measure the
conditions inside the appliance.
DELAYED START (except DW244)
The start of the washing cycle can be delayed for up to 9
hours, in 1 hour increments.
Close the door of the dishwasher making sure that
door latches closed.
Depress the on/off switch.The indicator light for the
cycle that was last selected will become illuminated
to indicate the dishwasher is on.
Immediately press the timer button labeled CYCLE
DELAY - HOURS. The alphanumeric display will
change to "1 ".
Press the CYCLE DELAY - HOURS button as
many times as necessary until the alphanumeric
display shows the number of hours delay desired.
Note: The cycle may be changed at any time during the
delay time until the cycle starts.
The dishwasher will not start until the indicated delay
has past.
At the end of the cycle the dishwasher will stop and
the display will point to "END".
TO INTERRUPT OR RESET CYCLE
(except DW244)
To interrupt cycle simply depress the on/off button to stop
operation. If you are interrupting the cycle during a wash or
rinse cycle please wait until the water noises stop before
opening the door. After opening the door leave it ajar for a
few minutes.The cycle then may be resumed by closing the
door and depressing the on/off button.
As a safety feature the dishwasher will automatically turn
itself off whenever the door is unlatched. However, if the
door is opened quickly while in a wash or rinse cycle some
water may splash out of the dishwasher. For this reason it is
recommended that the machine always be switched to off
before opening the door.
If you wish to reset the cycle to its beginning after stopping
the dishwasher:
1. Close the door of the dishwasher. Make sure that the
door is completely closed and latched.
2. Depress the on/off button, then depress HEAVY
WASH button and LIGHTWASH buttons at the same
time and hold for approximately 3 seconds.You will see
the cycle status bar progress to end. When the drain
pump has stopped and the alphanumeric display is at the
end the cycle is complete and the dishwasher is reset.
3. Depress the on/off button to shut-off the dishwasher.
4. The dishwasher is now ready to run your selected wash
cycle. Depress the on/off button to restart the
dishwasher.
Note:
If you wish to change the cycle selection simply
depress the button of the cycle desired twice. The
light above the cycle will then become illuminated
to show it has been selected.
SOIL SENSOR (except DW244)
The Soil Sensor automatically scans the amount of food and
fat particles in the water to check how clean or soiled it is.
A fresh water refill occurs when needed, but only adds up to
a maximum of 7.1 gallons. Soil Sensor will reduce the overall
water consumption by about 20% in cases of lightly soiled
dishes.
13
CARE AND CLEANING
Thermador _' dishwashers have a three-stage filter system
comprised of: a microfilter, a fine filter and a coarse filter.
The microfilter is self-cleaning, but the coarse filter and fine
filter will sometimes be found to have collected items, from
bones to toothpicks or seeds that have been left on the plates
or in the glasses, For this reason the following maintenance
should be observed:
Wash arms
The wash arms should be checked for food particles on
a regular basis to assure that the spray orifices are clear
and unobstructed, If the wash arms require cleaning they
are easily removable:
Figure 16. Filter System
Filters
The filters should be checked on aweekly basis.To remove
the filters, turn the knurled ring handle of the coarse/
microfilter 1/4 turn counter-clockwise, see Figure 16,
and lift out the coarse/microfilter. After removing the
coarse/microfilter the fine filter can also be lifted out for
inspection, Examine the filters, If large solids, such asbones,
or large seed(s) are present, remove the filters and dispose
of the large solids by emptying into a waste basket, If any
other items have been trapped by the filters, paper labels
for example, these should also be removed while you
havethe filters out of the dishwasher.These smaller items
can usually be flushed out under running water or with a
soft brush, Remove any food residue lodged under edge
of fine filter and on recessed areas of tank,
After cleaning, reinsert the filters in the dishwasher making
sure to press the filters firmly into position, and then
turning the knurled ring I/4 turn clockwise until locked,
Pull gently on the knurled ring to make sure the filters
are again locked in place,
Other areas requiring periodic maintenance are the wash
arms, the stainless steel tank, inner door and door gasket,
Figure 17. Removable Wash Arms
The lower wash arm simply snaps into place
and can be removed by pulling upwards,
The upper wash arm is held in position by a
locking ring that can be released by turning it
approximately 1/8 turn, See Figure 17,
After cleaning, reattach the wash arms by reversing the
action used to remove them,
Stainless Steel Tank and Door
The outer edges of the inside door panel should be
cleaned on a regular basis to remove food particles that
can gather there from normal loading, If spots begin to
appear on the stainless steel door or tank check to make
sure that the RINSE AID RESERVOIR has rinse agent in
it, Also it is possible that the wash arms are blocked,
which prevented the door aswell as your dishware from
being properly washed and rinsed, Check the wash arms
to make sure they are moving freely, If not, clear the
obstruction away so that the arms may rotate freely and
then rewash the load of dishes in the dishwasher.
Spots that appear on the stainless steel door may be
removed by wiping gently with a sponge sprinkled with a
stainless steel cleaner. Do not use metal scouring pads to
clean the stainless steel surfaces as these can scratch the
surface and leave metal fragments that can rust,
Door Gasket
The door gasket should be cleaned on a regular basis,To
remove food particles that can gather from normal loading,
clean the door gasket with a damp cloth,
14
Table 4. SELF-HELP
Dishwashers may exhibit problems that are unrelated to a malfunction of the dishwasher itself, The following table may
serve to answer your question about a problem you are having without having to call a serviceman,
PROBLEM
Dishes do not dry
Indicator light(s) do
not come on
Dishwasher does not
start
Dishwasher runs long
time
Machine cycle does
not advance to rinse
Water not pumped
from dishwasher
POSSIBLE CAUSE/ACTION
Rinse aid dispenser is empty, Fill rinse aid dispenser. RINSEONLY cycle selected in error.
A fuse may have blown or a circuit breaker tripped, Replace fuse or reset circuit breaker.
Door of dishwasher not properly closed, Close dishwasher making sure that door latches,
If the dishwasher completes the cycle, but the run time seem exceptionally long, it is probably
due to cold incoming water. To avoid this problem, it is recommended to turn on the hot water
faucet at the sink nearest the dishwasher before starting the dishwasher. Run the water
until the water is hot,Then turn off the water and start the dishwasher.
Water line is closed or inlet filter is blocked, Open water valve and/or check inlet filter.
Kink in drain hose, Filter clogged, Kitchen sink clogged, Check drain hose and fine and
coarse filters (see section titled CARE and CLEANING), Check kitchen sink to make sure it
is draining well, If problem is kitchen sink not draining you may need a plumber rather than a
serviceman for the dishwasher.
Detergent dispenser A program was not completely finished, See directions on Page 13 for resetting cycle,
lid will not close
Lower spray arm does Remove lower spray arm and clean arm and spray arm mounts,
not rotate freely
White deposits left on Too little rinse aid, Increase dosage dispensed, Page 10,
dishes
Streaks on glassware Too much rinse aid used, Decrease dosage dispensed, Page 10,
Rattling noises Utensils not properly arranged and anchored, Rearrange load,
Suds in dishwasher Incorrect type of detergent used, Use only automatic dishwasher detergents,
Unsatisfactory
washing results
Incorrect amount of detergent or rinse agent,
Utensils incorrectly arranged or rack overloaded,
• Wash arm rotation blocked by utensils,
Filters not properly fitted into position,
Clogged nozzles in wash arm(s),
Unsuitable program selected,
15
WARRANTY
FULL ONE YEAR WARRANTY
Covers one year from date of installation, or date of
occupancy on a new, or previously unoccupied dwelling. Save
your dated receipt or other evidence of installation/
occupancy date.
ThermadorWill Pay For:
All repair labor and replacement parts found to be defective
due to materials and workmanship.
Service must be provided by a Factory Authorized
Service Agency, during normal working hours. For a
Service Agency nearest you, please call 800/735-4328.
ThermadorWill Not Pay For:
1. Service by an unauthorized agency. Damage or repairs
due to service by an unauthorized agency or the use of
unauthorized parts.
. Service visits to:
Teach you how to use the appliance.
Correct defects or repairs due to improper
installation. You are responsible for providing
electrical wiring and other connecting facilities.
Reset circuit breakers or replace home fuses.
Repair damage caused from accident, alteration,
misuse, abuse, improper installation or installation
not in accordance with local electrical codes or
plumbing codes, or improper storage of the appliance.
.
4.
Service labor during limited warranty period.
Travel fees and associated charges incurred when the
product is installed in a location with limited or restricted
access. (i.e., airplane flights, ferry charges, isolated
geographic regions).
5. Repairs due to other than normal home use.
This warranty applies to appliances used in residential
applications; it does not cover their use in commercial
installations.
The warranty is for products purchased and retained in the
50 states of the U. S.A., the District of Columbia and Canada.
Should the appliance be sold by the original purchaser during
the warranty period, the new owner continues to be
protected until the expiration date of the original purchaser's
warranty period. Products for use in Canada must be
purchased through the Canadian distribution channel to
ensure regulatory compliance.
This warranty gives you specific legal rights. You may also
have other rights which vary from state to state.
Thermador wants to ensure that we exceed your
expectations of support not only with your current appliance
purchase, but well into the future. If an issue arises that is
not resolved to your satisfaction, please let us know by calling
or writing to us at the telephone number or address shown
below.
HOWTO OBTAIN SERVICE
Contact the Factory Authorized Service Agent in your area
Contact the Dealership where you purchased the appliance,
Call the Thermador Customer Support Call Center at 800-735-4328
Write us at: Thermador, 5551 McFadden Avenue, Huntington Beach CA, 92649
16
Specifications are for planning purposes only, Refer to installation instructions and consult your countertop supplier prior to
making counter opening, Consult with a heating and ventilating engineer for your specific ventilation requirements, We
reserve the right to change specifications or design without notice, Some models are certified for use in Canada,Thermador
is not responsible for products which are transported from the U,S, for use in Canada, Check with your local Canadian
distributor or dealer.
For the most up to date critical installation dimensions by fax, use your fax handset and call (702) 833-3600, Use code #8030
Thermador
CORPORATION
5551 McFadden Avenue, Huntington Beach, CA 92649
ECO# 91151 35-07-002C ©1998 Thermador Corporation, Litho Date: 8/99
  • Page 1 1
  • Page 2 2
  • Page 3 3
  • Page 4 4
  • Page 5 5
  • Page 6 6
  • Page 7 7
  • Page 8 8
  • Page 9 9
  • Page 10 10
  • Page 11 11
  • Page 12 12
  • Page 13 13
  • Page 14 14
  • Page 15 15
  • Page 16 16
  • Page 17 17
  • Page 18 18
  • Page 19 19

Thermador DWI246UW Owner's manual

Category
Dishwashers
Type
Owner's manual
This manual is also suitable for

Ask a question and I''ll find the answer in the document

Finding information in a document is now easier with AI