Insignia NS-HWG1965 TV Console for up to 75″ TVs User guide

Type
User guide

This manual is also suitable for

Insignia NS-HWG1965 TV Console for up to 75″ TVs: With its sturdy construction and stylish design, this TV console is the perfect addition to any living room. It offers ample storage space for your entertainment components and accessories, as well as adjustable shelves to accommodate items of various sizes. The console's open design allows for easy access to your devices, while its durable materials ensure long-lasting use. Whether you're looking for a functional piece of furniture or a stylish accent for your living room, the Insignia NS-HWG1965 TV Console is the ideal choice.

Insignia NS-HWG1965 TV Console for up to 75″ TVs: With its sturdy construction and stylish design, this TV console is the perfect addition to any living room. It offers ample storage space for your entertainment components and accessories, as well as adjustable shelves to accommodate items of various sizes. The console's open design allows for easy access to your devices, while its durable materials ensure long-lasting use. Whether you're looking for a functional piece of furniture or a stylish accent for your living room, the Insignia NS-HWG1965 TV Console is the ideal choice.

USER GUIDE
SAFETY INFORMATION AND SPECIFICATIONS..2
PACKAGE CONTENTS: PARTS...................................3
PACKAGE CONTENTS: HARDWARE .......................4
ASSEMBLY INSTRUCTIONS.......................................6
CARE AND MAINTENANCE ................................... 22
TV Console for up to 75" TVs
NS-HWG1965
Before using your new product, please read these instructions to prevent any damage.
On-line Video Instruction Guides
Go to www.guides.sellpoints.com to view step-by-step instructional videos for assembling and
installing your product. Enter the following product number on the website.
NS-HWG1965
2
NS-HWG1965
www.insigniaproducts.com
SAFETY INFORMATION AND SPECIFICATIONS
Maximum overall weight: 335 lbs (151.9 kg)
Maximum top panel weight: 135 lbs (61.2 kg)
Maximum shelf weight: 50 lbs (22.6 kg)
Maximum TV weight: 135 lbs (61.2 kg)
Maximum screen size: 75” diag.
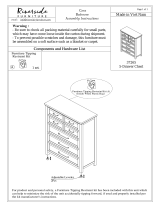
Overall dimensions (H × W × D):
22 × 65 × 15.75 in. (55.8 x 165.1 x 40 cm)
Shelf dimensions (W × D):
30.0 × 12.2 in. (76.3 × 31 cm)
TV stand weight: 101.2 lbs. (46 kg)
22 in.
(55.8 cm)
6
5
i
n
.
(
1
6
5
.
1
cm
)
15.75 in.
(40 cm)
3
0
.
0
4
i
n
.
(
7
6
.
3
c
m
)
16.34 in.
(41.5 cm)
12.2 in.
(31 cm)
CAUTION: The console’s top work surface is
designed for use with a product weighing no
more than 135 lbs. (61.2 kg) and having a
width that permits it to sit evenly on the
console with no more than a one-inch
overhang on each side of the top panel. Use with
products that weigh more than the maximum weight
allowed, or with dimensions that extend beyond the
maximum width may result in instability, which may
result in injury. The base of the television must be placed
behind the stopper. See instructions for more details.
CAUTION: This product contains small items
that could be a choking hazard if swallowed.
Keep these items away from young children!
3
TV Console for up to 75" TVs
www.insigniaproducts.com
PACKAGE CONTENTS: PARTS
Make sure that you have all the parts necessary to assemble your new TV stand.
Tools needed:
Phillips screwdriver
Power drill
3/8” drill bit
Hammer
Rubber mallet
Pliers
A Top panel (1)
Note: Keep the stopper template attached to the top panel.
B Left side panel (1) C Right side panel (1)
D Partition panel (1)
E Bottom shelf (1)
F Front skirting (1)
G Back skirting (1)
H Left skirting
(1)
I Right skirting
(1)
J Back panel (1)
K Adjustable shelf (2)
L Door (4)
M Wood door
panel (4)
4
NS-HWG1965
www.insigniaproducts.com
PACKAGE CONTENTS: HARDWARE
Note: You may receive extra hardware.
Make sure that you have all the hardware necessary to assemble your new TV stand.
Label Hardware Qty.
N
26
P22
Q22
R6
S12
T22
U2
V6
W8
Wood dowel
M8 x 30 mm
Cam pin
Cam lock
Screw
M4 x 50 mm
Flat head screw
M3.5 x 15 mm
Door stopper
Cam lock cover
Shelf support
Label Hardware Qty.
X4
Y4
Z2
AA 2
BB 2
CC 1
DD 4
EE 4
FF 1
GG 2
Knob
Knob bolt
Corner
connector
Floor leveler
Stopper
Glue
Bumper
Large cam lock
cover
Touch-up pen
Tipping restraint
hardware kit
10 20 30 40 50 60 70 80 90 100mm
1234in
5
TV Console for up to 75" TVs
www.insigniaproducts.com
INSTALLATION TIPS
Gluing wood dowels (N)
When using a wood dowel (N), put one drop of glue (CC) in the hole before you insert the wood dowel (N). Insert
the wood dowel (N), then gently tap it with a rubber mallet to secure it in place.
Locking cam pins (P) and cam locks (Q)
1 One end of a cam pin (P) is threaded so that it screws into place. The other end is not threaded. Before you insert
the un-threaded end into a hole, insert a cam lock (Q) into the hole and make sure that the hole in the cam lock
(Q) faces the outside edge of the part being used.
2 Insert the un-threaded end of the cam pin (P) through the hole in the part being used and into the cam lock
hole, then rotate the cam lock (Q) clockwise with a screwdriver to lock the cam pin (P) into place.
3 Insert a cam lock cover (V) into the cross slot of the cam lock (Q) to conceal.
312 4
X
FINAL
GL
U
E
Cam pin
Pre-drilled hole Cam lock Cam lock
cover
LOCKED
PANEL
PANE L
6
NS-HWG1965
www.insigniaproducts.com
ASSEMBLY INSTRUCTIONS
Step 1: Screw cam pins onto the top panel, bottom shelf, and skirtings
Tip: Assemble your stand on a carpeted floor or the empty TV stand carton to avoid scratching it.
Securely screw the cam pins (P) into the designated small holes on the top panel (A), bottom shelf (E), front
skirting (F) and side skirtings (H and I) using a Phillips screwdriver.
You’ll need:
P (22)
Phillips screwdriver
7
TV Console for up to 75" TVs
www.insigniaproducts.com
Step 2: Attach the back skirting between the side skirtings
1 Glue two wood dowels (N) into the drilled holes on the ends of the back skirting (G).
Tip: See “Gluing wood dowels (N)“ on page 5 for more information.
2 Attach the back skirting to the side skirtings (H and I) by inserting two cam locks (Q) and tightening with a
screwdriver. Make sure that the cam screw holes face inward.
Tip: See “Locking cam pins (P) and cam locks (Q)“ on page 5 for more information.
You’ll need:
Cam screw holes must
face in
Phillips screwdriver
N (2)
Q (2)
CC (1)
8
NS-HWG1965
www.insigniaproducts.com
Step 3: Attach the front skirting to the side skirtings
1 Glue two wood dowels (N) into the drilled holes on the front skirting (F).
2 Attach the front skirting (F) to the side skirtings (H and I) by inserting two cam locks (Q) and tightening with a
screwdriver. Make sure that the cam screw holes face inward.
You’ll need:
Phillips screwdriver
N (2)
Q (2)
CC (1)
9
TV Console for up to 75" TVs
www.insigniaproducts.com
Step 4: Attach the assembled base to the bottom shelf
1 Glue 10 wood dowels (N) into the drilled holes on the bottom shelf (E).
2 Position the assembled base onto the wood dowels (N) and cam pins (P) on the bottom shelf (E). Make sure that
the pilot holes for the corner connectors face the front of the bottom shelf.
Tip: Try working from one end to the other to slide the assembled base into place. You may need to push or pull the
skirts slightly to get them to align with the holes.
3 Insert 12 cam locks (Q), then tighten with a screwdriver to secure.
You’ll need:
Pilot holes for
corner connector
FRONT
Phillips screwdriver
N (10)
Q (12)
CC (1)
10
NS-HWG1965
www.insigniaproducts.com
Step 5: Install two floor levelers to the assembled base
1 Using the pilot holes as a guide, fasten two corner connectors (Z) to the joints where the front skirting (F) meet
with the side skirtings (H and I) with eight 15 mm flat head screws (S).
2 Screw two floor levelers (AA) onto the installed corner connectors (Z).
You’ll need:
AA
Phillips screwdriver
AA (2)
Z (2)
S (8)
11
TV Console for up to 75" TVs
www.insigniaproducts.com
Step 6: Attach two door stoppers to the top panel
Note: Keep the stopper template attached to the top panel (A).
Using the pilot holes as a guide, attach two door stoppers (U) onto the front supports on the top panel (A) with
two 15 mm flat head screws (S) per stopper. Make sure that the right angle sides of the stoppers face the front of
the unit.
You’ll need:
Phillips screwdriver
S (4)
U (2)
12
NS-HWG1965
www.insigniaproducts.com
Step 7: Align and attach the side panels to the top panel
1 Glue two wood dowels (N) into the holes on the top edge of the left side panel (B).
2 Attach the left side panel to the top panel (A) by inserting two cam locks (Q) and tightening with a screwdriver.
Make sure that the door hinge mounts are on the same side as the door stoppers.
3 Repeat this process to attach the right side panel (C) on the opposite end.
You’ll need:
Door stopper
Door hinge mounts
point towards the
front of the unit
Phillips screwdriver
N (4)
Q (4)
CC (1)
13
TV Console for up to 75" TVs
www.insigniaproducts.com
Step 8: Attach the partition panel to the top panel
1 Glue two wood dowels (N) into the inner holes on the top edge of the partion panel (D).
2 Attach the partition panel to the top panel (A) by inserting two cam locks (Q) and tightening with a screwdriver.
You’ll need:
Door hinge mounting bases point
towards the front of the unit
Phillips screwdriver
N (2)
Q (2)
CC (1)
14
NS-HWG1965
www.insigniaproducts.com
Step 9: Attach the bottom shelf to both side panels and partition panel
1 Glue six wood dowels (N) into the holes on the bottom edge of side panels (B and C) and partition panel (D).
2 Align the drilled holes on the bottom shelf (E) with the installed wood dowels (N) on both side panels (B and C)
and partition panel (D), then press them together. Make sure that the leveling feet are on the same side as the
hinges.
3 Insert six 50 mm screws (R) through the pre-drilled holes on the bottom shelf (E) and screw into the holes on the
vertical panels (B, C, and D).
You’ll need:
Leveling feet
Hinges
Phillips screwdriver
N (6)
R (6)
15
TV Console for up to 75" TVs
www.insigniaproducts.com
Step 10: Attach the back panel to the assembled console frame
1 Go back and tighten all cam locks and screws. Make sure that all the parts are tight and there are no gaps
between the pieces. This will help keep the unit square.
2 Turn the assembled unit over so that its back is facing up.
3 Unfold the back panel (J) and align its holes with the pilot holes along the edges of the assembled unit.
4 Use the washer head screws (T) to secure the back panel to the assembled unit. Tighten the screws using a
Phillips screwdriver.
You’ll need:
Phillips screwdriver
T (22)
16
NS-HWG1965
www.insigniaproducts.com
Step 11: Attach adjustable shelves
1 Stand the assembled unit upright.
2 Insert the small and large cam lock covers (V and EE) into the cross slots on the visible cam locks on the vertical
panels (B, C, and D).
3 Insert eight shelf supports (W) into the holes in the sides of the compartments. Make sure that you place the
shelf supports at the same level so the shelves are not tilted.
4 Tilt and rest the adjustable shelves (K) onto the shelf supports (W).
You’ll need:
EE
V (6)
W (8)
EE (4)
17
TV Console for up to 75" TVs
www.insigniaproducts.com
Step 12: Attach doors to the vertical panels
1 Push the knob bolts (Y) through the inside of each door (L), then screw on the knobs (X).
2 Attach a door (L) to the right side panel (C) by engaging both door hinges together as shown:
A Extend both hinges of the door (L) to the open position, if needed.
B Slide the back hooks (on the door hinges) into the slots on the ends of the mounting bases.
C Once the back hooks are inserted into place, push in the back of the hinge arm to secure it to the mounting
base.
D Repeat the same process to attach the other doors (L) to left side panel (B) and partition panel (D).
Tip: If you need to remove a door, press the release lever on the end of the hinge arm.
3 Open and close the doors to make sure they are aligned and shut correctly. If necessary, adjust the screws on
the hinge arm for a better fit.
Tip: If you need additional information on how to assemble the hinges, go to www.guides.sellpoints.com to view
step-by-step instructional videos.
You’ll need:
Release lever
Mounting base
Hinge arm
Push in the back of the
hinge arm
Hooks
Slot
X (4)
Phillips screwdriver
Y (4)
18
NS-HWG1965
www.insigniaproducts.com
Step 13: Attach the bumpers to the door stoppers
Peel two bumpers (DD) from the bumper card and attach one to each door stopper (U) where it will contact the
door (L).
You’ll need:
DD
DD
DD (4)
19
TV Console for up to 75" TVs
www.insigniaproducts.com
Step 14: Attach the stopper to the top panel
To prevent your TV from tipping, you must follow these instructions if you place a TV on top of your stand.
Otherwise, skip to “Step 15: Change the door panel” on page 20.
If your TV has one base:
1 Remove the paper backing from the stopper (BB), then place it in the cut-out of the stopper template on the top
panel (A). Press down on the stopper (BB) to help adhesion.
2 On the back of the top panel (A), carefully pull out the thumb tacks to remove the stopper template.
If your TV has two bases:
1 On the back of the top panel (A), carefully pull out the thumb tacks to remove the stopper template.
2 Align the template at the position where one of your TV’s bases will be located.
3 Remove the paper backing from the stopper (BB), then place it in the cut-out of the stopper template on the top
panel (A). Press down on the stopper (BB) to help adhesion.
4 Repeat this process to attach the second stopper.
You’ll need:
BB
BB
Pliers
BB (2)
20
NS-HWG1965
www.insigniaproducts.com
Step 15: Change the door panel
Follow these steps if you want to change your TV stand’s door panels from glass to wood. Otherwise, skip
to “Step 16: Position the TV stand and install the tipping restraint hardware kit” on page 21.
1 Open a door (L) and loosen the screws on the inside of the door frame.
2 Rotate the clips to remove the old panel.
3 Insert the new panel, then rotate the clips and tighten the screws to secure the panel in the door frame.
4 Repeat this process to replace all the door panels.
You’ll need:
Glass door
panel
Wood door
panel
Clip
Phillips screwdriver
  • Page 1 1
  • Page 2 2
  • Page 3 3
  • Page 4 4
  • Page 5 5
  • Page 6 6
  • Page 7 7
  • Page 8 8
  • Page 9 9
  • Page 10 10
  • Page 11 11
  • Page 12 12
  • Page 13 13
  • Page 14 14
  • Page 15 15
  • Page 16 16
  • Page 17 17
  • Page 18 18
  • Page 19 19
  • Page 20 20
  • Page 21 21
  • Page 22 22
  • Page 23 23
  • Page 24 24

Insignia NS-HWG1965 TV Console for up to 75″ TVs User guide

Type
User guide
This manual is also suitable for

Insignia NS-HWG1965 TV Console for up to 75″ TVs: With its sturdy construction and stylish design, this TV console is the perfect addition to any living room. It offers ample storage space for your entertainment components and accessories, as well as adjustable shelves to accommodate items of various sizes. The console's open design allows for easy access to your devices, while its durable materials ensure long-lasting use. Whether you're looking for a functional piece of furniture or a stylish accent for your living room, the Insignia NS-HWG1965 TV Console is the ideal choice.

Ask a question and I''ll find the answer in the document

Finding information in a document is now easier with AI