Page is loading ...

Outdoor Propane Turkey Fryer
Product no. 085-3230-2 (TF2115708-MC-00)
INSTRUCTION MANUAL
TM
Toll-free: 1-855-803-9313
Read this manual thoroughly before using and save it for future reference.

2
Table of Contents
Product no. 085-3230-2 (TF2115708-MC-00) |
Contact us: 1-855-803-9313
Warnings 2
Product Diagram 4
Component List 5
Hardware List 5
Assembly Instructions 6
Troubleshooting
10
Limited Warranty
11
Warnings
• To installer or person assembling this appliance: Leave this manual with this appliance for future reference.
• This instruction manual contains important information necessary for the proper assembly and safe use
of the appliance.
• Read and follow all warnings and instructions before assembling and using the appliance.
• Follow all warnings and instructions when using the appliance.
• Keep this manual for further reference.
SAFETY SYMBOLS:
The symbols and boxes shown below explain what each heading means.
Read and follow all of the messages found throughout the manual.
DANGER: Indicates an imminent hazardous situation which, if not avoided, will result in death or
serious injury.
WARNING: Indicates a potentially hazardous situation which, if not avoided, could result in
death or serious injury.
CAUTION: Indicates a potentially hazardous situation which, if not avoided, may result in minor or
moderate injury.

3
TM
DANGER:
If you smell gas:
1. Shut o gas to the appliance.
2. Extinguish any open flame.
3. If odour continues, keep away from the appliance and immediately call your gas supplier or fire
department.
Failure to follow these instructions could result in fire or explosion which could cause property
damage, personal injury or death.
Warnings
DANGER:
1. Never operate this appliance unattended.
2. Never operate this appliance within 10’ (3.0 m) of any structure, combustible material or other
gas cylinder.
3. Never operate this appliance within 25’ (7.5 m) of any flammable liquid.
4. Do not fill cooking vessel beyond maximum fill-line.
5. Never allow oil or grease to get hotter than 400°F or 200°C. If the temperature exceeds
400°F (200°C) or if oil begins to smoke, immediately turn the burner or gas supply OFF.
6. Heated liquids remain at scalding temperatures long after the cooking process.
Never touch cooking appliance until liquids have cooled to 115°F (45°C) or less.
7. If a fire should occur, keep away from the appliance and immediately call your fire department.
Do not attempt to extinguish an oil or grease fire with water.
Failure to follow these instructions could result in fire or explosion which could cause property
damage, personal injury or death.
WARNING:
This appliance is not intended for commercial use.
WARNING:
1. Never leave the appliance unattended.
Keep children and pets away from the appliance at all times.
2. The use of alcohol, prescription or non-prescription drugs may impair the consumer’s ability to
properly assemble or safely operate the appliance.
3. This appliance must not be used on or under any apartment or condominium balcony or deck.
4. This appliance is for OUTDOOR USE ONLY.
DO NOT use in a building, garage or any other enclosed area.
5. This appliance is not intended to be installed in or on a boat.
This appliance is not intended to be installed in or on recreational vehicles.
6. This appliance is not intended for and should never be used as a heater.
7. When cooking, the fryer/boiler must be on a level, stable noncombustible surface in an area clear
of combustible material. An asphalt surface (blacktop) is not acceptable for this purpose.

4
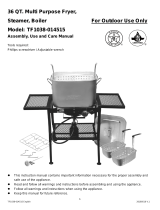
Product Diagram
1
2
3
4
5
6
7
8
9
10
11
Product no. 085-3230-2 (TF2115708-MC-00) |
Contact us: 1-855-803-9313

5
TM
Component List
Key No. Description Qty.
1 1
2 Pot lid handle 1
3 1
4 36 qt (34 L) aluminum pot 1
5 1
6 Timer control box 1
7 1
8 T-star stand 1
9 1
10 Strainer basket 1
11 1
Steel stand
Pot lid
Burner
Heat shield
Lifter
15” (38.1 cm) Thermometer
Hardware List
Part No. Description Diagram Qty.
A M6 x 12 Bolt 2
Tools required (not included):
Cross-head screwdriver / Adjustable wrench

6
Step 1
Step 2
Attach the burner (5) to automatic
shut o valve in the timer control
box (6) by turning the burner
clockwise. Do not fully tighten the
burner to the valve; tighten until
3 threads remain visible on the valve.
Assembly Instructions
THREE visible threads left.
Proper connection is critical
for correct operation of unit.
5
6
Attach thermocouple (D) to
thermocouple bracket (E) which
has been fixed to the burner.
Attach thermocouple (D) as per
right drawing and tighten the nut (Y).
Y
Y
D
E
Product no. 085-3230-2 (TF2115708-MC-00) |
Contact us: 1-855-803-9313

7
TM
Assembly Instructions
Step 3
Step 4
Unscrew the pre-assembled nut
from the threaded pin of the
burner (5). Insert the burner
through the bottom of the
stand (1), between the wind
shield (F) (side with rectangle
lip) and burner support bar (G).
F
G
1
Align timer control box (6) to the
timer box support bar (H) and secure
it with 2 pieces M6x12 screws by
going through the support bar (H)
and then into the timer control box (6).
Align burner (5) base to burner
support bar (G). Align holes on heat
shield (7) with threaded pin and
alignment pin of the burner (5)
through hole in burner support
bar (G), then through small hole of
heat shield (7). The alignment pin
on bottom of burner (5) must be
inserted through the large hole of
the heat shield (7). Tighten hex
nut onto bolt of the burner (5).
7
A
6
H
5
G

8
Assembly Instructions
Step 5
When transporting or storing LP
cooker without tank attached,
hook regulator onto burner or
cooker stand to prevent damage
to regulator.
Finally, unscrew the two screws from
the lid handle by loosening the nuts.
Align the lid handle on the lid and
secure by reattaching the nuts to the
screws.
Step 6
Product no. 085-3230-2 (TF2115708-MC-00) |
Contact us: 1-855-803-9313

9
TM
Troubleshooting
Problem Possible Cause Corrective Action
The connection between the regulator
and LP tank are not in good condition.
The LP tank valve and regulator
control valve are not open.
The LP tank is empty.
Push button of safety valve was not
pushed down.
The burner does
not light up.
Check and make sure the regulator coupling nut is tightened to
the LP tank valve.
The regulator control valve and LP tank valve is open during normal
operation. The regulator control valve is opened in clockwise
direction and the LP tank valve is opened in counter-clockwise direction.
Check and make sure the LP tank is filled with fuel.
Press and fully hold down push button of safety valve after the lighted
match is placed on the burner.
The burner does
not stay lit.
The push button on safety valve was
not fully pushed down for at least
10 seconds.
Timer is not activated.
The thermocouple is not in direct flame
path of burner.
High wind condition.
Timer has completed its cycle.
Fully hold down the push button on safety valve at least 10 seconds
and then release.
Fully turn the timer control knob clockwise.
Ensure the thermocouple is assembled in right position and the nut is
tightened on the thermocouple. (See Assembly Instructions - step 2 for
detail). Make sure the flame has full contact with the thermocouple.
If wind blows out flame, gas supply will be cut o. Move out of wind
and restart.
Each cycle of timer is 15 minutes, after 15 minutes, the burner will go
o automatically. Please re-set the timer.
The oil is not
reaching desired
temperature.
The food is not fully defrosted.
The regulator control valve is not
fully opened.
Overfilled Protection Device (OPD) on
tank has been tripped.
Do not attempt to fry a frozen or partially frozen turkey or food.
Ensure the turkey or food is completely thawed prior to proceeding.
Fully open the regulator control valve. The regulator control valve is
opened in clockwise direction and the LP tank valve is opened in
counter-clockwise direction.
Overfilled Protection Device (OPD) has been activated. To reset, turn o
regulator control valve and LP tank valve. Disconnect the regulator from
the LP tank and wait one minute. Reconnect the regulator control valve
to the LP tank valve and slowly open the LP tank valve until it is fully open.

10
Limited Warranty
1. Limited Warranty
This product carries a one (1) year warranty against defects in workmanship and materials.
Trileaf Distribution agrees to replace a defective product, within the stated warranty period,
when returned to the place of purchase with proof of purchase. This product is not guaranteed
against wear or breakage due to misuse and/or abuse.
2. Manufacturer warrants this product to be free from defects in workmanship and materials for a
period of 1 year from the date of purchase, PROVIDED claims are submitted, in writing, with
proof of purchase.
3. If any part of this item fails because of a manufacturing defect within the limited warranty period,
manufacturer offers to replace such part(s) provided that such parts have not been improperly
repaired, altered, or tampered with or subject to misuse, abuse or exposed to corrosive
conditions. This limited warranty is, however, subject to certain limitations, exclusions, time limits
and exceptions (hereinafter “conditions”) as listed below. Read these conditions carefully.
4. This Limited Warranty shall be limited to the replacement or repair of any part(s) which
manufacturer determines, after reasonable examination, to have been defective at the time of
manufacturing and manufacturer’s obligation(s) shall be limited to replacement, if any, of
defective part(s) which shall be shipped at original purchaser’s expense to original purchaser’s
designated shipping address.
5. This limited warranty is given to and covers the ORIGINAL PURCHASER ONLY and such
coverage terminates 1 year from the date of purchase.
6. DAMAGE LIMITATION WARNING: IN NO EVENT SHALL MANUFACTURER BE LIABLE
FOR ANY INCIDENTIAL OR CONSEQUENTIAL DAMAGES, INCLUDING (BUT NOT
LIMITED TO) LOSS OF USE OF THE PRODUCT, LOSS OF TIME, LOSS OF FOOD,
INCONVENIENCE, EXPENSE FOR TRAVEL, TRANSPORTATION LODGING EXPENSES,
LOSS BY DAMAGE TO PERSONAL PROPERTY OR LOSS OF INCOME, PROFITS OR
REVENUE.
7. MANUFACTURER’S OBLIGATION: Manufacturer’s liability shall be limited to the delivery of a
good, merchantable product and, if necessary, the repair or replacement, at manufacturer’s
option, of any defective part or unit.
8. TRANSFER LIMITATIONS: This limited warranty is not assignable or transferable.
It covers only the original purchaser.
9. RESERVED RIGHT TO CHANGE: Manufacturer reserves the right to make changes or
improvements to products it produces in the future without imposing on itself any obligations to
install the same improvements in the products it has previously manufactured.
10 This limited warranty gives the original purchaser specific legal rights but there may be other
rights which vary by jurisdiction.
11. This warranty does not cover the following items:
Chips or scratches on porcelain or painted surfaces.
Rust or corrosion, which is not deemed a manufacturing or materials defect.
Discolouration or loss of paint due to handling during assembly, heat or cleaning products.
Paint may require touch-up.
Stainless steel discolouration or corrosion.
Consumables such as batteries.
Imported by
Trileaf Distribution Trifeuil Toronto, Canada M4S 2B8
Product no. 085-3230-2 (TF2115708-MC-00) |
Contact us: 1-855-803-9313

Master Chef Canada
Toronto, Canada M4S 2B8
/