Page is loading ...

Installation and
Operating Instructions
for STERIFLO
®
Ultra Violet
Water Treatment System
Models SF1000S mkII & SF2500S mkII
Please pass these instructions onto the operator
of this equipment.
Distributed in Australia by Davey Water Products Pty Ltd.
DO NOT DISASSEMBLE ANY COMPONENTS UNTIL YOU HAVE FULLY READ
THESE INSTRUCTIONS!
Ultra violet radiation is harmful to skin & eyes.
DO NOT LOOK AT UV LAMP WHILE LAMP IS OPERATING.
WARNING: The UV Chamber operates under pressure. Under no
circumstances should the UV Chamber be disassembled unless the internal
pressure of the unit has been relieved. Failure to observe this warning will
expose persons to the possibility of personal injury and may result in
damage to the UV system or other property.
This unit is designed to treat water at ambient temperatures (5
o
C to 45
o
C).
Contact your dealer for details of UV systems suitable for hot water service.
Maximum operating pressure for stainless steel UV chambers is 850kPa (125
psi). If this pressure can be exceeded or if operating close to this pressure
fit a suitable pressure limiting valve in the supply to the UV chamber.
Plastic UV chambers have a maximum operating pressure of 400kPa (60 psi).

2
Table of Contents
Introduction Page 3
Preparing your system Page 3
Choosing a Site Page 4
Housing your Steriflo
®
System Page 4
Power Connection Page 5
Electrical Power Surge Protection Page 5 - 6
Pipe Connections Page 6
Pre-treatment (drinking water) Page 6
Lamp Installation Page 7
Operation Page 7
Maintenance Page 8 - 9
Water Quality Page 9
Lamp Alarm System Page 9
Trouble Shooting Page 9 - 10
Part Numbers Page 10
Warning - UV Radiation Page 11
After Sales Service Page 11

3
Congratulations on your purchase of a high quality, New Zealand made Steriflo
®
Ultra Violet water treatment system. All components have been designed and
manufactured to give trouble free, reliable operation.
Your new Steriflo
®
system incorporates a lamp failure system design feature that
enables you to be warned of a lamp failure by :-
1. A lamp failure LED
2. An audible alarm
3. Remote alarm contacts
In addition when the alarm “beeps” on and off, the lamp is due to be changed so
that effective treatment is maintained.
Preparing your system
On removing your Steriflo
®
system from its carton you should check all
components, especially the lamp, to ensure all are present and have not been
damaged in transportation. You should have:
1. Power supply control box with indicator light(s) and electrical flex.
2. UV lamp (or lamps).
3. Treatment chamber with mounting brackets.
Before installing your new Steriflo
®
, please read all instructions carefully as failures
caused by incorrect installation or operation are not covered by the guarantee. Your
Ultra Violet water treatment system is designed to handle clean water. The system
should not be used for any other purpose without specific referral to CCL. The use of
the system with flammable, corrosive and other materials of a hazardous nature is
specifically excluded.
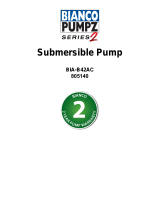
Lamp
Quartz Sleeve (pre-installed in chamber)
Drain plug
Lamp Lead
1 metre
OUTLET
or
INLET
INLET
or
OUTLET
Treatment Chamber
Power Lead
1.5 metre
Alarm LED (Red)
Alarm reset
On LED (Amber)
The appliance is not intended
for use by young children or
infirm persons without
supervision. Young children
should be supervised to ensure
they do not play with the
appliance
NOTE: The quartz sleeve has been
factory fitted, and there is no need to
remove these endcaps on first
installation. Before removing endcaps,
please read the Maintenance section of
these instructions completely.

4
Choosing a Site
Choose a site with a firm mounting position. Allow room for removal of the lamp
and sleeve during servicing. Leave a chamber lengths space at the lamp
connector end for lamp removal, with 100mm free at the other end for access to
the end nut. The ‘open’ end nut and the blank end nut are interchangeable, so
lamp removal can be from either end.
Housing your Steriflo
®
System
To protect your Steriflo
®
system from the weather, make sure the site is water
proof, frost free and has adequate ventilation. The unit should be either
horizontally mounted with the inlet and outlet facing upwards or vertically mounted
with the inlet at the bottom. Allow for drainage, to avoid damage to flooring etc.,
that over time may occur from leaking pipe joints or seals and allow room to
remove the lamp.
WARNING: Some insects, such as small ants, find electrical
devices attractive for various reasons. If your site or enclosure is
susceptible to insect infestation you should implement a suitable
pest control plan.

Power Connection
Connect lead to power supply designated on control box label. Earth stainless
steel chambers using bolt provided on the chamber (see illustration below).
5
WARNING: When servicing or attending your Steriflo
®
, always
ensure power is switched off and lead unplugged. Electrical
connections should be serviced only by qualified persons. If the
electrical supply lead of this system is damaged, it must only be
replaced by a qualified service personnel.
The Steriflo
®
control box has a red LED alarm indicator light
mounted on its front panel, adjacent to the amber “power on” LED.
This light will be illuminated whenever the Steriflo
®
control box
senses no lamp current. There is also an audible alarm in the
event of lamp failure. The LED and/or alarm will only work when
unit is connected to the correct electrical supply.
Install the power supply enclosure above the treatment chamber
so that in the event of a leak, water cannot drip down the lamp
lead into the enclosure.
CAUTION: The supply cord is necessary for lamp changing. The
three pin supply plug must remain accessible after installation. If
installed to fixed wiring without the plug a two pole switch must be
fitted and its ON and OFF positions shall be marked.

6
Electrical Power Surge Protection
An electrical power surge or spike can travel on the supply lines and cause serious
damage to your electrical equipment. The Steriflo
®
control box has a 2 Amp fuse
to protect the circuit. The fuse is not a lightning arrestor and may not protect the
Steriflo
®
if lightning or a very powerful surge hits the unit.
If the installation is subject to electrical power surges or lightning we strongly
recommend the use of suitable additional surge protection devices on ALL
electrical equipment.
We recommend the use of an RCD or earth leakage circuit breaker on the
power supply to your unit.
Pipe Connections
Never use PVC pipe directly connected to unit. PVC pipe and fittings can be used
after 90
o
bends of a suitable material are connected to the inlet and outlet of the
chamber. Larger diameter pipe may be used to minimise resistance to flow, but
maximum flow rates should not be exceeded, as correct water treatment cannot be
assured at higher flows. If flows may exceed the design maximum, install a flow
restriction device.
Use unions at pipe connections to enable easy removal and servicing. Use
sufficient tape to ensure airtight seal and do not over tighten. To prevent strain on
unit threads always support heavy inlet and outlet pipes.
Do not use pipe thread sealing compounds (especially hemp) on
any part of this unit. ONLY use Teflon sealing tape.
NOTE: Prior to installation remove the transport plugs from the
inlet, outlet and lamp end cap.
DO NOT DISASSEMBLE ANY COMPONENTS UNTIL YOU HAVE
FULLY READ THESE INSTRUCTIONS!
Ultra violet radiation is harmful to skin & eyes.
DO NOT LOOK AT UV LAMP WHILE LAMP IS OPERATING.

7
Pre-treatment (drinking water)
Prefiltration is usually required to ensure that particulate matter does not shield
micro-organisms from the UV light. Sand filtration or 20 micron cartridge filtration
is the usual minimum. In some cases, particularly with surface water, finer filtration
may be necessary, or if cysts like Giardia or Cryptosporidium may be present. In
this case 1 micron filtration is required, not necessarily for the whole supply,
filtration for the drinking tap only may be practical.
Lamp Installation
Once the Steriflo
®
Treatment Chamber has been connected to the pipework, the
installation should be checked for water leaks.
Attach the “DO NOT LOOK AT LAMP” sticker in an obvious position on the
treatment chamber, check that the chamber is clean to ensure the sticker will
adhere correctly.
The Quartz Sleeve is pre-installed in the treatment chamber, and provided the
endcaps have not been disturbed or undone, is able to withstand well in excess of
the maximum operating pressures.
If the chamber test is successful, it is now time to insert the lamp. DO NOT
INSERT THREE PIN POWER PLUG TO POWER OUTLET YET!
Expose the connection end of the lamp from its transport tube and protective
wrapping. The lamp connection socket is “keyed” to ensure correct alignment.
Carefully remove the tube fully from its transport tube, touching the lamp as little as
possible. Handle the lamp by the ends where possible. Wipe with clean cloth and
methylated spirits if fingerprints or dirt need removing.
Slide the lamp into the chamber, fit lamp connection socket and then fasten the
end washer into the endcap, with the screws provided.
Operation
Once all leak testing and lamp fitment has been completed, open valves and allow
water to fill the chamber. Connect three pin plug to outlet and switch on. The
“Mains On” Amber LED will be illuminated and the red alarm light will flash slowly.
Allow two minutes for the UV lamp to reach full intensity before starting water flow.
Full lamp performance for a new installation will be achieved in 24 hours. On a
new installation where no other form of sterilisation has been in constant usage,
we recommend flushing the pipework with a suitable sanitiser such as Steritank HP
at 100mg/L. This solution should be left in the piping for at least an hour and
preferably overnight.
The Steritank solution can be dosed to the water tank or if necessary added as a
shot dose to the bowl of any filter housing installed with the UV system and slowly
flushed into the piping.
If dosed to the water tank the Steritank HP will be left in the water as it is tasteless
and suitable for use in drinking water. If added as a shot dose it should be rinsed
out through a nearby tap.
Davey Water Products Limited can not accept responsibility for loss or
damage resulting from incorrect or unauthorised installations.

8
Maintenance
Lamp changing (every year of operation) :
1. Shut valve(s) so that water cannot flow through steriliser.
2. Switch off steriliser by unplugging mains.
3. Undo end cover screws.
4. Unplug lamp connector.
5. Remove lamp.
Reverse procedure when replacing lamp, ensuring that lamp is centrally located in
the chamber. Handle only by the ends.
Quartz Sleeve Cleaning (three monthly) :
If dirt is allowed to build up on the quartz sleeve it will impair the UV output. The
quartz sleeve should be removed after one month and inspected for deposits.
Clean with methylated spirits (5% hydrochloric acid if heavily fouled) and carefully
dry. Handle the sleeve with tissue to keep it clean. The sleeve should be cleaned
every three months or as required.
Sleeve removal (use care-fragile) :
1. Remove lamp as described.
2. Remove drain port cap and empty water from chamber.
3. Undo nut at one end of the chamber and remove o-ring, repeat with nut at
other end and remove o-ring, withdraw sleeve carefully.
4. Inspect o-rings for damage, replace annually.
CAUTION: Handling lamp and quartz sleeve. Keep the quartz
components free of finger marks to avoid loss of output through
dirt or grease shadows - handle the lamps by their ends where
possible. Wipe lamp and sleeve with clean cloth or tissue if
needed. The o-rings should be replaced annually or if damaged –
do not grease the o-rings.
NOTE: When withdrawing sleeve take care not to let the end drop
into the chamber as it could break - a clean dowel inserted right
through the sleeve to support it is useful.

9
Maintenance continued...
Reverse procedure when replacing sleeve.
When replacing quartz sleeve after cleaning, the sleeve should stick out about 1cm
at each end. Place o-ring over closed nut end and fit closed nut, fastening it hand
tight. Hold the other end of the sleeve in position during the tightening with the
other hand, then fit open end o-ring and cap.
A tiny amount of silicon spray or CRC in the end of aluminium endcap threads will
aid easy tightening. Do not use excessive force when tightening nuts. Do not re-
use quartz sleeve or o-rings if damaged.
Water Quality
Where the water being pumped contains unusually high levels of dissolved solids
(hard water), iron, manganese or biological organisms, a deposit build up on the
quartz sleeve may occur over time. This will compromise the effectiveness of the
UV system and the sleeve should be cleaned as required to maintain it in a clean
condition. Discoloured water will reduce the effectiveness of the UV system and
filtration should be installed.
Lamp Alarm System
If the UV lamp is out due to a failure or bad connection the alarm buzzer will sound
and the red LED will light and the alarm contacts will changeover. These are able
to close a normally open solenoid valve. The alarm function can be checked by
switching the unit off, disconnecting the lamp and then switching the unit back on.
The lamp should be replaced after a year’s running time. The alarm will beep
intermittently after the internal clock has measured this time as a reminder to
change the lamp. Pressing the recessed ‘reset’ button witha ballpoint pen will
silence it for 24 hours at a time to allow time for a new lamp to be obtained. Once
a new lamp is installed press the reset button for 5 seconds to start another year’s
timing. Do this whenever a new lamp is installed. The alarm light flashes slowly
during normal operation to show the timer circuit is running.
Trouble Shooting
Principle. A ballast (choke) provides the correct voltage and current for the
lamp(s). The circuit board monitors the current to the lamp and if it is not present,
illuminates the red alarm light and sounds the alarm buzzer (a “squealing” noise).
An orange light indicates the power is on.
a) UV LAMP OUT, NO ORANGE “ON” LIGHT, NO ALARM
1. No mains voltage.
2. Internal fuse failed.
3. Check mains power connections inside power supply.
b) UV LAMP FLICKERING, ALARM ON
1. Failed lamp.
2. Incorrect lamp or ballast fitted.

10
Trouble Shooting continued...
c) UV LAMP OUT, ALARM ON
1. Lamp failed.
2. Poor connection to lamp (check/clean connector/lamp pins).
3. Ballast failed (unlikely).
d) LAMP ON, ALARM ON
1. Faulty circuit board.
e) LAMP OUT, ALARM OFF
1. Loose connection or faulty circuit board, possibly short in lamp circuit.
Part Numbers
a) Lamp (SF2500S has 2 lamps and 2 sleeves)
SF1000/SF2500 GPH840N2/S
b) Sleeve
SF1000/SF2500 QS880
c) O-rings
All models S24x3N70 (2 per sleeve)
d) Lamp Connector
All models S114/2
WARNING: When servicing or attending your Steriflo
®
, always
ensure power is switched off and lead unplugged. Electrical
connections should be serviced only by qualified persons. If the
electrical supply lead of this system is damaged, it must only be
replaced by qualified personnel.
Care should also be taken when servicing or disassembling the
unit and associated pipework to avoid possible injury from
pressurised water. Unplug power, relieve pressure by opening a
tap on the discharge side of the unit and allow any water in the
unit to cool before attempting to dismantle.

11
After Sales Service
For professional after sales service or repair, contact your dealer.
For assistance in locating your nearest dealer, contact Davey Water Products
Limited in New Zealand on 0800 654 333, by fax on 0800 654 334 or by email to
[email protected], or in Australia contact Davey Water Products
Pty Ltd, customer service centre on 1300 367 866 or visit davey.com.au.
WARNING
ULTRA-VIOLET RADIATION IS HARMFUL TO SKIN AND EYES.
EYES
Switch off UV system before removing covers. If working within line of sight
of UV light, ensure that a suitable full face plastic facemask is worn.
SKIN
It is recommended that exposed skin is covered to prevent sunburn,
possibly severe, if working within line of sight of operating UV system.
Note: exposure to UV light results in symptoms that develop slowly, the
exposure cannot be felt at the time.
SYMPTOMS
EYES: Mild exposure - irritation developing several hours later.
Severe exposure - sore, red eyes, sensitive to light, painful to keep
eyes open.
SKIN: Mild exposure - slight reddening, tenderness, mild sunburn
symptoms.
Severe exposure - skin sloughing (peeling), weeping area, sever
sunburn symptoms.
FIRST AID
EYES: In mild cases, if in doubt seek medical attention.
Severe cases cover eyes with gauze or clean cloth, seek medical
attention.
SKIN: In mild cases removal from exposure may be sufficient. If in doubt
seek medical attention.
In severe cases, cover affected area loosely with a clean bandage or
cloth. Seek medical attention. Do not apply fat, butter or oil to skin.
The above notes are intended to highlight the dangers of exposure to UV
radiation. With sensible precautions any hazard can be eliminated.
Germicidal UV cannot pass through clothing or other opaque materials or
clear materials such as plastics or even window glass.
During service DO NOT use lubricants or sealants of any type on
the o-rings. Keep the inside of the quartz sleeve dry and clean.
WARNING - Do not use hydrocarbon based or hydrocarbon
propelled sprays around the electrical components of this unit.

PRODUCT GUARANTEE (NEW ZEALAND)
Steriflo
®
systems, except for lamps, are guaranteed for a period of one year from the date of original
purchase to be free of material or manufacturing defects. Should any part fail as a result of such defects
within this period, the pressure system will be repaired free of charge. Additionally, a one year pro-rata,
parts only guarantee commencing from the date of original purchase shall apply only to the lamp.
TERMS AND CONDITIONS
1. This guarantee applies to all states and territories of Australia and New Zealand only and is subject to
the provisions of the Trade Practices Act (Aust.), the Goods and Consumer Protection Legislation of
the various Australian states and the Consumers Guarantee Act 1993 (NZ) as applicable.
2. The guarantee period commences on the date of original purchase of the equipment. Evidence of
this date of original purchase must be provided when claiming repairs under guarantee. It is
recommended you retain all receipts in a safe place.
3. This guarantee covers parts and workshop labour only. Goods should be forwarded, with proof of
date of original purchase, to an Authorised Davey Service Centre in Australia or Davey Water Products
Limited in New Zealand, freight paid.
4. The pro-rata lamp guarantee is calculated on a monthly basis, up to 12 months.
5. This guarantee is subject to due compliance by the original purchaser with all directions and
conditions set out in the Installation and Operating Instructions. Failure to comply with these
instructions, damage or breakdown caused by fair wear and tear, negligence, misuse, incorrect
installation, chemical or additives in the water, inadequate protection against freezing, rain or other
adverse weather conditions, corrosive or abrasive water, lightning or high voltage spikes or through
unauthorised persons attempting repairs are not covered under guarantee. The product must only be
connected to the voltage shown on the nameplate.
6. Without limiting the original purchaser’s entitlements under the Trade Practices Act (Aust.), the Goods
& Consumer Protection Legislation of the various Australian states, or the Consumers Guarantee Act
1993 (NZ), Davey shall not be liable for any loss of profits or any consequential, indirect or special
loss, damage or injury of any kind whatsoever arising directly or indirectly from the product or any
defect.
7. Where the Trade Practices Act (Aust.), the Goods and Consumer Protection Legislation of the various
Australian states and the Consumers Guarantee Act 1993 (NZ) does not apply, Davey shall not be
liable for any loss of profits or any consequential, indirect or special loss, damage or injury of any kind
whatsoever suffered by the purchaser arising directly or indirectly from the product or any defect and
the purchaser shall indemnify Davey against any claim by any other person whatsoever in respect of
any such loss, damage or injury.
8. Nothing in this guarantee is intended to have the effect of contracting out of the provisions of the
Trade Practices Act (Aust.), the Goods and Consumer Protection Legislation of the various Australian
states and Consumers Guarantee Act 1993 (NZ) except to the extent permitted by the various Acts
and this guarantee is to be modified to the extent necessary to give effect to that intention.
9. Davey may be collecting personal information from you in order to provide you with a service. Davey
Water Products Pty Ltd promises only to use this information in accordance with the Provisions of the
Privacy Act 1988 (Cth) and the Privacy Policy of Davey Water Products Pty Ltd which is available at
davey.com.au.
® Davey and Steriflo are registered trademarks of Davey Water Products Pty Ltd.
© Davey Water Products Pty Ltd 2005.
P/N 400585-3 CC ver 0508 supersedes P/N 400585-2 CC ver 0807
Australia
Davey Water Products Pty Ltd
Member of the GUD Group
ABN 18 066 327 517
Head Office and Manufacturing Customer Service Centre Interstate Offices
6 Lakeview Drive, Ph: 1300 367 866 Sydney • Brisbane • Adelaide
Scoresby, Australia 3179 Fax: 1300 369 119 Perth • Townsville
Ph: +61 3 9730 9222 E-mail: sales@davey.com.au
Fax: +61 3 9753 4100 International Offices
Website: davey.com.au Germany • New Zealand • USA
New Zealand
Davey Water Products Limited
7 Rockridge Avenue, PO Box 14-641
Penrose, Auckland 1061, New Zealand Panmure, Auckland 1741
Ph: +64 9 570 9135
Fax: +64 9 527 7654
E-mail: [email protected]
Website: microlene.co.nz
/