Page is loading ...

EN
INSTRUCTION MANUAL ...............2
IT
ISTRUZIONI PER L’USO .............. 14
DE
BEDIENUNGSANLEITUNG .......... 28
FR
MODE D‘EMPLOI ....................... 40
ES
MANUAL DE INSTRUCCIONES .... 52
*Radio-controlled clock function not available in all territories. / Funzione di orologio radiocontrollati non disponibile in ogni territorio. / Funkuhrfunktion nicht in jederm Gebiet verfügbar. / La fonction
d‘horloge radio-piloté n‘est pas disponible dans tous les territoires. / La función de reloj radiocontrolado no está disponible en todos los territorios.
RADIO-CONTROLLED* ALARM CLOCK
SVEGLIA RADIOCONTROLLATA*
FUNKWECKER*
RÉVEIL RADIO-COMMANDÉ*
DESPERTADOR RADIO-CONTROLADO*
Art.No.: RDC1005

2
ABOUT THIS INSTRUCTION
MANUAL
These operating instructions are to be
considered a component of the device.
Please read the safety instructions and the
operating instructions carefully before use.
Keep these instructions for renewed use at a
later date. When the device is sold or given to
someone else, the instruction manual must be
provided to the new owner/user of the product.
The device is intended only for indoor use.
GENERAL WARNINGS
• Risk of electric shock — This device
contains electronic components that
operate via a power source (batteries).
Children should only use the device under
adult supervision. Only use the device as
described in the manual; otherwise, you
run the risk of an electric shock.
• Choking hazard — Children should only
use the device under adult supervision.
Keep packaging material, like plastic bags
and rubber bands, out of the reach of chil-
dren, as these materials pose a choking
hazard.
• Risk of chemical burn — Keep batteries
out of the reach of children! Make sure you
insert the batteries correctly. Leaking bat-
tery acid can lead to chemical burns. Avoid
contact of battery acid with skin, eyes and

3
EN
IT
DE
FR
ES
mucous membranes. In the event of con-
tact, rinse the affected region immediately
with a plenty of water and seek medical
attention.
• Risk of re/explosion — Do not expose the
device to high temperatures. Use only the
recommended batteries. Do not short-cir-
cuit the device or batteries, or throw them
into a re. Excessive heat or improper han-
dling could trigger a short-circuit, a re, or
an explosion.
• Do not disassemble the device. In the
event of a defect, please contact your
dealer. The dealer will contact the Service
Centre and can send the device in to be
repaired, if necessary.
• Use only the recommended batteries. Al-
ways replace weak or empty batteries with
a new, complete set of batteries at full ca-
pacity. Do not use batteries from different
brands or with different capacities. The
batteries should be removed from the unit
if it has not been used for a long time.
SCOPE OF DELIVERY
Alarm clock, Operating instructions, 2x AAA
batteries.
BEFORE YOU BEGIN
• We recommend using alkaline batteries. If
temperatures regularly fall below 0°C (32°F),
we recommend using lithium batteries.
• Avoid using rechargeable batteries. (Re-
chargeable batteries cannot maintain cor-
rect power requirements.)
• Insert batteries before rst use, matching
the polarity in the battery compartment. 2x
AAA Batteries are required.

4
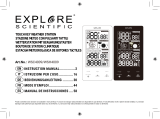
PRODUCT OVERVIEW
1.
Press [ ] to activate the snooze
function and backlight.
2. In date mode, press [ ] to turn
on/off zone. In alarm time mode,
press to turn on/off alarm. Press and
hold to enter time and date setting.
3. Press [ ] to show alarm time of
Alarm 1-5 and Alarm 6-7. Press and
hold to enter alarm setting.
4. Press [ ] to switch between tem-
perature and weekday display. Press
and hold to start RCC signal receiving.
In setting mode, press to increase one
unit, press and hold to increase rap-
idly.

5
EN
IT
DE
FR
ES
5. Press [ ] to switch between date
mode and the nearest coming alarm
time. In setting mode, press to de-
crease one unit, press and hold to
decrease rapidly.
6. Battery compartment. Slide down to
open.

6
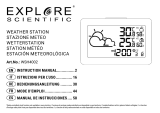
LCD DISPLAY
1.
Time display
2. Date display or Alarm time display
(Press [
] to switch)
3. Temperature display or weekday display
(Press [
] to switch)
[
] RCC signal received
[
] Alarm ON
[
] DST ON
[
] Snooze activated
[
] Low battery indicator
[
] Temperature mode

7
EN
IT
DE
FR
ES
GETTING STARTED
INSERT BATTERIES
1. Remove the battery door from the back.
2. Insert 2x AAA (LR03)/1.5V batteries. Please
ensure the polarities (+/-) of the batteries
match upon installation.
3. Reattach the battery door.
NOTE: Replace batteries when [
] displays,
or when the display is dim.
CLOCK
CLOCK RECEPTION
1. Replace batteries or press [
] button
will initiate RCC receiving.
2. RCC receiving can work in both date mode
and alarm mode.
3. The receiving process duration is 7 minutes.
4. During receiving process, the RCC signal
symbol [
] ashes.
5. If the RCC receiving process is successful, a
completed RCC symbol [
] will be shown
in the display and the date and time will be
set automatically. If it fails within 7 minutes,
RCC setting will quit automatically. If that
happens, press [
] button to re-initiate
RCC receiving.
6. RCC receiving will automatically start at 2:03,
3:03, 4:03, 5:03 every night. Auto receiving
function will cease if it is successful.
7. To stop RCC reception, press the [
]
button.
8. If the device is still not receiving the signal,
please proceed to set the time manually.
SET THE CLOCK MANUALLY
1. Press and hold [
] button to enter
time and date setting.

8
2. The setting parameter will flash.
3. Sequence of setting: Weekday Language
12/24 Hr Year (2000 – 2099) Date
format Month Date Hour Minute
Zone °C/°F exit
4. Press [
] button once, the figure will
increase 1 unit (when setting minute, second
will reset to 0). Press and hold the [
]
button, the figures will increase rapidly.
5. Press [
] button once, the figure will de-
crease 1 unit (when setting minute, second
will reset to 0). Press and hold the [
] but-
ton, the figures will decrease rapidly.
6. Press [
] button to confirm setting
and enter to next parameter.
7. If there is no action in 20 seconds, the setting
will be saved and will exit the setting mode.
LANGUAGE
Sequence of setting weekday language:
German (GER) English (ENG) French
(FRE) Italian (ITA) Dutch (DUT).
TIME ZONE SETTING
To set a different time zone, proceed as fol-
lows:
1. Press and hold [
] button, enter time
and date setting.
2. Press [
] button several times until
the display shows the time offset “Zone 00”
3. Press the [
] button to increase or
[
] button to decrease the Time zone
offset.
°C/°F SETTING
1. Press and hold [
] button, enter time
and date setting.
2. Press [
] button several times until

9
EN
IT
DE
FR
ES
the display shows °C/°F.
3. Press the [
] or [ ] button to switch
Celsius (°C) / Fahrenheit (°F).
ALARM
SETTING/ADJUSTING DUAL ALARM TIME
You can set one alarm time for weekdays,
(Monday to Friday / 1-5) and one alarm time
for the weekend (Saturday to Sunday / 6-7).
Alarm 1 = Weekday alarm (1-5)
Alarm 2 = Weekend alarm (6-7)
1. Press and hold [
] button, enter alarm
setting.
2. Sequence of setting: Alarm 1 (1-5) weekday
hour weekday minute Alarm 2 (6-7)
weekend hour weekend minute exit
3. During setting, the setting parameter will
flash.
4. Press [
] button once to increase by 1
or press [
] once to decrease by 1. Alter-
natively press and hold the [
] button to
change the figures rapidly.
5. Press [
] button to confirm setting and
enter to next parameter.
6. Press [
] button to turn on/off alarm.
7. Alarm will turn on automatically when alarm
setting is finished.
8. If there is no action in 20 seconds, the set-
ting will be saved and will exit the setting
mode.
TURN ON/OFF ALARM
1. Press the [
] button once to turn on/
off the alarm that is nearest in time. (1-5) or
(6-7) will ash to indicate which alarm was
activated.
How activate alarm times individually:
2. Press [
] button once to switch to alarm
mode. Monday to Friday alarm time will be
shown and (1-5) will ash.

10
3. Press [ ] button once to turn on/off
Monday to Friday alarm.
4. Press [
] button again to show Saturday
to Sunday alarm time. (6-7) will ash.
5. Press [
] once to turn on/off Satur-
day to Sunday alarm.
OPERATION
1. At the set time, alarm signal rings.
2. During the alarm, press the [
] but-
ton to delay the alarm by 8 minutes.
3. If you do not press any button to stop the
alarm, it will automatically turn off after 2
minutes.
4. To stop the alarm, press the [
] or any
other button.
5. The alarm will start again at the next alarm
time, unless you switch off the alarm func-
tion by pressing the [
] button.
SPECIFICATIONS
Dimensions (Main unit):
72 x 25 x 75 mm (L x W x H)
Weight (Main unit):
73g (Exclude batteries)
Temperature display range:
-10°C to +50°C (14°F to 122°F)
Accuracy:
0° to +40°: +/- 1.5° (+/-3°)
<0° and >+40°: +/- 2° (+/-4°)
Resolution:
0.1° (0.2°),

11
EN
IT
DE
FR
ES
Power:
2x AAA (LR03) 1.5V batteries
NOTE
• When the temperature is lower than -10°(14°),
the temperature displays LL.L. When the tem-
perature is higher than 50°(122°), the tem-
perature displays HH.H.
• During alarm rings or RCC receiving process,
temperature detection will be stopped.
EC DECLARATION OF CONFORMITY
Hereby, Explore Scientic GmbH de-
clares that the equipment type with
part number: RDC1005 is in compli-
ance with Directive: 2014/53/EU. The full text
of the EU declaration of conformity is availa-
ble at the following internet address:
www.bresser.de/download/RDC1005/CE/
RDC1005_CE.pdf
FCC DECLARATION OF CONFORMITY
This device complies with Part 15 of
the FCC Rules. Operation is subject
to the following two conditions: (1)
this device may not cause harmful interfer-
ence, and (2) this device must accept any in-
terference received, including interference
that may cause undesired operation.
Please note that changes or modications not
expressly approved by the party responsible
for compliance could void the user’s authority
to operate the equipment.
NOTES ON CLEANING
• Remove the batteries before cleaning.
• Only use a dry cloth to clean the exterior
of the device. To avoid damaging the
electronics, do not use any cleaning uid.
• Protect the device from dust and moisture.

12
DISPOSAL
Dispose of the packaging materials
properly, according to their type, such as
paper or cardboard. Contact your local
waste-disposal service or environmental au-
thority for information on the proper disposal.
Do not dispose of electronic devices in
the household garbage!
As per the Directive 2002/96/EC of the
European Parliament on waste electrical and
electronic equipment and its adaptation into
German law, used electronic devices must be
collected separately and recycled in an envi-
ronmentally friendly manner.
In accordance with the regulations con-
cerning batteries and rechargeable bat-
teries, disposing of them in the normal house-
hold waste is explicitly forbidden. Please
make sure to dispose of your used batteries
as required by law — at a local collection point
or in the retail market. Disposal in domestic
waste violates the Battery Directive. Batteries
that contain toxins are marked with a sign and a
chemical symbol.
Cd¹ Hg² Pb³
1
battery contains cadmium
2
battery contains mercury
3
battery contains lead

13
EN
IT
DE
FR
ES
WARRANTY & SERVICE
The regular guarantee period is 2 years and
begins on the day of purchase. To benet
from an extended voluntary guarantee period
as stated on the gift box, registration on our
website is required.
You can consult the full guarantee terms
as well as information on extending the
guarantee period and details of our services
at www.bresser.de/warranty_terms.
Would you like detailed instructions for this
product in a particular language? Then visit
our website via the link below (QR code) for
available versions.
Alternatively you can also send an email to
manuals@bresser.de or leave a message on
+49 (0) 28 72 – 80 74-220*. Please always
state your name, precise address, a valid
phone number and email address, as well as
the article number and name.
*Number charged at local rates in Germany (the
amount you will be charged per phone call will depend
on the tariff of your phone provider); calls from abroad
will involve higher costs.
www.bresser.de/download/RDC1005
MANUAL DOWNLOAD:
www.bresser.de/warranty_terms
SERVICE AND WARRANTY:

www.bresser.de/warranty_terms
SERVICE AND WARRANTY:
www.bresser.de/download/RDC1005
MANUAL DOWNLOAD:
Errors and technical changes reserved. • Con riserva di errori
e modiche tecniche. • Irrtümer und technische Änderungen
vorbehalten. • Sous réserve d’erreurs et de modications
techniques. • Queda reservada la posibilidad de incluir modica-
ciones o de que el texto contenga errores.
Manual_RDC1005000000_Alarm-clock_en-it-de-fr-es_EXPSC_v112019a
All rights reserved. Made in China.
Explore Scientific GmbH
Gutenbergstr. 2 · DE-46414 Rhede · Germany
www.bresser.de · [email protected]
EU
Explore Scientific, LLC
1010 S. 48th Street, Springdale, AR 72762
www.explorescientificusa.com
USA
/