DO NOT DISCARD
Installation and maintenance tool
NWP-940
Note:
If installing faucet to a stainless steel rim, an under-mount support, (e.g. wood, appropriate size x 1/2”
thick), should be utilized.
1. Before installing the faucet, flush the hot and cold lines to elimi-
nate any dirt that may have accumulated in the pipes of the home.
2. The through hole in the sink or countertop should be between 1-
1/4" to 1-1/2". If the sink has three holes, use a cover plate to
cover extra holes (PN: 102 is not supplied with the faucet and
must be ordered separately).
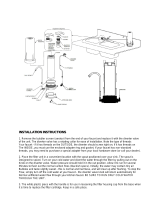
3. To install the faucet, verify that the base o-ring (91362) is seated
into the base, guide the flex hoses, rigid tube and threaded insert
through the sinkhole. Mount bracket (11280), and loosely tighten
nut (11285) onto the threaded rod. Utilize tool (92297)
to secure into place.
4. Position the spout and handle toward the
front of the sink. Make sure that the handle
swings freely and equally in both hot and
cold directions. Tighten mounting nut to
secure the faucet firmly in place.
5. Connect supply line (not included) to the
faucet's flex hose inlets. The ½" NPT inlets
are color coded BLUE for cold and RED for
hot.
6. If you have purchased Model 941 with pull-
out side spray, the through-hole for spray
shall be 1-1/4" to 1-1/2". Place the spray
base through hole and secure into place
with lower mounting kit. Insert the hose of
sprayer through base and use plumber's tape
to attach it to the rigid brass tube. For nor-
mal installation it is not necessary to bend
tube, however should it be necessary cau-
tion must be taken so that the tube is not
kinked while performing bending. It is rec-
ommended that proper tube bending equip-
ment be used.
7. After installation is complete flush faucet by
removing aerator from spout and side spray
head from hose (if applicable). While hold-
ing spray hose, run hot and cold water
through faucet by lifting handle lever and
rotating from left to right. Continue to flush
until water is clear. Reinstall aerator and
spray head.
*
*
Side Spray (129)
11289
Plug cap
(940)
91413
O-ring
91362
Base
O-ring
11291
Base
11286
Diverter
nut
(941 only)
*
11208 Diverter
(941 only)
1-625 Valve
Body
Assembly
Escutcheon
2-176
Handle
Assembly
2-178
Aerator
11280
Bracket
11285
Nut
92297
Tool
*
1/2” NPT
11205
Hose
(941)
Rev A


