en Installation instructions
16
▶
Unrestricted operation is possible if the appliance is
operated exclusively in air recirculation mode.
WARNING‒Risk of suffocation!
Children may put packaging material over their heads
or wrap themselves up in it and suffocate.
▶
Keep packaging material away from children.
▶
Do not let children play with packaging material.
WARNING‒Risk of fire!
¡ Grease deposits in the grease filter may catch fire.
▶
The specified safety clearances must be com-
plied with in order to prevent a build-up of heat.
▶
Observe the specifications for your cooking ap-
pliance. If gas and electric hobs are being oper-
ated together, the largest specified clearance ap-
plies.
¡ Grease deposits in the grease filter may catch fire.
▶
Never work with naked flames close to the appli-
ance (e.g. flambéing).
▶
Do not install the appliance near a heat-produ-
cing appliance for solid fuel (e.g. wood or coal)
unless a closed, non-removable cover is avail-
able. There must be no flying sparks.
WARNING‒Risk of injury!
¡ Components inside the appliance may have sharp
edges.
▶
Wear protective gloves.
¡ The appliance may fall down if it has not been prop-
erly fastened in place.
▶
All fastening components must be fixed firmly
and securely in place.
¡ The appliance is heavy.
▶
To move the appliance, twopeople are required.
▶
Use only suitable tools and equipment.
¡ The appliance is heavy.
▶
The appliance must not be fitted directly onto
plasterboard or similar lightweight materials.
▶
To ensure correct installation, you must use a
material which is sufficiently stable and suitable
for both the structural conditions and the weight
of the appliance.
¡ Changes to the electrical or mechanical assembly
are dangerous and may lead to malfunctions.
▶
Do not make any changes to the electrical or
mechanical assembly.
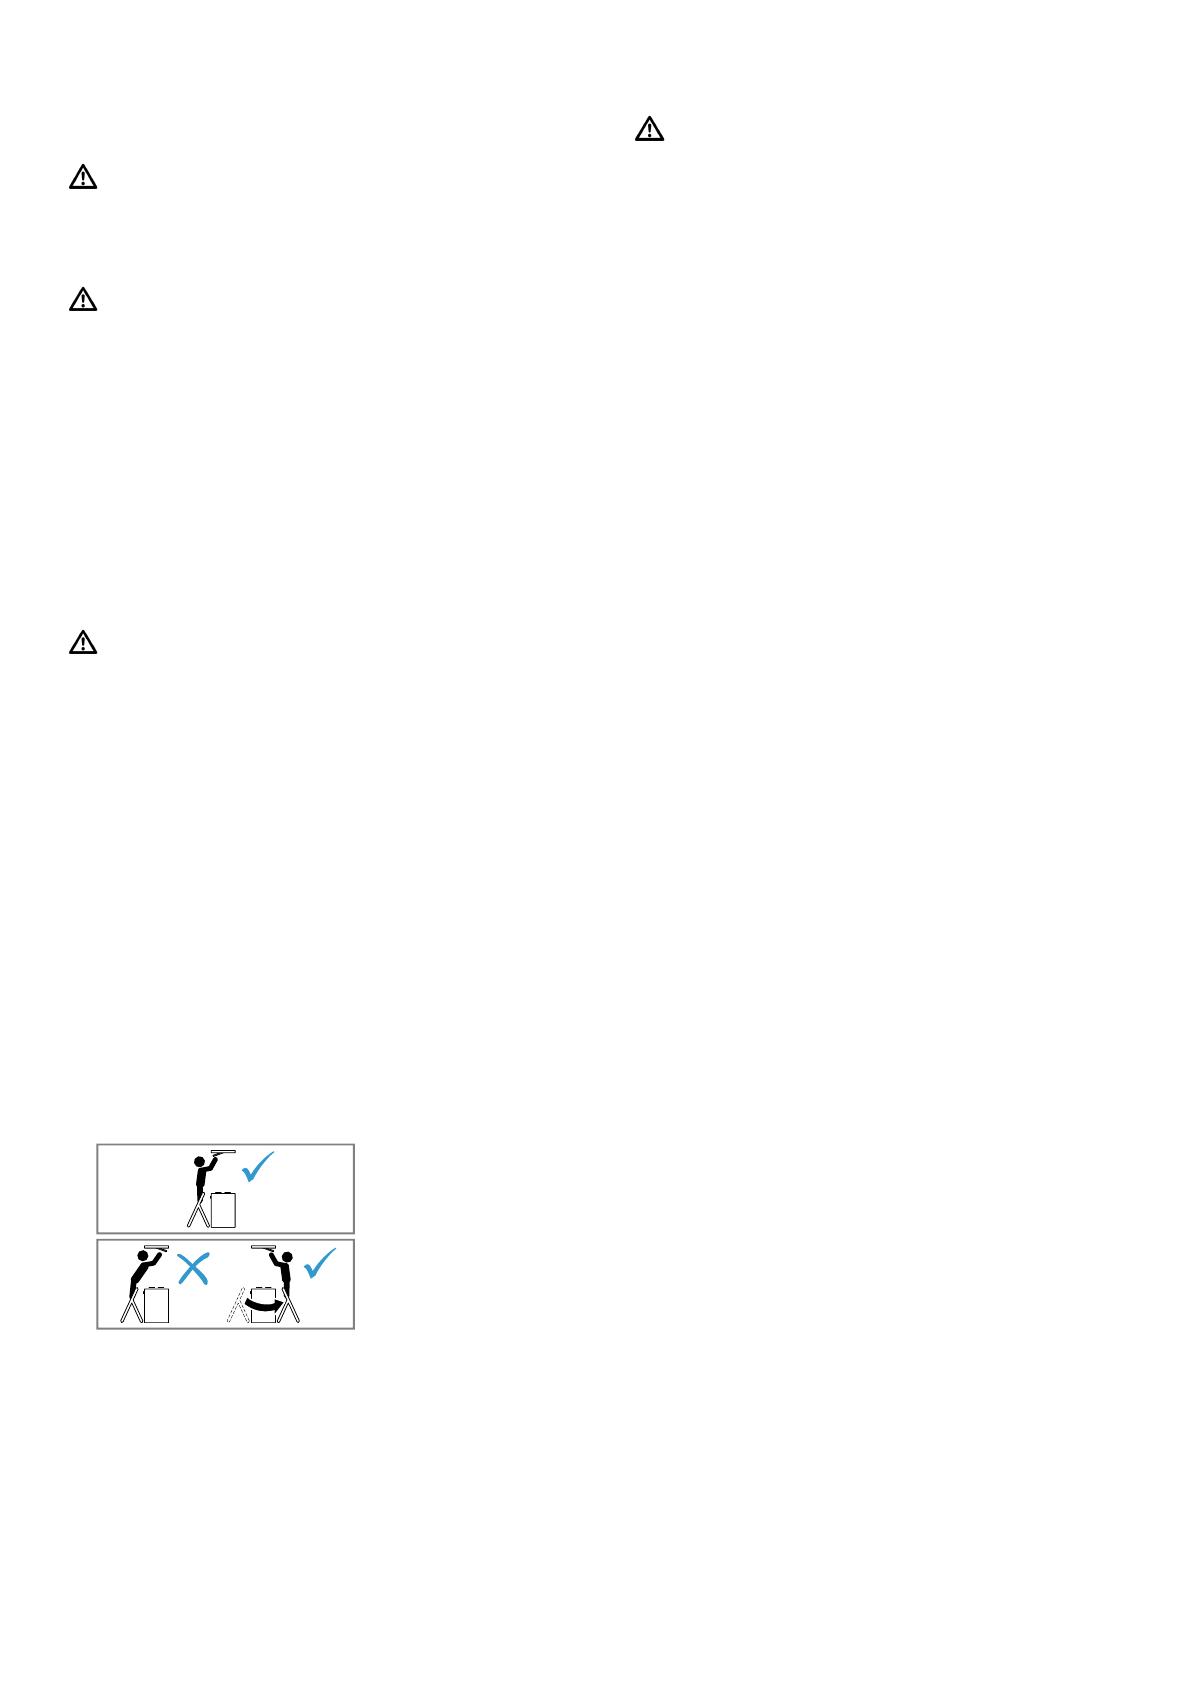
¡ Risk of falling when working on the appliance
▶
Use a stable stepladder.
▶
Do not lean over the hob.
▶
Do not step on the hob or the work surface.
¡ The filter cover may swing out.
▶
Open the filter cover slowly.
▶
Take hold of the filter cover after opening until it
no longer swings out.
▶
Close the filter cover slowly.
¡ Risk of injury when opening and closing the hinges.
▶
Keep your hands away from the hinges.
WARNING‒Risk of electric shock!
¡ Sharp-edged components inside the appliance may
damage the connecting cable.
▶
Do not kink or trap the connecting cable.
¡ If the appliance or the power cord is damaged, this
is dangerous.
▶
Never operate a damaged appliance.
▶
Never pull on the power cord to unplug the appli-
ance. Always unplug the appliance at the mains.
▶
If the appliance or the power cord is damaged,
immediately unplug the power cord or switch off
the fuse in the fuse box.
▶
"Call Customer Service." →Page13
▶
Repairs to the appliance should only be carried
out by trained specialist staff.
¡ Improper repairs are dangerous.
▶
Repairs to the appliance should only be carried
out by trained specialist staff.
▶
Only use genuine spare parts when repairing the
appliance.
▶
If the power cord of this appliance is damaged, it
must be replaced by trained specialist staff.
¡ Improper installation is dangerous.
▶
Connect and operate the appliance only in ac-
cordance with the specifications on the rating
plate.
▶
Connect the appliance to a power supply with al-
ternating current only via a properly installed
socket with earthing.
▶
The protective conductor system of the domestic
electrical installation must be properly installed.
▶
Never equip the appliance with an external
switching device, e.g. a timer or remote control.
▶
When the appliance is installed, the mains plug
of the power cord must be freely accessible. If
free access is not possible, an all-pole isolating
switch must be installed in the permanent elec-
trical installation according to the conditions of
Overvoltage Category III and according to the in-
stallation regulations.
▶
When installing the appliance, check that the
power cable is not trapped or damaged.
Information on the installation situation
¡ Install this appliance on the kitchen ceiling or a
stable suspended ceiling.
¡ The surfaces of the appliance are sensitive. Avoid
damaging them during installation.
Instructions for the exhaust air pipe
The appliance manufacturer does not provide any war-
ranty for faults attributable to the pipeline.
¡ Use a short, straight exhaust air pipe with as large a
pipe diameter as possible.
¡ Long, rough exhaust air pipes, many pipe bends or
small pipe diameters reduce the suction power and
increase the fan noise.
¡ An exhaust air pipe that is made of non-combustible
material.
¡ To prevent condensate from returning, fit the ex-
haust air pipe from the appliance with a 1° gradient.
Round pipes
Use round pipes with an inner diameter of 150mm (re-
commended) or at least 120mm.


