Hyundai HYM430SPER User manual
- Category
- Lawnmowers
- Type
- User manual
This manual is also suitable for

PETROL LAWNMOWER
HYM430SPR
HYM480SPR
HYM530SPR
Instruction Manual

Introduction
This manual has been produced by Hyundai Power Products and should be kept with the
product. Please read and understand these instructions before you use your product. Failure to
do this may result in personal injury or damage to the product.
The safety precautions and warnings are to ensure your safety and protect you from harm or
damage to the product.
The information contained in this manual was accurate at the time of production, however
HYUNDAI Power Products may make modifications to the product without notification.
GENPOWER LTD
Isaac Way, London Road,
Pembroke Dock, UNITED KINGDOM, SA72 4RW
T: +44 (0) 1646 687 880 F: +44 (0) 1646 686 198
www.hyundaipowerproducts.co.uk
We work very hard to give all of our customers the best possible service.
If you have any problems, before leaving negative feedback, please contact
us to give us a chance to resolve the issue.
We would be delighted if you left us positive feedback!
Thank you for purchasing this product.
Thank You For Purchasing Your HYUNDAI Lawnmower

Contents
IMPORTANT: DON’T FORGET TO REGISTER YOUR EXTENDED
3 YEAR HYUNDAI WARRANTY WITHIN 30 DAYS OF PURCHASE.
https://www.hyundaipowerequipment/warranty
Features.......................................................................................................................4
What’s In The Box......................................................................................................4
Symbols On The Machine...........................................................................................5
General Safety.........................................................................................................6-9
For Safe Operation...............................................................................................10-11
Getting To Know The Machine.................................................................................12
Assembly.............................................................................................................13-18
Cable Attachment.....................................................................................................16
OPC Cable Adjustment............................................................................................17
Drive Cable Adjustment………………………………………………………………….18
Before Each Use.......................................................................................................19
Starting Procedure...............................................................................................19-20
After Each Use..........................................................................................................20
Stopping Procedure..................................................................................................20
Troubleshooting........................................................................................................21
Specifications............................................................................................................22
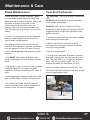
Maintenance And Care........................................................................................24-31
Checking Oil Level....................................................................................................28
Filling The Fuel Tank.................................................................................................28
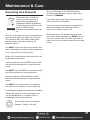
Storage And Transport…………………………………………………………..…....29-30
Disposal……………………………………………………………………………............31
Spare Parts……........................................................................................................32
Tips For Mowing........................................................................................................33
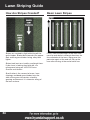
Lawn Striping Guide………………………………………………………………......34-35
Our Product Range...................................................................................................36
Useful Information.....................................................................................................37
Notes....................................................................................................................38-41
Contact Us................................................................................................................42
Declaration Of Conformity........................................................................................43

1 - Handle
2 - Drive Control (Self Propelled) Lever
3 - OPC (Operator Presence Control) Lever
4 - Handle Quick Release
5 - Fuel Filler Cap
6 - Air Filter
7 - Primer Bulb (If Applicable)
8 - Spark Plug
9 - Exhaust
10 - Rear Roller
11 - Wheel Height Adjustment Lever
12 - Oil Filler Cap
13 - Grass Collector
14 - Recoil Starter Handle
15 - Central Control Panel (If Applicable)
16 - Choke (Cold Start) Lever (If Applicable)
17 - Throttle Lever (If Applicable)
Features
4
• Lawnmower
• Grass Collector
• User Manual
What’s In The Box
1
2
3
4
5
6
8
10
11
12
13
14
7
9
15
16
17

5
Symbols On The Machine
CAUTION!
Handle carefully.
INSTRUCTION MANUAL
Read and understand operator’s
manual before using the machine.
Failure to follow instructions could
result in death or serious injury.
DANGER!
Keep hands and feet away from
cutting parts.
BEWARE OF SHARP BLADES
Remove the spark plug cable from
the spark plug and always
turn the engine off before
commencing maintenance work.
Always read instructions before
carrying out any repair or
maintenance.
DANGER AREA
Keep away from the danger area.
DANGER OF THROWN OBJECTS
Keep all bystanders and animals at
least 15 metres away from the
machine during operation. If
approached, stop the machine
immediately.
PROTECT FROM MOISTURE
Do not expose the product to rain or
wet conditions.
WEEE SYMBOL
Waste electrical products should
not be disposed of with household
waste. Please recycle where
facilities exist. Check with your local
authority or local store for
recycling advice.
PROTECTION CLASS II
Equipped with enhanced or double
insulation.
CE SYMBOL
This product complies with the
applicable European directives and
an evaluation method of conformity
for these directives was done.
WARNING
Do not touch the rotating parts.
DO NOT USE ON SLOPES
Do not use on hills above 20°.
WARNING
Always use correct tools and
original spare parts.
WARNING
The blade is sharp, do not touch the
blade.
WARNING
Stop the engine before cleaning of
work area.
KEEP BYSTANDERS AWAY
Keep bystanders, especially
children away!

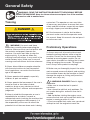
General Safety
6
WARNING : READ THE INSTRUCTION BOOKLET THOROUGHLY BEFORE
USING THE MACHINE. Keep for future reference and pass it on if the machine
is loaned or sold to another user.
Training
1. WARNING! You must read these
instructions carefully before operating the
machine. Make sure that you are familiar with
the controls and properly operate the
machine. You must learn how to stop the
engine quickly. If you do not follow the
warnings and instructions, it may result in fire
and/or serious injury. Make sure to save all
warnings and instructions for future reference.
2. Never allow children or people unfamiliar
with these instructions to use the product.
Local regulations can restrict the minimum
age of the operator.
3. Never operate while people, especially
children, or pets are nearby.
4. Never operate the lawnmower if the user is
unwell or tired, or has taken alcohol,
medicine, drugs or any substances which
may slow the user’s reflexes and compromise
judgement.
5. Keep in mind that the operator or user is
responsible for accidents, hazards or
unexpected events involving the machine that
occur to other people or their property. It is
the responsibilty of the user to assess the
potential risk of the area where work is being
Preliminary Operations
1. Always wear anti-slip and resistant work
footwear and long trousers while using the
machine. Do not use the lawnmower when
barefoot or wearing open sandals. Do not
wear chains, bracelets or clothing that is loose
fitting or hanging ties or cords. Tie long hair
back. Always wear protective earplugs.
2. Make sure you thoroughly inspect the entire
work area and remove all objects and anything
that could be thrown by the machine or could
damage the engine or cutting unit (branches,
stones, wire, toys, etc).
3. WARNING: DANGER! Petrol is highly
flammable.
- Make sure to store the fuel in special
containers.
- Use a funnel to add fuel, only outdoors. Do
not smoke during this and each time fuel is
handled.
- Add fuel before starting the engine, never
remove the fuel tank cap or add fuel whilst the
engine is running or when it is hot.
- If you have spilled fuel, make sure you do not
attempt to start the engine but move the
!
!
!
carried out. The operator or user must take
all necessary precautions to ensure their own
safety and that of others, especially on slopes
or rough, slippery and unstable ground.
6. If the lawmower is sold or lent to others,
you must make sure that the operator reads
this manual. Keep this manual safe and pass it
on to the new user.
DANGER

7
General Safety
GLOVES
Protective electrically non-conductive gloves are highly recommended when working.
HEARING PROTECTION
Suitable safety hearing protection is recommended.
EYE PROTECTION
Always wear safety glasses/goggles and/or face shields. Everyday eyeglasses have
only impact resistant lenses; they are not safety glasses/goggles.
BOOTS
Non-skid heavy duty footwear are highly recommended when working.
CLOTHING
Do not wear loose clothing, gloves, scarfs, neckties or jewellery
(rings, wrist watches), which can be caught in moving parts.
Appropriate Personal Protective Equipment (PPE), MUST be worn at all times when operating
or repairing the machine.
machine away from the area of spilled fuel and
avoid creating any source of ignition until the
fuel has evaporated and fuel vapours have
dissipated.
- Make sure to always put the tank and fuel
container caps back on and tighten well.
4. Make sure to replace faulty silencers.
5. You must check the general condition of the
machine before using and in particular:
- Check that the blade is not worn or
damaged. Replace the entire blade and all
worn or damaged fittings to preserve balance.
Any repairs must be done at a specialised
centre.
- Do not force the OPC safety lever as it must
move freely; it should return automatically and
quickly back to the neutral position, resulting
in the stopping of the blade.
6. Where applicable, check the battery status
regularly. If there is any damage to the casing,
cover or terminals, you must replace it.
7. Before you start work, always fit the exit
guards (grass collector, side discharge guard
or rear discharge guard).
8. WARNING - The noise and vibration
levels shown in these instructions are the
maximum levels for use of the lawnmower.
The use of an unbalanced blade, the
excessive speed of movement, or the absence
of maintenance have a significant influence on
noise emissions and vibrations. It is necessary
to take preventive steps to eliminate possible
damage due to high levels of noise and stress
from vibration. You must maintain the machine
well, wear ear protection and take breaks from
working.
!

General Safety
8
CAUTION!
ALL FUELS ARE FLAMMABLE
• Fire hazard - keep fuel away from all
sources of ignition for example heaters,
lamps, sparks from grinding or welding.
• DO NOT carry out hot work on tanks that
have contained fuel.
• ALWAYS keep the work area tidy.
• ALWAYS clean up spills promptly using
absorbent granules and a lidded bin.
• ALWAYS dispose of waste fuels correctly.
General Fuel Safety
CAUTION!
ALL FUELS ARE FLAMMABLE
• ALWAYS fuel and de-fuel in a well ventilated
area outside of buildings.
• ALWAYS wear correct, suitable and fit for
purpose Personal Protective Equipment (PPE),
suggested items are but not limited to safety
gloves, overalls.
• When fueling/de-fueling ALWAYS avoid
inhaling fumes.
• When de-fueling ALWAYS use a proper fuel
retriever.
• ALWAYS carry fuel in the correct and clearly
marked container.
Fueling / De-Fueling
• Electricity can kill – NEVER work on
LIVE/ENERGISED equipment.
• Prior to carrying out any maintenance work
you MUST identify electrical isolation methods
and isolate all electrical supplies.
• Prior to use and with all electrical supplies
isolated, you MUST check all electrical cables,
plugs and connectors for the following;
• Are intact and have no signs of damage, to
include but not limited to bare wires, chaffing,
cuts and loose wiring.
• If there are any signs of damage, the
damaged item MUST be taken out of service
until the damage has been repaired by an
electrically competent person.
• All trailing cables should be routed so as not
to cause any kind of trip hazard.
• NEVER work on or near electricity with wet
hands, wet clothing and wet gloves.
Electrical Safety (Where
Applicable)
Batteries present a risk if they become
damaged by the possible leaking of
electrolyte. This electrolyte is an acid and can
cause serious burn injuries. Care should be
taken when working on or near them. NOTE
the electrolyte may be in a liquid or gel form.
Should you come in to contact with electrolyte
you should;
• Remove all clothing contaminated with
electrolyte. If you cannot remove then saturate
them in water.
• Get medical assistance as soon as possible.
Batteries (Where Present)
!
!

General Safety
9
• Not all factors that lead to white finger
disease are known, but cold weather, smoking
and other diseases that affect blood vessels
and blood circulation as well as large and
long-lasting impact of shocks are considered
factors in the formation of white finger. Note
the following to reduce the risk of white finger
and carpal tunnel syndrome;
• Wear gloves and keep your hands warm.
• Take regular breaks.
• All of the above precautions may help
reduce the risk of white finger disease but not
rule out the carpal tunnel syndrome.
Long-term and regular users are therefore
recommended to observe the condition of
your hands and fingers. Seek medical
attention immediately if any of the above
symptoms should occur.
You must advise the medical staff of the type
of acid.
• Lead/acid battery = dilute sulphuric acid.
• Nickel/cadmium = potassium hydroxide
alkali electrolyte.
• Use fresh running water to wash off excess
electrolyte, continue this until medical
assistance arrives. Make sure that you do not
move the electrolyte to another part of your
body or face.
• If electrolyte comes in to contact with eyes
the electrolyte needs to be immediately
washed away with large amounts of water.
Make sure that you do not wash the
electrolyte to another part of your face or
body.
• Gasses from charging batteries are
highly flammable and explosive and great care
should be taken to charge in well ventilated
areas.
• There is an explosion risk if the battery
terminals are short circuited, when
connecting/disconnecting ALWAYS exercise
great care so that the terminals or battery
leads are NOT allowed to touch and cause a
spark. ALWAYS use suitable insulated tools.
• Prolonged use of hand held (operated)
machines will cause the user to feel the effects
of/from vibrations. These vibrations can lead
to white finger (Raynaud’s phenomenon) or
carpal tunnel syndrome. This condition
reduces the ability of the hand to feel and
regulate temperature, causing numbness and
heat sensations and may cause nerve damage
and circulatory tissue death.
Vibrations (Where
Applicable)
• The operating noise of the machine can
damage your hearing. Wear hearing protection
such as earplugs or ear defenders to protect
your hearing. Long-term and regular users are
advised to have hearing checked regularly. Be
especially vigilant and cautious when using
ear protection because your ability to hear
alarm warnings will be reduced.
• Noise emissions for this equipment is
unavoidable. Carry out noisy work at
approved times and for certain periods.
Limit the working time to a minimum. For your
personal protection and protection of people
working nearby it is also advisable for them to
wear hearing protection.
• See Certificate of Conformity section
for Outdoor Noise declaration of conformity.
Noise (Where Applicable)

10
For Safe Operation
During Use
1. Never operate the engine in a confined
space where dangerous carbon monoxide
fumes can develop. All ignition operations
have to be effected in an open or
well-ventilated area. Always remember that
exhaust fumes are toxic.
Carbon monoxide is a colourless and
odourless gas. Inhaling this gas can cause
death as well as serious long term health
problems such as brain damage.
The symptoms of carbon monoxide poisoning
can include but are not limited to the
following; Headaches, dizziness, nausea,
breathlessness, collapsing or loss of
consciousness.
Carbon monoxide poisoning symptoms are
similar to flu, food poisoning, viral infections
and simply tiredness. It is quite common for
people to mistake this very dangerous
poisoning for something else.
To avoid carbon monoxide poisoning DO NOT
use Petrol/Diesel powered equipment inside
any of the following; Home, garage, tent,
camper van, mobile home, caravan or boat.
This is not exhaustive and if you are in any
doubt contact your dealer.
If you think you have or someone around you
has been affected by carbon monoxide
poisoning; Get them fresh air immediately,
by leaving the affected area or by opening
doors and windows. If safe and practical to do
so make sure that the machine is turned off.
DO NOT enter a room you suspect of having
carbon monoxide present – instead call the
emergency services.
Contact a Doctor immediately or go to
Hospital – let them know that you suspect
carbon monoxide poisoning.
DO NOT use in an enclosed area or moving
vehicle.
2. You must only work in daylight or with good
artificial light in good visibility conditions. Keep
people, children and animals away from the
working area.
3. Avoid mowing wet grass if possible. Do not
work in the rain or when there is a
thunderstorm or lightning risk. If there is bad
weather conditions, do not use the machine.
4. Make sure on slopes you have a steady
foothold.
5. Do not allow the lawnmower to pull you
along, you must walk and never run.
6. You must pay special attention when
approaching obstacles that could compromise
visibility.
7. When mowing on slopes, you must mow
across the slope and not up and down it.
When changing direction, you need to be
careful that the wheels do not hit any
obstacles (such as roots, branches, stones,
etc) that can cause the lawnmower to slide
sideways or make you lose control of it.
8. The lawnmower must never be used on
slopes of over 20°, regardless of the mowing
direction.
9. Be very careful when pulling the
lawnmower toward you. You must look behind
you to make sure there are no obstacles
before and during operations in reverse.
10. You must immobilise the blade if the
machine must be inclined for transport, when
moving over surfaces other than grass
and when the lawnmower is transported from
or to an area that must be cut.
11. When using the machine near roads, pay
attention to traffic.
12. Do not operate the machine with damaged
guards or without the grass collector, side
discharge guards or rear discharge guards.
!

11
For Safe Operation
13. You must be careful near ravines, ditches
or embankments.
14. Follow the instructions to start the engine
carefully whilst keeping feet away from the
blade.
15. Never incline the lawnmower whilst
starting. Start the machine on a flat surface
without obstacles or high grass.
16. Do not place your hands or feet near or
under rotating parts. Keep away from the
discharge opening.
17. If the lawnmower is running, do not lift or
transport.
18. Do not tamper with or disable safety
systems.
19. Do not over-rev the engine or change the
engine settings.
20. The engine parts get very hot when
running, do not touch. Danger of burns.
21. Disengage the wheel drive before starting
the engine on power-driven models.
22. Only use manufacturer-recommended
attachments.
23. If the attachments/tools are not installed in
their seats, do not use the machine.
24. You must disengage the blade, switch off
the engine and unplug the spark plug cable
(making sure that all moving parts are
stationary):
- When transporting the machine
- Whenever you leave the machine
unattended; also remove the key on models
with electric ignition systems
- Before clearing blockages or unclogging the
discharge chute
- Before cleaning, checking or working on the
machine
- After striking a foreign object, you must
inspect the machine for damage and make
repairs before using it again.
25. Disengage the blade and turn off the
engine:
- Before refuelling
- Whenever you remove or attach the grass
collector
- Whenever you remove or attach the side
discharge cute
- Before adjusting the cutting height
26. Always keep a safe distance from the
rotary blade, given by the length of the handle.
27. Before stopping the engine, reduce the
throttle setting, if applicable.
28. Stop the engine before emptying the grass
collector or before you change the cutting
height.
29. WARNING - If something breaks or an
accident happens whilst working, you must
turn off the engine immediately and move the
lawnmower away to prevent further damage. If
an accident happens with injuries or third
parties are injured, carry out the first aid
measures most suitable for the situation
immediately and contact the medical
authorities for any necessary health care.
Carefully remove any debris that might cause
damage or harm persons or animals should it
not be seen.
30. Start the engine carefully according to
instructions and with feet well away from the
blade.
31. Do not tilt the lawnmower when starting
the engine.
32. Do not tamper with the safety features.
!

12
About The Lawnmower
Getting To Know The Machine
Machine Description
HYM430SPR
The HYM430SPR is a petrol powered rear
roller, self-propelled lawnmower from
HYUNDAI, ideally suited for small to medium
sized lawns. The HYM430SPR has a cutting
width of 420mm and is powered by a 139cc
4-stroke OHV petrol engine.
HYM480SPR
The HYM480SPR is a petrol powered rear
roller, self-propelled lawnmower from
HYUNDAI, ideally suited for medium sized
lawns. The HYM480SPR has a cutting width of
480mm and is powered by a 139cc 4-stroke
OHV petrol engine.
HYM530SPR
The HYM530SPR is a petrol powered rear
roller, self-propelled lawnmower from
HYUNDAI, ideally suited for medium to large
sized lawns. The HYM530SPR has a cutting
width of 525mm and is powered by a 196cc
4-stroke OHV petrol engine.
The lawnmower is a garden tool and precisely
a pedestrian controlled lawnmower. The
machine is essentially composed of an engine
which drives a blade enclosed in a casing,
equipped with wheels and a handle. The
operator is able to operate the machine and
use the main controls, always staying behind
the handle at a safe distance from the rotating
blade. If the operator leaves the machine, the
engine and cutting means will stop within a
few seconds.
The lawnmower is manufactured according to
the latest safety requirements. These include
a blade brake that stops the engine and blade
when you let go of the OPC lever. Every
precaution is only effective when it is followed
exactly.
Intended Use
This machine was designed and manufactured
for cutting and collecting grass in gardens and
grassy areas, in areas in proportion to its
cutting capacity, controlled by a pedestrian
operator.
The presence of attachments or specific
devices can prevent cut grass from being
collected or produce a mulching effect,
depositing cut grass on the ground.
User Types
This machine is intended for use by
consumers, i.e. non professional operators.
The machine is intended for “DIY” and
domestic use only.
Improper Use
Any other usage not in keeping with the above
mentioned ones may be hazardous and harm
persons and/or damage things. Examples of
improper use may include, but are not limited
to:
- transporting people, children or animals on
the lawnmower
- letting yourself be transported by the
lawnmower
- using the machine to tow or push loads
- using the machine for leaf or debris
collection
- using the machine to trim hedges, or cutting
anything other than grass
- use of the machine by more than one person
- using the blade on surfaces other than grass

13
Getting Started
Assembly
CAUTION - This guide is meant to serve
as a quick reference for operating your
HYUNDAI lawnmower. We always advise
reading the manual in full before operation.
CAUTION - For OUTDOOR use ONLY.
Petrol lawnmowers produce carbon monoxide
– a poisonous, colourless and odourless gas
that can cause serious injury or death. Petrol
is highly flammable, always handle with
extreme care and in a well ventilated area.
NOTE - Images may vary depending on
model. If the lawnmower has the mulching
option, the mulching plug may already be
installed for transport.
NOTE - The lawnmower can be supplied
with some parts already assembled. Prior to
assembly, check all items have been received.
WARNING - Unboxing and assembling the
lawnmower should be done on a flat, stable
surface with enough room. Disposal of the
packaging should be done in accordance with
the local regulations in force.
!
!
!
!
!
As soon as you have purchased your
machine, we recommend that you fill out
the information on page 42. If you need to
contact an authorised dealer or customer
service for information on servicing, you
may need to provide this information.
There is also a service record so you can
keep track of your lawnmower service
dates.
Unboxing & Assembly Videos:
HYM430SPR
Go to youtube.com and type in Hyundai
HYM430SPR petrol lawnmower unboxing &
assembly.
HYM480SPR
Go to youtube.com and type in Hyundai
HYM480SPR petrol lawnmower unboxing &
assembly.
HYM510SPR
Go to youtube.com and type in Hyundai
HYM530SPR petrol lawnmower unboxing &
assembly.
YOU MUST read and understand the
instruction manual first.
Adjusting Cutting Height
1. To adjust the cutting height, stop the
mower.
2. Push the lever out and move up or down to
select the required cutting height.
3. Restart the engine.
The height is automatically adjusted for all
wheels.

14
Assembly
STEP 1
Make sure the blade is free of long grass and
the cutting height is set to maximum.
STEP 2
Attach the upper handle to the lower handle
and tighten bolts securely.
Using the hooks on the grass bag, hook the
grass bag over the bar at the rear of the lawn
mower.
STEP 6
STEP 5
Attach the grass collecting bag to the lawn
mower.
STEP 3
Slowly pull the recoil cord and thread it
through the cord loop.
STEP 4
Insert the metal frame into the grass bag and
clip the bag to the frame.
You must read the assembly safety on
the previous page before you begin.
!

15
Assembly
STEP 7
Lower the rear discharge flap until it rests on
the grass collector.
STEP 8
Attach the centre control panel with two
screws.
STEP 9
NOTE - All machines are tested and
inspected so there may be some residual oil
left in the machine so please fill with caution.
If you overfill the oil, you can remove some by
gently tilting the machine on its side and
pouring out any excess oil into a suitable
container or use an oil syringe.
Remove the oil filler cap and fill with fresh
SAE 30 or 15W40 engine oil to the upper
mark on the dipstick. DO NOT overfill.
Once the correct amount of oil has been
added, refit the dipstick securely.
Remove the fuel tank cap. Fill the fuel tank
with fresh straight unleaded petrol. Allow a
25mm gap from the top of the tank, then refit
the cap securely. DO NOT mix petrol with oil
and clean up any spills immediately.
DO NOT overfill. The fuel tank only needs
to contain enough fuel to complete the days
mowing. If you run out of fuel, refilling must
only be done once the engine has cooled
down. Fuel stored within the machine for 28
days or more can go stale and should be
drained before further use.
STEP 10
Refit the fuel filler cap securely and clean up
any fuel spilt before starting the engine.
STEP 11

Cable Attachment
16
Cable Attachment
NOTE - If you are standing behind the
lawnmower:
OPC Cable: This attaches to the lever in front
of the main handlebar and if followed, will
attach to the engine.
Drive Cable: This attaches to the lever behind
the main handlebar and if followed, will enter
the deck of the lawn mower behind the engine.
STEP 1
Follow the cable you want to attach and
determine which lever it will attach to.
STEP 2
Gently prise the lever from its locating hole in
the main handlebar.
STEP 4
Position the cable until it lies flat in the lever.
STEP 3
Insert the end of the cable in to the location
hole on the lever.
STEP 5
Refit the lever back into its location hole on
the main handlebar.

17
OPC Cable Adjustment
STEP 6
Check the cable lies flat and has not snagged
on any other part of the lawnmower.
OPC Cable Adjustment
Before use you MUST check and if
necessary adjust the Operator Presence
Control cable (OPC).
NOTE - It is necessary as part of routine
maintenance to adjust the OPC cable tension
to ensure the lawnmower will start correctly.
If there is more than 10mm movement in the
OPC lever before the cable begins to move,
then the OPC cable will require adjustment.
STEP 1
Follow the OPC cable to the adjuster located
on the side of the engine.
Lock Nut
Adjustment Nut
STEP 2
Undo the lock nut and wind it forwards.
STEP 3
Move the adjustment nut towards the lock nut
and continually check the cable tension at the
lever.
STEP 4
Once the movement has been removed, hold
the adjustment nut in place and tighten the
lock nut back towards the adjustment lever to
lock the cable in place.Check the cable
adjustment has worked by starting the mower.
If the mower still fails to start, re-adjust until
the lawnmower starts. Also check that when
the OPC lever is released that the blade stops
promptly.

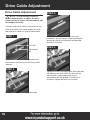
Drive Cable Adjustment
18
Drive Cable Adjustment
NOTE - It is necessary as part of
routine maintenance to adjust the drive
cable tension to ensure the lawnmower will
self-propel correctly.
If there is more than 10mm movement in the
drive lever before the cable begins to move,
then the drive cable will require adjustment.
!
STEP 1
Follow the drive cable down towards the
lawnmower until you reach the drive cable
adjuster.
Lock Nut
Adjustment
Nut
STEP 2
Undo the lock nut and wind it forwards.
STEP 3
Wind the adjuster nut towards the main
handlebar. As you adjust, keep checking the
tension on the drive cable until the desired
tension is reached.
STEP 4
Tighten the lock nut finger tight, back towards
the adjuster nut and check for drive on the
lawn mower. If adjusted correctly the
lawnmower will self-propel. Once drive is
restored, tighten the lock nut securely.

19
Starting The Lawnmower
Cold Starting Procedure
NOTE - You MUST ensure the
mower has the correct oil and fuel level
before operation. Images may vary
depending on the model of machine.
!
Before Each Use
• Always ensure that the mower is in a safe
working condition. Inspect the blade, check
safety devices and guards and check all nuts,
bolts and screws are secure.
• Check the oil level, go to page 28 for
instructions.
• Fill the fuel tank with unleaded petrol. Go to
page 28 for instructions.
• Check the OPC cable, if there is more than
10mm movement in the OPC lever before the
cable begins to move, then the OPC cable will
require adjustment. Go to page 17 for
instructions.
STEP 1
Make sure the blade is free of long grass and
the cutting height is set to maximum.
STEP 2
Place the choke lever to the ‘START’ position.
STEP 2
Pull back the Operator Presence Control
(OPC) lever towards the main handle.
STEP 3
Pull the recoil starter handle gently until you
feel resistance.
STEP 4
Once you feel resistance, pull the starter
handle swiftly until the mower starts.
Continued

20
Starting & Stopping The Lawnmower
STEP 5
Once the engine starts, move the choke lever
to the ‘RUN’ position
Warm Starting Procedure
STEP 1
Follow the procedure for cold start but remove
step 2 and leave the choke in the ‘RUN’
position.
Stopping Procedure
STEP 1
Release the OPC lever and the engine will
stop.
CAUTION - The engine and exhaust
will remain hot for a while after use. Ensure
the engine and exhaust have cooled before
carrying out any maintenance or storage.
Before stopping the machine, you must
allow the engine to idle for 30 seconds.
!
After Each Use
• Examine the blade for damage.
• Clean the machine if necessary, go to page
29 for more information on how to clean your
machine.
Page is loading ...
Page is loading ...
Page is loading ...
Page is loading ...
Page is loading ...
Page is loading ...
Page is loading ...
Page is loading ...
Page is loading ...
Page is loading ...
Page is loading ...
Page is loading ...
Page is loading ...
Page is loading ...
Page is loading ...
Page is loading ...
Page is loading ...
Page is loading ...
Page is loading ...
Page is loading ...
Page is loading ...
Page is loading ...
Page is loading ...
Page is loading ...
-
 1
1
-
 2
2
-
 3
3
-
 4
4
-
 5
5
-
 6
6
-
 7
7
-
 8
8
-
 9
9
-
 10
10
-
 11
11
-
 12
12
-
 13
13
-
 14
14
-
 15
15
-
 16
16
-
 17
17
-
 18
18
-
 19
19
-
 20
20
-
 21
21
-
 22
22
-
 23
23
-
 24
24
-
 25
25
-
 26
26
-
 27
27
-
 28
28
-
 29
29
-
 30
30
-
 31
31
-
 32
32
-
 33
33
-
 34
34
-
 35
35
-
 36
36
-
 37
37
-
 38
38
-
 39
39
-
 40
40
-
 41
41
-
 42
42
-
 43
43
-
 44
44


Hyundai HYM430SPER User manual
- Category
- Lawnmowers
- Type
- User manual
- This manual is also suitable for
Ask a question and I''ll find the answer in the document
Finding information in a document is now easier with AI
Related papers
Other documents
-
Hyundai power products P5100SPE Petrol Lawnmower Owner's manual
-
-
-
-
-
 Yard Force GM B40 Owner's manual
-
-
-
WOLF-Garten 3549000 Datasheet
-
