Planar Systems 997-6399-00 Datasheet
- Category
- Touch screen monitors
- Type
- Datasheet
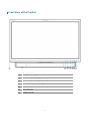
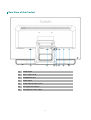
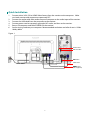
Planar Systems 997-6399-00 is a feature-rich LED touch monitor designed to enhance your computing experience. Equipped with a range of connectivity options including VGA, DVI, and HDMI, it seamlessly integrates with your existing setup. The 24-inch Full HD display delivers crisp and vibrant visuals, while the touchscreen capability offers intuitive control and navigation. Experience effortless volume and preset mode adjustment using the front-panel controls, ensuring a user-friendly experience.
Planar Systems 997-6399-00 is a feature-rich LED touch monitor designed to enhance your computing experience. Equipped with a range of connectivity options including VGA, DVI, and HDMI, it seamlessly integrates with your existing setup. The 24-inch Full HD display delivers crisp and vibrant visuals, while the touchscreen capability offers intuitive control and navigation. Experience effortless volume and preset mode adjustment using the front-panel controls, ensuring a user-friendly experience.


-
 1
1
-
 2
2
-
 3
3
-
 4
4
-
 5
5
-
 6
6
-
 7
7
-
 8
8
-
 9
9
-
 10
10
-
 11
11
-
 12
12
-
 13
13
-
 14
14
-
 15
15
-
 16
16
-
 17
17
-
 18
18


Planar Systems 997-6399-00 Datasheet
- Category
- Touch screen monitors
- Type
- Datasheet
Planar Systems 997-6399-00 is a feature-rich LED touch monitor designed to enhance your computing experience. Equipped with a range of connectivity options including VGA, DVI, and HDMI, it seamlessly integrates with your existing setup. The 24-inch Full HD display delivers crisp and vibrant visuals, while the touchscreen capability offers intuitive control and navigation. Experience effortless volume and preset mode adjustment using the front-panel controls, ensuring a user-friendly experience.
Ask a question and I''ll find the answer in the document
Finding information in a document is now easier with AI
Related papers
-
Planar Systems PLL1900MW User manual
-
-
Planar Systems PLL1900W User manual
-
-
Planar Systems PLL2710W User manual
-
-
Planar Systems PXL2470MW User manual
-
Planar Systems PXL2770MW User manual
-
-
Planar Systems PL1911M-BK User manual
Other documents
-
-
YURAKU YM17NPX User manual
-
Envision G22LWK Owner's manual
-
YURAKU YM19GPX User manual
-
Envision G19LWK User manual
-
-
V7 L236VA-2N,L236VA-2NH,L236VA-2E User manual
-
Planar PL1500M User manual
-
-