

The information in this manual furnished for information use only, is subject to change without notice, is not to be
construed as a commitment by ATN Corp.
ATN Corp. assumes no responsibility or liability for any errors or inaccuracies that may appear in this book.
©2002 ATN Corp. All right reserved.
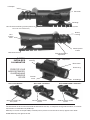
5 Diopter
Elevation
Windage
Reticle system
Battery
housing
New Titanium mounting system (mounts to
std. U.S. 7/8” weaver rail)
Lens
fixation
knob
Manual focus lens
Reticle brightness
adjustment
Master power
button
“Green on Green” reti-
cle system
“Red on Green” reticle
system
“Red on Green” reticle
system
Aries 330 “Warrior” Aries 350c “Guardian” Aries 6800c/7800c “Defender”
IR brightness
adjustment
DIGITAL
INFRA-RED
ILLUMINATOR
FREE FOR YOUR
ARIES DEFENDER,
GUARDIAN AND
WARRIOR
SCOPE
Battery
housing
Fixation
screw
IR elevation
IR windage
IR focusing

2
APPLICATION
ARIES 330
“WARRIOR”
• 3x magnification with F1:1.7,
f90mm lens
• “Green on Green” reticle
system
• New, detachable most pow-
erful in the industry 450mw
Infrared Illuminator with dedi-
cated windage and elevation
adjustments.
• New Titanium mounting
system
• Reticle brightness adjust-
ment
• Dimensions: 9” x4” x2”
• Weight: 2.2 lbs.
ARIES 350C
“GUARDIAN”
• The most compact first gen-
eration rifle scope on the
market.
• New, high resolution Gen. 1+
LIT.
• “Red on Green” reticle
system with 1/8 inch @
100yards adjustment
• 2.5X magnification with new
F1:1.2, f50mm lens
• New, detachable most pow-
erful in the industry 450mWt
Infrared Illuminator with dedi-
cated windage and elevation
adjustments.
• New Titanium mounting
system
• Reticle brightness adjustment
• Dimensions: 8” x3” x2”
• Weight: 1.8 lbs.
ARIES 6800C/7800C
“DEFENDER”
• The most compact and light-
weight Second Generation
weapon sight
• Optical configuration that
surpasses current Military
Specifications
• 3X magnification with new
F1:1.2, f50mm lens
• “Red on Green” reticle
system with 1/8 inch @
100yards adjustment
• Automatic brightness
control(ABC) for tube protec-
tion
• New Titanium mounting
system
• Dimensions: 8”x3”x2.5”
• Weight: 2 lbs
• Made in USA
The Aries 330 “Warrior” is an affordable, high
quality 1
st
. generation weapon sight. It sports
features such as a new super fast front lens
system for optimal brightness, easy push button
operation and a reticle brightness adjustment.
The Warrior also comes with our new detacha-
ble, most powerful in the industry 450mw Infra-
red Illuminator with dedicated windage and ele-
vation adjustments. This new IR lets you see
even in total darkness up to 150 yards away!
The Aries 350 “Guardian” is the most com-
pact 1
st
gen. weapon sight on the market. Meas-
uring only 8 inches long and weighing less then
2 lbs. the Guardian is one of the most rugged
yet compact scopes made.
The accuracy on the 350 Guardian is unpar-
alleled thanks to our “Red on Green” reticle
system. Windage and elevation adjustments
are as amazing 1/8 inch @ 100yards.
Combine this accuracy with other features such
as a new super fast front lens system for optimal
brightness, easy push button operation, reticle
brightness adjustment and our new detacha-
ble, most powerful in the industry 450mw Infra-
red Illuminator with dedicated windage and ele-
vation adjustments.
The “c” in 6800c/7800c, stands for compact.
The Aries Defender is one of the most compact
high-end night vision scopes you will ever find.
Utilizing either a top grade US 2
nd
Gen. (6800c)
tube or a high end US 3
rd
gen (7800c) light
intensifier tube the Defender has an extremely
sharp resolution and brightness. This compact
marvel is not a stripped down NVD it is full of
features such as a new super fast front lens
system for optimal brightness, easy push button
operation, and a reticle brightness adjustment.
Plus, it comes with our new detachable, most
powerful in the industry 450mw Infrared Illu-
minator with dedicated windage and elevation
adjustments for total darkness usage.
FEATURES

3
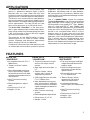
MOUNTING
PREPARATION FOR OPERATION
Before getting started make sure to follow these
steps:
• Install the battery into its housing with the
polarity order shown on the main body of the
unit.
• Switch on the Aries scope with the protective
lens cover still attached to the lens.
• Make sure that the green luminance of the
light intensifier tube is present.
• Observe the scene, and adjust the diopter
and/or lens for optimal image clarity.
• You may now enter a dark environment or
simply shut the lights off in order to darken
the room.
• Next, remove the lens cap/daylight filter.
• Observe the scene, and adjust the front lens
for ideal focus.
• Finally, you may want to turn the infra red (IR)
illuminator on. Notice the ability of the Aries
scope to see in total darkness with the aid of
the IR illuminator.
OPERATING
RETICLE BRIGHTNESS ADJUSTMENT
By rotating the knob you may adjust the ret-
icle’s brightness. Adjustment could be easily
seen if you look through the scope while adjust-
ment.
1. Slightly loosen the horizontal and vertical
fixing screws on the 7/8” weaver rail built into
the scope.
2. Place the scope on the dovetail mount of the
fire arm making certain that the mount aligns
with the receptor attachment screw groove.
Adjust as necessary.
3. Tighten the horizontal fixing screws.
NOTE: Receptor attachment screws may need to
be tightened after continuous shooting.
FOCUSING
To focus your riflescope you will need to adjust
the diopter first thing. Simply turn the diopter
clockwise until it stops. Then, while looking
through the diopter at a subject, slowly turn the
diopter back counter clockwise until the grain
in the image is sharp.
NOTE: We suggest that you focus the diopter
during daylight with the filter on.
Before focusing turn the lens fixation handle
clockwise, to unlock the lenses.
Next, focus the front lens until the image and the
grain are both sharp. When you are in the low-
light conditions and the daylight filter is off you
may focus the front lens to receive a sharp image,
the diopter should not be adjusted.
NOTE: The front lens should be readjusted as
you view objects at different distances.
When you are finished to adjust the front lens
focus, you should lock the front lens in place by
turning the lens fixation knob clockwise. Fail-
ure to do this may cause shift in aimpoint when
shooting.
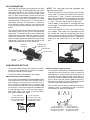
Locking knob
Battery
installation

4
IR ILLUMINATION
Infra-red (IR) Illuminators are common for night
vision technology. The IR light greatly enhances
the performance of your Aries scope, while
remaining almost totally invisible to the naked
eye. In dark environment, power up the Aries
scope. Now, find a scene and examine it with-
out the IR on then with IR powered up. Note
the difference in illumination. It is important to
remember that the IR illuminator is simply an
infra red light source, and like any light source
it may loose its effectiveness over a great dis-
tance.
To fix the IR Illuminator to the riflescope screw
the thumb screw on the IR into the thread on
the scope. To switch the IR on and to adjust the
brightness rotate the rheostat located on the
side of the Illuminator. The changes of adjust-
ment could be observed while looking through
the scope. The IR is off when the mark on the
rheostat coincides with “0” on the scale.
NOTE: The riflescope could be equipped with
digitally controlled IR.
The IR illuminator control buttons are located
on its side. To switch the Digital IR illuminator
on/off press “+” and “-” buttons simultaneously.
When the IR illuminator is switched on you can
see the green LED lit. By pushing the buttons
“+” and “-” you may adjust the IR brightness.
The IR beam is focusable to change the field
of coverage. To change the beam width slightly
turn the IR lens.
You could change the IR control panel fitting
your needs. The screw-tool included into the
set should be used for weakening the fixing
screw located on the IR. Rotate the IR placing
at in the most convenient position. Tighten the
screw with the screw-tool to fix the new posi-
tion.
IR Brightness
Adjustment
Battery
Housing
Fixation
Screw
IR Elevation
IR Windage
IR Focusing
The range finder reticle in your Night Vision Rif-
lescopes was designed to assist you in deter-
mining the range of your target.
These distances are based on a 6’ target.
ARIES350/6800/7800 RETICLE
A 6’ target fits between the numbered baseline
(the three short horizontal lines directly next to
the numbers) and the main horizontal line. If
the 6’ target fits between the 1 and the right
horizontal post of the main line the target is 100
yards away. If the same target fits between the
2 and the right post of main line the target is
200 yards away. The same is with the three,
the target is 300 yards away.
ARIES350/6800/7800 RETICLE
A 6’ target fits between the numbered baseline
and the main horizontal line. If the 6’ target fits
between the 2 and the right horizontal post of
the main line the target is 200 yards away. If
the same target fits between the 5 and the right
post of main line the arget is 500 yards away.
The same is with the 1,3 and 4.The target would
be either 100,300 and 400 yards away.
The vertical lines in chevron reticle are propor-
tioned to help in rangefinding and in making
allowances for wind or movement.
RANGEFINDE RETICLE
If a 6’ target fits
between these two
lines then the target
is 100 yards away.
If a 6’ target fits
between these two
lines then the target
is 200 yards away.
If a 6’ target fits
between these two
lines then the target
is 500 yards away.
If a 6’ target fits
between these two
lines then the target
is 200 yards away.

5
WARNINGS AND
CAUTIONS
• Always remember to turn off the Aries scope
when it is not in use. If you do not plan on
using your aries scope for a period of more
than 10 days, you should remove the batter-
ies.
• Keep lens cap/daylight filter on when not in
use.
• Avoid contact with dust, steam, and gas.
• The Aries scope are not harmful to the user or
the environment.
• Do not disassemble except to clean the front
lens and the eyepiece: it will void your war-
ranty.
• Evaluate the scopes function by looking
through it in a lit environment with the day-
light filter lens cap on. Never use in daylight
without the daylight filter lens cap on. Do not
surpass ten minutes of testing.
• Never point the Aries scope at a bright light
source. If the scope shuts off automatically
after directing it at a bright light source, turn
the unit off and wait 1 - 2 minutes before turn-
ing the unit back on.
• Adverse atmospheric conditions such as fog,
smog, or haze and a lack of ambient light
(moon or starlight) may diminish the effec-
tive viewing distance. All technical data for
this unit was compiled in a controlled envi-
ronment.
TROUBLESHOOTING
Q: Flashes, flickers, or clicking occur while
operating
S: If it occurs within the first five minutes
of inserting new batteries, it is normal and
the device will resume normal operation soon
thereafter. If it occurs for more than 10 minutes,
contact your dealer or other authorized service
representative for service instructions.
Q: Dark spots on screen.
S: This may be dust on the lens, please clean
according to instrutions. They may also be Cos-
metic blemishes in the intensifier tube which
are a by-product of the manufacturing process.
This is normal and will not affect the life or per-
formance of the unit.
Q: Image not clear.
S: Adjust focus ring. If problem persists,
increase viewing distance
Q: Fixed-pattern noise in a honeycomb shape.
S: Usually a cosmetic blemish characterized by
a faint honeycomb-type pattern. This usually
occurs when viewing very bright lights. Adjust
the potentiometer, to reduce brightness.
Q: A pattern of dark thin lines which look like
chicken wire.
S: Turn on illuminator, if purchased. If illumi-
nator doesn’t brighten image, replace batter-
ies. If problem persists, contact ATN for serv-
ice instructions.
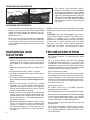
The vertical and horizontal adjust-
ments for the Aries can be achieved
by turning the elevation and windage
adjustment mechanisms (remove dust
caps first). Each click equals 1/8 inch at
100 yards for the 350 and 6800/7800.
1/4 inch for the 330. When reaching
the maximum range of rotation do not
use force.
Windage
Elevation
Aries 350c/6800c/7800c
Windage
Elevation
Aries 330
WINDAGE AND ELEVATION
You may need to clean the eyepiece of the rif-
lescope from time to time in order to guarantee
top performance. When you receive your rifle-
scope you should check for dust on the eye-
piece of the unit.
First you will need to remove the eyepiece.
To do that you will need to initially loosen the
2 set screws that can be found on the base.
Then unscrew the eyepiece counter-clockwise
to remove it.
NOTE: You do not have to remove the set screws
completely, they are very small and easy to mis-
place.
CAUTION: Use only Photographic lens clean-
ing tissue on these surfaces. Be careful not to
scratch or smudge any of these surfaces.
When using compressed air to blow dust away,
make sure to avoid inverting the can while
spraying. This can cause frozen propellant
to exit the can, which can cause serious prob-
lems with the glass and phosphor screen.
CLEANING THE EYEPIECE

6
2 YEAR PRODUCT
WARRANTY
This product is guaranteed to be free from man-
ufacturing defects in material and workmanship
under normal use for a period of 2 (two) years
from the date of purchase. In the event a defect
that is covered by the foregoing warranty occurs
during the applicable period stated above, ATN, at
its option, will either repair or replace the product,
and such action on the part of ATN shall be the
full extent of ATN’s liability, and the Customer’s
sole and exclusive remedy. This warranty does
not cover a product (a) used in other than its
normal and customary manner; (b) subjected to
misuse; (c) subjected to alterations, modifications
or repairs by the Customer of by any party other
than ATN without prior written consent of ATN; (d)
special order or “close-out” merchandise or mer-
chandise sold “as-is” by either ATN or the ATN
dealer; or (e) merchandise that has been discon-
tinued by the manufacturer and either parts or
replacement units are not available due to rea-
sons beyond the control of ATN. ATN shall not
be responsible for any defects or damage that in
ATN’s opinion is a result from the mishandling,
abuse, misuse, improper storage or improper
operation, including use in conjunction with equip-
ment which is electrically or mechanically incom-
patible with or of inferior quality to the product,
as well as failure to maintain the environmental
conditions specified by the manufacturer. CUS-
TOMER IS HEREBY NOTIFIED THAT OPERA-
TION OF THE EQUIPMENT DURING DAYLIGHT
HOURS OR UNDER ANY EXCESSIVE LIGHT
CONDITIONS MAY PERMANENTLY DAMAGE
THE INTERNAL COMPONENTS OF THE UNIT
AND SAID DAMAGE WILL NOT BE COVERED
UNDER THIS WARRANTY. This warranty is
extended only to the original purchaser. Any
breach of this warranty shall be waived unless the
customer notifies ATN at the address noted below
within the applicable warranty period.
The customer understands and agrees that except
for the foregoing warranty, no other warranties
written or oral, statutory, expressed or implied,
including any implied warranty of merchantability
or fitness for a particular purpose, shall apply
to the product. All such implied warranties are
hereby and expressly disclaimed.
LIMITATION OF LIABILITY
ATN will not be liable for any claims, actions, suits,
proceedings, costs, expenses, damages or liabili-
ties arising out of the use of this product. Opera-
tion and use of the product are the sole respon-
sibility of the Customer. ATN’s sole undertaking
is limited to providing the products and services
outlined herein in accordance with the terms and
conditions of this Agreement. The provision of
products sold and services performed by ATN to
the Customer shall not be interpreted, construed,
or regarded, either expressly or implied, as being
for the benefit of or creating any obligation toward
any third party of legal entity outside ATN and the
Customer; ATN’s obligations under this Agree-
ment extend solely to the Customer. ATN’s liabil-
ity hereunder for damages, regardless of the
form or action, shall not exceed the fees or
other charges paid to ATN by the customer
or customer’s dealer. ATN shall not, in any
event, be liable for special, indirect, inciden-
tal, or consequential damages, including, but
not limited to, lost income, lost revenue, or
lost profit, whether such damages were fore-
seeable or not at the time of purchase, and
whether or not such damages arise out of a
breach of warranty, a breach of agreement,
negligence, strict liability or any other theory
of liability.
PRODUCT WARRANTY REGISTRATION
In order to validate the warranty on your product,
ATN must receive a completed Product Warranty
Registration Card for each unit. Please complete
the form below and immediately mail it to our Serv-
ice Center: ATN Corporation, 20 South Linden
Ave., Suite 1B, South San Francisco CA 94080.
Products qualifying for warranty repair will be
either repaired or replaced within 10 business
days of receipt of merchandise unless the cus-
tomer is notified otherwise.
OBTAINING WARRANTY SERVICE
To obtain warranty service on your unit, take or
send the product, postage paid, with a copy of
your sales receipt to our service center, ATN Cor-
poration at the address noted above. All merchan-
dise must be fully insured with the correct post-
age; ATN will not be responsible for improper post-
age, or, missing or damaged merchandise during
shipment.

For customer service and technical support, please contact
American Technologies Network Corp.
North American Office
20 S. Linden Ave. Suite 1B, South San Francisco, CA 94080
phone: 800-910-2862, 650-875-0130; fax: 650-875-0129
European Office
phone: 44(0)870-0111286, fax: 44(0) 845-3349142
The following countries can use our
toll free number 00 800 9102-8620
Austria, France, Germany, Holland, Italy, Spain, Sweden, Switzerland
www.atncorp.com
©2002 ATN Corporation
-
 1
1
-
 2
2
-
 3
3
-
 4
4
-
 5
5
-
 6
6
-
 7
7
-
 8
8


Ask a question and I''ll find the answer in the document
Finding information in a document is now easier with AI
Related papers
-
 ATN Aries 330 “Warrior” User manual
-
ATN Aries 390 Paladin User manual
-
 ATN Aries MK300 User manual
-
 ATN Night Arrow 2 User manual
-
 ATN Night Arrow 2 User manual
-
 ATN Night Arrow 2 User manual
-
 ATN Night Arrow 2 User manual
-
 ATN Night Arrow 2 User manual
-
 ATN Night Arrow 2 User manual
-
 ATN Night Arrow 2 User manual


Other documents
-
Yukon 26011 User manual
-
NIGHT OWL NOXM50 Owner's manual
-
NIGHT OWL NOB3X User manual
-
Barska AC11586 Owner's manual
-
Carson CP-45 User guide
-
-
Topeak TC9606 Owner's manual
-
-
-
Aimpoint 3XMag-1 User manual