Page is loading ...

Smart Video Doorbell
EN ES
FR IT
DE NL
User guide
Guide de l’utilisateur
Benutzerhandbuch
Guía del usuario
Manuale di istruzioni
Gebruikershandleiding

2 3
Lees de instructies aandachtig voor u begint met de installatie.
Bewaar de met het product meegeleverde documentatie
tijdens de gehele levensduur van het product.
Read these instructions carefully before starting the
installation.
The documentation provided with this product must be kept
throughout the product’s life time.
EN
Lire attentivement cette notice avant l’installation.
Conserver impérativement la documentation fournie avec ce
produit pendant toute sa durée de vie.
FR
Lesen Sie diese Anleitung aufmerksam durch, bevor Sie mit
der Installation beginnen.
Bewahren Sie die mit diesem Produkt mitgelieferte
Dokumentation auf jeden Fall über seine gesamte Lebens-
dauer auf.
DE
Lee atentamente estas instrucciones antes de empezar la
instalación.
Conservar toda la documentación entregada con el producto
durante toda su vida útil.
ES
Leggi attentamente le seguenti istruzioni prima di iniziare
l’installazione.
Conservate obbligatoriamente la documentazione fornita con
il prodotto per tutta la sua durata di vita.
IT
NL

4 5
https://doorbell.netatmo.com
User guide available in more languages at the following
address:
Bruksanvisningen finns på fler språk på:
Le guide de l’utilisateur est disponible dans plusieurs autres
langues à l’adresse ci-dessous :
Brukerguide tilgjengelig på flere andre språk på:
Unter der folgenden Adresse finden Sie das Benutzerhand-
buch in mehreren Sprachen:
Brugervejledningen fås på flere sprog på:
Guía del usuario disponible en otros idiomas en la siguiente
dirección:
Uživatelská příručka v dalších jazykových verzích je k
dispozici na adrese:
Il manuale di istruzioni è disponibile in numerose altre lingue
al seguente indirizzo:
Instrukcję obsługi dostępną w innych językach można
znaleźć pod adresem:
Gebruikershandleiding in meer talen beschikbaar op de
volgende website:
より多くの言語で利用可能なユーザーガイドは、次のアド
レスで入手できます。
EN
SE
FR
NO
DE
DA
ES
CZ
IT
PL
NL
JA
Руководство пользователя доступно на нескольких
языках по следующему адресу:
RU
Guia do utilizador disponível em mais línguas em:
PT
https://doorbell.netatmo.com
You can watch an installation video tutorial online at the
following address:
Du kan titta på en installationsvideohandledning online på
följande adress:
Une vidéo d’aide à l’installation est disponible à l’adresse
ci-dessous :
Du kan se en opplæringsvideoopplæring online på følgende
adresse:
Unter der folgenden Adresse können Sie ein Tutorial-Video
zur Installation online anschauen:
Du kan se en installationsvideovejledning online på følgende
adresse:
Puedes ver un tutorial de instalación en línea en la siguiente
dirección:
Instalační video tutoriál můžete sledovat online na následující
adrese:
Guarda online il video tutorial sull’installazione del prodotto al
seguente indirizzo:
Samouczek wideo dotyczący instalacji można obejrzeć online
pod następującym adresem:
U kunt een online installatievideo bekijken op de volgende
website
次のアドレスでインストールビデオチュートリアルをオン
ラインで見ることができます。
EN
SE
FR
NO
DE
DA
ES
CZ
IT
PL
NL
JA
Вы можете посмотреть онлайн-учебник по установке по
следующему адресу:
RU
Você pode assistir a um tutorial em vídeo de instalação on-
line no seguinte endereço:
PT

6 7
SUMMARY
Pack Content
Product Overview
Product Installation
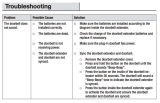
Troubleshooting
Safety Warnings
Legal Mentions
SOMMAIRE
Contenu du pack
Aperçu du produit
Installation du produit
Résolution des problèmes
Consignes de sécurité
Mentions légales
SUMMARY
Packungsinhalt
Produktübersicht
Produktinstallation
Fehlersuche
Sicherheitshinweise
Rechtliche hinweise
8
14
18
76
8
14
18
76
8
14
18
76
EN
FR
DE
SUMMARY
Contenido del pack
Descripción del producto
Instalación del producto
Solución de problemas
Advertencias de seguridad
Menciones legales
SUMMARY
Contenuto della confezione
Descrizione prodotto
Installazione del prodotto
Risoluzione di problemi
Avvisi di sicurezza
Menzioni legali
SUMMARY
Inhoud van het pakket
Productoverzicht
Product installatie
Problemen oplossen
Veiligheidswaarschuwingen
Juridische vermeldingen
8
14
18
76
8
14
18
76
8
14
18
76
ES
IT
NL

8 9
Pack content 1/3
A. 1 Smart Video Doorbell
B. 1 wall mounting plate
C. 1 25° bracket
D. 1 finish plate
A. 1 Sonnette Vidéo Intelligente
B. 1 support mural
C. 1 support incliné à 25°
D. 1 plaque de finition
Pack content
Contenu du pack
A. 1 Smarte Videotürklingel
B. 1 Wandhalterung
C. 1 Halterung für einen
Neigungswinkel von 25°
D. 1 Abdeckung
Verpackungsinhalt
A. 1 Slimme Video Deurbel
B. 1 muurmontageplaat
C. 1 steun met een hoek van 25°
D. 1 afdekplaat
Inhoud van het pakket
A. 1 Campanello Intelligente
con Videocamera
B. 1 suporto a muro
C. 1 supporto inclinato a 25°
D. 1 piastra di copertura
Contenuto della confezione
A. 1 Timbre con Vídeo
Inteligente
B. 1 soporte mural
C. 1 soporte inclinado à 25°
D. 1 placa de acabado
Contenido de la caja
EN
FR
DE
ES
IT
NL
Pack content 1/3
A B
C D

10 11
Pack content 2/3
E.
F.
G.
H.
I.
J.
E.
F.
G.
H.
I.
J.
E.
F.
G.
H.
I.
J.
E.
F.
G.
H.
I.
J
E.
F.
G.
H.
I.
J.
E.
F.
G.
H.
I.
J.
Pack content
Contenu du pack
Contenido de la caja
1 module de carillon
1 connecteur de fils
1 cable USB
1 fusible supplémentaire
1 gabarit de perçage
1 carte Homekit
Contenuto della confezione
Verpackungsinhalt Inhoud van het pakket
EN
FR
DE
ES
IT
NL
1 chime module
1 wire connector
1 usb cable
1 additional fuse
1 drilling template
1 Homekit card
1 chime module
1 wire connector
1 usb cable
1 additional fuse
1 drilling template
1 Homekit card
1 chime module
1 wire connector
1 usb cable
1 additional fuse
1 drilling template
1 Homekit card
1 chime module
1 wire connector
1 usb cable
1 additional fuse
1 drilling template
1 Homekit card
1 chime module
1 wire connector
1 usb cable
1 additional fuse
1 drilling template
1 Homekit card
Pack content 2/3
E
F
G
H
J
I

12 13
Pack content 3/3
K.
L.
M.
N.
K.
L.
M.
N.
K.
L.
M.
N.
K.
L.
M.
N.
K.
L.
M.
N.
K.
L.
M.
N.
Pack content
Contenu du pack
4 vis pour support incliné
2 vis de montage et
2 chevilles
1 vis de sécurité et son
outil personnalisé
1 vis de connecteur
Verpackungsinhalt Inhoud van het pakket
Contenuto della confezione
Contenido de la caja
EN
FR
DE
ES
IT
NL
4 bracket screws
2 mounting screws and
2 anchors
1 security screw and its
custom tool
1 connector screw
4 wedge screws
2 mounting screws and
2 anchors
1 security screw and its
custom tool
1 connector screw
4 wedge screws
2 mounting screws and
2 anchors
1 security screw and its
custom tool
1 connector screw
4 wedge screws
2 mounting screws and
2 anchors
1 security screw and its
custom tool
1 connector screw
4 wedge screws
2 mounting screws and
2 anchors
1 security screw and its
custom tool
1 connector screw
Pack content 3/3
L
N
K
M

14 15
Product overview
Night Vision LED
LED
Camera
Speaker
Microphone
Doorbell Button
Night Vision LED
LED
Camera
Speaker
Microphone
Doorbell Button
Night Vision LED
LED
Camera
Speaker
Microphone
Doorbell Button
Night Vision LED
LED
Camera
Speaker
Microphone
Doorbell Button
Night Vision LED
LED
Camera
Speaker
Microphone
Doorbell Button
Product overview
Aperçu du produit
Product overview
LED de vision nocturne
LED
Camera
Microphone
Haut-parleur
Bouton de sonnette
Product overview
Product overview Product overview
EN
FR
DE
ES
IT
NL
A.
B.
C.
D.
E.
F.
A.
B.
C.
D.
E.
F.
A.
B.
C.
D.
E.
F.
A.
B.
C.
D.
E.
F.
A.
B.
C.
D.
E.
F.
A.
B.
C.
D.
E.
F.
Product overview
A
B
C
E
F
D

16 17
Required tools
Required tools Herramientas necesarias
Outils nécessaires Strumenti necessari
Erforderliches Werkzeug Benodigd gereedschap
EN
FR
DE
ES
IT
NL
Philips screwdriver
Drill - Ø6mm
Pair of scissors
(recommended tool)
Level (recommended tool)
Philips screwdriver LED
Drill - Ø6mm
Pair of scissors
(recommended tool)
Level (recommended tool)
Philips screwdriver LED
Drill - Ø6mm
Pair of scissors
(recommended tool)
Level (recommended tool)
Philips screwdriver LED
Drill - Ø6mm
Pair of scissors
(recommended tool)
Level (recommended tool)
Philips screwdriver LED
Drill - Ø6mm
Pair of scissors
(recommended tool)
Level (recommended tool)
Tournevis cruciforme
Perceuse - Ø6mm
Paire de ciseaux
(outil recommandé)
Niveau à bulle (outil recom-
mandé)
A.
B.
C.
D.
A.
B.
C.
D.
A.
B.
C.
D.
A.
B.
C.
D.
A.
B.
C.
D.
A.
B.
C.
D.
Required tools
A B
C D

18 19
1
Check Wi-Fi Reception
Check with your smartphone that you have Wi-Fi reception at
your doorbell with your door closed.
If you do not, try to move your Wi-Fi router closer or install a
Wi-Fi extender.
Check with your smartphone that you have Wi-Fi reception at
your doorbell with your door closed.
If you do not, try to move your Wi-Fi router closer or install a
Wi-Fi extender.
Check with your smartphone that you have Wi-Fi reception at
your doorbell with your door closed.
If you do not, try to move your Wi-Fi router closer or install a
Wi-Fi extender.
Check Wi-Fi Reception
Check Wi-Fi Reception
Check Wi-Fi Reception
Check Wi-Fi Reception
Check Wi-Fi Reception
Vérifiez avec votre smartphone que vous recevez une connexion
Wi-Fi au niveau de votre sonnette avec votre porte d’entrée
fermée.
Dans le cas contraire, essayez de rapprocher votre routeur Wi-Fi
ou ajoutez un répéteur.
Vérifier la réception Wi-Fi
EN
FR
Check with your smartphone that you have Wi-Fi reception at
your doorbell with your door closed.
If you do not, try to move your Wi-Fi router closer or install a
Wi-Fi extender.
DE
Check with your smartphone that you have Wi-Fi reception at
your doorbell with your door closed.
If you do not, try to move your Wi-Fi router closer or install a
Wi-Fi extender.
ES
IT
NL

20 21
Download the app and create an account2
netatmo security
To prepare the installation of your Smart Video Doorbell, please
download the app and create an account.
Download the app and create an account
Pour préparer l'installation de votre Sonnette Video Intelligente,
téléchargez l'application et créez un compte.
Téléchargez l'app et créez un compte
To set up and control your Smart Video Doorbell from your smart-
phone or tablet, please download the app.
Download the App and follow the instructions
To set up and control your Smart Video Doorbell from your smart-
phone or tablet, please download the app.
Download the App and follow the instructions
To set up and control your Smart Video Doorbell from your smart-
phone or tablet, please download the app.
Download the App and follow the instructions
To set up and control your Smart Video Doorbell from your smart-
phone or tablet, please download the app.
Download the App and follow the instructions
EN
FR
DE
ES
IT
NL

22 23
Locate your chime
3
Press your doorbell button to locate your chime.
Note: The chime is the little box that rings.
If you don’t have a chime please visit the Help Center at
helpcenter.netatmo.com.
Locate your chime
Appuyez sur votre bouton de sonnette pour repérer votre
carillon.
Note : Le carillon est la petite boite qui sonne.
Si vous n’avez pas de carillon, rendez-vous sur le Help Center à
l'adresse helpcenter.netatmo.com.
Localisez votre carillon
Press your doorbell button to locate your chime.
Note: The chime is the little box that rings.
If you don’t have a chime please visit the Help Center at
helpcenter.netatmo.com.
Locate your chime
Press your doorbell button to locate your chime.
Note: The chime is the little box that rings.
If you don’t have a chime please visit the Help Center at
helpcenter.netatmo.com.
Locate your chime
Press your doorbell button to locate your chime.
Note: The chime is the little box that rings.
If you don’t have a chime please visit the Help Center at
helpcenter.netatmo.com.
Locate your chime
Press your doorbell button to locate your chime.
Note: The chime is the little box that rings.
If you don’t have a chime please visit the Help Center at
helpcenter.netatmo.com.
Locate your chime
EN
FR
DE
ES
IT
NL

24 25
OFF
4
Caution: Electrical Danger
Disconnect power at fuse or circuit breaker before proceeding to
the installation.
Caution: Electrical Danger
Coupez le courant au disjoncteur général avant de procéder à
l'installation.
Avertissement : danger électrique
Schalten Sie den Strom der Sicherung oder Schutzschalter ab,
bevor Sie mit der Installation beginnen..
Vorsicht: elektrische Gefahr.
Antes de proceder con la instalación desconecta el fusible o el
disyuntor.
Atención: peligro eléctrico.
Staccare i fusibili o il contatore della corrente, prima di eettuare
l'installazione.
Attenzione: rischio elettrico.
Schakel de stroom uit bij de zekering of stroomonderbreker
voordat u de installatie uitvoert.
Let op: gevaar door elektriciteit.
EN
FR
DE
ES
IT
NL

26 27
5
Open your chime
A
B
A. If your chime is near or around your door:
Remove your chime cover.
B. If your chime is in your switch board:
Unscrew and remove your switch board cover.
You should see the two wires connecting your chime. If you see more than
two wires please visit the Help Center at helpcenter.netatmo.com.
Open your chime
A. Si votre carillon est autour ou proche de votre porte :
Retirez le couvercle de votre carillon.
B. Si votre carillon est dans votre tableau électrique :
Dévissez et retirez le couvercle de votre tableau électrique.
Vous devriez voir les 2 fils connectés à votre carillon. Si vous voyez plus de 2
fils, rendez-vous sur le Help Center à l'adresse helpcenter.netatmo.com.
Ouvrez votre carillon
FR
DE
ES
IT
NL
EN

28 29
6
1
2
1 2
Connect the first wire of the chime module
1. Loosen one of the screws.
2. Hook one of the chime module's wires.
Note: There is no polarity in the circuit, choose the wire you want.
Connect the first wire of the chime module
1. Desserrez une des vis.
2. Accrochez un des fils du module de carillon.
Note : Il n’y a aucune polarité dans le circuit, choisissez le fil que
vous souhaitez.
Connectez le premier fil du module de carillon
EN
FR
DE
ES
IT
NL
1. Loosen one of the screws.
2. Hook one of the chime module's wires.
Note: There is no polarity in the circuit, choose the wire you want.
Connect the first wire of the chime module
1. Loosen one of the screws.
2. Hook one of the chime module's wires.
Note: There is no polarity in the circuit, choose the wire you want.
1. Loosen one of the screws.
2. Hook one of the chime module's wires.
Note: There is no polarity in the circuit, choose the wire you want.
1. Loosen one of the screws.
2. Hook one of the chime module's wires.
Note: There is no polarity in the circuit, choose the wire you want.
Connect the first wire of the chime module
Connect the first wire of the chime module
Connect the first wire of the chime module

30 31
7
Secure the first wire
Tighten the screw in order to maintain the wires together.
Secure the first wire
Resserrez la vis pour maintenir les fils ensemble.
Sécurisez le premier fil
Tighten the screw in order to maintain the wires together.
Secure the first wire
Tighten the screw in order to maintain the wires together.
Secure the first wire
Tighten the screw in order to maintain the wires together.
Secure the first wire
Tighten the screw in order to maintain the wires together.
Secure the first wire
EN
FR
DE
ES
IT
NL

32 33
8
Connect and secure the second wire
Repeat steps (5) and (6) with the second wire.
Connect and secure the second wire
Répétez les étapes (5) et (6) pour le second fil.
Connectez et sécurisez le second fil
Repeat steps (5) and (6) with the second wire.
Connect and secure the second wire
Repeat steps (5) and (6) with the second wire.
Connect and secure the second wire
Repeat steps (5) and (6) with the second wire.
Connect and secure the second wire
Repeat steps (5) and (6) with the second wire.
Connect and secure the second wire
EN
FR
DE
ES
IT
NL

34 35
9
Verify the chime module configuration
Make sure the selectors are in 1 - LOW position.
Verify the chime module configuration
Assurez-vous que les sélecteurs soient sur la position 1 - LOW.
Vérifiez la configuration du module de carillon
Make sure the selectors are in 1 - LOW position.
Verify the chime module configuration
Make sure the selectors are in 1 -LOW position.
Verify the chime module configuration
Make sure the selectors are in 1 - LOW position.
Verify the chime module configuration
Make sure the selectors are in 1 - LOW position.
Verify the chime module configuration
EN
FR
DE
ES
IT
NL

36 37
10
Stick the chime module
Stick the chime module next to your chime using the two stickers
on the back. Then put the chime cover or switch board cover
back on.
Stick the chime module
Fixez le module de carillon à coté de votre carillon en utilisant les
deux stickers au dos du module. Remettez ensuite le couvercle
du carillon ou du tableau électrique.
Fixez le module de carillon
EN
FR
DE
ES
IT
NL
Stick the chime module next to your chime using the two stickers
on the back. Then put the chime cover or switch board cover
back on.
Stick the chime module next to your chime using the two stickers
on the back. Then put the chime cover or switch board cover
back on.
Stick the chime module next to your chime using the two stickers
on the back. Then put the chime cover or switch board cover
back on.
Stick the chime module next to your chime using the two stickers
on the back. Then put the chime cover or switch board cover
back on.
Stick the chime module.
Stick the chime module.
Stick the chime module.
Stick the chime module.

38 39
OFF
Caution: Electrical Danger
11
Make sure power is still disconnected before continuing the
installation.
Caution: Electrical Danger
Assurez-vous que le courant est toujours coupé au disjoncteur
général avant de poursuivre l'installation.
Avertissement : danger électrique
Make sure power is still disconnected before continuing the
installation.
Caution: Electrical Danger
Make sure power is still disconnected before continuing the
installation.
Caution: Electrical Danger
Make sure power is still disconnected before continuing the
installation.
Caution: Electrical Danger
Make sure power is still disconnected before continuing the
installation.
Caution: Electrical Danger
EN
FR
DE
ES
IT
NL
/