Page is loading ...

Operator's
Manual
Victa
19" & 21"
Commercial
Lawnmowers
WARNING! Read this manual before operating your Victa Lawnmower.
Not for
Reproduction
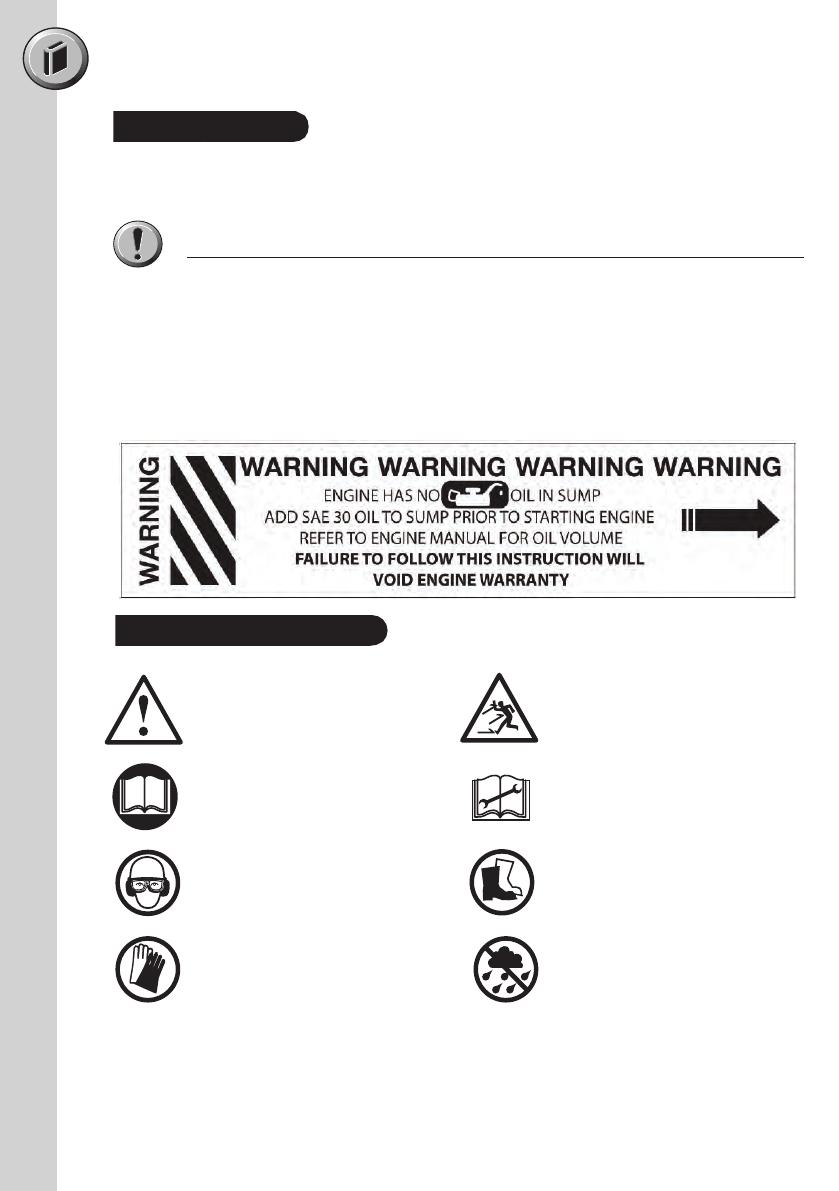
4 Stroke Label
Briggs & Stratton:-
Engine must have SAE 30 Oil added to the Engine Sump before starting.
Refer to the Engine Manual for oil filling information.
Please use the engine's dipstick to ensure correct oil fill level.
Failure to add oil to your engine before attempting to start it will
damage the engine and void the Engine Warranty.
The following warning labels are attached to your mower on purchase.
Please read labels before discarding.
Engine Oil
IMPORTANT INFORMATION
Warning! Be careful of objects being
thrown out!
Read the directions
for use before
operating the machine.
Read the manual before
carrying out any
maintenance work.
Wear safety goggles,
a helmet and ear
protection.
Wear sturdy, nonslip
footwear.
Wear safety gloves. Protect the machine from
rain and damp.
Safety Marking and Symbols
Not for
Reproduction
Table of Contents
Important Notes 1
Unit Details
Safety & Handling 2
Safety Instructions
Hazards
Personal Safety Equipment
Assembly Procedures 5
Features
Handle Knobs/Toggles
Throttle Control
Grasscatcher
Remote Air Intake Assembly
Operating Instructions 8
Starting & Stopping
Grasscatcher Fitting
Mulching Plug
Maintenance & Care 12
Cleaning
Maintenance Chart
Troubleshooting
Warranty - See Warranty Leaflet
Notes
Not for
Reproduction

IMPORTANT NOTES
1
Congratulations on your purchase of a Victa lawnmower. This instruction manual will aid in the
assembly, operation and maintenance of your new lawnmower.
Please read this manual carefully to ensure safety and the long life of your product.
Please read the Warranty leaflet carefully.
Keep this operators manual in a safe place for future reference, or if service is required on your unit.
Do not operate the unit before reading this manual.
Do not operate before reading the ‘Engine Manual’.
Not for
Reproduction

2
Safety InstructionsSafety Instructions
Transporting the mower
• Turn the engine off, by moving the throttle lever to the ‘STOP’ position and switching the
fuel tap off (where fitted).
• Disconnect the spark plug lead and wedge it well away from the spark plug.
• Do not transport the mower in a vehicle if there is fuel in the fuel tank.
Before using the mower
• Do not allow children, or people unfamiliar with these instructions, to use the mower.
• Ensure that the blade assembly is not worn or damaged. Always replace worn or
damaged blades and bolts in sets to preserve correct balance. Damaged or worn blades
and bolts are major hazards. Use genuine Victa spare parts only.
• Please note: blades may be tucked under blade disc for safety and transport reasons
before use. Once the engine is started they will relocate themselves for cutting.
• Check all fasteners regularly. Always ensure the mower is in a safe operating condition.
Use genuine spare parts only.
• Check for grass build up around the engine and muffler which may cause overheating
and/or a fire hazard.
• SAE 30 oil must be placed in engine sump before starting the engine. Please refer to
Engine Owner’s Manual, for filling volume and method. Failure to do so will cause engine
damage and will void engine warranty.
• Do not start the engine unless the rear flap and/or grasscatcher are securely in position.
• Know the mower controls. Learn how to stop the engine quickly in an emergency by
moving the throttle to the 'STOP' position or releasing the brake bale arm on models
fitted with presence control
Operating the mower
• Do not mow while people, especially children, or pets are in the vicinity of the mower or
within the mowing area. Ensure that bystanders are a minimum of 15 metres away.
• Do not mow in bare feet or open shoes. Wear long trousers heavy footwear and
eye protection.
Not for
Reproduction

3
Safety Instructions cont'd
• Make sure the lawn is clear of sticks, stones, bones, wire and debris before mowing.
These could be thrown by the blades and cause injury or damage.
• Start the engine carefully with feet well clear of blades. Do not tilt the mower when
starting the engine.
• Stop the engine whenever you leave the mower, even for a moment.
• Mow only in good daylight.
• Keep hands and feet away from rotating parts beneath mower when engine is running.
• Do not over speed the engine or alter the governor settings. Excessive engine speed is
dangerous and shortens mower life.
• Never lift, carry or tilt the mower when the engine is running.
• Stop the engine before pushing the mower across gravel, paths or roads. Stop the
engine before the mower leaves the lawn.
• Stop the engine before adjusting the cutting height.
• Mow across the face of a slope, never up or down. Use extreme caution when changing
direction on a slope. Do not mow on excessively steep slopes.
• Never mow by pulling the mower towards you. You may slip and pull the mower on top
of your feet. Never mow grass while walking backwards.
• Walk with the mower, never run.
• The safety distance determined by the guiding handles must be maintained at all times.
• At the conclusion of mowing, always turn the mower off using the throttle lever then turn
fuel tap off (where fitted). To stop the mower on models with presence control, release
the brake bale arm.
• Do not operate the mower in confined spaces where exhaust fumes (carbon monoxide)
can collect.
• Stop the engine when emptying the grasscatcher.
• Stop the engine and disconnect spark plug wire before clearing blockages, checking, or
working on the mower.
• If you strike an obstruction, stop the engine and check the blades for damage.
• Bystanders must be at least 15 metres away during operation of the mower, as rocks
and other materials may be thrown at high velocities. Switch the unit off immediately if
approached.
• Never use the mower unless the grasscatcher and/or the rear flap are correctly
assembled and fitted.
• Wear suitable eye protection when operating mower.
• Never use an electrically powered mower in the rain or when grass is wet.
Maintaining the mower
• If the mower begins to vibrate abnormally, or if it strikes a foreign object - STOP the
engine. Disconnect the spark plug lead from the spark plug and carefully wedge it well
away from the spark plug. Inspect the mower and blades for any damage.
• Replace worn or faulty mufflers as they adversely affect engine performance and increase
emissions.
Not for
Reproduction

4
The following safety precautions must be strictly observed to avoid the risk of damage or personal
injury.
• Do not smoke while operating or refuelling the mower. Never add fuel or remove the fuel cap
while the engine is running or hot. If fuel is spilt, do not start the engine. Move the mower
away from the area of the spill. Do not create any source of ignition until the fuel vapours have
dissipated.
• Check all fasteners regularly. Always ensure that the mower is in safe operating condition. Use
genuine spare parts only.
• Do not operate the mower in confined spaces where exhaust fumes (carbon monoxide) can
collect.
• Stop the engine whenever you leave the mower, even if only for a moment.
• Stop the engine when emptying the grasscatcher. Never try to clear grass from inside the mower
while the engine is running.
• Never lift, carry or tilt the mower when the engine is running.
• Bystanders must be at least 15 metres away during operation of the mower, as rocks and other
materials may be thrown at high velocities. Switch the unit off immediately if approached.
• Never use the mower unless the grasscatcher and/or the rear flap are correctly assembled and
fitted.
Recommended personal protection equipment to wear when working with your lawnmower:
Hazards
Safety Instructions cont'd
• Victa recommends that all maintenance, repair and inspection work be carried out by a
Victa Authorised Service Centre.
• Store the mower in a well ventilated area, away from any naked flames such as those found
in hot water heaters.
Refuelling the mower
• Refuel the mower outdoors only.
• Do not smoke while operating or refuelling the mower. Never add fuel or remove the
fuel cap while the engine is running or hot. If fuel is spilt, do not start the engine. Move
the mower away from the area of the spill. Do not create any source of ignition until fuel
vapours have dissipated.
• Store fuel in a cool place and in a container specifically designed for the purpose. Victa
supplies a 5 litre fuel can as an optional extra. Plastic containers are unsuitable, except
those specifically designed to hold fuel.
A pair of safety boots.
Eye protection.
A set of ear muffs.
Personal Protective Equipment
A pair of protective gloves.
Not for
Reproduction
PRODUCT FEATURES
5
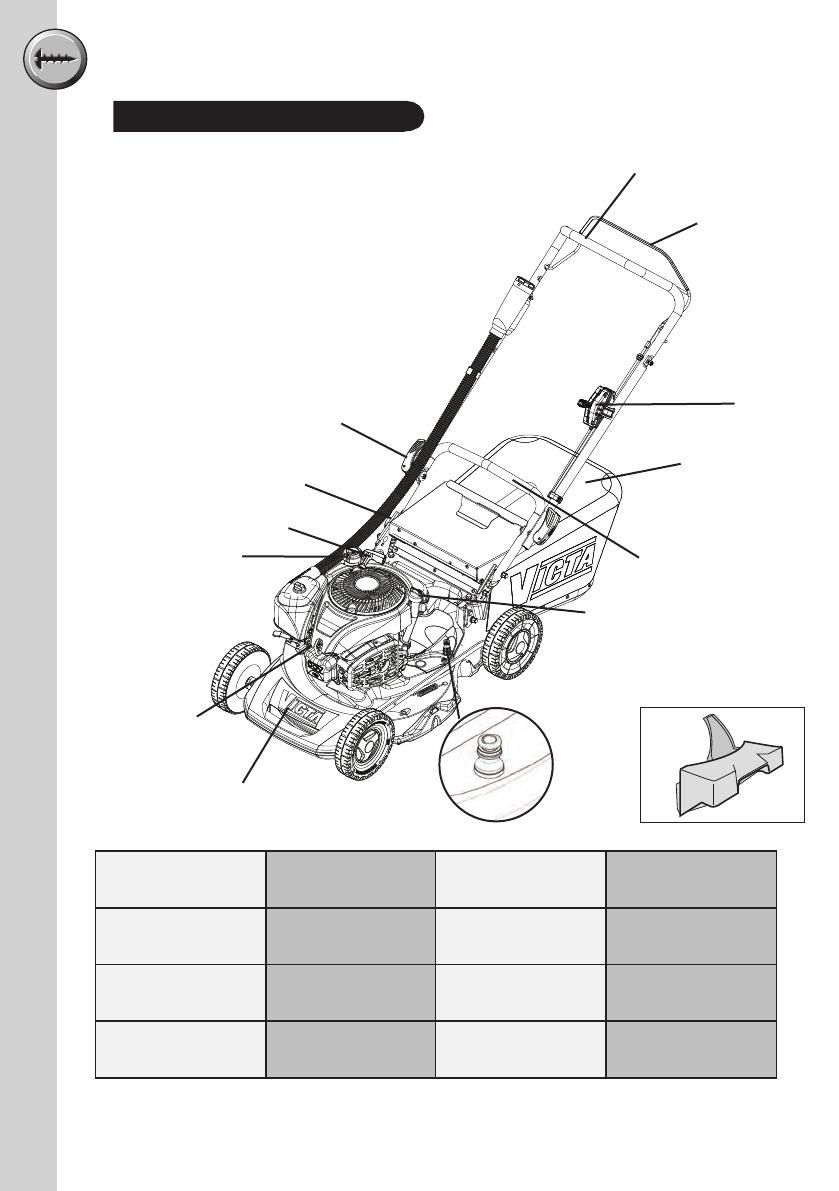
1. Upper Handle 5. Grass Catcher 9. Fuel Cap 13. Mulch Plug *
2. Self Propelled
Bail *
6. Height Adjust
Lever
10. Spark Plug 14. Oil Cap
3. Throttle Control 7. Lower Handle 11. Deck
4. Handle Knob/
Lever
8. Pull Start * 12. Wash Port *
Features
1.
2.
3.
5.
4.
7.
6.
14.
8.
9.
10.
11.
12.
13.
* Present on specific models only
Not for
Reproduction

6
ASSEMBLY PROCEDURES
Attaching upper handle
Adjusting Handle height
Attaching the throttle control
• Attach the throttle control to the inside of the
upper handle, so that the lever lifts upward toward
the user.
STOP
Mowers will have either knobs or toggles
to fix the handles in position. Refer to the
instruction below which is specific to your
particular model.
• Attach the upper handles using the knobs
and bolts provided. The knobs should be
on the outside.
• Tighten the handle knobs to secure the
upper handle to the lower handle.
• Flip the handle toggles to secure the upper
handle to the lower handle.
• On some models the knobs/toggles have
to be consumer fitted.
Your mower has two handle height
positions. It is supplied with the
handles set in the higher position.
To adjust the handle height to the
lower position:
1. Loosen nut “A” (left and right hand
sides)
2. Remove nut and bolt “B“(left and
right hand sides). Lift rear flap to
gain access
3. Push handle down to align hole
“C”
4. Re-assemble bolts in hole “C”
ensuring bolt shoulder is aligned in
square hole
5. Re-tighten all nuts (16Nm)
A
B
C
Not for
Reproduction
7
ASSEMBLY PROCEDURES
Text
Starting & Stopping
These notes supplement the information on starting and stopping your lawnmower engine
found in the Engine Operator’s Manual supplied with your lawnmower. Please read your
Engine Operator’s Manual prior to attempting to start your engine for the first time. If your
engine model is not covered by the notes below please read the Engine Manual supplied with
your lawnmower.
• Always check your engine oil level before starting the engine at the start of mowing.
• Check that the spark plug is connected before attempting to start the engine.
• Ensure you have fresh petrol in the engine’s fuel tank.
• Ensure the fuel tap, where fitted is ON before attempting to start the engine.
• For your safety, keep your hands and feet clear of the mower blades at all times.
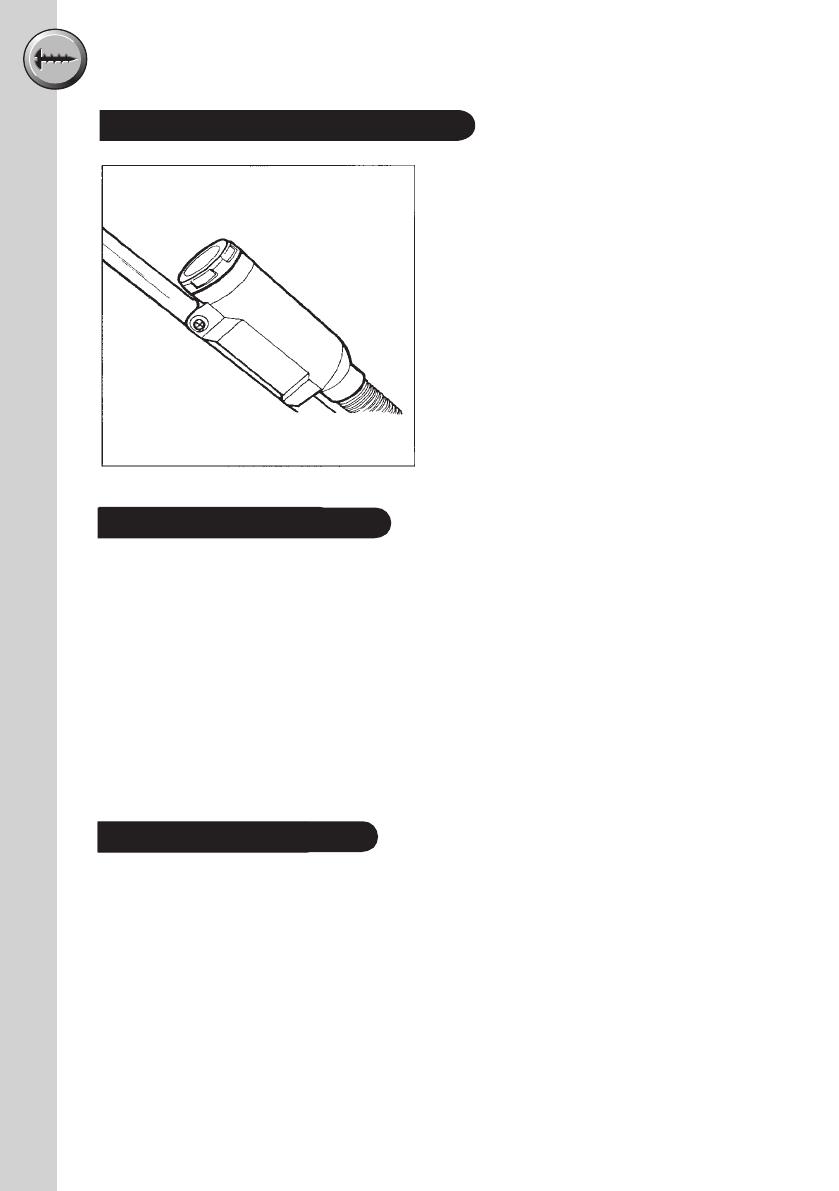
Never run the engine unless the remote air
intake assembly and snorkel are properly
fitted to the upper handle.
1. Use screw, 2 washers, star washer and nut
from kit provided.
2. Place housing over upper handle as shown.
3. Pass screw from outside of handle and ensure
flat washers are fitted against on both sides
and the star washer under the nut.
4. Tighten nut securely.
NOTE: Check that snorkel is pushed all the way
into the housing.
Remote Air Intake Assembly (Where Supplied)
Text
Starting & Stopping
Starting – Non-Primer Engines:
1. Push the throttle control to the START/RUN position.
2. Firmly hold the starter handle and pull the starter slowly until resistance is felt, then pull
the cord rapidly.
3. The engine should start after a couple of attempts.
4. Return the starter handle gently. Do not allow the starter handle to fly back and strike
the engine cowling as damage may result.
To stop the engine, move the throttle control to the stop position.
Not for
Reproduction

8
OPERATING INSTRUCTIONSOPERATING INSTRUCTIONS
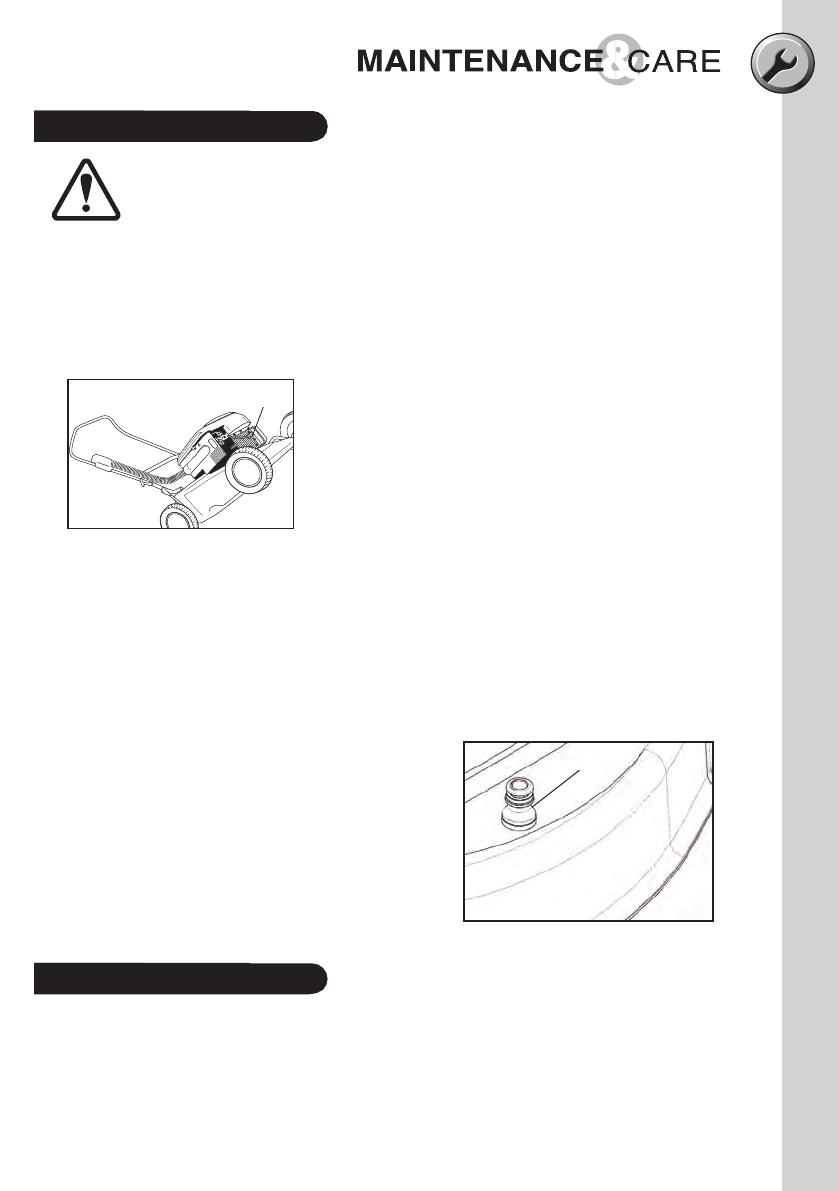
Mulching Plug - (mulch or catch models only)
• Stop the engine and set the mower height setting.
• Mulching is most effective between height settings 4 and 10.
• Lift the rear flap and identify the support plate as shown. Note the orientation of the
mulching plug.
• Insert the mulching plug into the baseplate.
• Ensure that the mulching plug is resting on the support plate and is positioned against
the inside of the baseplate. Push the mulching plug down so that it rests flush against
the rear cross member.
• Close the rear flap ensuring that it closes fully. The rear flap should rest on the mulching
plug as shown in the sectional illustration.
STOP the engine before inserting or removing the mulching plug.
Fitting the grasscatcher
• Stop the engine.
• Raise the rear flap. Locate the grasscatcher tongue over the rear axle and insert the
grasscatcher under the rear flap and locate on bracket.
• Lower the rear flap.
Grasscatcher - Fitting
Support
Plate
Bracket
Not for
Reproduction
9
OPERATING INSTRUCTIONS
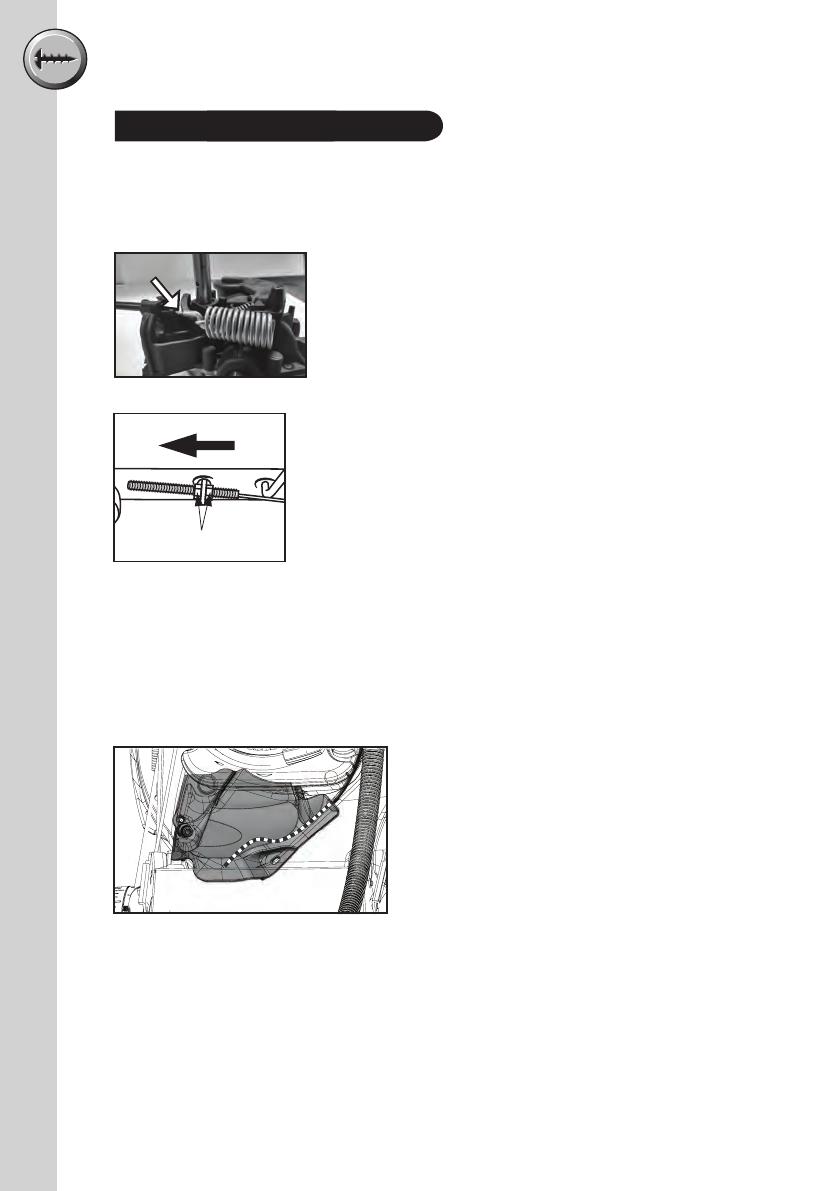
Set Clutch Lever Travel
Clutch lever setting is very important to ensure clutch is not
slipping or overloaded. Incorrect clutch setting may shorten
gearbox life.
The clutch is set correctly at the factory during assembly of the
mower. The clutch travel should be checked after the first five
hours of operation and then every fifty hours thereafter.
The clutch lever travel setting should be checked IMMEDIATELY
if clutch slipping is noted during operation of the mower.
To check and set the clutch:
1. Stop the engine and disconnect the spark plug lead from the
spark plug.
2. Remove the four screws securing the drive belt cover.
3. Hold the clutch bale arm closed against the upper handle as
shown.
Using a feeler gauge measure the cable gap (B) between the
dog-leg and plastic grommet. The gap must be between 0.5mm
and 1.0mm. Fig 1.
4. If the clutch setting is incorrect: Loosen the locknuts (A) Fig 2
on the upper end of the clutch cable. Adjust the outer cable in
the direction of the arrow to decrease the gap or opposite the
arrow direction to increase the gap.
5. Tighten the locknuts and recheck the gap before refitting drive
belt cover and spark plug lead.
A
Fig. 2
Upper
Handle
Drive Control
6. Refit drive Belt Cover using 4 screws and
washers. Fig 3.
Caution
When replacing the cover, make sure that the
cables are not pinched by the belt cover and are
neatly in position as shown before tightening the
cover screws.
Ensure spark plug lead is disconnected.
B
Fig. 1
Fig. 3
Not for
Reproduction
10
Text
Maintenance Chart
Maintenance Chart
Before cleaning the mower, ensure the throttle lever is in the 'STOP'
position. Turn the fuel tap off, disconnect the spark plug lead and wedge
it well away from the spark plug, and remove the battery on Instart
models.
• Remove grass build up from the air intakes on the top of the mower cowl, around the
engine and carburettor, and around the air filter body.
• The underside of the mower should be cleaned regularly to remove dirt and grass build
up; any build up will adversely affect grass catching and mulching performance and can
promote corrosion on steel baseplates.
• When cleaning the underside of the mower, always tilt handle back to ground level so
the front wheels are off the ground and spark plug is pointing to the sky. Tilting in other
direction can cause the oil to contaminate the fuel & damage air filter causing starting
difficulties.
• A hose may be used on the underside of your mower ONLY. Care must be taken to NOT
get water into the engine, as it may damage the magneto or get into the fuel system.
• To prevent chassis corrosion, the underside of your mower should be cleaned
immediately after mowing an area which has been recently dressed with sulphate of
ammonia or fertiliser.
• After cleaning, run the engine briefly to dry
off excess moisture before storing.
Wash Port (where fitted)
• Turn engine off.
• Attach hose to wash port and turn on water.
• Start engine and run for a short period.
• Turn off engine.
• Turn off water and disconnect hose.
Cleaning
Storage
Washport
(Only on some baseplate models)
Fuel can become stale when stored over 30 days. Stale fuel causes acid and gum deposits
to form in the fuel system. Drain the fuel for long term storage.
Spark
plug
Spark
plug
Not for
Reproduction
11
Maintenance Chart
Maintenance Chart
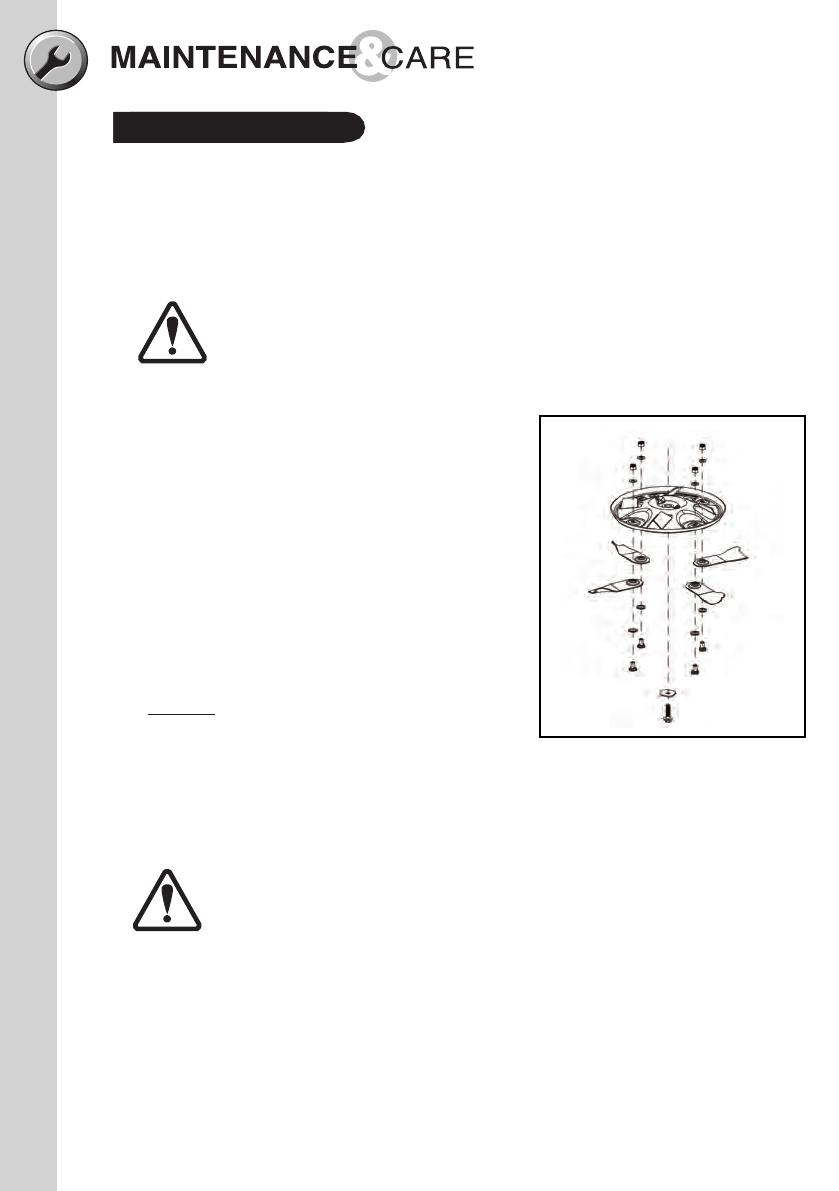
Blade Replacement
For Your Safety
• Before starting the mower check blades and bolts for damage or wear.
• Victa recommends that all maintenance, repair and inspection work be carried out by a
Victa Authorised Service Centre.
Worn and damaged blades are major hazards.
• Stop the engine and disconnect the spark plug lead
before fitting new blades.
• Work from the grasscatcher flap.
With the rear flap secured, undo the blade nut,
applying upward pressure to the bolt head into the
blade disc. (the head of the bolt will not rotate due to
the diamond shape in the underside of the head).
Assembly: Fit as per the drawing remembering to
push the head of the bolt into the blade disc (this
will stop the bolt head from turning). Ensure correct
order of assembly.
DO NOT lay mower on its side.
• We recommend changing blades, bolts, nuts and
washers as a set. Metal fatigue and damage may occur which may not be visible to
the operator. Always replace all blades to ensure correct engine balance, reducing
vibration and wear. Tighten nuts on blade bolts to 14-19 Nm.
• Always turn the nut to check tightness, not the bolt.
Use only genuine replacement parts made and guaranteed by Victa.
Insist on them from your parts and service dealer.
Detailed fitting instructions are printed on genuine Victa blade packs.
Use of non-genuine blades may void your warranty, and could result
in damage or injury.
13
Not for
Reproduction

12
13
Maintenance Chart
* Victa recommends that certain maintenance, repair and inspection work be
carried out by a Victa Authorised Service Centre.
Features Requirements
Before Start
After Finish
Refuelling
Weekly
Monthly
If Faulty
If Damaged/Faulty
As Required
Lawnmower Visual inspection (leaks) • •
Throttle lever Check operation •
Remote air filter hose Check • •
Cutting system (Blades) Inspect and check assembly •
Replace* • •
Rear flap Inspect and check assembly • •
Chassis Check for buildup of grass •
Clean •
Replace •
Air filter Check •
Clean •
Replace • •
Engine cylinder fins Clean • •
Spark plug Replace • •
All accessible fasteners Clean •
Retighten •
Engine mounting bolts Check •
Retighten •
Mulching plug Inspect and check assembly • •
Muffler Inspect • •
Replace • •
Grasscatcher Check •
Clean •
Replace •
Check oil Check •
Before carrying out maintenance, STOP the engine, disconnect the
spark plug lead from the spark plug and move it well away from
the spark plug. Remove the starter key from the ignition switch of
Keystart models and disconnect the battery.
Never attempt maintenance that is not outlined in this manual. All
repair work must be carried out by a Victa Authorised Service Centre.
Not for
Reproduction

Text
If running difficulties continue, please contact your closest Victa Authorised
Service Centre. You will find the latest Service Centre listing on the Victa
website, www.victa.com.au or contact Victa Customer Service 1800 356 632.
Troubleshooting
Problem Possible Cause Correction
Does not start Out of fuel Refill tank with correct fuel
Throttle lever in incorrect position Refer to 'Starting Procedures'
Spark plug lead not connected Press terminal cover fully onto
the spark plug
Engine flooded Turn fuel tap 'OFF'. Pull starter cord
until engine starts, then turn fuel
tap 'ON'
Dirty spark plug Replace spark plug
Stale fuel in tank from last season Contact Service Centre
Water in fuel tank Contact Service Centre
Service required Contact Service Centre
Engine worn Contact Service Centre
Low or no oil Top up with correct oil
Loss of power Incorrect throttle setting Set throttle lever in the 'RUN' position
Dirty air filter element Clean or replace
Too low height adjustment Raise cutting height
Low or no oil Top up with correct oil
Poor cutting or catching Blades worn or damaged Replace
Blade disc loose Contact Service Centre
Slow running Refer to 'Loss of Power' above
Blades restricted by grass and dirt
accumulated under the baseplate
Remove spark plug lead and clean
under the baseplate
Excessive vibrations Build up of grass and dirt on upper
surface of blade disc
Clean
Blades out of balance Replace both blades
Bent or damaged disc or blade Replace disc or both blades
Looseness of assembly Check all nuts for tightness
Low or no oil Top up with correct oil
Engine stops frequently Fuel supply blocked Check fuel line
Engine worn or seized Contact Service Centre
Fuel cap not venting Check / Loosen cap slightly
Low or no oil Top up with correct oil
Not for
Reproduction

14
NOTES
_________________________________________________________
_________________________________________________________
_________________________________________________________
_________________________________________________________
_________________________________________________________
_________________________________________________________
_________________________________________________________
_________________________________________________________
_________________________________________________________
_________________________________________________________
_________________________________________________________
_________________________________________________________
_________________________________________________________
_________________________________________________________
_________________________________________________________
_________________________________________________________
_________________________________________________________
_________________________________________________________
_________________________________________________________
_________________________________________________________
_________________________________________________________
_________________________________________________________
_________________________________________________________
_________________________________________________________
_________________________________________________________
_________________________________________________________
_________________________________________________________
_________________________________________________________
_________________________________________________________
_________________________________________________________
_________________________________________________________
_________________________________________________________
_________________________________________________________
_________________________________________________________
Not for
Reproduction

15
NOTES
_________________________________________________________
_________________________________________________________
_________________________________________________________
_________________________________________________________
_________________________________________________________
_________________________________________________________
_________________________________________________________
_________________________________________________________
_________________________________________________________
_________________________________________________________
_________________________________________________________
_________________________________________________________
_________________________________________________________
_________________________________________________________
_________________________________________________________
_________________________________________________________
_________________________________________________________
_________________________________________________________
_________________________________________________________
_________________________________________________________
_________________________________________________________
_________________________________________________________
_________________________________________________________
_________________________________________________________
_________________________________________________________
_________________________________________________________
_________________________________________________________
_________________________________________________________
_________________________________________________________
_________________________________________________________
_________________________________________________________
_________________________________________________________
_________________________________________________________
_________________________________________________________
Not for
Reproduction

16
CHOKE
NOTES
_________________________________________________________
_________________________________________________________
_________________________________________________________
_________________________________________________________
_________________________________________________________
_________________________________________________________
_________________________________________________________
_________________________________________________________
_________________________________________________________
_________________________________________________________
_________________________________________________________
_________________________________________________________
_________________________________________________________
_________________________________________________________
_________________________________________________________
_________________________________________________________
_________________________________________________________
_________________________________________________________
_________________________________________________________
_________________________________________________________
_________________________________________________________
_________________________________________________________
_________________________________________________________
_________________________________________________________
_________________________________________________________
_________________________________________________________
_________________________________________________________
_________________________________________________________
_________________________________________________________
_________________________________________________________
_________________________________________________________
_________________________________________________________
_________________________________________________________
_________________________________________________________
Not for
Reproduction

80082858
©2019 Briggs & Stratton
Victa, Victa Razor are
trademarks of Briggs & Stratton Australia Pty. Ltd.
ABN 13 006 576 856
All rights reserved. No part of this booklet may be reproduced by any means
without prior written permission. All information herein is subject to change without notice.
2208 A PL TC OPERATORS MANUAL 02/09/19
ECN ISS DRN CKD DESCRIPTION DATE
Not for
Reproduction
/