Sony CMT-DC1 Operating instructions

Category
Audio tuners
Type
Operating instructions

Sony CMT-DC1: This compact Hi-Fi component system offers a versatile audio experience with CD, tuner, and tape capabilities. Enjoy your favorite CDs with various playback modes, including normal play, shuffle, and repeat functions. Preset your preferred radio stations for easy access and utilize the Radio Data System (RDS) for additional information. Record your favorite tracks from CD to tape with ease, or set up timer recordings for your convenience.

Sony CMT-DC1: This compact Hi-Fi component system offers a versatile audio experience with CD, tuner, and tape capabilities. Enjoy your favorite CDs with various playback modes, including normal play, shuffle, and repeat functions. Preset your preferred radio stations for easy access and utilize the Radio Data System (RDS) for additional information. Record your favorite tracks from CD to tape with ease, or set up timer recordings for your convenience.

Micro Hi-Fi
Component
System
© 2001 Sony Corporation
Operating Instructions
4-235-851-12 (1)
CMT-DC1
2
WARNING
To prevent fire or shock hazard, do not
expose the unit to rain or moisture.
To avoid electrical shock, do not open the cabinet.
Refer servicing to qualified personnel only.
Do not install the appliance in a confined space,
such as a bookcase or built-in cabinet.
This appliance is classified
as a CLASS 1 LASER
product. The CLASS 1
LASER PRODUCT
MARKING is located on
the rear exterior.
To prevent fire, do not cover the ventilation of the
apparatus with news papers, table-cloths, curtains,
etc. And don’t place lighted candles on the apparatus.
To prevent fire or shock hazard, do not place objects
filled with liquids, such as vases, on the apparatus.
Don’t throw a battery, dispose it as
the injurious wastes.
NOTICE FOR THE CUSTOMERS IN THE
U.S.A.
This symbol is intended to alert the
user to the presence of uninsulated
“dangerous voltage” within the
product’s enclosure that may be of
sufficient magnitude to constitute a
risk of electric shock to persons.
This symbol is intended to alert the
user to the presence of important
operating and maintenance (servicing)
instructions in the literature
accompanying the appliance.
CAUTION
The use of optical instruments with this product will
increase eye hazard.
Note to CATV system installer:
This reminder is provided to call the CATV system
installer’s attention to Article 820-40 of the NEC that
provides guidelines for proper grounding and, in
particular, specifies that the cable ground shall be
connected to the grounding system of the building, as
close to the point of cable entry as practical.
INFORMATION
This equipment has been tested and found to comply
with the limits for a Class B digital device, pursuant
to Part 15 of the FCC Rules. These limits are
designed to provide reasonable protection against
harmful interference in a residential installation. This
equipment generates, uses, and can radiate radio
frequency energy and, if not installed and used in
accordance with the instructions, may cause harmful
interference to radio communications. However,
there is no guarantee that interference will not occur
in a particular installation. If this equipment does
cause harmful interference to radio or television
reception, which can be determined by turning the
equipment off and on, the user is encouraged to try to
correct the interference by one or more of the
following measures:
– Reorient or relocate the receiving antenna.
– Increase the separation between the equipment and
receiver.
– Connect the equipment into an outlet on a circuit
different from that to which the receiver is
connected.
– Consult the dealer or an experienced radio/TV
technician for help.
CAUTION
You are cautioned that any changes or modifications
not expressly approved in this manual could void
your authority to operate this equipment.
NOTICE FOR THE CUSTOMERS IN
CANADA
CAUTION
TO PREVENT ELECTRIC SHOCK, DO NOT USE
THIS POLARIZED AC PLUG WITH AN
EXTENSION CORD, RECEPTACLE OR OTHER
OUTLET UNLESS THE BLADES CAN BE FULLY
INSERTED TO PREVENT BLADE EXPOSURE.
For the customers in North America
ENERGY STAR
®
is a U.S.
registered mark.
As an ENERGY STAR
®
partner,
Sony Corporation has determined
that this product meets the
ENERGY STAR
®
guidelines for
energy efficiency.
3
Parts Identification
Main unit ............................................... 4
Remote Control ..................................... 5
Getting Started
Hooking up the system .......................... 6
Inserting two size-AA (R6) batteries into
the remote control ........................... 7
Setting the time...................................... 7
CD
Loading the CD ..................................... 8
Playing the CD
–– Normal Play/Shuffle Play/Repeat Play ...
8
Programming the CD tracks
–– Program Play .............................. 9
Using the CD display ............................ 9
Tuner
Presetting radio stations.......................10
Listening to the radio
–– Preset Tuning ........................... 10
Using the Radio Data System (RDS)* ...
11
Tape
Loading a tape ..................................... 12
Playing a tape ...................................... 12
Recording to a tape
–– CD Synchro Recording/
Recording Manually/Program Edit ...
13
Timer-recording radio programs ......... 15
Sound Adjustment
Adjusting the sound ............................. 16
Other Features
Falling asleep to music
— Sleep Timer .............................. 16
Waking up to music
— Daily Timer .............................. 16
Optional Components
Hooking up the optional components....
18
Connecting headphones....................... 18
Additional Information
Precautions .......................................... 19
Troubleshooting................................... 20
Specifications ...................................... 21
Table of Contents
* European model only
4
Parts Identification
The items are arranged in alphabetical order.
Refer to the pages indicated in parentheses () for details.
Main unit
CD cover qa (8, 18)
Shown open in the illustration
above.
CD SYNC 9 (13, 14)
CD .m/M> qg (8, 9,
14)
CD Z qf (8)
CD u qj (8, 9)
CD x qh (8, 9, 21)
DSG indicator qd (16)
FUNCTION 7 (8-10, 12-14, 18)
PHONES jack qs (18)
Remote sensor q;
TAPE PAUSE X 5 (12-14)
TAPE Y 2 (12-14)
TAPE m/M 4 (12)
TAPE x 3 (12-14, 21)
TUNER/BAND ql (10, 21)
VOLUME 8 (17)
BUTTON DESCRIPTIONS
@/1 (power) 1 (7, 10, 15, 17, 18)
Z 6 (12)
+/– qk (10, 11)
12
5
4
7
63
8
9
q;
qs
qf qdqh qgqj
qk
ql
qa
Parts Identification
5
Remote Control
CD REPEAT qk (8)
CD N ws (8, 9)
DIR MODE ql (12-14)
DISPLAY 2 (9, 11)
DSG 1 (16)
ENTER qd (7, 10, 15, 17)
MEMORY qh (10)
PLAY MODE 9 (8, 9, 14)
SLEEP qf (16)
STEREO/MONO qj (11)
TAPE Y w; (12-14)
TIMER SELECT qs (15, 17)
TIMER SET qg (7, 15, 17)
TUNER/BAND wa (10)
TUNING MODE q; (10, 11)
VOL +/– qa (17)
BUTTON DESCRIPTIONS
X 4 (8, 12-14)
x 5 (8, 9, 12-14)
./> 6 (7-10, 15, 17)
m/M 7 (8, 10-12)
@/1 (power) 3 (7, 10, 15, 17)
z REC 8 (13)
123
8
5
6
4
9
0
qa
qsqd
qj
qk
qh
qg
qf
ql
w;
wa
ws
7
6
Jack type A
F
M
7
5
A
M
U
ANTENN
A
Jack type B
FM75
A
M
ANTENNA
U
U
Getting Started
Hooking up the system
Follow steps 1 through 4 of the procedure below to hook up your system using the supplied cords
and accessories.
AM loop antenna
Left speaker
Right speaker
FM antenna
1 Connect the speakers.
Connect the right and left speaker cords to
the SPEAKER terminals as shown below.
3
L
#
#
R
3
2 Connect the FM and AM antennas.
Set the AM loop antenna up before
connecting it.
Insert this portion
Black (#)
Gray (3)
AM loop
antenna
Extend the FM wire
antenna horizontally
AM loop
antenna
Extend the FM
wire antenna
horizontally
4
2
3
1
7
Getting Started
3 For models with a voltage selector, set
VOLTAGE SELECTOR to the local
power line voltage.
110V-120V
220V-240V
VOLTAGE
SELECTOR
4 Connect the power cord to a wall outlet.
If the plug does not fit the wall socket,
detach the supplied plug adaptor (only for
models equipped with an adaptor).
To turn on the system, press @/1.
Inserting two size-AA (R6)
batteries into the remote
control
E
E
e
e
Tip
When the remote no longer operates the system,
replace both batteries with new ones.
Note
If you do not use the remote for a long period of time,
remove the batteries to prevent possible damage from
battery leakage and corrosion.
Setting the time
1 Turn on the system.
2 Press TIMER SET on the remote.
If you are setting the clock for the first time,
go to step 5.
3 Press ./> on the remote
repeatedly until “SET CLOCK” appears
in the display.
4 Press ENTER on the remote.
The hour indication flashes.
5 Press ./> on the remote
repeatedly to set the hour.
6 Press ENTER on the remote.
The minute indication flashes.
7 Press ./> on the remote
repeatedly to set the minute.
8 Press ENTER on the remote.
The clock will begin operating.
To reset the system clock
Start over from step 1.
8
CD
Loading the CD
1 Press CD Z.
The CD cover opens and the disc tray slides
out.
2 Load a CD onto the disc tray.
3 Press CD Z again to close the disc
tray.
Tip
You can stand a CD case upright in the groove on top
of the system.
Playing the CD
–– Normal Play/Shuffle Play/Repeat
Play
This system lets you play CDs in different play
modes.
1 005
1 Press FUNCTION repeatedly until “CD”
appears in the display.
The CD u button lights up.
Load with the
label side up.
When you play
a CD single
(8 cm CD),
load it onto the
inner circle of
the tray.
Track number Playing time
2 Press PLAY MODE on the remote
repeatedly until the mode you want
appears in the display.
Select
No display
SHUFFLE
PGM
3 Press CD u (or CD N on the remote).
Other Operations
To
Stop playback
Pause
Select a track
Find a point in a track
Remove the CD
Play repeatedly
(Repeat Play)
To play
The CD in original order.
The tracks on the CD in random
order.
The tracks on the CD in any
order that you want (see
“Programming the CD tracks” on
page 9).
Do this
Press CD x.
Press CD u (or X on the
remote). Press again to
resume playback.
During playback or pause,
press CD .m/
M> repeatedly until
you find the desired track.
During playback, press and
hold down CD .m/
M> until you find the
desired point.
Press CD Z.
Press CD REPEAT on the
remote repeatedly during
playback until “REPEAT”
or “REPEAT 1” appears in
the display.
REPEAT: For all the tracks
on the CD.
REPEAT 1: For only the
currently playing track.
To cancel playing
repeatedly, press CD
REPEAT on the remote
repeatedly until “REPEAT”
and “REPEAT 1” disappear
from the display.
9
CD
Programming the CD
tracks
–– Program Play
You can make a program of up to 24 tracks on
a CD in any order that you want.
1 Press FUNCTION repeatedly until “CD”
appears in the display.
2 Press PLAY MODE on the remote
repeatedly until “PGM” appears in the
display.
3 Press CD .m/M> repeatedly
until the desired track number appears
in the display.
3 243
PGM
4 Press PLAY MODE on the remote .
The selected track is programmed.
The selection number appears in the
display.
5 To program additional tracks, repeat
steps 3 and 4.
6 Press CD u (or CD N on the remote).
To
Cancel Program Play
Add a track to the end
of the program
Erase the entire
program
Tips
The program you made remains after Program Play
finishes. To play the program again, switch the
function to CD, and then press CD u (or CD N
on the remote).
“--.--” appears in the display when the total program
time exceeds 100 minutes.
Selected track
number
Total playing time
Do this
Press PLAY MODE on the
remote repeatedly until
“PGM” disappears from the
display.
Do steps 3 and 4 with
Program Play stopped.
Press CD x with Program
Play stopped.
Using the CD display
Press DISPLAY on the remote repeatedly.
The display changes as follows:
During normal playback
Current track number and elapsed playing time
of the track t Current track number and
remaining playing time of the track t
Remaining playing time of the entire CD t
Clock display t Current track number and
elapsed playing time of the track t ......
While the CD is stopped
Total playing time t Clock display t
Current source display t Total playing time
t ......
Note
If the CD contains 25 tracks or more, the remaining
playing time of the current track will appears as
“---.--” for each track starting with the 25th.
10
Tuner
Presetting radio stations
The system can store a total of 30 preset
stations (20 for FM and 10 for AM).
1 Press FUNCTION repeatedly until
“TUNER” appears in the display.
The TUNER/BAND button lights up.
2 Press TUNER/BAND to select FM or
AM.
3 Press TUNING MODE on the remote
repeatedly until “AUTO” appears in the
display.
4 Press +/– (or m/M on the remote).
The frequency changes as the system scans
for a station. Scanning stops automatically
when a station is tuned in. At that time,
“TUNED” and “STEREO” (for stereo
program only) appear.
5 Press MEMORY on the remote.
A preset number flashes.
1FM1005
PRESET
STEREO
TUNED
MH
z
6 Press ./> on the remote
repeatedly to select the preset number
that you want.
7 Press ENTER on the remote.
The station is stored to the selected preset
number.
8 Repeat steps 2 through 7 to preset
other stations.
To tune in a weak station
In step 3, press TUNING MODE on the remote
repeatedly until “AUTO” and “PRESET”
disappear from the display, then press +/– (or
m/M on the remote) repeatedly to tune in
the station.
Preset number Frequency
To change the preset number
Start over from step 2.
Tip
The preset stations are saved in the system’s memory
for about a day even if you disconnect the power cord
or a power failure occurs.
To change the AM tuning interval
(not applicable on the European
model)
The AM tuning interval is factory-preset to 9 kHz (or
10 kHz for some areas). To switch the AM tuning
interval, tune in any AM station first, then turn off the
system. Pressing and holding down +, turn the
system back on. When you change the interval, all
the AM preset stations are erased. To change back to
the original interval, tune in any AM station first, then
turn off the system. Pressing and holding down –,
turn the system back on.
Listening to the radio
–– Preset Tuning
Presetting radio stations in the system’s
memory in advance make it easy to tune in
those stations later (see “Presetting radio
stations” on this page).
1 Press FUNCTION repeatedly until
“TUNER” appears in the display.
2 Press TUNER/BAND to select FM or
AM.
3 Press TUNING MODE on the remote
repeatedly until “PRESET” appears in
the display.
4 Press +/– (or m/M on the remote)
repeatedly to display the preset number
of the desired station.
To turn off the radio
Press ?/1.
11
Tuner
To tune in a non-preset radio station
In step 3, press TUNING MODE on the remote
repeatedly until “AUTO” and “PRESET”
disappear from the display, then press +/– (or
m/M on the remote) repeatedly to tune in
the desired station (Manual Tuning).
Tips
If there is static during an FM broadcast, press
STEREO/MONO on the remote until “MONO”
appears in the display. After “MONO” scrolls
across the display, the frequency will appear. The
broadcast will no longer be in stereo, but the
reception will improve.
To improve the reception, adjust the supplied
antennas or connect an external antenna.
Using the Radio Data
System (RDS)
(European model only)
What is the Radio Data System?
Radio Data System (RDS)* is a broadcasting
service that allows radio stations to send
additional information along with the regular
program signal.
Note
RDS may not work properly if the station you have
tuned in is not transmitting the RDS signal properly
or if the signal is weak.
* Not all FM stations provide RDS service, nor do
they all provide the same type of services. If you
are not familiar with the RDS system, check with
your local radio stations for details on RDS services
in your area.
Receiving RDS broadcasts
Simply select a station from the FM band.
When you tune in a station that provides RDS
services, the station name appears in the
display.
To check the RDS information
Each time you press DISPLAY on the remote,
the display changes as follows:
Station name* t Frequency t Clock display
t Station name* t ......
* If the RDS broadcast is not properly received, the
station name may not appear in the display.
12
Tape
Loading a tape
1 Press Z.
2 Load a recorded/recordable tape into
the cassette holder.
Playing a tape
You can use Type I (normal) tape.
1 Load a recorded tape into the cassette
holder.
2 Press FUNCTION repeatedly until
“TAPE” appears in the display.
The TAPE Y button lights up.
3 Press DIR MODE on the remote
repeatedly to select “ ” to play one
side of the tape, “ ” to play both
sides, or “ ”* to play both sides
repeatedly.
* The tape automatically stops after playing back
five times.
4 Press TAPE Y.
Press TAPE Y again to play the reverse
side. The tape starts playing back.
With the side you want to play/
record on facing towards you
Other Operations
To
Stop playback
Pause
Fast-forward or
rewind
Remove the tape
Do this
Press TAPE x.
Press TAPE PAUSE X (or
X on the remote). Press again
to resume playback.
With the tape stopped, press
TAPE m/M.
Press Z.
13
Tape
Recording from a CD
(CD Synchro Recording)
Recording manually
Load a recordable tape into the cassette holder.
Load a CD onto the disc tray.
Load a CD or tune in the desired station.
Press FUNCTION repeatedly until “CD”
appears in the display.
Press FUNCTION repeatedly to select
the source you want to record from.
Press CD SYNC.
Press z REC on the remote.
The tape stands by for recording.
” and “B” (or “b”) appear.
To start recording on the side facing away from you, press TAPE Y until “
changes to “ .”
Press DIR MODE on the remote repeatedly to select “ ” to record on one side of
the tape, or “ ” or “ ” to record on both sides.
Press TAPE PAUSE X (or X on the
remote).
Steps
2
3
4
5
6
Recording to a tape
–– CD Synchro Recording/Recording Manually/Program Edit
You can record from a CD, radio or any of the connected components. You can use Type I (normal)
tape.
1
Press TAPE PAUSE X (or X on the
remote), and then start playing the
desired source.
continued
To stop recording
Press TAPE x.
Tip
For recording manually:
To pause recording, press TAPE PAUSE X (or X on
the remote).
14
Recording CD tracks in your
favorite order
–– Program Edit
1 Load a recordable tape into the
cassette holder.
2 Load a CD onto the disc tray.
3 Press FUNCTION repeatedly until “CD”
appears in the display.
4 Press PLAY MODE on the remote
repeatedly until “PGM” appears in the
display.
5 Press CD .m/M> repeatedly
until the desired track number appears
in the display.
6 Press PLAY MODE on the remote .
The selected track is programmed.
The selection number appears in the
display.
To program additional tracks, repeat steps 5
and 6.
7 Press CD SYNC.
The tape stands by for recording and the CD
stands by for playback.
” and “B” (or “b”) appear, and the
CD SYNC button lights up.
To start recording on the side facing away
from you, press TAPE Y until “
changes to “ .”
8 Press DIR MODE on the remote
repeatedly to select “ ” to record on
one side of the tape, or “ ” or “
to record on both sides.
9 Press TAPE PAUSE X (or X on the
remote).
To
Stop recording
Cancel Program
Edit
Recording to a tape (continued)
Do this
Press TAPE x.
Press PLAY MODE on the
remote repeatedly until “PGM”
disappears from the display.
To place a specific number of tracks
on each side of the tape during CD
Synchro Recording
1 Program the tracks for the first side by
doing steps 1 to 6.
2 Press X on the remote.
3 Program the tracks for the other side by
doing steps 5 and 6.
4 Do steps 7 to 9 (see Note below).
When the X command is detected during
CD Synchro Recording, the CD will pause,
the first side of the tape will continue
running till it ends, the tape will reverse
direction, the CD will play and recording of
the remaining tracks will resume on the
other side of the tape.
Note
To enable two-sided recording, you must select
” or “ ” in step 8 on the left.
15
Tape
Timer-recording radio
programs
To timer-record, make sure that you have set
the system clock correctly (see “Setting the
time” on page 7) and preset the radio station
(see “Presetting radio stations” on page 10).
1 Tune in the desired preset radio station
(see “Listening to the radio” on page
10).
2 Load a recordable tape.
3 Press TIMER SET on the remote.
4 Press ./> on the remote
repeatedly until “SET REC” appears in
the display.
“SET REC” scrolls and “c REC” appears
in the display.
5 Press ENTER on the remote.
“ON TIME” appears, then the hour
indication flashes.
6 Set the starting time.
Press ./> on the remote repeatedly to
set the hour, then press ENTER on the
remote.
The minute indication begins flashing next.
Press ./> on the remote repeatedly to
set the minute, then press ENTER on the
remote.
“OFF TIME” appears, then the hour
indication flashes again.
7 Set the stopping time by repeating step
6.
The start time, the stopping time,
“TUNER,” and the preset station appear in
turn, then the original display returns.
Do this
Press TIMER SELECT on the
remote repeatedly until
c REC” appears in the
display. The preset items
appear in turn.
Press TIMER SELECT on the
remote repeatedly until
c REC” disappears from the
display.
8 Press @/1 to turn off the system.
When the recording starts, the volume level
is automatically set to the minimum.
To
Check the settings
Turn off the timer
Tip
Once you set the timer, the time settings will remain
in the system’s memory until you change them, even
when you turn the system or the timer off. The
settings that were last used will be in effect when you
turn the timer on again.
Notes
The system will turn on 15 seconds before the
specified starting time.
If the system is turned on at the specified starting
time, recording will not occur.
When you have set the Sleep Timer, the timer
recording will not operate until the Sleep Timer
Function is turned off.
16
Other Features
Falling asleep to music
— Sleep Timer
The Sleep Timer Function lets you specify a
sleep time, after which the system stops playing
and turns off automatically. You can thus fall
asleep to music.
Press SLEEP on the remote repeatedly.
The sleep time changes as follows:
AUTO* t 90MIN t 80MIN t 70MIN t
t 10MIN t OFF t AUTO* t
* The system turns off after the current CD or tape
finishes playing (up to 100 minutes). The system
also turns off when you manually stop the CD or
tape.
To
Check the remaining
sleep time
Change the sleep time
Cancel the Sleep
Timer Function
Waking up to music
— Daily Timer
By setting the Daily Timer, you can make the
system automatically turn on and off at
specified times. To use this function, make
sure that you have set the system clock
correctly (see “Setting the time” on page 7).
Sound Adjustment
Adjusting the sound
Generating a more dynamic sound
(Dynamic Sound Generator)
Press DSG on the remote.
To cancel the DSG, press DSG on the remote
again.
Press
SLEEP on the remote once.
SLEEP on the remote
repeatedly until the time
you want appears.
SLEEP on the remote
repeatedly until “OFF”
appears.
17
Sound Adjustment/Other Features
1 Prepare the music source you want to
listen to when the system turns on.
CD: Load a CD. To start playing from a
specific track, make a program (see
“Programming the CD tracks” on page 9).
Tape: Load a tape with the side you want
to play facing towards you.
Radio: Tune in the preset radio station
that you want (see “Listening to the radio”
on page 10).
2 Adjust the volume.
3 Press TIMER SET on the remote.
4 Press ./> on the remote
repeatedly until “SET DAILY” appears
in the display.
“SET DAILY” scrolls and “c DAILY”
appears in the display.
5 Press ENTER on the remote.
“ON TIME” appears, then the hour
indication flashes.
6 Set the starting time.
Press ./> on the remote repeatedly to
set the hour, then press ENTER on the
remote.
The minute indication begins flashing next.
Press ./> on the remote repeatedly to
set the minute, then press ENTER on the
remote.
“OFF TIME” appears, then the hour
indication flashes again.
7 Set the stopping time by repeating step
6.
8 Press ./> on the remote
repeatedly until the music source you
want appears.
The display changes as follows:
t TUNER y CD T
t TAPE T
9 Press ENTER on the remote.
The starting time, the stopping time, and the
music source appear in turn, then the
original display returns.
10
Press @/1 to turn off the system.
To
Check the settings
Turn off the timer
Tip
Once you set the timer, the time settings will remain
in the system’s memory until you change them, even
when you turn the system or the timer off. The
settings that were last used will be in effect when you
turn the timer on again.
Notes
The system will turn on 15 seconds before the
specified starting time.
When you have set the Sleep Timer, the Daily
Timer will not operate until the Sleep Timer
Function is turned off.
Do this
Press TIMER SELECT on the
remote repeatedly until
c DAILY” appears in the
display. The preset items
appear in turn.
Press TIMER SELECT on the
remote repeatedly until
c DAILY” disappears from
the display.
18
Optional Components
Hooking up the optional
components
You can connect a variety of components to
your system in order to enhance it. Make sure
that the color of the plugs matches that of the
connectors.
* If the jack is covered with a cap, remove it before
use.
To
Make a digital
recording from
CD to MD
Listen to the
connected MD
deck
Listen to the
connected VCR
To the audio output jacks
on your MD deck/VCR
To the digital input connector
on your MD deck*
Do This
Connect the optical cable.
Press FUNCTION repeatedly
until “MD” appears in the
display.
Press FUNCTION repeatedly
until “VIDEO” appears in the
display.
Tip
If you cannot select “VIDEO” by pressing
FUNCTION repeatedly, press @/1 while pressing
down FUNCTION in standby mode. The function
will change from “MD” to “VIDEO,” and “VIDEO”
will appear in the display. To change back to “MD,”
repeat this procedure.
Connecting headphones
Open the CD cover, and then connect
headphones to the PHONES jack.
PHONES jack
19
Additional Information
Precautions
On operating voltage
Before operating the system, check that the operating
voltage of your system is identical with the voltage of
your local power supply.
On safety
The unit is not disconnected from the AC power
source (mains) as long as it is connected to the wall
outlet, even if the unit itself has been turned off.
Unplug the system from the wall outlet (mains) if it
will not be used for an extended period of time. To
disconnect the power cord (mains lead), pull it out
by the plug. Never pull the cord itself.
Should any solid object or liquid fall into the
system, unplug the system and have it checked by
qualified personnel before operating it any further.
AC power cord must be changed only at the
qualified service shop.
On placement
Do not place the system in an inclined position.
Do not place the system in locations where it is:
— Extremely hot or cold
— Dusty or dirty
— Very humid
— Subject to vibrations
— Subject to direct sunlight
On heat buildup
Although the unit heats up during operation, this is
not a malfunction.
Place the system in a location with adequate
ventilation to prevent heat build-up in the system.
If you continuously use this system at a large volume,
the cabinet temperature of the top, side and bottom
rises considerably. To avoid burning yourself, do not
touch the cabinet.
To prevent a malfunction, do not cover the ventilation
hole for the cooling fan.
On operation
If the system is brought directly from a cold place
to a warm place, or is placed in a very damp room,
moisture may condense on the lens inside the CD
player. Should this occur, the system will not
operate properly. Remove the CD and leave the
system turned on for about an hour until the
moisture evaporates.
When moving the unit, remove any disc that may be
on the disc tray.
If you have any questions or problems concerning
your system, please consult your nearest Sony dealer.
Notes on CDs
Before playing a CD, clean the CD surface with a
cleaning cloth. Wipe the CD from the center out.
Do not play a CD with tape, stickers, or adhesives
on any of its surfaces as this may damage the
system.
Do not use solvents.
Do not expose the CDs to direct sunlight or heat
sources.
Disc with non-standard shapes (e.g., heart, square,
star) cannot be played on this system. Attempting
to do so may damage the system. Do not use such
discs.
Cleaning the cabinet
Clean the cabinet, panel and controls with a soft cloth
slightly moistened with mild detergent solution. Do
not use any type of abrasive pad, scouring powder or
solvent such as thinner, benzene or alcohol.
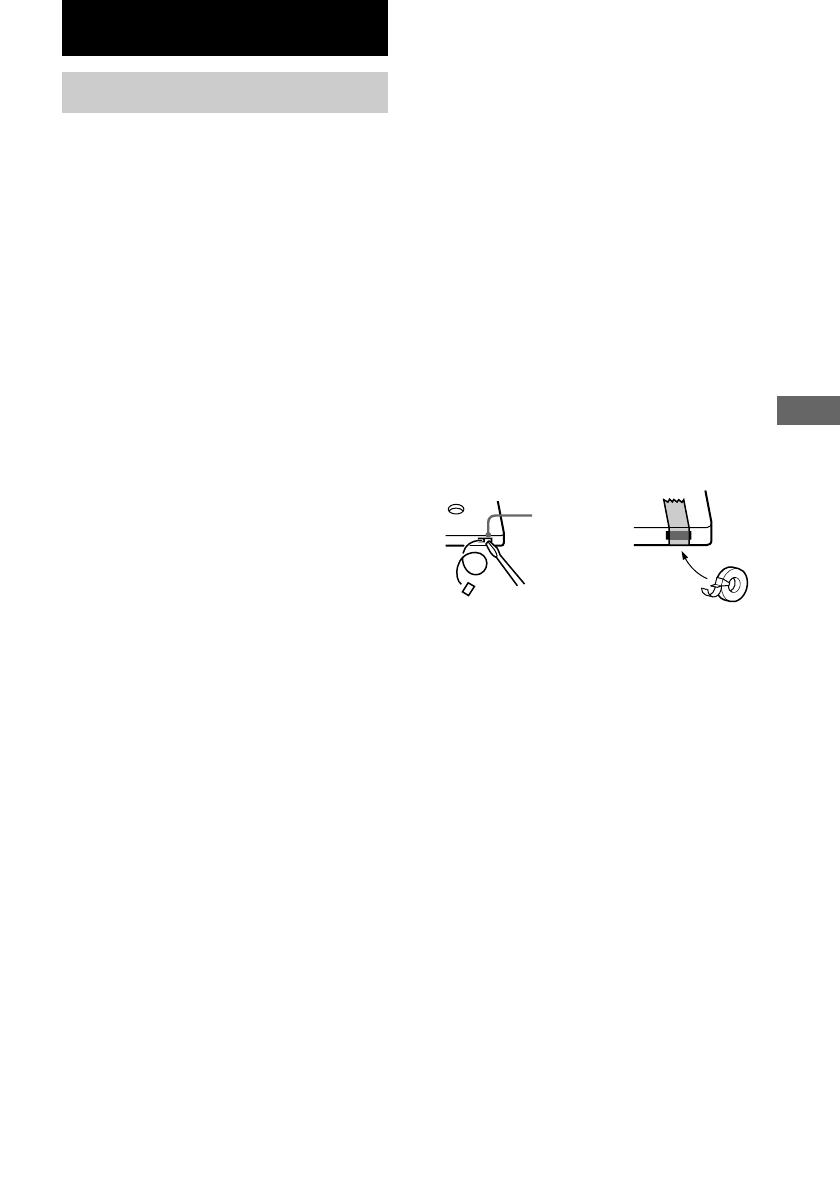
To save a tape permanently
To prevent a tape from being accidentally recorded
over, break off the cassette tabs from side A or side B
as illustrated.
If you later want to reuse the tape for recording, cover
the broken tab with adhesive tape.
Before placing a cassette in the tape
deck
Take up any slack in the tape. Otherwise the tape
may get entangled in the tape deck’s playing
mechanism and become damaged.
When using a tape longer than 90
minutes
The tape is very elastic. Do not change the tape
operations such as play, stop, and fast-winding etc.
too frequently. The tape may get entangled in the
tape deck’s playing mechanism.
Cleaning the tape heads
Clean the tape heads after every 10 hours of use.
Make sure to clean the tape heads before making an
important recording or after playing an old tape. Use
a commercially available dry-type or wet-type
cleaning cassette. For details, refer to the instructions
of the cleaning cassette.
Demagnetizing the tape heads
Demagnetize the tape heads and the metal parts that
have contact with the tape after every 20 to 30 hours
of use with a commercially available demagnetizing
cassette. For details, refer to the instructions of the
demagnetizing cassette.
Break off the
cassette tab
Optional Components/Additional Information
20
Troubleshooting
Should you encounter a problem with your
system, do the following:
1 Make sure the power cord and speaker cords
are correctly and firmly connected.
2 Find your problem in the troubleshooting
checklist below and take the indicated
corrective action.
If the problem persists after doing all of the
above, consult your nearest Sony dealer.
General
There is no sound from the speakers.
Adjust the volume.
The headphones are connected.
Check the speaker connections.
There is severe hum or noise.
A TV or VCR is placed too close to the unit.
Move the unit away from the TV or VCR.
“0:00” (or “AM 12:00”) flashes in the display.
A power interruption has occurred. Set the clock
(see page 7) and timer settings (see pages 15 and
16) again.
The timer does not function.
Make sure the clock is correctly set (see page 7).
You cannot operate the Daily Timer and the
timer recording at the same time.
c DAILY” and “c REC” do not appear when
you press TIMER SELECT on the remote.
Make sure each timer is correctly set (see pages
15 and 16).
Make sure the clock is correctly set (see page 7).
The color on the TV screen is irregular.
Move the speakers farther away from the TV set.
The remote does not work.
There is an obstacle between the remote and the
unit.
You are not pointing the remote in the direction
of the system’s sensor.
The batteries in the remote have run down.
Replace the batteries.
Make sure that the batteries are inserted
correctly.
Speakers
Sound comes from only one channel, or the left
and right volumes are unbalanced.
Check the speaker connections and placement.
CD Player
The CD will not play.
The CD is dirty.
The surface of the CD is scratched. Replace the
CD.
The CD is loaded with the label side down.
Condensation has built up in the system.
Remove the CD and leave the system turned on
for about an hour until the moisture evaporates.
Play does not start from the first track.
The player is in Program or Shuffle Play. Press
PLAY MODE on the remote repeatedly until
“PGM” and “SHUFFLE” disappear.
Tape Deck
Recording cannot be done.
There is no tape in the cassette holder.
The record protect tab has been removed from
the cassette (see page 19).
The tape has come to the end.
The tape does not record or play, or there is a
decrease in sound level.
The heads are dirty. Clean them (see page 19).
The record/playback heads are magnetized.
Demagnetize them (see page 19).
The tape does not erase completely.
The record/playback heads are magnetized.
Demagnetize them (see page 19).
There is excessive wow or flutter, or the sound
drops out.
The capstans or pinch rollers are dirty. Clean
them (see page 19).
Noise increases or the high frequencies are
missing.
The record/playback heads are magnetized.
Demagnetize them (see page 19).
1 / 1

Sony CMT-DC1 Operating instructions

Category
Audio tuners
Type
Operating instructions

Sony CMT-DC1: This compact Hi-Fi component system offers a versatile audio experience with CD, tuner, and tape capabilities. Enjoy your favorite CDs with various playback modes, including normal play, shuffle, and repeat functions. Preset your preferred radio stations for easy access and utilize the Radio Data System (RDS) for additional information. Record your favorite tracks from CD to tape with ease, or set up timer recordings for your convenience.

Ask a question and I''ll find the answer in the document

Finding information in a document is now easier with AI

Ask the document