Page is loading ...

OPERATIONS MANUAL
INTRODUCTION
HOOKUP CABLES
DBMD-010
DB25 male to DB25 male, Tascam analog pinout, 10 feet, molded
DBMF-010
DB25 male to fanout, 8 XLRF, Tascam analog pinout, 10 feet, molded
DBMM-010
DB25 male to fanout, 8 XLRM, Tascam analog pinout, 10 feet, molded
DBMS-010
DB25 male to fanout, 8 TRSM, Tascam analog pinout, 10 feet, molded
DB1-015
DB25 male to DB25 male, Tascam analog pinout, 15 feet, Canare MR202 -8AT
DBF1-F-025
DB25 male to fanout, 8 XLRF gold, Tascam analog pinout, 25 feet, Canare MR202 -8AT, Snakeskin
DBF1-M-015
DB25 male to fanout, 8 XLRM gold, Tascam analog pinout, 15 feet, Canare MR202-8AT, Snakeskin
DBF1-S-015
DB25 male to fanout, 8 TRSM gold, Tascam analog pinout, 15 feet, Canare MR202 -8AT, Snakeskin
5.1
PRECISION ATTENUATOR
PA
The Whirlwind 5.1PA system is an extremely accurate, sonically pure, six channel precision attenuator. The 5.1PA was
designed to provide precise, repeatable, multichannel volume adjustments in the post production editing environment. The
level of all channels track symmetrically in 0.5 dBV increments, allowing the user to vary the listening volume and perfectly
maintain the surround image.
In addition to the single knob multichannel level control, the 5.1PA system offers a multitude of switching functions that allow the
operator to mix seamlessly with different speaker combinations and compare different aspects of the surround mix in real time.
The 5.1PA has two sets of outputs and can be configured to control two separate sets of 5.1 speaker systems for comparison
purposes, or configured for one 5.1 speaker arrangement and two pair of stereo speakers to accommodate both surround and
stereo mixing.
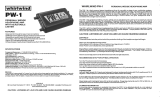
Audio connections are made through 25 pin female Dsub connectors, wired to the Tascam® analog pinout. A variety of standard
and custom DB25 cables are available from Whirlwind through your dealer. Part numbers for some common DB25 cables are:

DB25 PINOUT AND CHANNEL ASSIGNMENT
CH# INPUT AUDIO
1 Left (front)
2 Right (front)
3 Left Surround
4 Right Surround
5 Center
6 LFE
7 Left - Stereo
8 Right - Stereo
CONFIGURATION
OPERATIONSYSTEM DESCRIPTION
18
19
21
20
22
23
25
24
10
11
13
G C H G C H G C G C H G C G G C H G C H
H = HOT
C = COLD
G = GROUND
12
9 8
7
6
5
4
3
2 1
14
15
17
16
MATING FACE OF FEMALE
C
1 2 3 4
5
6 7 8
H H H
The 5.1PA is a two piece system consisting of a single space
rack mount main unit which contains all system input and
output connections and a small portable controller unit that
houses the level adjust knob, LED display and switches that
operate input and output signal selection.
There are two sets of line level outputs on the 5.1PA main I/O
unit. The A output is for connection to the 5.1 surround
amplifiers or powered speakers. The B output can be used to
control a second set of 5.1 speakers or configured to operate
two pairs of stereo speakers providing multiple monitoring
options. Output connections are balanced line level on 25
pin female Dsub connectors, wired to the Tascam® analog
standard. Ground lift switches are provided on all outputs to
eliminate ground loops, if necessary.
Balanced line level audio inputs for the six surround
channels plus the separate stereo input are through another
25 pin female Dsub connector, also wired to the Tascam®
analog standard. An alternate set of stereo inputs on the
front of the rack mounted I/O box allows easy access for
injection of an additional stereo signal. The front ¼” TRS
inputs are electronically buffered and summed with the
stereo signal from the DB25 input. Both signals are
controlled by the Stereo input selector switch.
The portable controller is a tabletop, sloped enclosure with
individual Speaker on/off switches, Speaker selector
switches, and a precision level control with an LED display.
Other switches include 5.1 and Stereo input selectors, Ref,
Mute and Solo functions, and a 5.1 to Stereo down mix. The
controller connects to the rack unit with a standard eight pin
RJ45 cable.
The 5.1PA can be used as a dual output 5.1 controller or as a
single 5.1 speaker system with two additional sets of stereo
speakers for both surround and stereo mixing. The installer
determines which configuration is desired and engages it
with the B output configuration switch on the rear of the rack
mount I/O unit.
In the dual 5.1 configuration, the A and B line level outputs
are connected to two 5.1 surround speaker arrangements.
The 5.1 output switch on the controller selects which of the
two systems is active.
The second configuration provides 5.1 surround
connections on the A output and two sets of stereo outputs
with an optional subwoofer on the B output DB25 connector.
The first set of stereo speakers (ST A) utilizes the left and
right front line level outputs and the second set (ST B) uses
the left and right surround output drivers. Internal switching
in the 5.1PA routes the same audio to either set of stereo
speakers. A single independent subwoofer can be
connected to the LFE output of the B DB25 connector. The
subwoofer audio is either the LFE signal from the 5.1 input or
a derived center mix of the left and right stereo signals. This
configuration gives the user three listening options; the 5.1
system or either set of stereo speakers, selectable via the
controller switches.
The 5.1PA functions are manipulated through a convenient portable controller
box. A large soft touch jog wheel associated with the easy to read four digit
display allows the user to make precise, repeatable level adjustments to all
outputs at once with a single knob. The 5.1PA is an attenuator only, with a range
of 0 to –70 dB. There is no gain through the system except for a switchable +10
dB of gain on the LFE outputs. This switch is located on the front of the rack I/O
unit.
To the right of the level adjust knob are eight switches, six of which turn the
individual speaker outputs on and off. The function of these switches is always
associated with the set of speakers that is currently selected for listening. The
ST A and ST B switches turn the two sets of stereo speakers on and off. These
switches are active only when the 5.1PA is configured for 5.1/Stereo operation,
indicated by the red LED between them.
To the left of the level adjust knob are six switches that manipulate the input
audio signals and a seventh switch that selects the desired surround system for
listening.
The Stereo Input switch applies the two channel stereo input signal to the left
and right front outputs of the selected speaker system. When a stereo speaker
selection is active, a mixed mono sum of the left and right signals available to
the LFE output and the center 5.1 channel.
The 5.1 Input switch sends the six surround audio input signals to their
respective speaker outputs.
The Stereo Downmix switch creates a stereo combination of the surround
inputs and routes them to the left and right front speakers.
The Ref switch allows the user to set a reference system attenuation level that
can be recalled at any time. To set the reference level, press and hold the Ref
switch and rotate the level adjust knob to the desired level of attenuation. The
letter “r” is displayed while the level is being set and goes away when the Ref
switch is released. The reference level is now set and is recalled by pushing the
Ref switch.
The Mute switch turns all outputs off.
The Solo switch changes the function of the Speaker selection switches from
individual on/off; to last switch pressed turns off the other speaker outputs.
Pushing the Solo switch causes it to blink and prepares the Speaker selection
switches for solo operation. Pushing any of the Speaker selection switches
turns off all the other available speakers. The speaker that is on has the switch
fully lit and the switches for the other speakers that can be soloed are blinking.
Pressing the Solo switch again returns the Speaker selection function to
individual on/off. Pressing and holding the Solo switch enables a signal Mono
function. The Mono function combines the various audio signals and presents
them to selected speakers. 5.1 surround signals are combined into mono by
summing the downmix left and downmix right signals and routing the mono
signal to the left, right and center front speakers. Stereo audio inputs are
properly summed to mono and sent to the left and right front speakers.
It is possible to use both the 5.1 input and the Stereo input simultaneously. In
this case the stereo left and right are routed to the front left and right speakers
along with the front left and right signals of the 5.1 mix.
The table on page 5 outlines the various signal routing paths with different input
switch combinations.
Channels 7 and 8 stereo inputs are summed with the Alternate Stereo input
connectors on the front panel of the rack I/O unit.
Output DB25 connections for 5.1 are the same as the inputs except channels 7
and 8 are unused. Stereo outputs connections use channels 1-4 on the B output
DB25 connector: CH 1-2=ST A, CH 3-4=ST B.
2

CAUTION: TO PREVENT ELECTRIC SHOCK DO NOT REMOVE COVER. NO USER
SERVICEABLE PARTS INSIDE. REFER SERVICING TO QUALIFIED SERVICE PERSONNEL.
WARNING: TO REDUCE RISK OF FIRE AND ELECTRIC SHOCK DO NOT EXPOSE THIS
EQUIPMENT TO ANY TYPE OF RAIN OR MOISTURE.
ATTENTION: DEBRANCHER AVANT D’OUVRIR
1
4
2
3
10
7
5
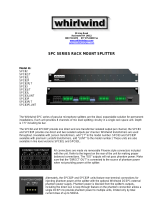
CONTROLS AND CONNECTIONS
8
6
9
PRECISION ATTENUATOR
DUAL OUTPUT
whirlwindusa.com
ALTERNATE STEREO INPUT
LEFT
RIGHT
LFE LEVEL
+10dB BOOST
CONTROLLER
DATA LINK
POWER
11
12
25 WATTS MAX
50-60 Hz
90-240 VAC
CONTROLLER
LINK TO
MAIN I/O
AUDIO
SHIELD
TO
EARTH
LIFT
5.1B OR STEREO A/B BALANCED LINE OUTPUTS
1. L.F. /ST. A LEFT
2. R.F /ST. A RIGHT
3. L.SUR. /ST.B LT
4. R.SUR. /ST.B RT
5. CENTER
6. LFE/ST.SUB
7. NOT CONNECTED
8. NOT CONNECTED
1. LEFT FRONT
2. RIGHT FRONT
3. LEFT SURRND
4. RIGHT SURRND
5. CENTER
6. LFE
7. NOT CONNECTED
8. NOT CONNECTED
5. CENTER
6. LFE
7. LEFT STEREO
8. RIGHT STEREO
1. LEFT FRONT
2. RIGHT FRONT
3. LEFT SURRND
4. RIGHT SURRND
5.1A BALANCED LINE OUTPUTS
BALANCED LINE INPUTS
B OUTPUT
CONFIG
STEREO A/B
5.1B
Made in USA
whirlwindusa.com
STANDARD TASCAM ANALOG WIRING
®
OUTPUT
GROUNDS
LIFTED
CONNECTED
OUTPUT
GROUNDS
LIFTED
CONNECTED
1 2
3
4
5
O
N
6
7
8
1 2
3
4
5
O
N
6
7
8
1. Alternate Stereo Input balanced line level ¼” TRS jacks
allow insertion of external stereo sources into the stereo
inputs. These inputs are electronically balanced and summed
with the stereo signal from the rear DB25 input.
2. LFE Level Boost switch adds 10 dB of gain to the signal
applied to the LFE outputs. The LED illuminates when the
boost is active for visual confirmation.
3. Controller Data Link LED indicates operational data
communication between the main I/O unit and the controller.
4. Power switch connects AC to the transformer primary and
the LED indicates that the unit has power. Both sides of the AC
line are switched and a mains fuse is located on the circuit
board inside the unit. At system power up, the speaker outputs
are set to –35dB to prevent high turn on levels.
5. Input DB25 female connector accepts balanced line level
audio for the six surround channels plus left and right stereo.
The pinout follows the Tascam® analog standard and channel
assignment can be found on the preceding chart.
6. 5.1A Output DB25 female connector delivers 6 channels of
balanced line level audio to the 5.1 surround amplifiers or
powered speakers. The pinout follows the Tascam® analog
standard and channel assignment can be found on the
preceding chart.
7.Output Ground switches are provided for both the A and B
outputs to connect the shield from each output to the common
audio ground bus. The dip switches are numbered 1-8 and
correspond with the same numbered output channel. In the
down (off) position the shield of each output is lifted.
8. B Output Configuration switch determines which audio
signals are delivered to the balanced output drivers. In the
out position a second 5.1 speaker system can be
connected. The in position feeds the stereo signals to the
outputs for connection of two sets of stereo speakers.
9. B Output DB25 female connector is dual function
depending on the position of the configuration switch. The B
output can be used to feed a second set of 5.1 speakers or
configured to operate two pair of stereo speakers and a
subwoofer. The pinout follows the Tascam® analog
standard and channel assignment can be found on the
preceding chart.
10. Audio Shield to Earth switch separates the earth
ground of the power cord (which is always connected to the
chassis) from the audio ground. When in high Radio
Frequency Interference situations, it is suggested to keep
audio ground connected to chassis ground.
11. Controller Link RJ45 connector sends power and
communications to the controller unit. The yellow LED
indicates that power is being supplied to the controller and
the green indicates data communication with the controller.
12. Power IEC inlet connects to incoming AC power with a
voltage range of 90- 240 VAC at 50 or 60 Hz.
3

PRECISION ATTENUATOR
DUAL OUTPUT
CONTROLLER FUNCTIONS
1
2
3
8
11
10
9
4
5
6
7
1. Stereo Input switch turns the stereo input signal on and
off. These signals are sent to the left and right stereo
outputs and also to the left and right front speakers of the
5.1 systems.
2. 5.1 Input switch turns the six surround input signals on
and off and directs them to the proper outputs.
3. Stereo Downmix switch combines the front, center and
surround signals in the proper proportions and sends them
to the left and right front 5.1 outputs. The LFE signal is
unaffected. See the signal combinations chart.
4. Ref switch allows instant recall of a reference system
attenuation level. Press and hold the Ref switch and rotate
the level adjust knob to set the desired level of attenuation.
The reference level is stored when the Ref switch is
released and is retained through power cycling.
5. Mute switch turns all active outputs on and off. The
display will flash as long as mute is engaged.
6. Solo/Mono converts the Speaker selection switches
from individual on/off; to last switch pressed turns off the
other speaker outputs. The Solo switch blinks when
activated and sets the Speaker selection switches for solo
operation. Pushing any of the Speaker selection switches
turns off all the other available speakers. The speaker that
is on has the switch fully lit and the switches for the other
speakers that can be soloed are blinking. Pressing and
holding the Solo switch enables the Mono function that
combines the left and right stereo inputs and the downmix
surround inputs into mono and routes them to various
speakers depending on the current operation of the 5.1PA.
Refer to the signal combination chart for complete mono
signal routing information.
7. 5.1 Output switch selects between 5.1 speakers
systems when the 5.1PA is configured for dual
5.1operation. In 5.1/Stereo mode the switch turns the 5.1 A
outputs on and turns off the stereo outputs.
8. Display indicates the amount of attenuation being
applied to the 5.1 surround signals. The display will flash
when the Mute switch is active and the leftmost digit will
show an “r” when the reference level is being set. On power
up, the display will briefly shown the current software
version and if communication with the main I/O unit is lost a
'C.err” message will be displayed. Turn on level of the
system is –35dB.
9. Level Adjust knob is a rotary encoder that changes the
amount of attenuation in 0.5 dBV increments from –70 dB
to 0 dB. The four digit display shows the attenuation in real
time for accurate adjustment repeatability.
10. ST A and ST B switches select between the stereo
outputs when the 5.1PA is configured for stereo speaker
operation. In dual 5.1 mode these two switches are
inactive.
11. Speaker Selection switches turn the individual
outputs on and off. The Left and Right switches control the
left and right front surround speakers and also the left and
right stereo speakers when those are selected for
monitoring. The LFE switch controls the 5.1 sub and also a
stereo subwoofer, if connected.
12. RJ45 connection (not shown) uses a standard, straight
through wired, eight conductor RJ45 cable as the control
cable connection to the rack mount main I/O unit.
SOLO
HOLD TO MONO
REF
4

Note: A switch on the
main unit determines
Speaker Mode, either
dual 5.1 outputs, or
one 5.1 output and
two stereo outputs.
{}means it defaults to
off, but, this signal
may be turned on.
SIGNAL ROUTING COMBINATIONS TABLE
Input Sources abbreviation key
5.1 Inputs Stereo Inputs Down Mix
FL (Front Left) STL (Stereo Left) DML (DownMix Left) = Mix of FL +
0.708*(SL + CC)
FR (Front Right) STR (Stereo Right) DMR (DownMix Right) = Mix of FR +
0.708*(SR + CC)
SL (Surround Left) MONO (DML+DMR) = Mix of DML+DMR
SR (Surround Right)
DC (Derived Center) = Mono Mix of
STL + STR (This term is used to
avoid confusion in the table.)
CC (Center
Channel)
LFE (Low Freq)
5.1 Output signal paths
(Mono mode = OFF)
Outputs -->
FL FR SL SR CC LFE
Selected Input
5.1
FL FR SL SR CC LFE
DownMix
DML DMR - - {MONO} {LFE}
Stereo
STL STR - - {DC} {DC}
5.1 + Stereo
FL+STL FR+STR SL SR CC LFE
DownMix+Stereo
DML+STL DMR+STR - - {MONO} {LFE}
(Mono mode = ON)
Outputs -->
FL FR SL SR CC LFE
Selected Input
5.1
MONO MONO - - MONO LFE
DownMix
MONO MONO - - {MONO} {LFE}
Stereo
DC DC - - {DC} {DC}
5.1 + Stereo
MONO+DC MONO+DC - - MONO LFE
DownMix+Stereo
MONO+DC MONO+DC - - {MONO} {LFE}
Stereo A or B Output paths
(Mono mode = OFF)
Outputs -->
LEFT RIGHT LFE
Selected Input
5.1
FL FR {LFE}
DownMix
DML DMR {LFE}
Stereo
STL STR {DC}
5.1 + Stereo
FL+STL FR+STR {LFE}
DownMix+Stereo
DML+STL DMR+STR {LFE}
(Mono mode = ON)
Outputs -->
LEFT RIGHT LFE
Selected Input
5.1
MONO MONO {LFE}
DownMix
MONO MONO {LFE}
Stereo
DC DC {DC}
5.1 + Stereo
MONO+DC MONO+DC {LFE}
DownMix+Stereo
MONO+DC MONO+DC {LFE}
5

5.1PA Block Diagram
Left
Right
STEREO IN
Balance Line
Receivers
STL (Stereo In Left)
DC (Derived Center)
INPUT SELECT
DIGITAL GAIN CONTROL
STR (Stereo In Right)
SUM
FL (Front Left)
FR (Front Right)
SL (Surround Left)
SR (Surround Rt)
CC (Center Chan)
LFE (Low Freq)
(8)
(7)
(1)
(2)
(3)
(4)
(5)
(6)
DC
STL
FL
DML
MONO
DC
STR
FR
DMR
MONO
DC
MONO
CC
DC
LFE
MONO
SUM
SUM
SUM
DMR (Downmix Rt)
DML (Downmix L)
Optional +10dB boost
LFEx
CCx
SRx
SLx
FRx
FLx
LFEx
CCx
SRx
SLx
FRx
FLx
LFEx
CCx
FLx
FRx
Manual Switch
Main Unit
FLx
SLx
SRx
FRx
OUTPUT SELECT/ENABLE
BALANCED LINE
DRIVERS
(1)
(2)
(3)
(4)
(5)
(6)
(1)
(2)
(3)
(4)
FL_A (Front Left)
FR_A (Front Right)
SL_A (Surround Left)
SR_A (Surround Right)
CC_A (Center Channel)
LFE_A (Low Freq. Enhancement)
FL_B (Front Left) or Stereo_A_L
FR_B (Front Right) or Stereo_A_R
SL_B (Surround Left) or Stereo_B_L
SR_B (Surround Right) or Stereo_B_R
(5)
CC_B (Center Channel)
(6)
LFE_B (Low Freq. Enhancement)
Outputs have individual ground lifts.
5.1 IN
25 pin D-SUB
Tascam Pinout
SECONDARY OUT
25 pin D-SUB
Tascam Pinout
25 pin D-SUB
Tascam Pinout
MAIN 5.1 OUT
CIRCUIT DESCRIPTION
The design of the 5.1 PA provides precision level control such that
channel gains are matched very closely to prevent image shifts
when changing monitor levels. Since the 5.1PA is intended to be
used in critical post production mixing, the goal was to achieve
“straight wire with attenuation” performance. Noise, distortion and
switching artifacts are kept extremely low by careful attention to
circuit design, component choices and signal routing.
Signal Flow
The 5.1PA signal path begins with the balanced line inputs and
proceeds to the input select section. The selected input signal then
passes through the digital gain controls for attenuation and through
the output select/enable circuitry to the balanced output drivers.
Switching functions are performed electronically with proprietary
circuitry under microprocessor control.
Six surround channels and stereo auxiliary input signals are
connected to the 5.1PA via a 25 pin Dsub connector. The alternate
stereo ¼” TRS inputs on the front of the rack mounted I/O unit are
electronically buffered and summed with the stereo signal from the
DB25 input.
Balanced line input circuits use high quality, low noise, low
distortion amplifiers and reject common mode signals while
preserving the balanced audio signal.
Downmix, mono, and derived center signals are created from
summing signals after the balanced input circuits.
Input source selection switching is performed by a proprietary
Whirlwind FET switching circuit.
These circuits, developed specifically for this product, allow
virtually no artifacts when switching audio signals. They are able to
work with high peak to peak signals, adding no noise or distortion,
yet also allow “gentle” switching. They switch slowly, so pops and
clicks are eliminated compared to relays or off the shelf FET
switching circuits. The source selectors also allow mixing of
signals, which handles the case of both Stereo and 5.1 inputs
selected at the same time.
After the input selection circuitry, all 6 channels of audio are passed
through precision digitally controlled audio attenuators. These
circuits employ precision resistor networks that are responsible for
the high accuracy of the attenuators. In addition, zero cross
detection helps reduce any artifacts of gain changing to below
audible levels.
A second level of audio switching follows the attenuators to route
signals to the proper outputs. This employs the same high
performance switching circuits used for source selection.
Finally, the signals are balanced and buffered by the output
balanced line drivers. These are also very low noise and low
distortion amplifiers with excellent drive characteristics. The 12
output drivers are also equipped with gain trimmers. This allows
Whirlwind technicians to calibrate each output at the factory to
guarantee excellent level matching on all 12 outputs.
Control is done by microprocessors in the main I/O unit and the
controller. Communication between the processors and power to
the controller is done using RJ-45 connections and a single 8 wire
CAT-5 cable. The interface uses balanced RS-485 circuits
ensuring a low noise, reliable interface. Most of the processing is
done in the controller.
Power is provided by a switching supply in the main I/O unit that
accepts line voltages of 90 to 240 VAC at 50 or 60 Hz. This
provides an efficient, universal supply for the system.
6

®Tascam is a registered trademark of the TEAC corporation Toyko, Japan
UNPACKING
Whirlwind has made every effort to ensure that your equipment is received in the same
perfect condition it was when it left the factory. Please inspect your product for any signs of
damage during shipping and report them to your dealer so that a claim can be made to the
shipper. We recommend that you save your packing material for use in the unlikely event
that you need to return your equipment for service.
SPECIFICATIONS
Frequency Response
20 to 20 kHz, +0/-0.1 dB
Total Harmonic Distortion +noise
1 KHz, +10 dBV, <0.002%, 20 to 20 KHz
+18 dBV <0.007%
Phase Shift
< +/- 12 degrees
20-20 KHz
Range of level pot 0 to –70 dB
Gain tracking between channels
0.1 dB typical, 0.2 dB max
Zipper Noise
< -90 dBV
Common Mode Rejection of Input
> 60 dB at 60 Hz.
Maximum Input level
+18 dBV
Input Impedance
20 k ohms
Maximum output level
+18 dBV
Output Impedance
200 ohms
Dynamic Range
110 dB (active channel)
Noise at unity gain
-92.7 dBV
Isolation between input channels
>100 dB at 1 kHz.
Turn off/on impulse noise
< -60 dBV
Power consumption
23 Watts Maximum
Power requirements
85 - 264 VAC, 23W 50/60 Hz
Internal Mains fuse
0.5 amp fast blow
AC dropout voltage
85 VAC
Emissions of RFI
Compliant with FCC Part 15 Class B
Size 5.1PAR
19”w x 1/75”h x 8.5”d 6.8 lbs.
Size 5.1 PAC
6.5”w x 2.3”h x 4.5”d 1.8 lbs.
Shipping Weight - 5.1PA
13 lbs.
Ship Wt.- 5.1PA with Dsub
18 lbs.
Reference Level Resolution .5 dB steps
7

Additional Resources for 5.1 Surround Mixing and System Setup
Creating 5.1 surround sound mixes is somewhat more involved than mixing for stereo.
Available on the whirlwind website,: http://whirlwindusa.com/support/downloads/downloads
are materials by noted audio educator, Mike Sokol. These materials can be helpful in preparing
for 5.1 surround and setting up the mixing environment. His paper entitled “Zen and the Art of
Surround” is a good resource that describes methods of equipment setup and the basics of
surround mix creation.
There are also several audio files provided which can be downloaded and used to assist in the
setup and testing of the 5.1 surround monitoring speaker system. Instructions for burning the
sample audio files to CD are also located there.
WARRANTY
MADE IN USA
99 Ling Road - Rochester, NY 14612
800-733-9473 / 585-663-8820 Fax: 585-865-8930
Website: http://whirlwindusa.com
Email: [email protected]
This product is guaranteed to be free from defects in materials and workmanship to the original purchaser for a
period of 2 years from the date of purchase. Should service be required, return the unit postage prepaid along with
the original sales receipt to:
Whirlwind
Attention - Repair
99 Ling Road
Rochester, New York 14612
The warranty on this product shall not apply to defects or damage resulting from abuse, abnormal use or from
repairs or modifications performed by anyone other than Whirlwind. If it is determined a manufacturing defect has
occurred, Whirlwind will repair or replace the unit at our option and pay the postage back to you.
8
Typical Connection Diagram
/