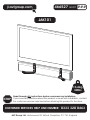
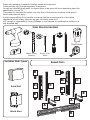
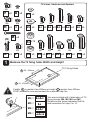
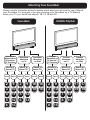
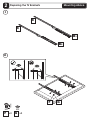
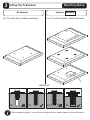
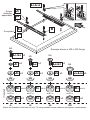
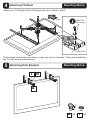
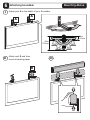
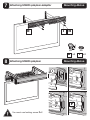
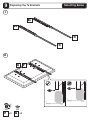
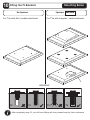
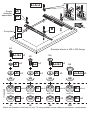
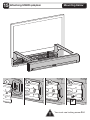
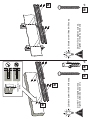
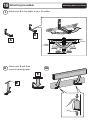
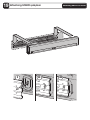
AVF JAK101 allows you to mount your soundbar either above or below your TV. It can also be mounted on a wall or on a TV bracket/TV furniture. The product is intended for indoor use only. The provided parts may vary from photography/illustrations. You will not need all these parts, so expect there to be some left over depending upon the specification of your TV.
AVF JAK101 allows you to mount your soundbar either above or below your TV. It can also be mounted on a wall or on a TV bracket/TV furniture. The product is intended for indoor use only. The provided parts may vary from photography/illustrations. You will not need all these parts, so expect there to be some left over depending upon the specification of your TV.


-
 1
1
-
 2
2
-
 3
3
-
 4
4
-
 5
5
-
 6
6
-
 7
7
-
 8
8
-
 9
9
-
 10
10
-
 11
11
-
 12
12
-
 13
13
-
 14
14
-
 15
15
-
 16
16
-
 17
17
-
 18
18
-
 19
19
-
 20
20
-
 21
21
-
 22
22
-
 23
23


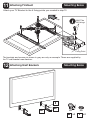
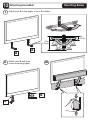
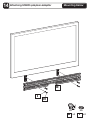
AVF JAK101 allows you to mount your soundbar either above or below your TV. It can also be mounted on a wall or on a TV bracket/TV furniture. The product is intended for indoor use only. The provided parts may vary from photography/illustrations. You will not need all these parts, so expect there to be some left over depending upon the specification of your TV.
Ask a question and I''ll find the answer in the document
Finding information in a document is now easier with AI
Related papers
-
AVF JNL655 User manual
-
-
-
-
AVF MRL12-A User manual
-
-
AVF PSL911-T Installation guide
-
-
-
Other documents
-
Sonos Playbar User manual
-
RocketFish RF-SBM102 User guide
-
 Commercial Electric MB-64102 User manual
-
Sonos SUB (GEN3) BLACK Owner's manual
-
-
Sonos SUBG1US1 User manual
-
-
-
-
