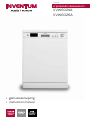
Inventum VVW6026A User manual
- Category
- Dishwashers
- Type
- User manual
This manual is also suitable for
Page is loading ...
Page is loading ...
Page is loading ...
Page is loading ...
Page is loading ...
Page is loading ...
Page is loading ...
Page is loading ...
Page is loading ...
Page is loading ...
Page is loading ...
Page is loading ...
Page is loading ...
Page is loading ...
Page is loading ...
Page is loading ...
Page is loading ...
Page is loading ...
Page is loading ...
Page is loading ...
Page is loading ...
Page is loading ...
Page is loading ...
Page is loading ...
Page is loading ...
Page is loading ...
Page is loading ...

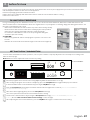
1. Safety and installation instructions page 29
Delivery page 29
Installation page 29
Positioning the appliance page 29
Connecting to the water tap and drainage page 30
Electrical connection page 31
In daily use page 31
2a. Description of the appliance VVW6024A page 34
2b. Description of the appliance VVW6026A page 35
3. Before first use page 37
Filling the salt reservoir page 37
Setting the salt consumption page 37
Filling with rinse aid and setting the consumption page 38
Dishwasher detergents page 39
4. Loading your dishwasher page 40
Adjusting the height of the upper basket page 40
The lower basket page 41
Cutlery drawer (only available on model VVW6026A) page 41
Different ways of loading the baskets page 42
5. Setting the dishwasher page 43
Switching the dishwasher on and off page 43
Ending or changing a program page 43
Program selection table page 44-45
6. Cleaning & maintenance page 46
Cleaning the filters page 46
Cleaning the spray arms page 46
7. Placing the dishwasher under a counter top page 47
8. Troubleshooting page 48
What to do if... page 49
Product fiche page 50
Guarantee & after sales service page 51
English
28 • English

• Please read these instructions before operating the appliance
and retain for future use.
• Check for any damage to the packaging or the appliance during
transportation. Never use a damaged appliance, but contact your
supplier.
• Dispose the packing materials according to local regulations.
• Keep the material out of reach of children. Danger of suffocation.
• This appliance should be installed and repaired by an authorised
service only.
• Place and connect the appliance according to the installation
regulations.
• Make sure that while placing the appliance is not plugged in.
• Check whether the indoor electrical fuse system is connected
according to the regulations.
• All electrical connections must match the values indicated on the
rating plate.
• If the connecting cable is damaged, it may only be replaced by the
service organisation of the manufacturer or equinvalently qualified
persons.
• Pay special attention and be sure that the appliance is not placed on
the electricity supply cable.
• Never use an extension cord or a multiple socket for making a
connection. The plug should be comfortably accessible after the
appliance has been installed.
• After installing the appliance to a suitable place, run it unloaded for the
first time.
• When determining a place to position the dishwasher, make sure you
choose a place where you can easily load and unload your dishes.
• Do not place the appliance in any location where there is the
probability for the room temperature to fall below 0°C.
• Position the appliance close to a water tap or drain and socket. Take
into consideration that the connections will not be altered when they
are made.
• Do not grip the appliance by its door or control panel in order to move
it.
safety and installation instructions
1
DELIVERY
INSTALLATION
POSITIONING THE APPLIANCE
English • 29

• Make sure that the water inlet and outlet hoses do not get stuck while
positioning the appliance.
• Adjust the appliances adjustable feet to ensure the appliance is
standing level and balanced. Proper positioning of the appliance
ensures problem-free opening and closing of the door.
• If the door of your appliance does not close properly, check if the
appliance stands level on the floor. If not, adjust the adjustable feet
and ensure its stable position.
Make sure that the indoor plumbing is suitable for installing a
dishwasher. Also, we recommend that you fit a filter at the beginning of
the water supply in your house to avoid any damage to your appliance
because of any contamination (sand, clay, rust, etc.)
that might occasionally carried in through the mains water supply.
• Always use the new water inlet hose supplied with your appliance. If
you are using the new water inlet hose, run water through it for a while
before making the connection.
• Connect the water inlet hose directly to to the water inlet tap. The
pressure supplied by the tap should be at a minimum of 0,03 Mpa
and at a maximum of 1 Mpa. If the water pressure is above 1 Mpa, a
pressure-relief valve should be fitted inbetween.
• After the connections are made, the tap should be turned on fully and
checked for water leakage.
• The appliance is supplied with an double-walled aquastop.
The system automatically cuts off the water supply if the
water inlet hose starts to leak and the space between the walls
is filled with water. Make sure not to cut into the aquastop or
that it gets twisted or stuck.
• The water drain hose can be connected either directly to a
drain pipe with a minimum diameter of 4 cm, or let it run into
the sink, making sure to avoid bending or crimping it. The free end of
the hose must be at a height between 40 and 100 cm
and must not be immersed in water.
• Close the water tap after each use.
Warning: When a drain hose longer than 4 m is used, the dishes might
remain dirty. In that case Inventum will not accept responsibility.
CONNECTING TO THE WATER TAP AND DRAINAGE
30 • English

• The plug of the appliance must be connected to an earthed socket.
Make sure that the voltage and the frequency values for the current
in the home correspond to those on the rating plate. Inventum is not
responsible for damage when using the appliance with a socket that is
not earthed.
• The electrical installation in the home must be provided with a fuse of
16 Amp. The dishwasher is designed for connection to 220 -240 V ~50
Hz. The appliance should not be plugged in during positioning. Always
use the supplied plug.
• The appliance’s electrical cable should only be replaced by an
authorised service or an authorised electrician. Failure to do so may
lead to accidents.
• For safety purposes, always make sure to disconnect the plug when a
wash program has finished. In order not to cause an electric shock, do
not unplug when your hands are wet.
• When disconnecting your appliance from the mains supply, always
pull from the plug. Never pull the cord itself.
• This appliance is intended to be used in household and similar
applications such as:
- in shops, offices or other working environments;
- farm houses;
- by client in hotels, motels and other residental type environments;
- bed & breakfast type environments.
• An electrical appliance is not a toy, and should therefore always be
placed outside the reach of children. Children are not always able to
understand potential risks. Teach children a responsible handling of
electrical appliances.
• This appliance shall not be used by children from 0 to 8 years. This
appliance can be used by children over the age of 8 and above if
they are continuously supervised. This can be used by people with
reduced physical, sensory or mental capabilities or lack of experience
or knowledge, if they have been given supervision or instruction
concering use of the appliance in a safe way and understand the
hazards involved. Keep the appliance and its cord out of reach of
children aged less than 8 years.
• Cleaning and maintenance shall not be made by children.
• Children must not play with the appliance.
• For your own safety, only use the accessories and spare parts from the
ELECTRICAL CONNECTION
IN DAILY USE
English • 31

manufacturer which are suitable for the appliance.
• This appliance must be earthed! Earthing reduces the risk of an
electric shock in the event of errors and faults. This appliance is fitted
with an earthed power lead and plug. Only insert the plug into an
earthed wall socket that has been fitted in compliance with the local
electrical regulations!
• Incorrect connection of the power lead can result in a lifethreatening
situation. In case of doubt, contact a qualified electrician or service
technician. Do not make any changes to the plug. If the plug does not
fit into the wall socket, contact a qualified electrician to change it.
• Do not place heavy objects on the opened door. Do not stand on the
door. The appliance may tip over, whoch can result in damage to the
appliance.
• Do not put any chemical dissolving agents such as solvents in the
appliance. There is risk of explosion.
• Do not clean unsuitable plastic dishes in the appliance, unless they
bear a mark indicating that they are dishwasher-safe. Where dishes
do not bear any such marking, always follow the manufacturer’s
instructions.
• Only use detergent, rinse aid and salt that is intended for use in a
dishwasher. Inventum will not be responsible for any damage that
might occur in your appliance otherwise.
• Keep the detergents out of reach of children.
• Keep detergents and rinse aids out of the reach of children. Keep
children out of reach of the dishwasher when open. There may still be
some cleaning agent present in the appliance. If swallowed, consult a
doctor immediately and take the packaging with you.
• Keep the door closed. You can trip over an open door.
• Do not bend the inlet and drainage hoses or power lead excessively
during installation. Take care to ensure they do not become stuck.
• Avoid contact with the skin and eyes. Keep children away from the
dishwasher when the door is open.
• Make sure that all loose components in the dishwasher have been
fitted correctly. Do not open the door during the cycle.
• This appliance is intended solely for washing dishes. Use the appliance
only in a frost-free room!
• Remove the door or deactivate the lock when disposing of the
appliance. Children are known to have gotten themselves locked in old
appliances. To forestall such a situation, break your appliance’s door
lock and tear off the electrical cables.
• Do not allow children to play with the appliance.
• Check whether the detergent reservoir is empty following the end of
the wash cycle.
32 • English

• Fill the salt and rinse aid reservoirs prior to first use and when the
indicators light up. Set the salt consumption before use.
• Disconnect the appliance from the power supply when cleaning or
performing repairs. Remove the plug from the socket or turn off the
switch in the fuse box.
• Long and/ or sharp items of cutlery, such as carving knives, should
be placed with the points facing down in the cutlery basket or placed
horizontally in the upper basket or cutlery drawer.
• Dispose of the packaging materials in a responsible manner and in
accordance with government regulations.
• This appliance must only be used for its intended purpose. If
the appliance is used for other purposes than intended, or is it
not handled in accordance with the instruction manual, the full
responsibility for any consequences will rest with the user. Any
damages to the product or other things are not covered by the
warranty.
• Do not put any items into your appliance which are not suitable for
dishwashing. Also, do not fill any basket above its capacity. Inventum
will not be responsible for any scratch or rust to form on the inner
frame of your appliance due to basket movements otherwise.
• Legislation requires that all electrical and electronic equipment
must be collected for reuse and recycling. Electrical and
electronic equipment marked with the symbol indicating
separate collection of such equipment must be returned to a
municipal waste collection point.
English • 33

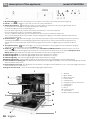
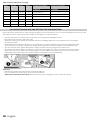
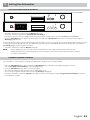
1. On/off button - when the on/off button is pressed the control lamp in the Start/Pause button lights up.
2. Handle - use the door handle to open and close the door of the dishwasher.
3. Delayed start button
with indicator lights - press this button to delay the start of the program by 3, 6, 9 or 12
hours. Each press of the button changes the delay time with 3 hours.
The indicator light at the selected time lights up.
Press the button again after you have selected the 12 hour delay to cancel the delay time.
Press the Start/Pause button to activate the delayed time.
To select a different delay time, press the Start/Pause button and select a different delay time.
As soon as the delayed time has passed the corresponding indicator light goes out and the dishwasher will start the
selected washing program.
4. Prewash button
with indicator light - press the button Prewash to improve the washing performance and select
a washing program. The selected washing program takes longer because of the Prewash and the temperature can
change. If you only want a prewash, make sure the program selector knob is on ● (Reset), press Prewash and press
Start.
5. Start/ Pause button with control light - once you press this button, the program you selected with the program
selector knob will start and the control lamp Wash lights up.
6. Child lock - in order to activate the child lock, press Start/Pause and Delayed start simultaneously for 4 seconds.
When activated the indicator light 3 hours flashed once. To deactivate the child lock, press the button Start/Pause and
Delayed start again simultaneously. When deactivated the 3 hours indicator light flashes twice.
7. Indicator light Wash - the indicator light will light up when the dishwasher is washing.
8. Indicator light Rinse - the indicator light will light up when the dishwasher is rinsing.
9. Indicator light Dry - the indicator light will light up when the dishwasher is drying.
10.Indicator light Ready - when the dishwasher has finished washing, rinsing and drying this indicator light lights up.
11. Control lamp for softening salt - the dishwasher checks if there is enough salt available. If not, the control lamp lights up and you
need to refill the salt reservoir.
12. Control lamp for rinse aid - the dishwasher checks if there is enough rinse aid available. If not, the control lamp lights up and you
need to refill the rinse aid reservoir.
13. Program selector knob - select the desired washing program with this knob.
1
2
3 4
6 13
7
12
5
8
9
10
11
3
2
4
5
6
7
8
9
1
11
12
10
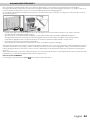
1. Worktop
2. Upper basket
3. Upper spray arm
4. Lower basket
5. Cutlery basket
6. Detergent and rinse aid reservoir
7. Control panel
8. Rating label
9. Filters
10. Lower spray arm
11. Salt reservoir
12. Upper basket track latch
description of the appliance model VVW6024A
2a
34 • English

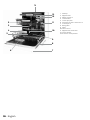
1. On/off button - when the on/off button is pressed the control lamp in the Start/Pause button lights up.
2. Display - shows the remaining time of the program and remaining time during the program is in operation.
In addition, you can adjust program delay time by pressing the + button on the indicator before program starts. If you
want to change the delay time, you can set the time by pressing the Start/Pause button and using the + or - buttons
on the indicator. Press Start/Pause button again in order to activate. As soon as the delayed time has passed the
dishwasher will start the selected washing program.
3. Indicator light Wash - the indicator light will light up when the dishwasher is washing.
4. Indicator light Rinse - the indicator light will light up when the dishwasher is rinsing.
5. Indicator light Dry - the indicator light will light up when the dishwasher is drying.
6. Indicator light Ready - when the dishwasher has finished washing, rinsing and drying this indicator light lights up.
7. Child lock
- in order to activate the child lock, press the buttons + and - simultaneously for 4 seconds.
(CL) flashes in the display indicating the child lock is activated. To deactivate the child lock, press the buttons + and -
again simultaneously for 4 seconds. (CL) flashes twice to indicate the child lock is deactivated.
8. Handle - use the door handle to open and close the door of the dishwasher.
9. Tablet detergent button
- press the tablet detergent button when you use a combined detergent that include
salt and rinse aid, such as 3-in-1 tablets.
10.Prewash button
with indicator light - press the button Prewash to improve the washing performance and
select a washing program. The selected washing program takes longer because of the Prewash and the temperature
can change. If you only want a prewash, make sure the program selector knob is on ● (Reset), press Prewash and
press Start.
11. Half load button
- Using this function you can choose three types of washing when the dishwasher is not full.
Just the lower basket, just the upper basket or both baskets.
If the dishwasher is not fully loaded and you want them washed, choose a program with half load. If you have dishes in
both baskets press the button till both lights are on.
If the dishes are only in the upper basket, press the button till just the top light is on. Make sure there are no dishes in the
lower basket.
If the dishes are only in the lower basket, press the button till just the bottom light is on. Make sure there are no dishes in
the upper basket or cutlery drawer.
12. Start/ Pause button
with control light - once you press this button, the program you selected with the program selector
knob will start and the control lamp Wash lights up.
13. Program selector knob - select the desired washing program with this knob.
14.Control lamp for softening salt - the dishwasher checks if there is enough salt available. If not, the control lamp lights up and you
need to refill the salt reservoir.
15. Control lamp for rinse aid - the dishwasher checks if there is enough rinse aid available. If not, the control lamp lights up and you
need to refill the rinse aid reservoir.
1
8
9 10
13
15
2
11 12
14
3 4 5 6
7
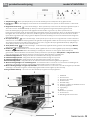
description of the appliance model VVW6026A
2b
English • 35

1. Worktop
2. Upper basket
3. Upper spray arm
4. Lower basket
5. Lower spray arm
6. Detergent and rinse aid reservoir
7. Control panel
8. Rating label
9. Filters
10. Salt reservoir
11. Upper basket track latch
12. Cutlery drawer
13. Nozzle for cutlery drawer
1
3
2
4
5
6
7
8
9
1
10
13
12
11
36 • English

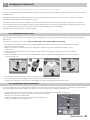
To find out the water hardness level in your area, contact your local water company. Adjust the salt consumption according to the
table on the next page.
Note! Hardness level is adjusted to level 3 as a factory setting.
• Move the program selector knob to the setting ● (Reset) while the dishwasher is not on (1).
• After setting the program selector knob on ● (Reset), press the Start/Pause button (2) and keep it pressed down.
• In the meanwhile switch on the dishwasher by pressing the On/Off button (4).
• Keep the Start/Pause button (2) pressed down until the indicator lights turn on and off (with model VVW6026A
SL appears brief in the display).
• After the indicator lights (3) lit up, release the Start/Pause button (2).
The control panel shows the latest entered water hardness setting.
• Set the level of water hardness by pressing the Start/Pause button (2) (with model VVW6026A press the + and -
button). Use the table of water hardness level settings on the next page.
• After adjusting the level of water hardness, press the On/Off button (4) to confirm and store the setting.
Prior to using the machine for the first time please check whether the electricity and supply water specifications match the values
indicated by the installation instructions for the appliance.
Remove all packaging materials inside the machine.
Fill the salt reservoir and fill up with water until it almost overflows. Set the water hardness setting.
Fill the rinse aid reservoir.
For a good washing result, the dishwasher needs soft, i.e. less calcareous water. Otherwise, white lime residues will remain on the
dishes and the interior of the dishwasher. This has a negative effect on your applinace’s washing, drying and shining performance. For
this purpose, dishwasher salt is used.
• Remove the lower basket and unscrew the cap of the salt reservoir (1 and 2).
• Fill the reservoir before first use with 1 litre of water (3). Place the provided
funnel into the opening and fill with salt till the overflow level (4).
It is normal for a little water to flow out of the opening when doing this.
• Screw the cap back on firmly.
ATTENTION!
• Remove any spilled salt and run a full program to prevent corrosion to the
bottom.
• Refill the salt reservoir when the indicator light of the salt reservoir lights up.
Model VVW6024A
Model VVW6026A
4
1
2
3
●
4
1
2
3
●
before first use
3
FILLING THE SALT RESERVOIR
SETTING THE SALT CONSUMPTION
English • 37

Rinse aid is used to prevent traces of water droplets being left on the clean dishes. It also increases the drying performance, since the
water drains off more easily. Only use rinse aid which is designed for use in dishwashers.
• The rinse aid reservoir is located on the inside of the door, alongside the detergent reservoir.
• Unscrew the cap of the rinse aid reservoir (1).
• Fill the rinse aid reservoir until the rinse aid level indicator turn dark (2). Replace the cap and make sure it lines up with
the indication marks.
• By checking the rinse aid level indicator you can see whether or not the dishwasher needs rinse aid. A dark indicator (b)
means there is rinse aid in the compartment. A light indicator (a) shows you need to refill the reservoir with rinse aid.
• The rinse aid level can be adjusted between the setting 1 and 6. The factory setting for rinse aid is level 3.
Unscrew the cap and use a large screwdriver to set the correct level (3). You need to increase the level of rinse aid when
water stains form on your dishes after a wash program. Decrease it when strips or blue stains form on the dishes. Keep
adjusting the level until the dishes are streak-free when you take them out of the dishwasher.
Attention!
• Refill the rinse aid reservoir when the rinse aid indicator lights up.
• Do not overfill the rinse aid reservoir. The reservoir will overflow.
• Spilled rinse aid must be cleaned up. Otherwise they may lead to leakage as a result of extreme foaming.
Table of water hardness level settings
Water
hardness
level
German
hardness
dH
French
hardness
dF
British
hardness
dE
Hardness level indicator Hardness level indicator
VVW6024A VVW6026A
1 0-5 0-9 0-6 Indicator Wash on L1
2 6-11 10-20 7-14 Indicator Rinse on L2
3 12-17 21-30 15-21 Indicator Dry on L3
4 18-22 31-40 22-28 Indicator Ready on L4
5 23-31 41-55 29-39 Indicator Wash and Ready on L5
6 32-50 56-90 40-63 Indicatior Rinse and Ready on L6
FILLING WITH RINSE AID AND SETTING THE CONSUMPTION
38 • English

Use a detergent specifically designed for use in domestic dishwashers. You can find it in a powder, gelcapsules and tablets.
Detergent must be placed into the reservoir before starting the dishwasher. Keep the detergents stored in a cool, dry place and out of
reach of children. If swallowed, consult a doctor inmmediately and take the packaging with you.
Do not fill more detergent than required in the reservoir; otherwise it may cause scratches on your glasses as well as lead to a poorly
dissolved detergent.
• Push the latch (1) to open the detergent reservoir. The detergent reservoir has level lines inside. It is possible to measure
the right amount of detergent using these lines.
• The reservoir can contain a maximum of 40 grams of detergent. Fill the large compartment (2b) with 25 grams of
detergent when the dishes are heavily soiled or with 15 grams if they are less soiled. Pour 5 grams in the small pre-wash
compartment (2a) when there are dried food wastes in the dishes and when the dishwasher is overly loaded.
• Close the lid, close the door and start the dishwasher.
• Depending on the water hardness and the amount of dirt on the dishes add extra detergent.
Detergent manufacturers also produce combined detergents called 2-in-1, 3-in-1, 5-in-1 etc. Generally, combined detergents produce
sufficient results under certain usage conditions only. Observe the instructions on packaging when using a combined product. Never
put the detergent tablet into the interior section or in the cutlery basket of the dishwasher. Always put the tablet into the detergent
reservoir.
When using short wash cycles it is possible the tablet does not dissolve fully. Therefore use detergent tablets only in combination with
long wash cycle, so that the detergent tablet has time to fully dissolve.
Extra for model VVW6026A
Do not forget to press the button 3-in-1
when using a combined product!
DISHWASHER DETERGENTS
English • 39

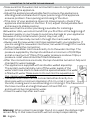
Properly placing your dishes into the dishwasher has a positive effect on the energy consumption and the washing and drying perfor-
mance.
The lower basket can be loaded with large items such as pots with long handles, pans, lids, plates, salad bowls and the cutlery basket.
The upper basket is for cups and saucers, mugs, small bowls and glasses. Wine glasses and long-stem glasses must be placed against
the edge of the basket, rack or glass supporter wire and not against other items. Long, small cooking
utensils, such as wooden spoons, should be placed lying down in the middle of the upper basket.
The cutlery basket is designed for cutlery. Sharp items of cutlery, such as knives and forks should be placed with their sharp points
facing down. Place the cutlery piece by piece in a compartent to ensure the spray arms can reach every part.
WARNING: place your dishes into your dishwasher in a way that they will not prevent the upper and lower spray arms from spinning.
The upper basket has height adjustable racks. They are designed to increase the capacity of the upper basket. You can place your
glasses and cups on the racks. You can adjust them in height with models VVW6024A and VVW6026A. Thanks to this feature, you can
place different sizes of glasses under the racks. In addition, you can place long forks, knives and spoons on these racks laterally, so that
they do not block the spinning of the spray arm.
Different ways of loading the baskets are shown on the next pages.
The upper basket is in the upper position. When it is in this position, you can place large items, such as pots and large plates, on the
lower basket. When the upper basket is in the lower position, you can place large plates in the upper basket.Adjust the height of the
upper basket only when it is empty.
Use the runners to adjust the height of the basket. Open the basket track latch by turning them sideways. Take the basket out of the
guiding rails. Place the other runners in the guiding rails and push the basket back in the rails. Close the track latches. You have now
placed the upper basket in the lower position.
1
2
VVW6024A
3 adjustable heights
VVW6026A
2 adjustable heights
loading your dishwasher
4
ADJUSTING THE HEIGHT OF THE UPPER BASKET VVW6024A
40 • English

The lower basket has folding racks. This makes it easier for you to place more large items if you don’t have many plates to clean. If
needed, each part can be folded separately , or all of them can be folded and larger spaces can be obtained. You can uses the folding
racks by raising them upwards (1), or by folding (2) them.
The cutlery drawer is designed for you to place forks, spoons and knives, long dippers and small items.
The cutlery drawer is composed of two pieces which can easily be taken out of the dishwasher.
In order to create more space in the upper basket you can remove the left or the right part of the cutlery drawer.
To adjust the height of the upper basket, you don’t need to remove the basket from the dishwasher. You can even adjust the height
when the basket is loaded. In order to raise the basket, hold it from both sides and pull it upwards. In order to lower the basket, lift the
basket slightly on both sides releasing the locks and lower the basket.
Make sure that both sides are in the same position and the basket is level.
high
position
low
position
ADJUSTING THE HEIGHT OF THE UPPER BASKET VVW6026A
THE LOWER BASKET
CUTLERY DRAWER only available on model VVW6026A
English • 41

Upper basket
Lower basket
Upper and lower basket faulty loading
WARNING: place your dishes into your dishwasher in a way that they will not prevent the upper and lower spray arms from spinning.
Make sure that no objects are sticking through the bottom of the cutlery basket.
DIFFERENT WAYS OF LOADING THE BASKETS
42 • English

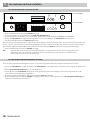
• Switch the dishwasher on by pressing the On/off button (4).
• Select the desired program with the program selector knob (1).
• If you prefer, you can choose an additional function, like prewash - applies only to models VVW6024A and VVW6026A.
• Press the Start/Pause button (2) to start the program. The light in the Start/Pause button turns off and the indicator light of
Washing (3) switches off.
You can follow the progress of the program using the indicator lights on the control panel. As long as the dishwasher is washing, rinsing
or drying, the indicator light (3) will be on. The dishwasher remains silent for about 40-50 minutes whilst drying. When the indicator
light Ready (3) lights up, the program is finished.
• Switch the dishwasher of with the On/off button (4).
NOTE! You can slightly open the door and wait a few minutes before unloading the dishwasher. The dishes and
cutlery will still be very hot and may break as a result of the heat. Moreover, the dishes dry better when allowed
to stand for a few minutes.
If you would like to end a program of change a program while a washing cycle is already running.
• Press the Start/Pause button (2). The light in the Start/Pause button will flash indicating the program is paused.
• Turn the program selector knob (1) to the setting ● (Reset).
• Press the Start/Pause button (2) to cancel the program.
The dishwasher will discharge the water in it for nearly 30 seconds.
• As soon as the program has ended, the indicator light Ready (3) will light up.
• Switch the dishwasher off with the On/off button (4) or select another program using the program selector knob (1) and switch
the dishwasher on again.
Model VVW6024A
Model VVW6026A
4
1
2
3
4
1
2
3
setting the dishwasher
5
SWITCHING THE DISHWASHER ON AND OFF
ENDING OR CHANGING A PROGRAM
English • 43

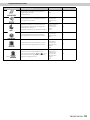
Program VVW6024A Program information Program process Time in minutes
PRE-WASH - Pre-wash and soaking of
leftover foods that you plan to wash later.
Pre-wash
Ready
15
RINSE - A short program for lightly soiled dishes
that do not need drying.
40°C wash
Cold rinse
Warm rinse
Ready
30
ECO - Daily program for normally soiled dishes.
(The program takes a little longer, but uses less
water and heats slower which decreases the
energy consumption)
30°C pre-wash
50°C wash
Warm rinse
Drying
Ready
165
FAST 50 MIN - A short program for dirty dishes
which need no drying, such as
casseroles.
65°C wash
Lukewarm rinse
Warm rinse
Ready
50
INTENSIVE - Wash program for heavily soiled
dishes, such as pots, pans and
casseroles with dried leftover food.
45°C wash
65°C wash
Cold rinse
Warm rinse
Drying
Ready
117
Extra
EXTRA INTENSIVE - Select the pre-wash pro-
gram and the intensive program
(
and ). For heavily soiled dishes which
have n’t been cleaned directly or which need a
hygienic cleaning.
50°C pre-wash
70°C wash
Cold rinse
Lukewarm rinse
Warm rinse
Drying
Ready
161
PROGRAM SELECTION TABLE
44 • English

Program VVW6026A Program information Program process Time in minutes
PRE-WASH - Pre-wash and soaking of
leftover foods that you plan to wash later.
Pre-wash
Ready
15
30-50°C
Automatically adjusts the washing time with
temperature and the amount of water by determining the
soil level of the dishes.
64-95
50-60°C 100-132
60-70°C 111-184
RINSE - A short program for lightly soiled dishes.
Pre-wash
40°C wash
Cold rinse
Warm rinse
Drying
Ready
30
ECO - Daily program for normally soiled dishes.
(The program takes a little longer, but uses less
water and heats slower which decreases the
energy consumption)
Pre-wash
50°C wash
Warm rinse
Drying
Ready
166
FAST 55 MIN - A short program for dirty dishes,
such as casseroles.
Pre-wash
65°C wash
Cold rinse
Warm rinse
Drying
Ready
55
HYGIENIC - Wash program for heavily soiled
dishes which have n’t been cleaned directly.
Pre-wash
60°C wash
Cold rinse
Warm rinse
Drying
Ready
124
Extra
EXTRA HYGIENIC - Select the pre-wash
program and the hygienic program. For heavily
soiled dishes which have n’t been cleaned
directly or which need a hygienic cleaning.
Pre-wash
50°C wash
70°C wash
Cold rinse
Lukewarm rinse
Warm rinse
Drying
Ready
169
English • 45

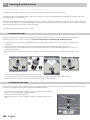
Cleaning the dishwasher regularly, prolongs the dishwasher’s service life.
Check before cleaning the dishwasher if it’s is turned off. Unplug the dishwasher and turn off the tap.
Clean the outside of the dishwasher with a damp cloth. To prevent odors from forming within the dishwasher, clean the seals of the
door regularly with a soft damp cloth.
To prevent the dishwasher from getting clogged, we advise to clean the dishwasher regularly with a special cleanser. Fill the detergent
reservoir with detergant, select a cycle with a high temperature and start the program. If this is insufficient, use a special cleanser for
dishwasher and follow the instructions on the packaging.
Clean the filters and the spray arms once a week.
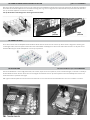
Check once a week if there is any residue on the filters. Remove the filters and clean them thoroughly under the water tap.
The filter system consist of three components: the micro filter (2a), the main filter (2b) and the sieve (3c).
1. To remove the filters, turn the main filter (2b) anti-clockwise and pull it upwards. The micro filter (2a) is attached to the
main filter.
2. Pull the main filter from the micro filter and clean both parts with warm water using a dishwashing brush.
3. Take the sieve out of the dishwasher and clean it with warm water and if needed a dishwashing brush. Place the sieve
back in the dishwasher.
4. Place the main filter in the micro filter with the markings allined. Re-fit the filters in the sieve and turn it clockwise to fixe
it.
• Do not use the dishwasher when there are no filters in place.
• Incorrect fitting of one the filters will result in the dishwasher no longer delivering maximum performance.
• Make sure the filters are clean. This ensures proper functioning of the dishwasher.
Check the nozzles of the upper and lower spray arms regularly for waste. Waste can block the nozzles and bearing in the spray arms.
Remove the clogging in the spray arms and clean them with warm water.
• Unscrew the nut of the upper spray arm to remove it. Remove the spray arm.
• Remove the lower spray arm by pulling it upwards.
• Clean the spray arm with warm water.
• Make sure that the nut is perfectly tightened when refitting the upper spray
arm.
cleaning & maintenance
6
CLEANING THE FILTERS
CLEANING THE SPRAY ARMS
46 • English

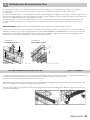
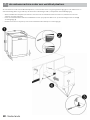
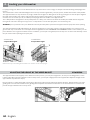
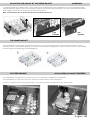
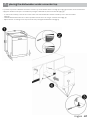
If you want to place the dishwasher under a counter top, check whether there is enough space (Fig. 1) and if the electrical and water
supply are suitable. If the space is suitable for placing the dishwasher, remove the wortktop (Fig. 2).
• To remove the worktop, remove the screws at the rear of the dishwasher. Push the worktop 1 cm to the rear and lift
it (Fig. 2).
• Push the dishwasher under the counter top. Make sure the hoses do not get crushed or bent (Fig. 4).
• Adjust the feet according to the slope of the floor by setting the dishwasher level (Fig. 3).
placing the dishwasher under a counter top
7
English • 47
Page is loading ...
Page is loading ...
Page is loading ...
Page is loading ...
Page is loading ...
Page is loading ...
Page is loading ...
Page is loading ...
Page is loading ...
-
 1
1
-
 2
2
-
 3
3
-
 4
4
-
 5
5
-
 6
6
-
 7
7
-
 8
8
-
 9
9
-
 10
10
-
 11
11
-
 12
12
-
 13
13
-
 14
14
-
 15
15
-
 16
16
-
 17
17
-
 18
18
-
 19
19
-
 20
20
-
 21
21
-
 22
22
-
 23
23
-
 24
24
-
 25
25
-
 26
26
-
 27
27
-
 28
28
-
 29
29
-
 30
30
-
 31
31
-
 32
32
-
 33
33
-
 34
34
-
 35
35
-
 36
36
-
 37
37
-
 38
38
-
 39
39
-
 40
40
-
 41
41
-
 42
42
-
 43
43
-
 44
44
-
 45
45
-
 46
46
-
 47
47
-
 48
48
-
 49
49
-
 50
50
-
 51
51
-
 52
52
-
 53
53
-
 54
54
-
 55
55
-
 56
56


Inventum VVW6026A User manual
- Category
- Dishwashers
- Type
- User manual
- This manual is also suitable for
Ask a question and I''ll find the answer in the document
Finding information in a document is now easier with AI
in other languages
- Nederlands: Inventum VVW6026A Handleiding
Related papers
-
Inventum VVW6022A User manual
-
Inventum IVW6014A User manual
-
Inventum IVW4508A Owner's manual
-
Inventum VVW6020A User manual
-
Inventum VVW6025A User manual
-
Inventum IVW6010A User manual
-
Inventum VVW5520 Owner's manual
-
Inventum KK470 User manual
-
Inventum VVW6023AS User manual
-
Inventum VVW4523AW Owner's manual