Page is loading ...

+
-
+
-
F
Notice d’utilisation et d’installation
Micro-ondes
Operating and installing instructions
Microwave Oven
D Gebrauchs-und Installationsanweisungen
Mikrowellenherde
P Manual de Instruções e de Instalação
do Microondas
E Instrucciones de uso e instalación
Microondas
Gebruiks- en installatiehandleiding
Magnetronoven


13
CONTENTS
Important safety instructions. Read careffully
and keep for future reference.
Installation . . . . . . . . . . . . . . . . . . . . . . . . . . . . . . . . . . . . . . . . . . . . . . . . . . .14
Warning . . . . . . . . . . . . . . . . . . . . . . . . . . . . . . . . . . . . . . . . . . . . . . . . . . . .15
General Description . . . . . . . . . . . . . . . . . . . . . . . . . . . . . . . . . . . . . . . . . . . .16
Control panel . . . . . . . . . . . . . . . . . . . . . . . . . . . . . . . . . . . . . . . . . . . . . . . .17
Setting the clock / Microwave power settings . . . . . . . . . . . . . . . . . . . . . . . .18
Setting A microwave Programme / Express programme . . . . . . . . . . . . . . . .19
Memory keys . . . . . . . . . . . . . . . . . . . . . . . . . . . . . . . . . . . . . . . . . . . . . . . . 20
Pointers . . . . . . . . . . . . . . . . . . . . . . . . . . . . . . . . . . . . . . . . . . . . . . . . . . . . .21
Child lock . . . . . . . . . . . . . . . . . . . . . . . . . . . . . . . . . . . . . . . . . . . . . . . . . . .21
Care & Cleaning . . . . . . . . . . . . . . . . . . . . . . . . . . . . . . . . . . . . . . . . . . . . . .22
GB

14
•
Make sure that your oven has not suffered any damage during transport (deformed
door or door seal, etc.). If you see any signs of damage, contact your dealer before use.
•
Check the power voltage. If there is a PERMANENT undervoltage (200-210 volts), consult your
electrical installer.
•
Make sure that nothing obstructs the ventilation louvers at the back of the appliance.
•
Make sure the electrical plug will be accessible after installation.
•
Do not use your appliance immediately (wait approx. 1-2 hours) after transfer from a cold
place to a warm place as condensation may cause a malfunction.
Location
INSTALLATION
•
The appliance should be installed at a distance of 85 cm above the floor.
•
Place the oven on a flat and horizontal surface, away from any source of heat or steam.
•
Make sure that air may circulate freely around the oven.
•
Check all the characteristics and building in conditions in the user’s manual supplied with
the appliance.
•
Your installation must be protected by a 10 Amp thermal fuse.
•
It is mandatory to use a power point with a ground terminal, connected in accordance with
current safety regulations.
•
In your electrical installation, provide a device that is accessible to the installer, capable of
separating the appliance from the mains power and whose contact opening is at least 3 mm
at all of the poles.
•
If the supply cord is damaged, it must be replaced by the manufacturer, its service agent or
similarly qualified persons in order to avoid a hazard.
Electrical connection
Before connection

15
• Your appliance is designed exclusively for the domestic purposes of defrosting, heating or
cooking foods. The manufacturer bears no responsibility in the case of improper usage.
• Only use ustensils that are suitable for use in microwave ovens.
• To avoid deterioration of your microwave oven, never operate it empty or without the
turntable.
• Never tamper with the lock mechanism of your microwave oven; you could cause damage
requiring repair by an authorised technician.
• When heating food in plastic or paper containers, keep an eye on the oven due to the
possibility of ignition.
• It is not advisable to use metal recipients, forks, spoons, knives, metal ties or staples for
deep-freeze bags.
• The contents of feeding bottles are baby food jars shall be stirred or shaken and the tem-
perature checked before consumption in order to avoid burns.
• Only allow children to use the oven without supervision when adequate instructions
have been given so that the child is able to use the oven in a safe way and understands
the hazards of improper use.
• Liquids and other foods must not be heated in sealed containers they are liable to explode.
• Eggs in their shell and whole hard-boiled eggs should not be heated in microwave ovens
since they may explode, even after microwave heating has ended.
• Microwave heating of beverages can result in delayed eruptive boiling, therefore care
must be taken when handling the container.
• For small amounts (one sausage, a single croissant, etc.), place a glass of water along-
side the food item.
• Time settings that are too long may dry out and burn the food. To avoid such incidents,
never use the same cooking times as those recommended for traditional ovens.
• If smoke is observed, switch off or unplug the appliance and keep the door closed in
order to stifle any flames.
• In order to evacuate moisture, your appliance is fitted with a delayed ventilation function.
Depending on the applied cooking mode (solo / grill / combination), the oven ventilation
will continue to operate afterthe cooking end.
WARNING
GB

+
-
+
-
16
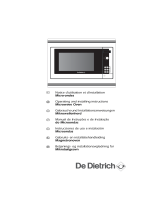
• THE TURNTABLE :
ensures equal cooking of food throughout with no need to intervene.
- It may be used as a cooking dish.
- Rotation is controlled by the drive shaft and the wheel support.
- The turntable rotates in both directions.
- If it does not turn, verify that all components are properly positioned.
•
TURNTABLE OFF :
stops the turntable from revolving in order to use platters which require the entire oven
space. When stopped, remember to stir the contents or turn the dish midway through
the programme.
• THE WHEEL SUPPORT :
Do not try to rotate the roller ring manually, as you could damage the drive system.
If it does not turn smoothly, make sure that there is nothing in the well beneath the
turntable.
GENERAL DESCRIPTION
TurntableWheel support
Identification
label

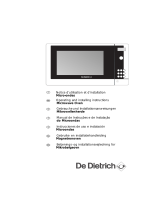
CONTROL PANEL
A Display window :
to simplify programming, the display indi-
cates : the time of day, the programme
length, and the functions programmed.
B The clock setting key :
to allow the clock setting.
C Microwave power selector knob :
to set the microwave power level.
D Time selector knob :
to set the clock, the programme length.
E MEMORY keys M1 / M2 / M3 :
for rapid access to 3 preprogrammed
operations.
F Marcha key :
to start all programmes.
G CLEAR/STOP key Stop :
to interrupt (press once) or cancel a pro-
gramme (press twice).
H STOP-TURNTABLE key :
to stop the turntable from revolving.
I Door open button :
to open the door or stop the oven.
GB
17
+
-
+
-
G
F
D
E
H
I
C
A
B

18
SETTING THE CLOCK
MICROWAVE POWER SETTINGS
To cook fish and poultry. To finish programmes
begun with the HIGH COOK power setting such
as beans, lentils or milk-based dishes.
POWER SETTING APPLICATION
DEFROST 150
VERY LOW
COOK 250
To top off cooking of delicate dishes or to
cook very slowly.
SIMMER 500
REHEAT 700
To reheat all fresh or frozen pre-cooked dishes
and frozen vegetables.
LOW COOK 350
To finish programmes begun with the HIGH
COOK power setting
which might otherwise over
cook on the outside, for instance veal or pork roast.
To defrost meat, fish, fruit, bread or delicate
dishes.
HIGH COOK 750
To cook fresh vegetables and soup
.
To heat
up all liquids.
MICROWAVE OUTPUT POWER : 750W
After the plugging in of the appliance or a power cut, the flashing
00:00invites you to set the clock.
To set the clock :
- Push the clock setting key .
- Set the clock with the time selector knob (ex. 12:00).
- Validate with a single push on the clock setting key
.
The clock is set.
0 0 : 0 0
1 2 : 0 0
0 0 : 0 0

19
Your microwave oven is now plugged in and the clock is set.
Open the door, set the dish inside, close the door. If the door is nor properly shut, the appliance
will not operate.
If the dish is too large to turn freely inside the oven, press the STOP TURNTABLE key before
or during the programme.
6 microwave power levels are available :
(150 - 250 - 350 - 500 - 700 - 750 W).
Example : Set a microwave programme at the HIGH COOK
power level (750 W).
①①
Turn the microwave power selector knob
to 750W
is displayed.
②②
Set the programme time with the time selector knob, ex. 5 minutes :
is displayed.
③③
Press Marcha.
The programme begins : the turntable revolves, the oven light comes on.
3 beeps announce the end of a programme. The beeps are repeated
every minute for 10 minutes until you open the door.
If there is an error in the programming, press the Stop key twice.
SETTING A MICROWAVE PROGRAMME
EXPRESS PROGRAMME
①①
Set the programme time with the selector knob, ex. three minutes :
is displayed.
②②
Press Marcha.
The HIGH COOK programme begins automatically : the turntable revolves,
the oven light comes on.
00 33 :: 00 00
77 55 00
WW
00 55 :: 00 00
GB
+
-
+
-
1
3
2

20
The Memory keys allow you to store 3 frequently used programmes which you can
then access simply by pressing M1 / M2 / M3. You may memorize any programme you
wish.
Example
: Use the Memory key to preprogramme heating up a plate of food.
Proceed as if setting the programme for immediate use :
①①
Turn the microwave power selector knob to HIGH COOK (750 W) :
is displayed.
②②
Set the programme time with the time selector knob, ex. 2 minutes :
is displayed.
③③
Instead of Marcha, press the MEMORY key M1; after several
seconds you will hear a tone confirming that the personalized
programme has been memorized.
is displayed.
You may memorize two more programmes by pressing Memory keys M2 / M3.
To call up a programme, press the corresponding Memory key; the preprogrammed
information is displayed.
Press Marcha, the memorized programme begins.
MEMORY KEYS M1 / M2 / M3
77 55 00
WW
00 22 :: 00 00
00 22 :: 00 00
+
-
+
-
1
3
2

21
Problem
∇ The microwave oven is noisy when
operating.
The turntable does not revolve correctly.
∇ The food is not heated up.
∇ The appliance produces sparks.
Suggestion
∆ Clean the wheels and the well area-
beneath the turntable.
∆ Make sure that you use only containers
which are adapted to microwave cooking.
∆ Wipe the water off with the help of a
cloth in order to avoid any corosion.
Troubleshooting guide
POINTERS
WHILE THE OVEN IS OPERATING :
• You may stop or start the turntable revolving during a programme by pressing the
TURNTABLE STOP key .
• To change a programme, press the
Stop key twice and programme again.
• If you open the door before the end of the programme, shut the door and press the
Marcha key to continue the programme.
• When using the defrost function
(150W)
turn the food midway through the pro-
gramme to obtain the best results. Close the door and press the
Marcha key to conti-
nue the second half of the programme.
• If you remove a dish before the end of the programme, press the
Stop key twice
to erase the programme.
GB
CHILD LOCK
You may programme “Child lock” to prevent unsupervised operation of your oven.
To set :
Press the
Stop button for 5 seconds with the open door,“
LL OO CC
” will appear.
To release :
Proceed as above / press the
Stop button for 5 seconds with the door open..

22
• WARNING : It is recomended to clear the oven regularly and to take
any food deposit inside and outside the appliance.Use a soapy and
wet cloth. If the appliance is not kept clean, its surface could deteriorat
and adversely affect its life and possibly result in a hazardous situation.
If the door or door seals are damaged, the oven must not be operated
until it has been repaired by a competent person.
• A steam cleaner is not to be used.
• Do not use abrasives, alcohol or solvents as they are liable to
damage the oven.
• In the event of bad odors or caked-on dirt, boil water containing lemon juice or vinegar in a cup
for 2 minutes and clean the walls with a little dishwashing liquid.
• The turntable can be removed for cleaning. For easy removal,
press on one edge to tilt. If you remove the drive, do not
allow water to enter the motor shaft hole.
Be sure to put the turntable and wheel support back in
their proper place.
CARE & CLEANING
SOAP
+
WATER
•
If the equipment has sustained any damage :
- Check that the door is not deformed.
•
If the oven does not operate, before calling the repairman :
- Check the electrical supply.
- Check that the door is properly closed.
- Check your programming.
CAUTION : never attempt to repair your oven yourself.
WARNING
: it is dangerous for anyone other than qualified personnel to make any repairs
requiring removal of the cover providing protection from exposure to microwave energy.
Only a specially trained technician is qualified
to repair your microwave oven.

37
PAINEL DE COMANDO
A O visor :
Facilita-lhe a programação exibindo:
a função microondas, o tempo ou a hora.
B A tecla para acertar o tempo :
Permite acertar o relógio.
C O selector de microondas :
Permite seleccionar a potência microondas desejada.
D O selector de tempo :
Permite programar o tempo ou o relógio.
E As teclas Memória M1 / M2 / M3:
permite aceder rapidamente as três
operações pré-programadas.
F A tecla Marcha :
Permite iniciar qualquer programa.
G A tecla Anulação Stop :
Permite interromper (Stop) ou apagar (Anulação)
um programa em curso. Uma pressão para Stop,
duas pressões para Anulação.
H A tecla paragem prato :
Permite a paragem do prato giratório.
I
A tecla abertura de porta:
Permite abrir o aparelho ou parar um
programa em curso.
P
+
-
+
-
G
F
D
E
H
I
C
A
B

47
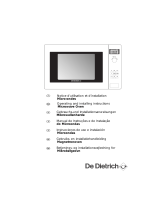
PANEL DE MANDOS
A La pantalla:
le facilita la programación presentando: la
función microondas, el tiempo o la hora.
B La tecla de puesta en hora :
permite poner el reloj en hora.
C El selector microondas :
permite elegir la potencia de microondas
que se desea.
D El selector tiempo :
permite programar el tiempo o el reloj.
E Las teclas Memoria M1 / M2 / M3:
permite acceder rápidamente as tres opera-
ciones ya programadas.
F La tecla Marcha :
permite iniciar cualquier programa.
G La tecla Anulación Stop :
permite interrumpir (Stop) o borrar
(Anulación) un programa en curso. Basta
con pulsar una vez para el Stop y dos veces
para la Anulación.
H La tecla Parada del plato :
permite parar el plato giratorio.
I La tecla de apertura de puerta:
permite abrir el aparato o parar un progra-
ma en curso.
+
-
+
-
G
F
D
E
H
I
C
A
B
E

57
BEDIENINGSPANEEL
A Display :
voor een vlotte programmatie verschijnen op
de display volgende gegevens :
de functie magnetron, de kookduur en het
uur.
B Uurtoets :
om het juiste uur in te stellen.
C Magnetronknop :
om het gewenste magnetronvermogen te
kiezen.
D Tijdknop :
om het huidige uur en de kookduur in te
stellen.
E Geheugentoetsen M1 / M2 / M3:
om drie voorgeprogrammeerde functies te
activeren.
F Marcha-toets :
om een programma te starten.
G Annulatietoets Stop :
om een programma te stoppen of te wissen. Druk
éénmaal op deze toets om het programma te
stoppen, tweemaal om het programma te wissen.
H Toets stoppen draaiplateau :
om het draaiplateau tijdens een berei-
ding niet te laten draaien.
I
Toets "ovendeur openen" :
om de magnetrondeur te openen of een
programma te stoppen.
NL
+
-
+
-
G
F
D
E
H
I
C
A
B

58
INSTELLEN VAN HET UUR
OVERZICHT VAN DE MICROGOLFSTANDEN
Voor alle vis en gevogelte.
Om bereidingen te beëindigen die u in de stand
STERK KOKEN bent begonnen, zoals voor bonen,
linzen en melkprodukten.
VERMOGEN - WATT GEBRUIK
ZEER ZACHT
KOKEN 250
Om delicate bereidingen te beëindigen of om
gerechten zeer langzaam te koken.
SUDDERKOKEN 500
OPWARMEN 700
Opwarmen van vers bereide of kant en klare
diepvriesgerechten. Om bereide schotels en
diepvriesgroenten op te warmen.
ZACHT
KOKEN 350
Om bereidingen te beëindigen die u in de stand
STERK KOKEN bent begonnen en die riskeren aan
de oppervlakte aan te bakken, zoals b.v. bij
kalfs- en varkensgebraad.
Ontdooien van vlees, vis, fruit, brood en weke
voedingsmiddelen.
STERK
KOKEN 750
Voor het koken van groenten en soepen.
Opwarmen van alle soorten vloeistoffen.
MAGNETRONVERMOGEN : 750W
ONTDOOIEN 150
Na de aansluiting van uw magnetronoven en ook na een
stroomonderbreking zal de uurindicator
00:00 op de display
verschijnen. U kan nu het uur instellen.
Hoe stel ik het uur in?
- Druk op de uurtoets .
- Stel het uur met de tijdknop in (bv. 12:00).
- Druk op de uurtoets om te bevestigen.
Uw klok is nu ingesteld.
0 0 : 0 0
1 2 : 0 0
0 0 : 0 0


99630251 - 02/04
/