Losi LOS05001 Owner's manual
- Category
- Remote controlled toys
- Type
- Owner's manual
This manual is also suitable for
Page is loading ...

2
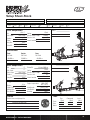
DESERT BUGGY XL • INSTRUCTION MANUAL
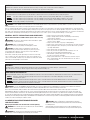
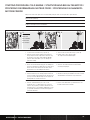
GENERAL SAFETY PRECAUTIONS AND GUIDELINES
Age Recommendation: Not for Children under 14 years. This is not a toy.
WARNING: This vehicle is only intended for advanced RC drivers capable
of operating large-scale model vehicles.
WARNING: Failure to follow all instructions can lead to
damage to your vehicle, property damage and bodily injury or death.
CAUTION: If you make changes or adjustments not shown in the
instruction manual, your vehicle may be damaged. To prevent any serious
personal injury and/or damage to property, please be responsible when
operating all remote controlled models.
This model is controlled by a radio signal subject to interference from many
sources outside your control. This interference may cause momentary loss of
control, so it is advisable to always keep some distance in all directions around
your model as a safety margin to avoid collisions.
• Always ensure all screws and nuts are tightened.
• Always carefully follow the directions and warnings for this and any
optional support equipment.
• Always keep all chemicals, small parts and anything electrical
out of the reach of children.
• Always ensure the failsafe is properly set during binding.
• Always operate your model in an open area away from cars, traffi c and people.
• When operating this vehicle, always keep it at least 20 feet from spectators,
especially small children.
• Never run this vehicle in or through water
• Never run your model in a public street where damage can occur.
• Never run your model with low transmitter batteries.
• When fi nished operating, always power off the engine fi rst,
then the receiver, then the transmitter.
• Always perform maintenance on the vehicle after each and every use.
Due to engine vibration, all screws and nuts will need to be checked
to ensure they are tight.
WARNING: Read the ENTIRE instruction manual to become familiar with the features of the product before operating. Failure to operate the product correctly
can result in damage to the product, personal property and cause serious injury.
This is a sophisticated hobby product. It must be operated with caution and common sense and requires some basic mechanical ability. Failure to operate this Product
in a safe and responsible manner could result in injury or damage to the product or other property. Do not use with incompatible components or alter this product in any
way outside of the instructions provided by Horizon Hobby, Inc. This manual contains instructions for safety, operation and maintenance. It is essential to read and follow
all the instructions and warnings in the manual, prior to assembly, setup or use, in order to operate correctly and avoid damage or serious injury.
NOTICE
All instructions, warranties and other collateral documents are subject to change at the sole discretion of Horizon Hobby, Inc.
For up-to-date product literature, visit horizonhobby.com and click on the support tab for this product.
MEANING OF SPECIAL LANGUAGE
The following terms are used throughout the product literature to indicate various levels of potential harm when operating this product:
NOTICE: Procedures, which if not properly followed, create a possibility of physical property damage AND a little or no possibility of injury.
CAUTION: Procedures, which if not properly followed, create the probability of physical property damage AND a possibility of serious injury.
WARNING: Procedures, which if not properly followed, create the probability of property damage, collateral damage, and serious injury OR
create a high probability of superfi cial injury.
WARNUNG: Lesen Sie die GESAMTE Bedienungsanleitung, um sich vor dem Betrieb mit den Produktfunktionen vertraut zu machen. Wird das Produkt nicht
korrekt betrieben, kann dies zu Schäden am Produkt oder persönlichem Eigentum führen oder schwere Verletzungen verursachen.
Dies ist ein hochentwickeltes Hobby-Produkt. Es muss mit Vorsicht und gesundem Menschenverstand betrieben werden und benötigt gewisse mechanische
Grundfähigkeiten. Wird dieses Produkt nicht auf eine sichere und verantwortungsvolle Weise betrieben, kann dies zu Verletzungen oder Schäden am Produkt oder
anderen Sachwerten führen. Verwenden Sie das Produkt nicht mit inkompatiblen Komponenten oder verändern es in jedweder Art ausserhalb der von Horizon Hobby,
Inc. vorgegebenen Anweisungen. Diese Bedienungsanleitung enthält Anweisungen für Sicherheit, Betrieb und Wartung. Es ist unbedingt notwendig, vor Zusammenbau,
Einrichtung oder Verwendung alle Anweisungen und Warnhinweise im Handbuch zu lesen und zu befolgen, damit es bestimmungsgemäß betrieben werden kann und
Schäden oder schwere Verletzungen vermieden werden.
HINWEIS
Alle Anweisungen, Garantien und dazugehörigen Dokumente können ohne Ankündigung von Horizon Hobby Inc. geändert werden.
Eine aktuelle Version ersehen Sie bitte im Support Feld unter: http://www.horizonhobby.com.
ERKLÄRUNG DER BEGRIFFE
Die folgenden Begriffe werden in der gesamten Produktliteratur verwendet, um auf unterschiedlich hohe Gefahrenrisiken beim Betrieb dieses Produkts hinzuweisen:
HINWEIS: Wenn diese Verfahren nicht korrekt befolgt werden, können sich möglicherweise Sachschäden UND geringe oder keine Gefahr
von Verletzungen ergeben.
ACHTUNG: Wenn diese Verfahren nicht korrekt befolgt werden, ergeben sich wahrscheinlich Sachschäden UND die Gefahr von schweren Verletzungen.
WARNUNG: Wenn diese Verfahren nicht korrekt befolgt werden, ergeben sich wahrscheinlich Sachschäden, Kollateralschäden und schwere Verletzungen ODER
mit hoher Wahrscheinlichkeit oberflächliche Verletzungen.
ALLGEMEINE SICHERHEITSVORKEHRUNGEN
UND RICHTLINIEN
Nicht geeignet für Kinder unter 14 Jahren. Dies ist kein Spielzeug.
WARNUNG: Dieses Modell eignet sich nur für Piloten, die bereits Erfahrung
mit dem Umgang von Großmodellen besitzen.
WARNUNG: Das nicht befolgen der Anweisungen kann zu Beschädigung
des Fahrzeuges, Sachbeschädigung, Körperverletzung oder Tod führen.
ACHTUNG: Sollten Sie Änderungen oder Einstellungen vornehmen,
die nicht in der Bedienungsanleitung dargestellt werden, könnte Ihr Fahrzeug
beschädigt werden.
Zur Vermeidung von Körperverletzungen oder Sachbeschädigung gehen Sie
bitte verantwortungsvoll bei dem Betrieb von ferngesteuerten Fahrzeugen um.
Page is loading ...
Page is loading ...
Page is loading ...

TABLE OF CONTENTS
A // VEHICLE PREPARATION 10
Removing the Body 10
Battery Charging Warnings and Precautions 10
Charging the Receiver Battery 12
Spektrum DX2E Radio System 13
Transmitter Setup 13
Changing the Travel Adjust Settings 15
Installing the Transmitter Batteries 16
Binding 17
Adjusting Steering and Throttle Trims 19
Steering Trim 19
Throttle Trim 20
Turning the System Off 21
B // FUEL PREPARATION 22
Basic Fuel Warnings and Guidelines 22
Fuel Requirements 23
Mixing the Fuel 23
Fuel Mixing Precautions and Guidelines 23
Fuel Storage Precautions and Guidelines 25
C // VEHICLE STARTING AND RUNNING 26
Engine Stop Switch 26
Fueling the Vehicle 27
Turning the System On 27
Priming the Engine 28
Starting Procedure: Cold Engine 29
Starting Procedure: Hot Engine 30
Breaking in the Engine 30
Stopping the Engine 31
Turning the System Off 31
D // ENGINE TUNING 32
Introduction to Engine Tuning 32
Factory Carburetor Settings 33
Adjusting the High-Speed Needle 33
Adjusting the Low-Speed Needle 34
Idle Adjustment 34
E // VEHICLE TUNING 35
Camber 35
Droop 36
Shock Oil 36
Shock Springs 37
Front Toe 38
Sway Bars 38
Differentials 39
Shock Mounting Positions 39
Gearing 40
Brake Bias 40
Ride Height 40
Setup Sheets 41
F // VEHICLE MAINTENANCE 43
Frequent Maintenance 43
Air Filter 44
Fuel Tank Cap 45
Semi-Frequent Maintenance 46
Pull Start 46
Clutch 49
Infrequent Maintenance 51
Shocks 52
Differentials 55
Engine 59
// TROUBLESHOOTING GUIDE 60
Spark Plug Test 64
Flooded Engine 64
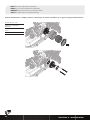
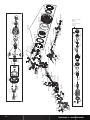
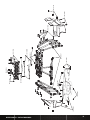
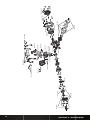
Parts Lists 67
Optional Parts 70
// Exploded Views 71
// Limited Warranty 77
Warranty and Service Contact Information 78
Parts Contact Information 78
Compliance Information for the European Union 78
Declaration of Conformity 78
Instructions for Disposal of WEEE 78
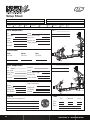
6
DESERT BUGGY XL • INSTRUCTION MANUAL
Page is loading ...
Page is loading ...
Page is loading ...

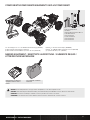
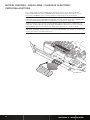
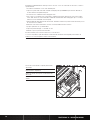
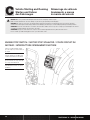
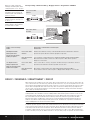
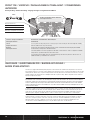
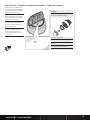
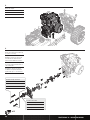
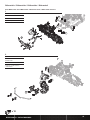
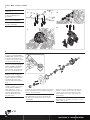
Remove the 12 body clips from the
vehicle as shown. Reinstall in reverse
order.
Nehmen Sie die 12 Body Clips vom
Fahrzeug wie abgebildet ab. Setzen
Sie diese bei dem Zusammenbau in
umgekehrter Reihenfolge wieder auf.
Retirez les 12 clips de carrosserie
indiqués sur l'illustration. Réinstallez en
ordre inverse.
Togliere dal veicolo le 12 clips della
carrozzeria, come illustrato. Rimontare
in ordine inverso.
REMOVING THE BODY // ABNEHMEN DER KAROSSERIE // DÉPOSE DE LA CAR-
ROSSERIE // RIMOZIONE DELLA CARROZZERIA
A
Vehicle Preparation
Fahrzeugvorbereitung
Préparation du véhicule
Preparazione del veicolo
• Never leave charging batteries unattended.
• Never charge batteries in extremely hot or cold places
(recommended between 50–80°F (10–26°C)) or place in
direct sunlight.
• Never allow children under 14 years of age to charge
battery packs.
• Never short circuit or modify batteries.
• Never attempt to charge dead or damaged batteries.
• Never charge a battery if the cable has been pinched or
shorted.
• Never expose the battery contacts to moisture at any time.
• Always inspect the battery before charging.
• Always charge batteries with compatible chargers in the
correct program mode.
• Always disconnect the battery and charger after charging
and let them cool between charges.
• Always constantly monitor the temperature of the battery
pack while charging.
• Always end the charging process if the charger or battery
becomes hot to the touch or starts to change form during
the charge process.
• Always dispose of batteries properly.
CHARGING WARNINGS // SICHERHEITSHINWEISE UND WARNUNGEN ZUM LADEN //
AVERTISSEMENTS ET PRÉCAUTIONS RELATIFS À LA CHARGE // AVVERTENZE PER
LA CARICA
WARNING: Read all instructions before use. Improper use of batteries can result in fi re causing serious injury and damage to property.
10
DESERT BUGGY XL • INSTRUCTION MANUAL
Page is loading ...

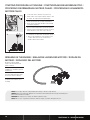
BATTERY CHARGING // AKKUS LADEN // CHARGE DE LA BATTERIE //
CARICA DELLA BATTERIA
Choose a charger designed to charge 5C Ni-MH batteries with universal connectors. We recommend the Dynamite
®
Prophet™ Ni-MH 35W AC Battery Charger (DYNC2000) with the Dynamite Charger Adaptor: EC3™ Battery to Receiver
Female Connector (DYNC0078). Refer to your charger manual for charging instructions and safety information.
Wählen Sie ein Ladegerät das Ni-Mh Zellen mit Universalanschluss mit 5C laden kann. Wir empfehlen hier das Dynamite®
Prophet Ni-MH 35W AC Ladegerät (DYNC2000) mit dem Dynamite Ladeadapter EC3 Akku auf EC3 Buchse (DYNC0078) Bitte
lesen Sie die Bedienungsanleitung mit Sicherheits- und Warnhinweisen des Ladegerätes sorgfältig durch.
Sélectionnez un chargeur conçu pour charger les batteries Ni-MH à 5 éléments équipées de prises standards. Nous vous
recommandons le chargeur Dynamite Prophet Ni-MH 35W AC (DYNC2000) avec l'adaptateur de prise EC3 vers prise BEC
femelle (DYNC0078). Référez-vous au manuel de votre chargeur pour les instructions et les consignes de sécurité.
Scegliere un caricatore adatto per caricare batterie NiMH 5C con connettore universale. Noi consigliamo il Dynamite Prophet
NiMH 35W AC (DYNC2000) e l'adattatore Dynamite con il connettore EC3 (DYNCO078). Si faccia riferimento al manuale del
caricatore per le istruzioni e le informazioni sulla sicurezza.
12
DESERT BUGGY XL • INSTRUCTION MANUAL

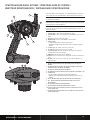
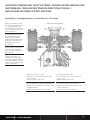
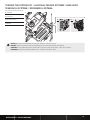
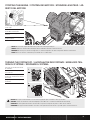
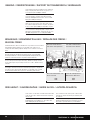
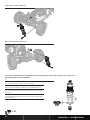
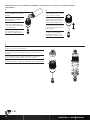
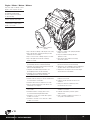
1. Steering Wheel controls direction (left/right) of the model
2. Throttle Trigger controls speed and direction (forward/brake/reverse) of the
model
3. Antenna transmits the signal to the model
4. ON/OFF Switch turns the power ON/OFF for the transmitter
5. Indicator Lights
• Solid green light indicates adequate battery power
• Flashing green light indicates the battery voltage is critically low. Replace
batteries.
6. ST. Trim adjusts the “hands off” direction of the model
7. TH. Trim adjusts the motor speed to stop at neutral
8. Steering Dual Rate adjusts the amount the front wheels move when the
steering wheel is turned left and right
9. BIND Button puts the transmitter into Bind Mode
10. ST. REV reverses the function of the steering when the wheel is turned left or
right
11. TH. REV reverses the function of the speed control when pulled back or
pushed forward
1. Mit dem Lenkrad kontrollieren Sie die Richtung (Links / Rechts) des
Modells.
2. Mit dem Gashebel kontrollieren Sie die Geschwindigkeit und Richtung
(Vorwärts/ Bremse / Rückwärts) des Modells.
3. Die Antenne überträgt das Signal zum Modell.
4. Der ON / OFF Schalter schaltet die Fernsteuerung ON = Ein und OFF = Aus
5. Indikator LED.
• Leuchtende Grüne LED zeigt ausreichende Batterieleistung.
• Blinkende grüne LED zeigt kritische Batteriespannung, Ersetzen Sie die
Batterien.
6. Der ST Trim Drehknopf regelt den Geradauslauf ohne Lenkeingabe.
7. Der TH Trim Drehknopf stellt die Motortrimmung auf Stop in der
Neutralstellung.
8. Die Einstellung Steering (Lenkung) Dual Rate.
9. Der Binde Button aktiviert die Bindevorgang am Sender.
10. ST Rev reversiert die Lenkfunktion wenn das Lenkrad nach Links oder
rechts gedreht wird.
11. Th REV reverisert die Gasfunktion wenn der Hebel nach vorne oder nach
hinten gedrückt wird.
1
2
3
4
5
6
7
8
9
10 11
13
DESERT BUGGY XL • INSTRUCTION MANUAL
SPEKTRUM DX2E RADIO SYSTEM // SPEKTRUM DX2E RC SYSTEM //
EMETTEUR SPEKTRUM DX2E // SISTEMA RADIO SPEKTRUM DX2E
For more information on the transmitter, go to www.horizonhobby.com and click
on the support tab for the Spektrum DX2E to download the instruction manual.
Für mehr Informationen über den Sender, besuchen Sie bitte www.horizonhobby.
com und klicken auf Support.
Pour des informations complémentaires concernant l’émetteur, visitez www.
horizonhobby.com et cliquez sur l’onglet support de la page de la Spektrum DX2E
pour télécharger son manuel d’utilisation.
Per maggiori informazioni sul trasmettitore, visitare il sito www.horizonhobby.com
facendo clik sul tab Support del radiocomando Spektrum DX2E per scaricare il
manuale di istruzioni.
Page is loading ...

Changing the Travel Adjust Settings // Ändern der Servowegeinstellungen //
Modifi cation des courses // Cambiare le regolazioni delle corse
1. Tenere il grilletto nella posizione di freno massimo mentre si accende il trasmettitore. Il LED lampeggia velocemente,
indicando che la modalità di programmazione è attiva.
2. Fine corsa motore: tenere il grilletto nella posizione di motore al massimo. Girare il TH TRIM per regolare il fi ne corsa al
massimo.
3. Fine corsa freno: tenere il grilletto nella posizione di freno al massimo. Girare il TH TRIM per regolare il fi ne corsa del
freno. Riportare il grilletto nella posizione centrale.
4. Fine corsa dello sterzo a sinistra: tenere il volantino tutto a sinistra. Girare il ST TRIM per regolare il fi ne corsa di sinistra.
5. Fine corsa dello sterzo a destra: tenere il volantino tutto a destra. Girare il ST TRIM per regolare il fi ne corsa di destra.
6. Spegnere il trasmettitore per salvare le regolazioni fatte. La corsa minima è al 75% e quella massima è al 150%. Le
corse di default sono al 125% per lo sterzo e al 100% per il motore.
Questa funzione permette di regolare il fi ne corsa con precisione in ogni direzione sia per il canale dello sterzo che per quello del motore.
1. Maintenez la gâchette en position frein en mettant l’émetteur sous tension. La DEL se met à clignoter rapidement indiquant
que le mode de programmation est activé.
2. Fin de course de l’accélérateur: Maintenez la gâchette en position plein gaz. Agissez sur le potentiomètre TH TRIM pour
régler la fi n de course de l’accélérateur.
3. Fin de course du frein: Maintenez la gâchette en position frein. Agissez sur le potentiomètre TH TRIM pour régler la fi n de
course du frein. Relâchez la gâchette pour la remettre au neutre.
4. Fin de course de la direction vers la gauche: Maintenez le volant totalement vers la gauche. Agissez sur le potentiomètre ST
TRIM pour régler la fi n de course de la direction vers la gauche.
5. Fin de course de la direction vers la droite: Maintenez le volant totalement vers la droite. Agissez sur le potentiomètre ST
TRIM pour régler la fi n de course de la direction vers la droite. Relâchez la gâchette pour la remettre au neutre.
6. Mettez l’émetteur hors tension pour enregistrer le réglage des fi ns de courses. La course minimale est de 75% et la course
maximale est de 150%. le réglage par défaut est une course de 125% à la direction et une course de 100% aux gaz.
La fonction de réglage des courses permet un réglage précis des fi ns de courses dans chaque direction de la voie des gaz et de direction.
1. Halten Sie den Gashebel auf Vollbremsfunktion und schalten den Sender ein. Die LED auf dem Sender blinkt schnell und
zeigt damit an, dass der Programmiermode aktiv ist.
2. Vollgasendpunkt: Halten Sie den Gashebel in der Vollgasposition. Drehen Sie den Gastrimmknopf TH TRIM und den
Vollgaspunkt einzustellen.
3. Bremspunkt: Halten Sie den Gashebel in der Vollbremsposition. Drehen Sie den Gastrimmknopf um den Vollbremspunkt
einzustellen. Bringen Sie den Gashebel dann zurück in die Mittelpostion.
4. Endpunkt Lenkung Links: Halten Sie das Lenkrad voll nach links eingeschlagen. Drehen Sie den ST TRIM Knopf um den
Lenkausschlag einzustellen.
5. Endpunkt Lenkung Rechts: Halten Sie das Lenkrad voll nach links eingeschlagen. Drehen Sie den ST TRIM Knopf um den
Lenkausschlag einzustellen.
6. Schalten Sie den Sender aus um die Servowegeinstellungen zu speichern. Der Mindestweg ist 75% und der
Maximumweg ist 150%. Der Standardweg bei der Lenkung beträg 125% und 100% bei der Gasfunktion.
Die Servowegfunktion (Travel) unterstützt die präzise Endpunkteinstellung in beide Richtungen bei dem Gas- oder Steuerkanal.
1. Hold the trigger in the full brake position while powering on the transmitter. The LED fl ashes rapidly, indicating the
programming mode is active.
2. Throttle End Point: Hold the trigger in the full throttle position. Turn the TH TRIM knob to adjust the full throttle end point.
3. Brake End Point: Hold the trigger in the full brake position. Turn the TH TRIM knob to adjust the full brake end point.
Return the trigger to the center position.
4. Left Steering End Point: Hold the steering wheel in the full left position. Turn the ST TRIM knob to adjust the left end point.
5. Right Steering End Point: Hold the steering wheel in the full right position. Turn the ST TRIM knob to adjust the right end
point. Return the steering wheel to the center position.
6. Power off the transmitter to save the travel adjust settings. The minimum travel is 75% and the maximum travel is 150%.
The default travel settings are 125% steering and 100% throttle.
The travel function supports precise endpoint adjustments in each direction for the steering and throttle channels.
15
DESERT BUGGY XL • INSTRUCTION MANUAL

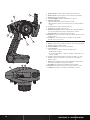
Installing the Transmitter Batteries
1. Push in the battery cover a small amount to release the retaining tab,
then remove the cover.
2. Install 4 AA batteries, taking care to align the battery polarity to the diagram
in the transmitter’s battery case.
3. Carefully reinstall the battery cover by aligning the tabs with the slots on the
transmitter.
CAUTION: Do not remove the transmitter batteries while the model is
powered on or while operating, as a loss of model control, damage or
injury can result.
Einlegen der Batterien
1. Drücken Sie die Batteriefachabdeckung etwas ein, um die Sperre zu lösen, und
nehmen Sie sie dann ab.
2. Legen Sie 4 AA-Batterien oder Akkus ein und achten Sie dabei auf die richtige
Polarität, die im Diagramm im Batteriefach des Senders angegeben ist.
3. Schließen Sie die Batteriefachabdeckung vorsichtig wieder, indem Sie die
Laschen in die Schlitze im Sender führen.
ACHTUNG: Nehmen Sie die Senderbatterien nicht heraus, wenn das
Modell eingeschaltet ist oder fährt, da Sie sonst die Kontrolle über das
Modell verlieren und möglicherweise Schäden oder Verletzungen verursachen.
Installation des piles de l’émetteur
1. Appuyez légèrement sur le cache des piles pour dégager la languette de
retenue, puis retirez-le.
2. Installez 4 piles AA, en prenant bien soin d’aligner les polarités conformément
au schéma présent dans le compartiment de l’émetteur.
3. Remettez le cache des piles en place en alignant avec soin la languette avec la
fente sur l’émetteur.
ATTENTION: Ne retirez JAMAIS les piles de l’émetteur quand le véhicule
est en fonctionnement, il pourrait se produire une perte de contrôle
entraînant des dégâts matériels ou des blessures corporelles.
Installare le pile del trasmettitore
1. Premere leggermente il coperchio delle pile per sganciarlo e toglierlo.
2. Inserire 4 pile AA facendo attenzione a rispettare le polarità indicate nel
portapile.
3. Rimettere a posto il coperchio facendo attenzione a inserirlo correttamente
nelle sue guide.
ATTENZIONE: non togliere le pile dal trasmettitore mentre il veicolo è
acceso perché si perderebbe il controllo causando facilmente danni e
lesioni.
16
DESERT BUGGY XL • INSTRUCTION MANUAL
Page is loading ...
Page is loading ...

Front // Front // Avant // Anteriore
ADJUSTING STEERING AND THROTTLE TRIMS // EINSTELLEN DER LENKUNG UND
GASTRIMMUNG // RÉGLAGE DES TRIMS DE DIRECTION ET DE GAZ //
REGOLAZIONE DEI TRIM DI STERZO E MOTORE
Adjust the steering trim to center the
tires. If the steering output arm is not
close to its desired neutral position
after the binding process and steering
cannot be centered using trim, please
take the following steps:
Mit der Lenkungstrimmung zentrieren
Sie die Räder. Bitte sehen Sie dazu
in der Bedienungsanleitung ihrer
Fernsteuerung nach. Sollte der
mögliche Trimmausschlag nach dem
Binden nicht zu dem Zentrieren der
Lenkung führen folgen Sie bitte
diesen Schritten.
Réglez la direction de façon à ce
qu'elle soit centrée. Si votre direction
ne peut être centrée en utilisant les
trims et sous-trims, veuillez suivre les
étapes suivantes.
Regolare il trim dello sterzo in modo
da avere le ruote centrate. Se la
squadretta dello sterzo non è vicino
alla posizione centrale desiderata dopo
la procedura di "binding" e non si può
centrare con i trim e i sub-trim, allora
attenersi ai seguenti passi:
Steering Trim // Lenkungstrimmung // Trim de direction // Trim sterzo
1. Make sure the trim is set to neutral.
2. Remove the servo output arm and replace the arm in
correct orientation.
3. Trim the steering as described above.
1. Accertarsi che il trim sia nel suo punto neutro.
2. Togliere la squadretta del servo e rimetterla a posto
orientata correttamente.
3. Trimmare lo sterzo come descritto prima.
1. Stellen Sie bitte sicher, dass die Trimmung auf Neutral steht.
2. Nehmen Sie den Servoarm ab und setzen ihn in korrekter
Ausrichtung wieder auf.
3. Trimmen Sie die Steuerung wie oben beschrieben.
1. Contrôlez que le trim est au neutre.
2. Retirez le palonnier du servo et replacez-le dans la
position correcte.
3. Affi nez le réglage à l'aide des trims.
19
DESERT BUGGY XL • INSTRUCTION MANUAL

Adjust the throttle trim so the carburetor is completely closed
at neutral. If the throttle output arm is not close to its desired
neutral position after the binding process and throttle cannot
be centered using trim, please take the following steps:
1. Make sure trim is set to neutral.
2. Remove the servo output arm and replace the arm in
correct orientation.
3. Trim the throttle as described above.
Justieren Sie die Gastrimmung so, dass der Vergaser bei
Neutralstellung vollständig geschlossen ist. Sollte der
Servohebel nicht auf dieser Position sein und kann nicht
mit der Trimmung eingestellt werden, führen Sie bitte die
folgenden Schritte durch:
1. Stellen Sie sicher, dass die Trimmung auf Neutral steht.
2. Nehmen Sie den Servoarm ab und setzen ihn richtig
ausgerichtet wieder auf.
3. Trimmen Sie die Steuerung wie oben beschrieben.
Réglez le trim de gaz de façon que le carburateur soit
totalement fermé au neutre. Si le bras de servo n'est pas
dans la position désirée après l'affectation et que la position
ne peut être corrigée à l'aide du trim, suivez les étapes
suivantes:
1. Contrôlez que le trim est au neutre.
2. Retirez le palonnier du servo et replacez-le dans la
position correcte.
3. Affi nez le réglage à l'aide du trim.
Regolare il trim del motore in modo che il carburatore sia
completamente chiuso nel punto neutro del comando. Se la
squadretta del motore non fosse vicino alla posizione centrale
desiderata dopo la procedura di connessione e non si potesse
centrare il motore usando il trim, si prega di osservare quanto
segue:
1. Accertarsi che il trim sia posizionato nel suo punto neutro.
2. Togliere la squadretta del servo e rimetterla a posto
orientata correttamente.
3. Trimmare il motore come descritto prima.
Throttle Trim // Gastrimmung // Trim des gaz // Trim motore
20
DESERT BUGGY XL • INSTRUCTION MANUAL

TURNING THE SYSTEM OFF // AUSSCHALTEN DES SYSTEMS // MISE HORS
TENSION DU SYSTÈME // SPEGNERE IL SISTEMA
CAUTION: Never power off the transmitter before the vehicle. You will lose control of your vehicle.
ACHTUNG: Schalten Sie niemals den Sender vor dem Fahrzeug aus. Sie verlieren die Kontrolle über das Fahrzeug.
ATTENTION: Ne mettez jamais l'émetteur hors tension avant le récepteur. Vous risqueriez de perdre le contrôle de votre véhicule.
ATTENZIONE: Mai spegnere il trasmettitore prima del veicolo, si avrebbe una perdita di controllo.
Turn off the receiver fi rst, then turn off
the transmitter.
Schalten Sie erst den Empfänger, dann
den Sender aus.
Mettrez hors tension le récepteur en
premier, puis l'émetteur.
Spegnere prima il ricevitore e poi il
trasmettitore.
1
OFF
2
OFF
21
DESERT BUGGY XL • INSTRUCTION MANUAL

B
Fuel Preparation
Kraftstoffvorbereitung
Préparation du carburant
Preparazione del carburante
• Always observe all warnings and precautionary
statements on fuel.
• Fuel is a fi re accelerant. Never operate your vehicle near
open fl ames. Never smoke while operating your vehicle
or while handling fuel.
• Always only use a mixture of gasoline and two-cycle
oil for fuel. Do not use glow (nitro) fuel.
• Always use caution when handling gasoline.
• Always run your model engine in a well-ventilated area.
Model engines produce harmful carbon monoxide fumes.
BASIC FUEL WARNINGS AND GUIDELINES
• Beachten Sie grundsätzlich alle Warnungen und
Sicherheitsbestimmungen zu Kraftstoff.
• Kraftstoff ist ein Brandbeschleuniger. Betreiben Sie Ihr
Fahrzeug niemals in der Nähe von offenen Flammen.
Rauchen Sie nicht bei dem Betrieb des Fahrzeuges oder
bei dem Umgang mit Kraftstoff.
• Verwenden Sie als Kraftsoff immer das vorgeschriebene
Gemisch aus Benzin und Zweitakt Öl. Verwenden Sie
keine Nitromethankraftstoffe.
• Seien Sie immer achtsam bei dem Umgang mit Kraftstoff.
• Lassen Sie Ihr Fahrzeug nur in gut belüfteten
Arealen laufen. Der Modellmotor produziert giftige
Kohlenmonoxid Abgase.
• Toujours respecter les précautions de manipulation
et d'utilisation du carburant.
• Le carburant est très infl ammable. N'utilisez jamais votre
véhicule à proximité de fl ammes. Ne fumez jamais quand
vous utilisez votre modèle ou quand vous manipulez le
carburant.
• Utilisez uniquement un mélange d'essence sans plomb
et d'huile 2T. N'utilisez jamais de nitrométhane.
• Toujours manipuler l'essence avec précaution.
• Toujours utiliser votre modèle dans un lieu très ventilé.
Les fumées contiennent du monoxyde de carbone.
• Osservare sempre tutte le avvertenze e i consigli di
prudenza riguardo al carburante.
• Il carburante è un accelerante del fuoco. Non usare il
veicolo vicino a fi amme libere. Non fumare mentre si usa
il veicolo o si maneggia il carburante.
• Usare sempre e soltanto una miscela di benzina e olio
per due tempi. Non usare carburante glow (con nitro).
• Prestare sempre attenzione quando si maneggia la
benzina.
• Far girare il modello a motore in un'area ben ventilata, la
combustione produce ossido di carbonio, molto nocivo.
RICHTLINIEN UND WARNUNGEN ZUM KRAFTSTOFF
INDICAZIONI E CAUTELE DI BASE PER IL CARBURANTE
PRÉCAUTIONS RELATIVES À LA MANIPULATION DU CARBURANT
22
DESERT BUGGY XL • INSTRUCTION MANUAL

• Always observe all warnings, precautionary statements
and instructions supplied by the fuel manufacturer/
provider.
• Only use gasoline mixed with two-cycle engine oil.
• Only use pre-mix two-cycle engine oil. Do not use any
other kind of oil.
• Always use 92–98 Octane RON (Europe) and 87–93
Octane AKI (US) gasoline.
• Always mix fuel in a sealable, water-resistant container
specifi cally made for gasoline.
• Always blend gasoline with two-cycle engine oil at a 25:1
ratio.
• Never use a 40:1 or 32:1 gas-oil ratio.
• Never use glow (nitro) fuel.
FUEL MIXING PRECAUTIONS AND GUIDELINES
SICHERHEITSVORKEHRUNGEN UND RICHTLINIEN ZUM MISCHEN
VON KRAFTSTOFF
FUEL REQUIREMENTS // KRAFTSTOFFANFORDERUNGEN // CARBURANT REQUIS
// REQUISITI DEL CARBURANTE
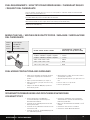
The fuel is a mixture of gasoline and 2-cycle oil. Use a 25:1 ratio gasoline to oil. Gasoline should be 92–98 Octane RON
in Europe and 87–93 Octane AKI in the US.
Der Kraftstoff ist eine Mischung aus Benzin und 2 Takt Öl. Verwenden Sie ein Gemisch 1:25 Öl zu Benzin. Das Benzin sollte
92–98 Okton RON in Europa und 87–93 Oktan AKI in den USA haben.
Le carburant utilisé est un mélange d'essence sans plomb et d'huile 2 temps. Le mélange est de 25:1. L'essence sans plomb
utilisée doit avoir un indice d'octane compris entre 92 et 98 en Europe (87-93 aux Etats-Unis).
Il carburante è una miscela di benzina e olio per 2 tempi con rapporto 25:1. La benzina dovrebbe essere 92-98 ottani RON
in Europa (87-93 ottani AKI in US).
MIXING THE FUEL // MISCHEN DES KRAFTSTOFFES // MÉLANGE // MISCELAZIONE
DEL CARBURANTE
2-Cycle Engine Oil
2 Takt Motor Öl
Huile 2 temps
Olio per motore 2 tempi
Gasoline
Benzin
Essence
Benzina
25 : 1
Gasoline // Benzin // Essence // Benzina :
2-Cycle Engine Oil
// 2 Takt Motor Öl //
Huile 2 temps
// Olio per motore 2 tempi
1 gallon // 1 Gallone // 1 gallon // 1 gallone : 5.1 fl oz
1/2 gallon // 1/2 Gallone // 1/2 gallon // 1/2 gallone : 2.6 fl oz
1/4 gallon // 1/4 Gallone // 1/4 gallon // 1/4 gallone : 1.3 fl oz
4 liters // 4 Liter // 4 litres // 4 litri : 160 ml
2 liters // 2 Liter // 2 litres // 2 litri : 80 ml
1 liter // 1 Liter // 1 litre // 1 litro : 40 ml
• Beachten und befolgen Sie alle Warnungen,
Sicherheitsbestimmungen und Anweisungen des
Kraftstoffherstellers/Anbieters.
• Verwenden Sie nur ein Benzingemisch das mit 2 Takt
Motoröl gemischt wurde.
• Verwenden Sie nur 2 Takt Motoröl. Verwenden Sie keine
anderen Arten von Öl.
• Verwenden Sie immer 92 - 98 Oktan ROB (Europa) und
87c -93Oktan AKI (US) Benzin.
• Verwenden Sie zum Mischen einen verschließbaren,
dichten Behälter der speziell für die Aufbewahrung von
Kraftstoff hergestellt wurde.
• Mischen Sie den Kraftstoff immer im Verhältnis 1: 25 Öl
zu Benzin.
• Verwenden Sie kein 1:40 oder 1:32 Gemisch.
• Verwenden Sie niemals Nitromethan Gemische.
23
DESERT BUGGY XL • INSTRUCTION MANUAL
Page is loading ...

• Entleeren Sie nach dem Fahren immer den Fahrzeugtank
/Motor. Lagern Sie keinen Kraftstoff im Modelltank.
• Hantieren Sie nicht mit Modellmotoren und
Auspuffanlagen bis sie abgekühlt sind. Diese
Komponenten werden bei Betrieb sehr heiß.
• Lagern Sie Ihren Kraftstoff an einem sicheren Ort weit
weg von Hitze, Funken oder anderen zündfähigen Stoffen.
• Lagern Sie Kraftsoff in eindeutig bezeichneten
Behältnissen ausserhalb der Reichweite von Kindern.
• Lagern Sie den Kraftstoff in einem dichten Behälter
der speziell für die Aufbewahrung von Kraftstoff
hergestellt wurde.
• Lagern Sie den Kraftstoff an einem kalten trockenen Ort.
Lagern Sie Kraftstoffbehälter nicht auf Beton, da der
Kraftstoff dadurch Feuchtigkeit aufnehmen könnte.
• Sorgen Sie für eine fachgerechte Entsorgung des
Kraftstoffes wenn sich durch Kondensation Wasser
im Kraftstoff befi ndet.
• Lassen Sie Kraftstoff niemals in Kontakt mit Augen oder
Mund kommen, da dieser wie andere Kraftstoffe giftig ist.
• Füllen Sie unverbrauchten Kraftstoff aus dem Modelltank
nicht zurück in den Kraftstoffbehälter.
SICHERHEITSHINWEIS FÜR DIE LAGERUNG VON TREIBSTOFF
• Toujours vider le carburant de votre modèle après
utilisation. Ne jamais stocker le modèle avec du
carburant dans le réservoir.
• Ne jamais toucher le moteur ou l'échappement durant
l'utilisation, ces éléments atteignent de très hautes
températures. Ne les manipuler qu'après un temps
de refroidissement.
• Toujours stocker votre carburant dans un lieu à l'écart
de hautes températures, d'étincelles ou d'autres
éléments pouvant déclencher un incendie.
• Toujours stocker le carburant dans un bidon clairement
identifi é et toujours le tenir éloigné des enfants.
• Toujours stocker votre carburant dans un bidon étanche
conçu pour contenir de l'essence.
• Toujours stocker le carburant dans un endroit frais et sec.
Ne mettez pas les bidons directement au contact du sol,
le carburant risquerait d'absorber l'humidité.
• Ne pas utiliser le carburant si de la condensation ou
de l'eau est présente dans le bidon.
• Ne jamais avaler ou projeter de l'essence sur les yeux.
L'essence et les autres carburants utilisés pour les
modèles réduits sont toxiques.
• Ne jamais remettre dans le bidon du carburant venant
du réservoir.
PRÉCAUTIONS DE STOCKAGE DE CARBURANT ET LES LIGNES DIRECTRICES
• Svuotare sempre il motore quando avete fi nito di usare
il modello. Non riporre il veicolo con del carburante
nel serbatoio.
• Non toccare il motore e il silenziatore del modello prima
che possano raffreddarsi. Durante il funzionamento
diventano molto caldi.
• Conservare sempre il carburante in un posto sicuro
lontano da scintille, calore o ogni altra cosa che
possa infi ammarlo.
• Assicurarsi che la benzina e la miscela siano conservate
in contenitori chiaramente individuabili, lontani dalla
portata dei bambini.
• Conservare il carburante in un contenitore sigillabile,
resistente all'acqua, fatto apposta per la benzina.
• Conservare il carburante in un posto fresco e secco. Non
permettere che il contenitore venga in contatto diretto
con il cemento, perché potrebbe assorbire l'umidità.
• Eliminare senza rimpianti il carburante contenente
con condensa o acqua.
• Non permettere che il carburante venga a contatto degli
occhi o della bocca. La benzina e gli altri carburanti per
modellismo sono velenosi.
• Non rimettere nel contenitore del carburante proveniente
dal serbatoio.
INDICAZIONI E CAUTELE PER LA CONSERVAZIONE DEL CARBURANTE
• Always drain your engine after you have fi nished running
your vehicle. Do not store the vehicle with fuel in the
gas tank.
• Never handle model engines and muffl ers until they have
had time to cool. They become extremely hot when in use.
• Always store your fuel in a safe place well away from
sparks, heat or anything that can ignite.
• Always ensure that gasoline and fuel are stored in
a clearly marked container well away from the reach
of children.
• Always store your fuel safely in a sealed, water-resistant
container specifi cally made for gasoline.
• Always store fuel in a cool, dry location. Do not allow fuel
containers to come in direct contact with concrete, as the
fuel may absorb moisture.
• Always responsibly discard fuel if there is condensation
and/or water inside the fuel container.
• Never allow fuel to come into contact with eyes or
mouth.Gasoline and other fuels used in model engines
are poisonous.
• Never return unused fuel from the fuel tank back into the
fuel container.
FUEL STORAGE PRECAUTIONS AND GUIDELINES
25
DESERT BUGGY XL • INSTRUCTION MANUAL

C
Vehicle Starting and Running
Starten und Fahren
des Fahrzeuges
Démarrage du véhicule
Avviamento e messa
in marcia del veicolo
CAUTION: Make sure you understand all engine instructions before attempting to start the engine.
Failure to follow all instructions can lead to damage to your vehicle, property damage and bodily injury.
ACHTUNG: Bitte stellen Sie sicher, dass Sie alle Anweisungen zum Starten des Motors verstanden haben bevor sie versuchen den Motor
zu starten. Ein nicht befolgen der Anweisungen könnte zu Beschädigung des Fahrzeuges, Sachbeschädigung und Körperverletzungen führen
ATTENTION: Lisez toutes les instructions concernant le moteur avant de l'utiliser. Un non-respect des consignes peut endommager votre moteur
et entraîner des dégâts matériels et des blessures corporelles.
ATTENZIONE: Bisogna accertarsi di avere ben compreso tutte le istruzioni riguardanti il motore prima di metterlo in moto.
In caso contrario si potrebbe danneggiare il veicolo o procurare danni o ferite.
ENGINE STOP SWITCH // MOTOR STOP SCHALTER // COUPE CIRCUIT DU
MOTEUR // INTERRUTTORE SPEGNIMENTO MOTORE
If there is a problem with the engine,
press the engine stop switch to shut off
the engine.
Sollte ein Problem mit dem Motor
auftreten, drücken Sie den Motor Stop
Schalter um den Motor auszuschalten.
Si un problème intervient sur le moteur,
pressez le bouton de coupe-circuit afi n
de le stopper immédiatement.
Se ci fossero problemi, spegnere
immediatamente il motore con questo
interruttore.
26
DESERT BUGGY XL • INSTRUCTION MANUAL

Remove the fuel tank cap and fi ll the
fuel tank. Tighten the fuel tank cap
securely back in place. Please note
that the body does not have to be
removed to fuel the vehicle.
Nehmen Sie den Tankdeckel ab und
befüllen den Kraftstofftank. Schrauben
Sie den Tankdeckel wieder auf und
überprüfen den einwandfreien Sitz des
Deckels. Bitte beachten Sie, dass die
Karosserie nicht abgenommen werden
muß um das Fahrzeug zu betanken.
Retirez le bouchon et remplissez le
réservoir. Replacez le bouchon en le
serrant. Il n'est pas nécessaire de
retirer la carrosserie pour remplir
le réservoir.
Togliere il tappo e riempire il serbatoio.
Rimettere a posto il tappo fi ssandolo
adeguatamente. Da notare che non è
necessario togliere la carrozzeria per
fare rifornimento.
Turn on the transmitter fi rst, then turn
on the receiver.
Schalten Sie erst den Sender, dann
den Empfänger ein.
Mettez en premier l'émetteur sous
tension, puis ensuite mettez le
récepteur sous tension.
Accendere prima il trasmettitore e poi
il ricevitore.
TURNING THE SYSTEM ON // EINSCHALTEN DES SYSTEMS // MISE SOUS TEN-
SION DU SYSTÈME // ACCENSIONE DEL SISTEMA
2
ON
1
ON
Fuel Tank Cap // Tankdeckel
Bouchon du réservoir // Tappo
del serbatoio
FUELING THE VEHICLE // BETANKEN DES FAHRZEUGES // REMPLISSAGE DU
RÉSERVOIR // RIFORNIRE IL VEICOLO
CAUTION: Do not tilt the vehicle even when the Fuel Tank Cap is back in place as gasoline may leak from the vent hole in the cap.
ACHTUNG: Bitte kippen Sie das Fahrzeug nicht wenn der Tank gefüllt ist, da durch das Belüftungsloch im Tankdeckel Benzin austreten könnte.
ATTENTION: Ne basculez pas le modèle quand le réservoir est rempli même si le bouchon est en place. Du carburant pourrait s'échapper par l'orifi ce
de mise à l'air du bouchon.
ATTENZIONE: Non inclinare il veicolo fi nché non si è rimesso a posto il tappo del serbatoio per evitare la fuoriuscita di carburante.
27
DESERT BUGGY XL • INSTRUCTION MANUAL

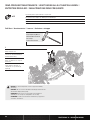
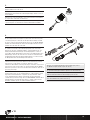
PRIMING THE ENGINE // BETÄTIGEN DER SPRITPUMPE // AMORÇAGE
DU CARBURANT // ADESCAMENTO DEL MOTORE
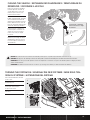
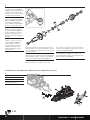
The engine must be primed before it
can be successfully started. Push the
primer bulb (pictured) until you can
see fuel in the yellow return tube
(also pictured).
Vor dem Start des Motor muß die
Spritpumpe betätigt werden. Drücken
Sie dazu die Pumpe bis Sie in dem
gelben Schlauch Kraftstoff sehen
können (siehe Abbildung).
Le moteur doit être amorcé avant
le démarrage. Pressez la bulle (voir
illustration) jusqu'à ce que le carburant
arrive dans la durite jaune de retour.
Per poter avviare il motore con facilità
bisogna prima adescarlo. Premere il
bulbo evidenziato fi nché non si vede il
carburante nel tubetto giallo di ritorno.
28
DESERT BUGGY XL • INSTRUCTION MANUAL

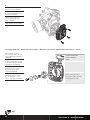
STARTING PROCEDURE: COLD ENGINE // STARTVORGANG BEI KALTEN MOTOR //
PROCESSUS DE DÉMARRAGE: MOTEUR FROID // PROCEDURA DI AVVIAMENTO:
MOTORE FREDDO
1 2
Almost Starting
Startet fast
Prêt à démarrer
Quasi avviato
Casi arranque
34
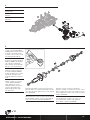
1. Set choke lever as shown in Step 1 (choke on).
2. Pull start cord in a quick continuous motion (about 3
times) until you hear the engine almost start, then stop.
Be careful not to fl ood the engine with fuel. DO NOT
pull more than 50 cm/20 in or you can damage the
pull start assembly.
3. Set the choke lever as shown in Step 3 (choke off).
4. Pull the starter cord to start the engine.
The engine should start within 6 pulls.
Only use the choke if the engine does not start normally. Using the choke can easily fl ood the engine with fuel.
Verwenden Sie nur den Choke wenn der Motor ohne nicht anspringt. Mit Choke kann der Motor leicht mit Benzin
gefl utet werden (absaufen).
Utilisez uniquement le starter si le moteur ne démarre pas normalement. Le starter peut facilement noyer le moteur.
Usare la valvola dell'aria (starter) solo se il motore non dovesse partire normalmente. L'uso dello starter potrebbe
facilmente far riempire il motore di carburante.
1. Stellen Sie den Choke wie in Abbildung 1 ein.
2. Ziehen Sie den Anreißstarter zügig ( bis zu 3 Mal) bis Sie
hören, dass der Motor fast läuft. Hören Sie auf zu ziehen.
Ziehen Sie den Starter nicht weiter als 50cm, da der
Mechanismus sonst beschädigt werden könnte.
3. Stellen Sie den Choke wie in Schritt 3 abgebildet ein.
4. Ziehen Sie den Starter. Der Motor sollte innerhalb
von 6 Zügen anspringen.
1. Placez le levier du starter dans la position de la fi gure 1.
2. Actionnez la tirette (3 fois environ) jusqu'au moment où
le moteur semble vouloir démarrer. Faites attention de ne
pas noyer le moteur. NE PAS dépasser une longueur de
50cm quand vous actionnez le lanceur.
3. Placez le levier du starter dans la position de la fi gure 3.
4. Actionnez le lanceur pour démarrer le moteur. Le moteur
devrait démarrer en moins de 6 coups de lanceurs.
1. Posizionare la leva dello starter come illustrato al punto 1.
2. Tirare la corda dell'avviatore per 3 volte con un
movimento veloce e continuo fi nché non si sente che
il motore sta per partire, poi smettere. Attenzione a non
riempire il motore con il carburante. NON tirare la corda
per più di 50 cm altrimenti si rischia di danneggiare il
sistema di avviamento.
3. Posizionare la leva dello starter come illustrato al punto 3.
4. Tirare la corda dell'avviatore per avviare il motore che
dovrebbe avviarsi entro 6 tentativi.
29
DESERT BUGGY XL • INSTRUCTION MANUAL

STARTING PROCEDURE: HOT ENGINE // STARTVORGANG BEI HEISSEN MOTOR //
PROCESSUS DE DÉMARRAGE: MOTEUR CHAUD // PROCEDURA DI AVVIAMENTO:
MOTORE CALDO
1
1. Set the choke lever as shown in Step 1 (choke off).
2. Pull the starter cord in a quick continuous motion to start
the engine. The engine should start within 6 pulls.
1. Placez le levier du starter dans la position de la fi gure 1.
2. Actionnez le lanceur pour démarrer le moteur. Le moteur
devrait démarrer en moins de 6 coups de lanceurs.
1. Stellen Sie den Choke wie in Schritt 1 dargestellt ein.
2. Ziehen Sie den Starter zügig. Der Motor sollte innerhalb
von 6 Zügen anspringen.
1. Posizionare la leva dello starter come illustrato al punto 1.
2. Tirare la corda dell'avviatore con un movimento veloce
e continuo fi nché il motore non si avvia. Il motore
dovrebbe avviarsi entro 6 tentativi.
BREAKING IN THE ENGINE // EINLAUFEN LASSEN DES MOTORS // RODAGE DU
MOTEUR // RODAGGIO DEL MOTORE
Break in the engine by driving
slowly for the fi rst half tank of fuel
(about 25 minutes).
Fahren Sie mit der Hälfte der ersten
Tankfüllung (ca. 25 Minuten) langsam
den Motor ein.
Pour effectuer le rodage, roulez
doucement durant la première moitié
du réservoir. (environ 25 minutes).
Rodare il motore guidando lentamente
per il primo mezzo serbatoio (circa
25 minuti).
NOTICE: Do not adjust carburetor settings during break-in. Doing so will cause engine damage.
HINWEIS: Nehmen Sie während des Einlaufen lassen des Motor keine Veränderungen an den Vergasereinstellungen vor.
Dieses könnte den Motor beschädigen.
REMARQUE: Ne changez pas les réglages du carburateur durant le rodage.
AVVISO: Non toccare le regolazioni del carburatore durante il rodaggio; si potrebbe danneggiare il motore.
2
30
DESERT BUGGY XL • INSTRUCTION MANUAL

Push the engine stop switch to shut
off the engine.
Drücken Sie den Motor Stop Schalter
um den Motor auszuschalten.
Pressez le bouton stop pour arrêter
le moteur.
Premere l'interruttore di Stop per
spegnere il motore.
STOPPING THE ENGINE // STOPPEN DES MOTORS // ETEINDRE LE MOTEUR // AR-
RESTO DEL MOTORE
NOTICE: Do not touch the engine and muffl er as they can become extremely hot during use.
HINWEIS: Berühren Sie nicht den Motor und Auspuff, da diese während des Betriebes extrem heiß werden.
REMARQUE: Ne touchez pas le moteur ni l'échappement, ces éléments atteignent de très hautes températures durant le fonctionnement.
AVVISO: Non toccare il motore e il silenziatore perché durante l'uso si scaldano molto.
TURNING THE SYSTEM OFF // AUSSCHALTEN DES SYSTEMS // MISE HORS TEN-
SION DU SYSTÈME // SPEGNERE IL SISTEMA
CAUTION: Never power off the transmitter or receiver before stopping the engine. You will lose control of your vehicle.
ACHTUNG: Schalten Sie niemals den Sender oder Empfänger vor dem Motor aus. Sie verlieren die Kontrolle über das Fahrzeug.
ATTENTION: Ne mettez jamais l'émetteur hors tension avant le récepteur. Vous risqueriez de perdre le contrôle de votre véhicule.
ATTENZIONE: Non spegnere mai il trasmettitore o il ricevitore senza prima aver arrestato il motore. Si potrebbe perdere il controllo del veicolo.
Turn off the receiver fi rst, then turn off
the transmitter.
Schalten Sie erst den Empfänger, dann
den Sender aus.
Mettez hors tension le récepteur en
premier, puis ensuite mettez l'émetteur
hors tension.
Spegnere prima il ricevitore e poi il
trasmettitore.
2
OFF
1
OFF
31
DESERT BUGGY XL • INSTRUCTION MANUAL

INTRODUCTION TO ENGINE TUNING // EINLEITUNG IN DAS MOTOR TUNING //
INTRODUCTION AUX RÉGLAGES MOTEUR // INTRODUZIONE ALLA MESSA A
PUNTO DEL MOTORE
D
Engine Tuning
Motor Tuning
Réglage du moteur
Messa a
punto del motore
The engine can be further tuned from the factory settings
to optimize performance under various conditions.
If you lose track of the engine settings, please revert back
to the factory carburetor settings (see next page).
Before making adjustments:
• Please make sure that the small vent hole in the Fuel
Tank Cap is open and the air fi lter is clean, as it will
affect engine performance and tuning.
• The carburetor needle is very sensitive. Adjusting the
needle even 1/16 of a turn is a signifi cant change. Be
careful when making adjustments.
Der Motor kann von den Werkseinstellungen getuned werden
um unter verschiedenen Bedingungen eine optimierte
Leistung zu bringen.
Sollte Sie den Überblick über Ihre Einstellungen
verloren haben, stellen Sie den Vergaser zurück auf
Werkseinstellungen (siehe nächste Seite).
Bevor Sie Einstellungen vornehmen:
• Bitte stellen Sie sicher, dass das kleine Belüftungsloch im
Tankdeckel offen ist und der Luftfi lter sauber, da dieses
direkten Einfl uss auf die Motorleistung hat.
• Die Einstellungen mit der Vergasernadel hat große
Auswirkungen. Bereits eine 1/16 Drehung bewirkt eine
signifi kante Änderung. Bitte gehen Sie deshalb sehr
vorsichtig damit um.
Les réglages d'origine du moteur peuvent être modifi és pour
augmenter les performances dans des conditions variables.
Si vous avez modifi é les réglages d'origine, revenez aux
réglages d'origine (voir page suivante).
Avant de modifi er les réglages:
• Vérifi ez que le fi ltre à air est propre et que l'orifi ce de
mise à l'air du bouchon n'est pas bouché. Ces éléments
infl uent sur les performances et les réglages du moteur.
• Les pointeaux du carburateur sont très sensibles.
Effectuez les réglages par 1/16 de tour. Toujours
effectuer les réglages avec attention.
Si possono fare ulteriori regolazioni al motore oltre a
quelle fatte in fabbrica, per migliorare le prestazioni
in certe condizioni.
Se si perde traccia delle regolazioni bisogna tornare
a quelle di fabbrica (vedi la prossima pagina).
Prima di fare le regolazioni:
• Accertarsi che le piccole prese d'aria sul tappo del
serbatoio e sul fi ltro dell'aria siano pulite, altrimenti
potrebbero infl uire sulle prestazioni del motore e
sulle regolazioni.
• Attenzione nelle regolazioni perché lo spillo del
carburatore è molto sensibile e anche una variazione
di 1/16 di giro è già un notevole cambiamento.
32
DESERT BUGGY XL • INSTRUCTION MANUAL
Page is loading ...
Page is loading ...
Page is loading ...
Page is loading ...
Page is loading ...
Page is loading ...
Page is loading ...
Page is loading ...
Page is loading ...
Page is loading ...
Page is loading ...
Page is loading ...
Page is loading ...
Page is loading ...
Page is loading ...
Page is loading ...
Page is loading ...
Page is loading ...
Page is loading ...
Page is loading ...
Page is loading ...
Page is loading ...
Page is loading ...
Page is loading ...
Page is loading ...
Page is loading ...
Page is loading ...
Page is loading ...
Page is loading ...
Page is loading ...
Page is loading ...
Page is loading ...
Page is loading ...
Page is loading ...
Page is loading ...
Page is loading ...
Page is loading ...
Page is loading ...
Page is loading ...
Page is loading ...
Page is loading ...
Page is loading ...
Page is loading ...
Page is loading ...
Page is loading ...
Page is loading ...
Page is loading ...
Page is loading ...
Page is loading ...
Page is loading ...
Page is loading ...
Page is loading ...
Page is loading ...
Page is loading ...
-
 1
1
-
 2
2
-
 3
3
-
 4
4
-
 5
5
-
 6
6
-
 7
7
-
 8
8
-
 9
9
-
 10
10
-
 11
11
-
 12
12
-
 13
13
-
 14
14
-
 15
15
-
 16
16
-
 17
17
-
 18
18
-
 19
19
-
 20
20
-
 21
21
-
 22
22
-
 23
23
-
 24
24
-
 25
25
-
 26
26
-
 27
27
-
 28
28
-
 29
29
-
 30
30
-
 31
31
-
 32
32
-
 33
33
-
 34
34
-
 35
35
-
 36
36
-
 37
37
-
 38
38
-
 39
39
-
 40
40
-
 41
41
-
 42
42
-
 43
43
-
 44
44
-
 45
45
-
 46
46
-
 47
47
-
 48
48
-
 49
49
-
 50
50
-
 51
51
-
 52
52
-
 53
53
-
 54
54
-
 55
55
-
 56
56
-
 57
57
-
 58
58
-
 59
59
-
 60
60
-
 61
61
-
 62
62
-
 63
63
-
 64
64
-
 65
65
-
 66
66
-
 67
67
-
 68
68
-
 69
69
-
 70
70
-
 71
71
-
 72
72
-
 73
73
-
 74
74
-
 75
75
-
 76
76
-
 77
77
-
 78
78
-
 79
79
-
 80
80
-
 81
81
-
 82
82
-
 83
83
-
 84
84
-
 85
85
-
 86
86


Losi LOS05001 Owner's manual
- Category
- Remote controlled toys
- Type
- Owner's manual
- This manual is also suitable for
Ask a question and I''ll find the answer in the document
Finding information in a document is now easier with AI
in other languages
- italiano: Losi LOS05001 Manuale del proprietario
- français: Losi LOS05001 Le manuel du propriétaire
- Deutsch: Losi LOS05001 Bedienungsanleitung
Related papers
-
Losi LOS01015T2 Owner's manual
-
Losi LOS01016T2 Owner's manual
-
-
-
Losi LOS05020T2 Owner's manual
-
Losi LOS04002 User manual
-
Horizon LOS03020V2T1 Owner's manual
-
Losi LOS03041 Owner's manual
-
-
Other documents
-
Spektrum SR415 DSMR 4 Ch Sport Rec User manual
-
ECX ECX03029 Owner's manual
-
ECX Roost ECX01005T2 Owner's manual
-
-
-
HobbyZone Faze RTF User manual
-
 Hobbico DIDC0045 Datasheet
-
-
Spektrum DX2E User manual
-
