Kenmore 38515358 User manual
- Category
- Sewing machines
- Type
- User manual
This manual is also suitable for

®
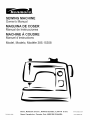
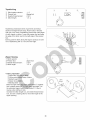
SEWING MACHINE
Owner's Manual
MAQUINA DE COSER
Manual de lnstrucciones
MACHINE A, COUDRE
Manuel d'instructions
Model, Modelo, Modele 385.15358
!
743-801-324
Sears, Roebuck and Co., Hoffrnan Estates, IL 60179 U.S.A.
Sears Canada Inc., Toronto, Ont., MSB 2B8 CANADA
www.sears.com
www.sears.ca

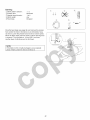
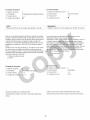
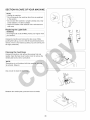
iMPORTANT SAFETY
iNSTRUCTiONS
This machine is designed and manufactured for House Hold use only.
When using an electrical appliance, basic safety precautions should always be followed, including the following:
Read all instructions before using this appliance.
DANG ER- _o reduce the risk of electric shock:
1. An appliance should never be left unattended when plugged in. Always unplug this sewing machine from the electric
outlet immediately after using and before cleaning.
2. Always unplug before replacing a sewing machine bulb. Replace bulb with same type rated 15 Watts.
iiiiiiiiii¸ )
WARNING-To reduce the risk of burns, fire, electric shock or injury to persons:
.
2.
.
.
.
6.
7.
8.
9.
10.
11. Always use the
12. Do not use bent
13. Do not pull or pL
14. Switch this sewi_
changing the
15. Always unplug
other adj
Do not allow to be used as a toy. Close attention is necessary when this sewi
Use this appliance only for its intended use as described in this owner's
mended by the manufacturer as contained in this owner's manual.
Never operate this sewing machine if it has a damaged cord or plMg i !i _tworki, i asbeen
dropped or damaged, or dropped into water ..... ......
Return this sewing machine to the nearest Sears store or s_yi _ier fo nation, re i ial or me
chanical adjustment. .......
Never operate the appliance with any air opening blocked #ntilation o¢_i_ of this sewin_ hind and foot
controller free from accumulation of lint dust and loose clotR ...... .....
Never drop or insert any object into any op#_#_ : ......... ....
Do not use outdoors. .... ............ ...............
Do not operate where aerosol (sl: ray: :tor _is being administered.
To disconnect, turn all controls to the _") posilion ,move _i _ m outlet.
Do not unplug by pulling on cord. To j, grasp the ot the ........
Keep fingers away from red arouna _ing machine needle.
the needi_ _reak.
needle causing it to break.
chine off ("O':) w_en ma <lngany adjustment in the needle area, such as threading the needle,
_reading th_ _in, changing the presser foot, and the like.
! the electrical outlet when removing covers, lubricating, or when making any
er s manual.
THESE INSTRUCTIONS
NOTE: Sewing machine design and specifications are subject to change without prior notice.
Page is loading ...
Page is loading ...

Kenmore Sewing Machine Warranty
25Year Limited Warranty on Sewing Machine Die-Cast Metal Internal Frame
For 25 years from the date of purchase, Sears will provide free repair for the die-cast metal internal frame of this
sewing machine if it is defective in material or workmanship.
10 Year Limited Warranty on Internal Mechanical Components
For 10 years from the date of purchase, Sears will provide free repair for the internal mechanical components of this
sewing machine if they are defective in material or workmanship. This 10 year warranty does not include belts, which
are only included in the 90 day warranty described below.
2Year Limited Warranty on Sewing Machine Exterior Components
For 2 years from the date of purchase, Sears will provide free repair for all components of the sewing machine exterior
if they are defective in material or workmanship. This 2 year warranty does not include needle plates or accessory
parts, which are only included in the 90 day warranty described below.
2 Year Limited Warranty on Electrical Equipment
For two years from the date of purchase, Sears will provide free repair for the electrical equipmen_ of this sewing
machine, if any part of it, including motor, wiring, electronic circuitry, switch and speed control i _fective in material
or workmanship. This 2 year warranty does not include light bulbs, which are only included in { _day warranty
described below.
90 Day Limited Warranty on Mechanical Adjustments and Specified Parts
For 90 days from the date of purchase, Sears will provide:
• free mechanical adjustments necessary for the proper operation 9__h:i__#_ing
machine care maintenance as described in the owner s manual: ........
• free replacement of belts, light bulbs, needle plates and acce_ _ festive in
This 90 day warranty does not include sewing machine neede_ _ _ are ex_ _!# parts.
: .....
Warranty Service
All warranty service is available by returning this sewing
If this sewing machine is used for other
from the date of purchase.
normal
,rkmanship.
nearest &
isava,a;iforonly9Odays
Except for 90 Days on Mechanical Adju,_
defects in material and workmanshi
1. A service technicial
2. A service techni(
3. Damage to
supplied with
4. Damage to or
purpose.
5. to
those
6. Damage to or failui
(s all warranty service covers only
stallation, or maintenance.
)crated or maintained according to all instructions
;ulting from accident, abuse, misuse or use for other than its intended
by the use of detergents, cleaners, chemicals or utensils other than
supplied with the product.
resulting from unauthorized modification(s) made to this product.
Disclaimer of implied warranties; limitation of remedies:
The customer's sole and exclusive remedy under this limited warranty shall be product repair as provided herein.
Implied warranties, including warranties of merchantability or fitness for a particular purpose, are limited to one year or
the shortest period allowed by law. Sears shall not be liable for incidental or consequential damages. Some states and
provinces do not allow the exclusion or limitation of incidental or consequential damages, or limitations or the duration
of implied warranties of merchantability or fitness, so these exclusions or limitations may not apply to you.
All warranty coverage applies only while this appliance is used in the United States or Canada.
This warranty gives you specific legal rights, and you may also have other rights which vary from state to state.
Sears, Roebuck and Co., D/817WA, Hoffman Estates, IL 60179
Sears Canada inc., Toronto, Ontario, Canada MSB 2B8
IV
Page is loading ...
Page is loading ...

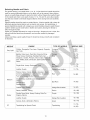
Machine Specifications (15358)
f
Item
Sewing speed (Maximum)
Stitch length:
Stitch width:
Stitch package (Stitch functions):
(Built-in stitches):
Buttonhole:
Machine dimensions:
Weight (Net):
Specification
Over 760 s.p.m
4 mm (Maximum)
5 mm (Maximum)
58
16
1-step built-in buttonhole
W 15.5" (388 mm) x D 6.1" (152 mm) x H 11.8" (295 mm)
13.2 Ibs (6.0 kg )
Especificaciones de la m_quina (15358) ....
Articulo
Vetocidad de costura (Maxima)
Longitud de puntada:
Ancho de puntada:
NQmero de puntadas (Funcionamiento de puntadas):
(Integradas):
Ojales:
Dimensiones de la maquina:
Peso:
Especificaci6n
Mas de 760 ................ ....
4 mm (Maximai ....
5 mm (Maim ..................... ....
s8 ::::::::::::::;.....
16 ..... ....
Description
Vitessedecouture(M_ i _ i
Longueur du point: .......
Largeur du point:
Ensemble de points(points de couture):
(points integr6s):
Boutonniere:
Dimensions de la machine:
Poids de la machine:
C_(_6ristiques de la machine (15358)
Caract_ristiques
760 points-minute en outre
4 mm (Maximum)
5 mm (Maximum)
58
16
Boutonniere integr6e en 1 etapes
Largeur: 388 mm (15.5") x Profondeur: 152 mm (6.1") x
Hauteur: 295 mm (11.8" )
6.0 kg (13.2 lb)
VII

PROTECTION
in the U.S.A.
Master Protection Agreements
Congratulations on making a smart purchase. Your
new Kenmore® product is designed and manufactured
for years of dependable operation. But like all products,
it may require preventive maintenance or repair from
time to time. That's when having a Master Protection
Agreement can save you money and aggravation.
Purchase a Master Protection Agreement now and
protect yourself from unexpected hassle and expense.
The Master Protection Agreement also helps extendthe life of
your new product. Here's what's included in
the Agreement:
[] Expert service by our 12,000 professional repair
specialists
[] Unlimited service and no charge for parts and
labor on all covered repairs
[] "No-lemon" guarantee- replacement
of your covered product if four or more product
failures occur within twelve months
[] Product replacement if your covered product
can't be fixed
[] Annual Preventive Maintenance Check at your
request - no extra charge
[] Fast help by phone- phone support from a Sears
representative on products requiring in-home
convenient repair scheduling
[] Power surge protection against electric
due to power fluctuations
[] Rental reimbursement if repair of your
AGREEMENTS
in Canada
Maintenance Agreements
Your purchase has added value because you can
depend on Sears HomeCentrat® for service. With
over 2400 Service Technicians and more than a
million parts and accessories, we have the tools,
parts, knowledge and skills to back our pledge:
We Service What We Sell.
Your Kenmore® product is designed, manufactured
and tested to provide years of dependable operation.
But like all products, it may require service from time
to time. The Sears Maintenance Agreement offers
you an outstanding service prograr
priced.
The Sears Maintenance
• Is your way to bu_ orrow's
price
• Eliminates re
and
ual Preventi_
.=st,to ensu_
in-home
repairs,
product
today's
lician
_ly.For more information
anada Maintenance Agreements,
can count on to help prolong the life of your new purchase for
years to come. Purchase your Master Protection Agreement
today!
Some limitations and exclusions apply.
For prices and additional information call
1-800-827-6655.
Sears Installation Service
For Sears professional installation d home
appliances, garage door openers, water heaters, and other
major home items, in the U.S.A. call 1-800-4=MY-HOME®
VIII
Page is loading ...

TABLE OF CONTENTS
SECTION l. NAMES OF PARTS
Cabinets and Sewing Machine Tote Bag ........................ 2
Names of Parts .............................................................. 2
Available Accessories and Attachments ........................ 4
SECTION II. GETTING READY TO SEW
Connecting Machine to Power Supply ........................... 6
Before Using Your Sewing Machine ............................... 6
For Your Safety ............................................................... 6
Polarized Plug ................................................................ 6
Controlling Sewing Speed .............................................. 6
Setting Spool Pins .......................................................... 8
Presser Foot Lifter .......................................................... 8
Thread Cutter ................................................................. 8
Extension Table ............................................................ 10
• Detaching the table .................................................... 10
•Attaching the table ..................................................... 10
Changing Needle ......................................................... 10
To Remove and Attach the Foot Holder ....................... 10
•To remove .................................................................. 10
•To attach .................................................................... 10
Changing Presser Foot ................................................ 12
•To remove .................................................................. 12
•To attach .................................................................... 12
Presser Foot Types ...................................................... 12
• Zigzag foot ................................................................. 12
•Automatic buttonhole foot .......................................... 1
• Zipper foot .................................................................. 12
• Hemmer foot .............................................................. 12
• Satin stitch foot
Selecting Needle and Fabric
Bobbin Winding
• Removing bobbin case ................
• Bobbin winding .............................
• Inserting bobbin ...........................
Threading the Machine
•Threading the ma_
Needle threader ...........................
Drawing up bobl aad ................................................ !6
Adjust the Needl_ _ adTension fo
traight Stitch .... 28
Correct tension
28
Tension is too tigh{ 28
•Tension is too loose 28
•Adjust bobbin tension ................................................ 28
Adjust the Needle Thread Tension for a Zigzag Stitch ...30
• Correct tension .......................................................... 30
•Tension is too tight ..................................................... 30
•Tension is too loose ................................................... 30
Stitch Pattern Selector ................................................. 32
Stitch Length Control .................................................... 32
Reverse Stitch Control ................................................. 34
To Drop or Raise the Feed Dog ................................... 34
SECTION Ill. STRAIGHT STITCH SEWING
Straight Stitch ............................................................... 36
• Starting to sew ........................................................... 36
• Finishing sewing ........................................................ 36
Use the Seam Guides .................................................. 36
Turn a Square Corner .................................................. 36
Topstitching .................................................................. 38
Zipper Sewing ......................................................... 38-40
• Fabric preparation ...................................................... 38
• To sew ........................................................................ 40
Rolled Hem Sewing ...................................................... 40
• To sew ........................................................................ 40
Darning ........................................................................ 42
SECTION IV. ZIGZAG STITCH SEWING
Basic Zigzag ................................................................. 44
Satin Stitching ............................. .................................. 44
Overcasting Sti{ .......... ........................ 50
Multiple Zigzag ....... ........................ 50
• Se_ 50
Aii; E.....
4em Stitchk 545252
................................................. 54
...................................................... 6
.................................................. 56
58
...................................................... 8
Decorative Stitch Pattern .................................... 60
Twin Needle Stitches (Option) .................................... 62
SECTION Vl. BUTTONHOLE
Buttonhole ............................................................... 64-66
To adjust buttonhole stitch density ............................... 66
SECTION VII. CARE OFYOUR MACHINE
Replacing the Light Bulb .............................................. 68
Cleaning the Feed Dogs .............................................. 68
Cleaning the Shuttle Race ........................................... 70
• Cleaning the shuttle area ........................................... 70
• Replacing shuttle assembly ....................................... 70
Oiling the Machine ....................................................... 72
• Oil behind the face cover ........................................... 72
• Oil the shuttle area ..................................................... 72
Troubleshooting ............................................................ 74
X
Page is loading ...
Page is loading ...

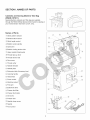
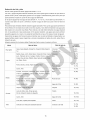
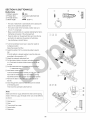
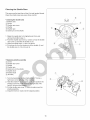
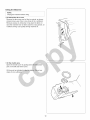
SECTION I. NAMES OF PARTS
Cabinets and Sewing Machine Tote Bag
(RSOS # 97611)
Sewing Machine cabinets and Tote bag are available
through the RSOS (Retail Special Order System) catalog at
your nearest Sears retail store (U.S.A. only),
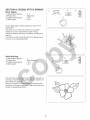
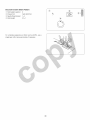
Names of Parts
f_
.!_ Stitch pattern selector
,_2"Reverse stitch control
,_3",,_ Stitch length control
(4.,Bobbin winder spindle
f_
,5_,Spool pins
_6j:Bobbin winding tension disc
,.77Upper needle thread guide
(8. Thread take-up lever
/>,
.9_:Thread tension dial
L10.:Face cover
s\
JT;Thread cutter
_2_yNeedle threader
qT,Needle plate
,_2Extension table (Accessory box)
'\ j
,t5_Carrying handle
_,qy
_I_Handwheel
_7_,Power switch
L_8.:Machine socket
s_
desFree-arm
_20_Buttonhole lever
,/; ,h
L2t:Presser foot lifter
_&_Presser foot holder
/..x
.2pSet screw
,Y- _h
L2€Presser foot
_ Needle clamp screw
_61
_ Needle
(2_,Foot control
f
......._6_
Page is loading ...

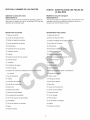
Available Accessories and Attachments
To order parts and accessories listed below, call:
1-800-4-MY-HOME ®(1-800-469-4663)
call any time, day or night.
When ordering parts and accessories, provide the following
information:
1. Part Number
2. Part Name
3. Model Number of Machine
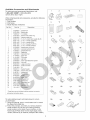
Ref. No. Part No. Description
1
2
3
4
5
6
7
8
9
10
11
12
13
14
15
16
17
18
19
20
21
22
23
24
25
26
27
28
29
3O
31
532096007
647515006
*102869107
647018004
639804000
*993001100
*993011100
*993011400
*993011600
*993011800
801506008
740801004
*731806001
301505002
743816001
611406002
611510000
000009803
647808009
*802424004
*820832005
*647803004
*741814003
*200262101
743815000
*214872011
*940200000
*941620000
"941850000_;:!:
"94025000_i!!i!!i!!i!!i!!ii!!
"74381300i_iilililiiliili
*2001171d_i_i!!i!!i!!i!ii!iiii
"62040400_iililii!!!!!ii
.611411000_!i!i
031119115
Shuttle hook
Bobbin case
10 x Bobbin
Bobbin winder rubber ring
Assorted needle set
5 x No.11 stretch fabric needle (BLUE)
5 x No. 11 needle (ORANGE)
5 x No. 14 needle (RED)
5 x No. 16 needle (PURPLE)
5 x No. 18 needle (GREEN)
Needle clamp with screw
Automatic buttonhole foot
Straight stitch foot
Zigzag foot
Satin stitch foot
Zipper foot
Foot holder
Light bulb
Seam ripper/Buttonhole opener
Lint brush
* These items are not furnished with the machine, but may be
ordered per instructions above.
To order additional parts not listed above for a do-it-
yourself repair:
1. Using the Internet, type in "www3.sears.com" to reach
the Sears Parts Web site.
2. Follow the prompts, and enter your sewing machine
model number.You can find your sewing machine
model number on the back of your machine, on the
Nomenclaure Plate. Enter the first eight digits of this
number, followed by an asterisk (example: 385.15358").
1
5
*9
13
21
2
*6
10
*30
*3
11
31
4
8
%
12
"16
*2O
*24
*28
Page is loading ...

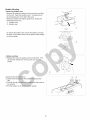
SECTION II. GETTING READY TO SEW
Connecting Machine to Power Supply
_1_Power supply plug
_2_Power switch
'_3_Outlet
_4_Machine socket
@ Machine plug
_6_Sewing light
Before connecting the power cord, make sure the voltage
and frequency shown on the machine conform to your
electrical power.
1. Turn off the power switch ,_2_.
2. Insert the machine plug@ into the machine socket (4_.
3. Insert the power supply plug _l_into the outlet _3_.
4. Turn the power switch _f)_to activate the power and
sewing light,,_6_.
Before Using Your Sewing Machine
Before using your sewing machine for the first time, place a
waste fabric under the presser foot and run the machine
with thread for a few minutes. Wipe away any oil which may
appear.
For Your Safety
* While in operation, always keep your eyes on the sewing
area. Do not touch any moving parts, such as the thread
take-up lever, handwheel or needle.
* Always turn off the power switch and unplug from the
power supply:
- When leaving the machine unattended
- When attaching or removing any parts
- When cleaning the machine
* Do not place anything on the foot contr not
sewing.
Polarized Plug
This appliance has a
the other). To
is intended to fit in
plug does not fit in
not fit, contact a qu
outlet. Do not modify
Foot Controller Model
Sewing Machine Model
numbers 000 through 999).
electric s]
outlet le wa
_g. If it still does
Jlthe proper
is used with
represents
Controlling Sewing Speed
Sewing speed can be varied by the foot control.
The harder you press on the foot control, the faster the
machine runs.
/
Page is loading ...

Setting Spool Pins
\!.J'Spool pin
The spool pins are used for holding the spools of thread
when feeding the thread to the machine.
To use, pull up the spool pins. Push down for storage.
Presser Foot Lifter
(!_ Presser foot lifter
_2_Normal up position
(3_,Highest position
The presser foot lifter raises and lowers the presser foot.
You can raise it about 1/4" (0.6 cm) higher than the normal
up position for easy removal of the presser foot, or to help
place heavy fabric under the foot.
Thread Cutter
'_!_Thread cutter
You do not need a pair of scissors to cut
sewing. Simply use the built-in thread
Page is loading ...

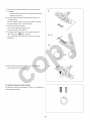
Extension Table
• Detaching the table
Pull the table away from the machine, as illustrated, for
"flee-arm" sewing of cuffs and sleeves. The extension
table can be used as accessory box.
• Attaching the table
Push the extension table until it snaps into the machine.
/\
L!; Extension table
:12)Pin
_3) Holes
(4)Tab
(&',Free-arm
\
\
\\\\
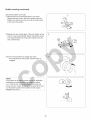
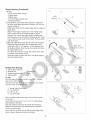
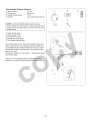
Changing Needle
f_
,!/Needle clamp screw
(2) Needle clamp
[] Turn off the power switch.
Raise the needle to its highest position by turning the
handwheel counterclockwise, toward you, and lowering
the presser foot. Loosen the needle clamp screw0_ by
turning it counterclockwise. Remove the needle from the
needle clamp (2).
[] Insert a new needle into the needle clamp _2)with the
flat side to the rear. When inserting the needle into the
needle clamp'S2), push it up as far as it goe
the needle clamp screw _1_,firmly by turn
[] To see if the needle is good, place the
needle onto something flat (e.g needk
The gap between the needle and the
be consistent. Never use a bent or
A damaged needle
in knits, fine silks
To Remove and Attach the Foot Holder
(i) Set screw
(2) Foot holder
(3) Presser bar
• To remove
Remove the set screw _i) by turning it counterclock-
wise with a screwdriver.
• To attach
Match the hole in the foot holder (2) with the threaded
hole in the presser bar (3). Fit the set screw _i) into
the hole. Tighten the screw _i) by turning it clockwise with
a screwdriver.
f
Flat side
Lado piano
.... Meplat
Needle
Aguja
Aiguille
/ //......
,/ /'
///
J
-x
10
Page is loading ...

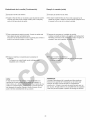
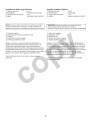
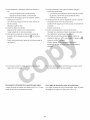
Changing Presser Foot
_l_Lever
(2_,Groove
, 3 Pin
• To remove
Turn the handwheel toward you to raise the needle to its
highest position. Raise the presser foot.
Press the lever _l_on the back of the foot holder. The
presser foot will drop off.
• To attach
Place the presser foot so that the pin _3_onthe foot lines
up directly below the groove Y2_ofthe foot holder.
Lower the foot holder to lock the foot in place.
Presser Foot Types
• Zigzag foot
Use this foot for both straight and zigzag stitching.
For: Straight stitch (page 36)
Topstitching (page 38)
Basic zigzag (page 44)
Bar tacking (page 48)
Button sewing (page 48)
Overcasting stitch (page 50)
Multiple zigzag stitch (page 50)
Blind hem stitch (page 52)
Lace work (page 52)
Stretch stitch patterns (page 54)
Knit stitch (page 56)
Straight stretch stich (page 56)
Box stitching (page 58)
Twin needle stitches (page
• Automatic buttonhole foot
The size of buttonhole is automatically
button in the automatic buttonhole foot.
For Buttonhole sewing (p
• Zipper foot
The edge of
seam straight.
For:Zipper
• Hemmer foot
This special foot is
the foot helps to form a
For: Rolled hem sewing
The curl of
;tant width.
(page 40)
• Satin stitch foot
Use this foot for satin stitch and outlining applique.
For: Satin stitch (page 44)
Monograming (page 46)
Applique (page 46)
Shell tuck (page 54)
Smocking (page 58)
Decorative satin stitch pattern (page 60)
/
i3b
%
f ......................................................................................................................................................................................................................................................................................................................................................
12
Page is loading ...

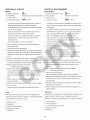
Selecting Needle and Fabric
For general sewing, use needle sizes 11 or 14. Afine thread and needle should be
used for sewing lightweight fabrics, so the fabric will not be marred. Heavy fabrics
require a needle large enough to pierce the fabric without fraying the needle thread.
In the needle set, there is one each of sizes 11, 14, 16, and 18, and a blue needle.
Use the blue needle to eliminate skipped stitches when sewing knits and synthetic
fabrics.
Special needles should be used on certain fabrics. A denim needle with a sharp tip
effectively pierces dense fabrics such as denim and canvas. For topstitching, a
special topstitching needle with a larger eye, accommodates heavier weight thread.
Leather needles punch small holes in leather and suede, allowing the thread to
follow through the hole.
Check your needles frequently for rough or blunt tips. Snags and runs in knits, fine
silks and silk-like fabrics are permanent, and are often caused by damaged
needles.
Always purchase a good quality thread. It should be strong, smooth and consistent
in thickness.
f
WEIGHT
Very Light
Light
FABRIC
Medium
Chiffon, Georgette, Fine Lace, Organdy, Organdy
Net, Tulle
Batiste, Voile, Lawn, Pure Silk, Crepe de Chine
Sheer Crepe, Chambray, Handkerchief Linen,
Gingham, Challis, Percale, Wool Crepe,
Sole, Taffeta, Satin, Silk Surah, Satin=backe_
Qiana ....
Single Knits, Jersey, Swimwe_r,_i: _ ........ i
:] .........
Leather, Suede
ih,
!!! iiii!ii
iNEEDLE
TYPE OF NEEDLE SIZE
(65)
(65)
(75)
(75)
Ball Point
(75)
11 (75)
11 (75)
14 (90)
14 (90)
Wedge Point Leather 14 (90)
Denim, Saiici_i_: _icking Denim 16 (100)
Double Faced Wool, Heavy Coating, Fake Fur, Purple 16 (100)
Heavy Drapery Fabrics
Leather, Suede Wedge Point Leather 16 (100)
Canvas, Duck, Upholstery Fabrics Green 18 (110)
11 (75)
All Topstitching for Special Finish Topstitching
14 (90)
',,. j
14
Page is loading ...
Page is loading ...
Page is loading ...

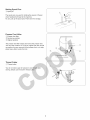
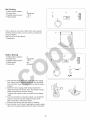
Bobbin Winding
oRemoving bobbin case
Remove the extension table from the machine by pulling
it to the left. Open the shuttle cover_,_l)by pulling down
the embossed part on the left of the cover.
Raise the needle to its highest position by rotating the
handwheel toward you.
,,"13Shuttle cover
_2_,Bobbin case
/,>,
To remove the bobbin case _2_from the shuttle, pull open
the latch of the bobbin case. Pull the bobbin case straight
out of the shuttle.
Bobbin winding
[] Release the clutch by pulling out the handwheel. This
will stop the needle from moving while you wl
bobbin.
[]
[] Draw thread
[] Guide the the bobbi !ing tension
disc.
[] Thread through the inside to
the outside.
::5_Put the bobbin on the spindle.
[]
18
Page is loading ...

Bobbin winding (continued)
[] Push the bobbin to the right.
[] With the free end of the thread held in your hand,
depress the foot control. Stop the machine when the
bobbin has made a few turns, and cut the thread close
to the hole in the bobbin.
[]
[] Depress the foot control again. When the bobbin is fully
wound, it stops automatically. Return the bobbin winder
to its original position by moving the spindle to the left,
and cut the thread.
[]
[] Push in the handwheel to engage the clutch.
* The machine does not function until the clutch is
engaged.
iiiiiiiiiiiiiiiiiiiiiiiiiiiiiiiiiiii
out. Adjust the position of the bobbin winder stopper.
Retighten the screw.
2O
Page is loading ...

• Inserting bobbin
[] Place a bobbin in the bobbin case, making sure the
thread feeds clockwise from the bobbin.
[] Draw the thread through the slot of the case.
[] Continue to draw the thread under the tension spring _1_:"
and through the opening.
Pull out about 4" (10 cm) of thread.
t_l_'Tension spring
[] Holding the latch
shuttle, and then
the latch.
[]The case should lock into the place when the latch is
released.
[]
[]
[]
[]
J
J
J
J
22
Page is loading ...

Threading the Machine
• Threading the machine
• Raise the thread take-up lever to its highest position by
turning the handwheel counterclockwise.
• Raise the presser foot lifter.
• Place a spool on the spool pin, with thread coming off
as shown.
[]
,E
] ...........
C []
/
I
J
- \
[] Draw the end of thread around the upper thread guide.
] %,
[_]While holding the thread near the spool, draw the end of
the thread down around the check spring h(
[] Firmly draw the
take-up lever the
to left over the
lever eye.
[] Slide the thread behind the needle bar thread guide on
the left.
[] Thread the needle from front to back.
[]
24
Page is loading ...

NeedleThreader
[] Raisetheneedletoits
highestposition.
Pulldowntheneedlethreaderknobasfarasit
willgo.
% Turn the knob in the direction of the arrow in the
illustration, then insert Hook into the needle eye.
Lead the thread around Guide and under Hook.
%
[]
Turn the knob in the direction of the arrow in the
illustration, drawing the thread loop through the
needle.
Pull the thread through the needle eye.
The needle threader can be used with a #11 to #16
needle or a blue tipped needle. Thread size
50 to 90 should also work well ..................
[]
%
%[]
$
, Drawing up bobbin thread
[_ Raise the presser foot. Hold the n_
with your left
_ead lightly
[_ Rotate the toward you,
forone complete ibbin thread up by
pulling the needle threaq
[_ Pull both threads 4" to 6" (10.0 to 15.0 cm) under and
behind the presser foot.
26
[]
%
Page is loading ...

Adjust the Needle Thread Tension for a Straight
Stitch
• Correct tension
_1_Needle thread (Top thread)
_2_Bobbin thread (Bottom thread)
(3_.To loosen
_4_To tighten
The ideal straight stitch has threads locked between two
layers of fabric, as illustrated (magnified to show detail).
If you look at the top and bottom of a seam, notice that
there are no gaps. Each stitch is smooth and even.
When adjusting the needle thread tension, the higher the
number, the tighter the needle thread tension.
Results depend on:
- stiffness and thickness of the fabric
- number of fabric layers
- type of stitch
•Tension is too tight
f \
,J_ Needle thread (Top thread)
_2_Bobbin thread (Bottom thread)
_3_To loosen
_4_Right side (Top side) of fabric
_5_Wrong side (Bottom side) of fabric
If the bobbin thread shows through on the right side (Top
side) of the fabric, and the stitch feels bumpy, turn the dial
to a lower tension setting number to loosen the needle
thread tension.
•Tension is too loose
_.1_Needle thread (Top
{2_,Bobbin thread
_3_To tighten
_4_.Right side
_5_,Wrong side
If the needle
(Bottom side) of th(
turn the dial to a hic
the needle thread tensi(
of fabric
wrong side
bumpy,
to tighten
• Adjust bobbin tension
'_l_Adjusting screw
_2_Increase tension
_'Decrease tension
NOTE:
Small screwdriver is not furnished with this machine, but
may be ordered. (page 4)
In some instances, you may need to adjust the bobbin
thread tension.
Turn the adjusting screw _1_in the direction of_3_when the
bobbin thread tension is too tight.
Turn the adjusting screw_l_ 'in the direction of_2_when the
bobbin thread tension is too loose.
28
f
J
\
J
\
J
-x
Page is loading ...

Adjust the Needle Thread Tension for a
Zigzag Stitch
For an ideal zigzag stitch, the bobbin thread does not show
on the right side (Top side) of the fabric and needle thread
shows slightly on the wrong side (Bottom side) of the
fabric.
See the illustrations for correct appearance.
To match this appearance, adjust the needle tension.
• Correct tension
_1_Right side (Top side) of fabric
,%
. _*Wrong side (Bottom side) of fabric
Minimize the amount of needle thread visible on the
wrong side (Bottom side) of the fabric without causing
excessive puckering or causing bobbin thread to show on
the right side (Top side) of the fabric.
Results vary with fabric, thread and sewing condition.
•Tension is too tight
f_
,_1_Right side (Top side) of fabric
?,-\
_2_Wrong side (Bottom side) of fabric
The corner of each zigzag pulls together on the right side
(Top side) of fabric.
•Tension is too loose
f x
L!SRight side (Top
,,2)Wrong side
Corner of each
(Bottom side)
wrong side
30
Page is loading ...
Page is loading ...
Page is loading ...
Page is loading ...
Page is loading ...
Page is loading ...
Page is loading ...
Page is loading ...
Page is loading ...
Page is loading ...
Page is loading ...
Page is loading ...
Page is loading ...
Page is loading ...
Page is loading ...
Page is loading ...
Page is loading ...
Page is loading ...
Page is loading ...
Page is loading ...
Page is loading ...
Page is loading ...
Page is loading ...
Page is loading ...
Page is loading ...
Page is loading ...
Page is loading ...
Page is loading ...
Page is loading ...
Page is loading ...
Page is loading ...
Page is loading ...
Page is loading ...
Page is loading ...
Page is loading ...
Page is loading ...
Page is loading ...
Page is loading ...
Page is loading ...
Page is loading ...
Page is loading ...
Page is loading ...
Page is loading ...
Page is loading ...
Page is loading ...
Page is loading ...
Page is loading ...
-
 1
1
-
 2
2
-
 3
3
-
 4
4
-
 5
5
-
 6
6
-
 7
7
-
 8
8
-
 9
9
-
 10
10
-
 11
11
-
 12
12
-
 13
13
-
 14
14
-
 15
15
-
 16
16
-
 17
17
-
 18
18
-
 19
19
-
 20
20
-
 21
21
-
 22
22
-
 23
23
-
 24
24
-
 25
25
-
 26
26
-
 27
27
-
 28
28
-
 29
29
-
 30
30
-
 31
31
-
 32
32
-
 33
33
-
 34
34
-
 35
35
-
 36
36
-
 37
37
-
 38
38
-
 39
39
-
 40
40
-
 41
41
-
 42
42
-
 43
43
-
 44
44
-
 45
45
-
 46
46
-
 47
47
-
 48
48
-
 49
49
-
 50
50
-
 51
51
-
 52
52
-
 53
53
-
 54
54
-
 55
55
-
 56
56
-
 57
57
-
 58
58
-
 59
59
-
 60
60
-
 61
61
-
 62
62
-
 63
63
-
 64
64
-
 65
65
-
 66
66
-
 67
67
-
 68
68
-
 69
69
-
 70
70
-
 71
71
-
 72
72
-
 73
73
-
 74
74
-
 75
75
-
 76
76
-
 77
77
-
 78
78
-
 79
79
-
 80
80
-
 81
81
-
 82
82
-
 83
83
-
 84
84
-
 85
85
-
 86
86
-
 87
87
-
 88
88
-
 89
89


Kenmore 38515358 User manual
- Category
- Sewing machines
- Type
- User manual
- This manual is also suitable for
Ask a question and I''ll find the answer in the document
Finding information in a document is now easier with AI
in other languages
- français: Kenmore 38515358 Manuel utilisateur
- español: Kenmore 38515358 Manual de usuario
Related papers
-
Kenmore 38512216790 Owner's manual
-
-
Sears 38517628890 Owner's manual
-
-
-
-
-
-
-
