Epson LabelWorks LW-300 User manual

Category
Label printers
Type
User manual

This manual is also suitable for

Epson LabelWorks LW-300 lets you create professional-looking labels for various uses. With its user-friendly interface, you can easily design and print custom labels with a wide range of fonts, symbols, and frames. You can save up to 30 frequently used labels for quick access. The LW-300 also offers advanced features like mirror and vertical printing, making it suitable for specialized tasks.

Epson LabelWorks LW-300 lets you create professional-looking labels for various uses. With its user-friendly interface, you can easily design and print custom labels with a wide range of fonts, symbols, and frames. You can save up to 30 frequently used labels for quick access. The LW-300 also offers advanced features like mirror and vertical printing, making it suitable for specialized tasks.

Read these instructions before using your product.
User’s Guide
Warning:
stops
1.
2.
1. Press
2. Press
3. Press
press
4. Press
press
.
Press
Press .
1. Press
2.
Press .
Note:
you
not
your label.
1. Press
available
2. Press
1. Press
2. Press
1. Press
2. Press
3. Press
Note:
press
1. Press
2. Press
3. Press
1. Press
where
press
2.
copies.
+
1. Press
2. Press
press
Note:
Button names and functions
1
2
3
4
5
6
7
8
9
11
12
13
14
15
16
17
18
19
20
21
10
1. Power
2. Font
3. Font size
4. Font style
5. Settings
6. Character keys
7. Shift key
8. Caps lock
9. Accent
10. Space
11. Shift key
12. Select/Enter
13. Punctuation
14. Symbols
15. Delete ( + deletes all text)
16. Preview
17. Print copies
18. Cursor keys ( + , + goes to previous or
next label)
19. Print ( + feeds the tape)
20. Cut button
21. Display
Turning the power off
Press to turn off the power. If using an AC adapter,
disconnect it from the wall outlet and the product. If
batteries are inserted, remove them only if the product
will not be used for a long period of time.
Display indicators
Indicators on the display show whether or not settings
are enabled.
1
7
8 69
2 3
4
5
10
11
1. Font size
2. Font width
3. Frame
4. Font style
5. Vertical text
6. Battery level
7. Cursor (blinks to indicate current position)
8. Line number (appears when multiple lines exist)
Note: You can print up to two lines of text.
9. Accent mark options
10. Upper/lower case
11. Label number (you can save up to 30 labels)
*412092100*
*412092100*
CPD-34888
Display settings
You can adjust the following display settings.
Contrast: Adjusts the density of the fonts on the display.
(Value: -5 to +5)
Language: Changes the language of the settings and
messages on the display.
inch:cm: Selects the unit of measurement.
To adjust display settings, follow the steps below:
1. Press to turn on the product.
2. Press + .
3. Press or to highlight a setting, then
press to select it.
4. Press or to select setting options, then
press .
.
Setup
This product operates with batteries (not included) or
with an AC adapter (not included).
Inserting batteries
1. Remove the rear cover.
2. Insert 6 AAA alkaline batteries.
Note: If you need to install a tape cartridge, see “Inserting
a tape cartridge” below.
3. Replace the cover and snap it into place.
Optional AC adapter (APT0615Z1-1)
Warning: Make sure to use AC adapter APT0615Z1-1 or
damage may occur.
1. Plug one end of the AC adapter into the product.
2. Plug the other end of the AC adapter into the wall
outlet.
Inserting a tape cartridge
1. Remove any slack from the ink ribbon.
2. Remove the rear cover, if necessary.
3. Insert the tape cartridge and press it down firmly until
it snaps into place. If there is excess tape, feed the end
of the tape through the tape guide slot.
4. Replace the cover and snap it into place.
Preparing the tape
After inserting a tape cartridge, make sure to feed
some tape through the tape guide slot to position it
for printing.
1. Press to turn on the product.
2. Press + .
3. Press the Cut button to cut the tape.
Warning: Do not press the Cut button until the tape
stops moving or the tape cartridge may be damaged.
Removing a tape cartridge
1. Remove the rear cover.
2. Hold the cartridge by the tabs, and lift it straight up.
Language selection
1. Press to turn on the product.
2. Press + .
3. Press or to highlight Language, then
press .
4. Press or to select your language, then
press .
.
Creating labels
Use the character keys to enter text, then see below.
Changing the letter case
Press to enter upper case or lower case for all letters or
+ character for a single letter..
Deleting characters
Press .
Deletes one character backward.
Deleting a label
1. Press + .
2. When a confirmation message appears, press .
All entered text will be deleted.
Breaking lines
Press .
Breaks the line from the character next to the cursor.
The line number is indicated on the display.
Note: You can print a maximum of two lines of text. If
you try to exceed the maximum, appears and you will
not be able to print. Press to delete the and print
your label.
Adding punctuation
There are two groups of available punctuation marks.
: ; < > [ ] { }
1. Press repeatedly to scroll through the
available marks.
2. Press to select the desired mark.
" | _ ^ \ = - +
1. Press + , then press repeatedly to scroll
through the available marks.
2. Press to select the desired mark.
Adding symbols
1. Press .
2. Press or to scroll through the
categories, then press to select a category.
3. Press or to select a symbol, then press .
Note: To cancel and return to the previous menu,
press .
Adding characters with an accent mark
If a character can include an accent mark, you can choose
it from a list indicated on the display.
1. Press + letter.
2. Press
.
A list of options appears on the display (e.g. ÈÉÊË).
3. Press or to select an item, then press .
Creating sequentially numbered labels
1. Press or to move the cursor to a position
where you want to add a serial number, then
press + .
2. Enter a number for the first label, then press .
The number increases by one when printing multiple
copies.
Saving labels
You can create and save up to 30 labels at a time.
To create multiple labels, type in your text, then press
+ or + to move to the next label (the label
number appears to the left of the text).
To print a label, press + or + to select the
label you want to print, then press .
Useful functions
Below are some common functions that will help you
customize your labels.
Changing the font size
1. Press .
2. Press or to select a line layout, then
press .
Note: You can select a maximum of two lines of text.
3. Press or to select a font size, then
press .
Tip: The setting is indicated on the display.
Changing the font
1. Press .
2. Press or to select a font, then
press .
The font used for the entire line of text will change.
Available fonts
B.Gothic
BR
CB
CL Roman
Gothic
Gyosho
SansS.HG
Mincho
ScriptPL
Reisho
Roman
SansS.
SansS.ST
US Roman
Changing the font style
1. Press .
2. Press or to select a style, then
press .
Note: Styles applied to small or elaborate characters may
not print clearly.
Available styles
Shadow
Outline
S+O+I
Italic
S+I
S+O
Normal
Bold
B+I O+I
Adding a frame
1. Press .
2. Press or to select Frame, then
press .
3. Press or to scroll through the options,
then press , or enter the frame number, to select
the desired frame.
Specifying the length of labels
1. Press .
2. Press or to select Label length, then
press .
3. Press or to select a value (up to 15
inches [40 cm]), then press .
Tip: Selecting Auto will adjust to the proper length
automatically.
Adjusting the space between characters
1. Press .
2. Press or to select Char. spacing, then
press .
3. Press or to select Narrow or Wide,
then press .
Note: The default setting (Narrow) is recommended.
Changing the font width
1. Press .
2. Press or to select Narrow, then press
.
3. Repeat step 2.
Creating vertical text
1. Press .
2. Press or to select Vertical, then
press .
3. Press or to select On, then
press .
Creating mirror image text
1. Press .
2. Press or to select Mirror print, then
press .
3. Press or to select On, then
press .
Printing labels
Previewing a label
Press .
Entered text scrolls across the display.
Note: Only the text and the length of the label can be
previewed. The actual print image will not show on the
display.
Visit
U.S.:
Printing a label
1. Press .
The length of the label and the number of copies
shows on the display while the label prints.
2. When printing stops, press the Cut button.
Warning: Do not press the Cut button until the tape
stops moving or the tape cartridge may be damaged.
Printing multiple copies
1. Press .
2. At the next screen, press the number keys or the
or buttons to enter the number of
copies (2-9).
3. Press . The length of the label and the number of
copies shows on the display while the label prints.
4. When printing stops, press the Cut button to cut
the tape. A cut mark will be printed between each
copy. Using scissors, cut along the marks to separate
each label.
Adjusting print density
1. When the power is off, press + .
2. Press .
3. Use the or buttons to adjust the print
density, then press .
Note: The default value (0) is recommended.
Attaching labels
1. Peel off the backing paper.
2. Place the label on the desired surface and press it
down firmly.
Cleaning
Exterior
Use a dry, soft cloth or, for stubborn stains, a moist cloth
that has been wrung dry.
Caution: Never use chemicals or solvents such as benzine,
thinner, or alcohol, or use a chemical duster. This could
damage your product.
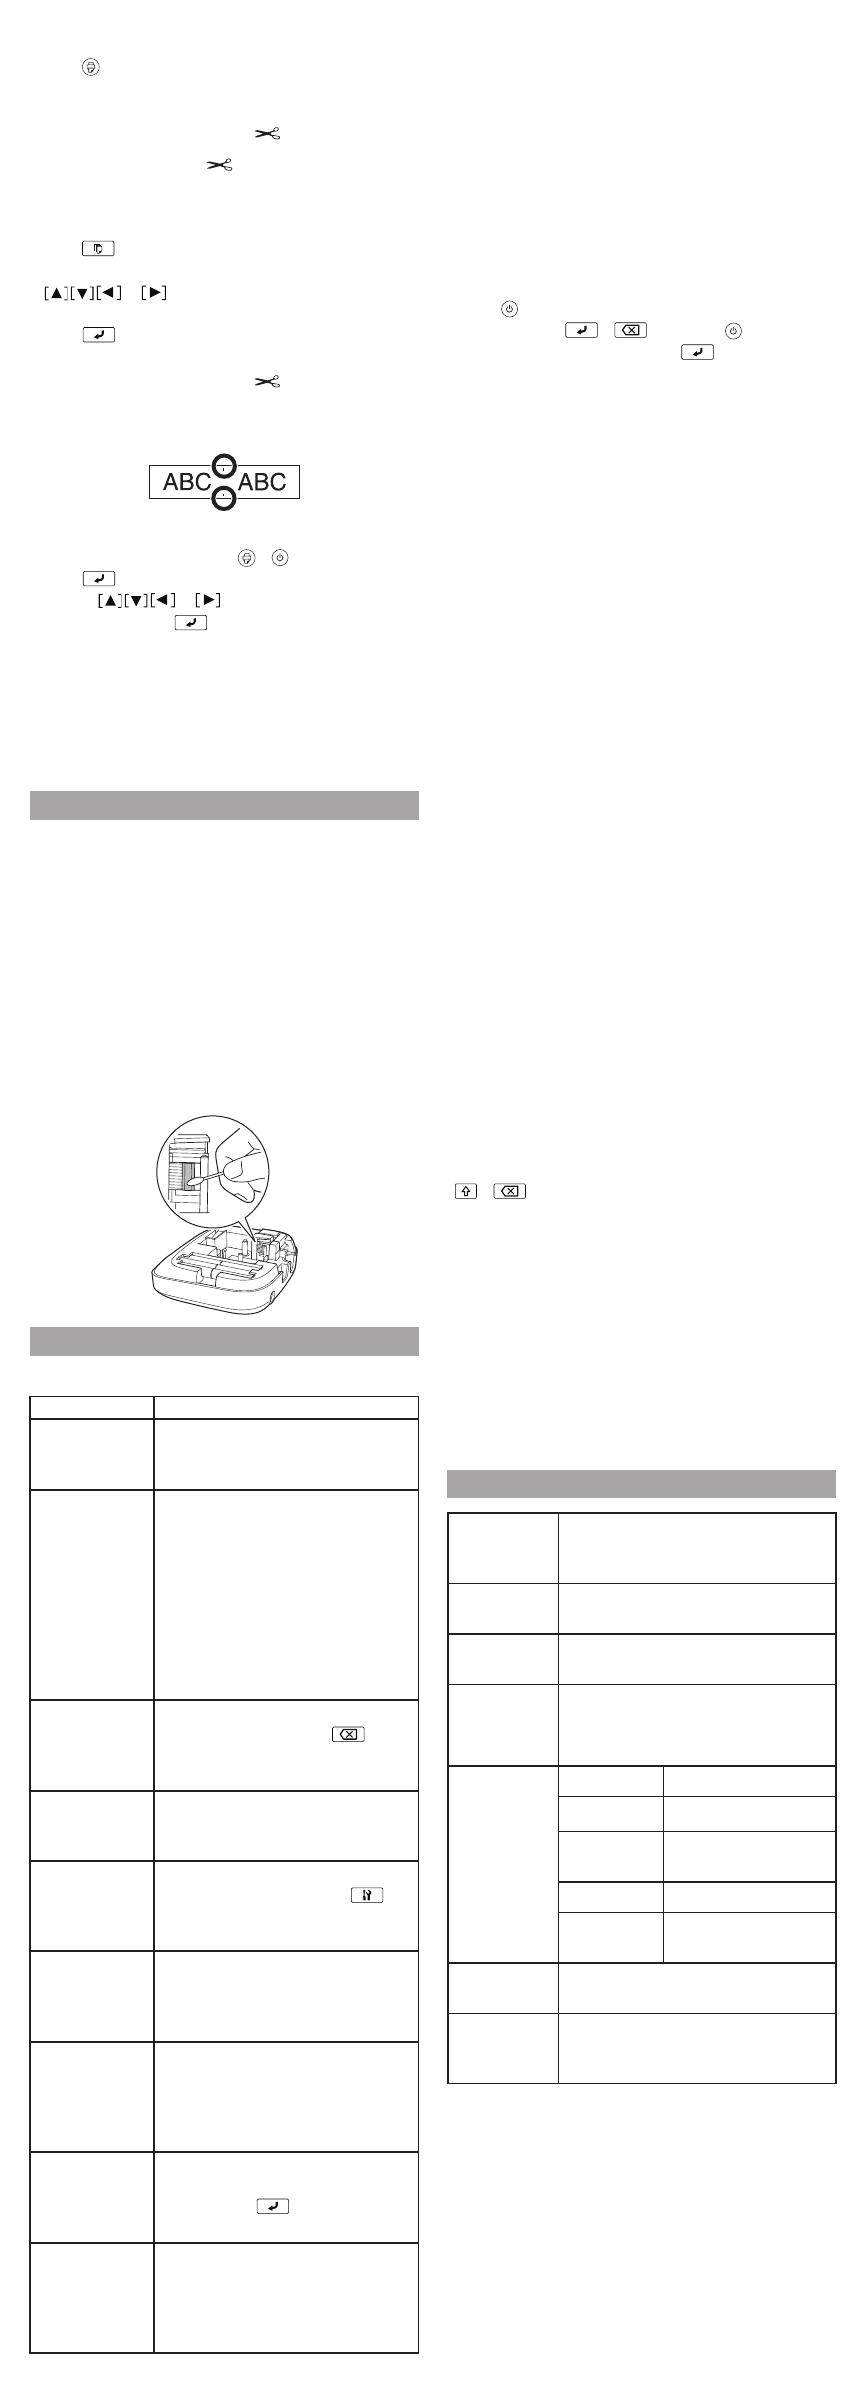
Cleaning the print head
If the print becomes faint or distorted, the print head may
need cleaning.
Remove the tape cartridge and clean the print head
using a cotton swab moistened with rubbing alcohol,
as shown.
Troubleshooting
Messages
Message Problem and solution
Insert tape No tape cartridge is installed. Turn
the power off and install a tape
cartridge.
Check battery The batteries may be running out,
the batteries may be installed
incorrectly, non-alkaline batteries are
being used with alkaline batteries,
or old and new batteries are being
used together. Turn the power off
and replace batteries with new ones,
or use the optional AC adapter. Make
sure new batteries are installed
correctly.
Too many lines You have exceeded the maximum
number of lines (2). Press to
delete the lines. (See “Breaking lines”
in “Editing text.)
Seq. num. only 1 Sequence numbers have already
been set. You can only enter one
sequence number per label.
Txt too long-
OK?
Entered text is too long for the
specified label length. Press and
adjust the label length or make text
shorter.
Overheated! The print head is too hot. Turn the
power off and remove the tape
cartridge. Allow the print head to
cool before trying to print again.
Cover open! If you open the rear cover while
the power is on, this message
displays and the power turns off
automatically. Always turn the power
off before opening the rear cover.
Delete all text? When creating a label with a special
format, the current text will be
deleted. Press to delete the text
and show the special format.
Motor error! An error occurred in the motor
operation. Turn the power off, then
turn it back on. If the same message
appears, turn the power off and
contact Epson.
, then
,
Problems and solutions
Check the solutions below if you are having trouble using
your product.
The product does not function normally
The product may stop functioning due to static
electricity or other causes. If your product does not
function normally (i.e. the power doesn’t turn on/off or
the display is distorted), reset your product by following
the procedure below.
Warning: Resetting your product will erase all saved labels
and formatting and return your product to default settings.
1. Press to turn the power off.
2. Press and hold + , and press .
3. When a message appears, press (to cancel, press
any other button).
The product will be reset.
Power is on but no images appear on the display
Make sure the batteries are inserted correctly.
Replace the batteries with new ones, or use the optional
AC adapter (APT0615Z1-1).
Warning: Make sure to use AC adapter APT0615Z1-1 or
damage may occur.
If you are using an AC adapter, make sure that it is
securely connected to both the wall outlet and the
product.
Adjust the contrast (see “Display settings”).
The display turns off
The power turns off automatically if the product is idle
for more than 5 minutes.
If an incorrect button sequence is entered, the display
may flicker or turn off for an instant.
Nothing prints
Make sure that text has been entered.
Replace the tape cartridge, if necessary.
Check the display for an error message and perform the
suggested solution.
Replace the batteries with new ones, or use the optional
AC adapter (APT0615Z1-1).
Make sure the rear cover is closed.
Characters do not print properly
Make sure the tape cartridge is correctly seated.
Clean the print head.
Change the font (sometimes symbols do not print
properly when certain fonts are selected).
Printing stops in the middle of text
Install a new tape cartridge.
Replace the batteries or use the optional AC adapter
(APT0615Z1-1).
Saved labels are missing
You may have accidentally deleted the text by pressing
+ .
If the product is reset, all of the previously entered text
will be deleted.
If the AC adapter is unplugged or the batteries are
removed during operation, the text may be deleted.
Cannot attach the label
Make sure to peel off the backing paper before
attaching the label.
Make sure the surface you are attaching to is clean and
dry. The label may not adhere to some materials, rough
or uneven surfaces, or surfaces subjected to extreme
environmental conditions, such as high humidity or
heat.
Specifications
Dimensions
(approximate)
Width 5.70 inches (145 mm)
Depth 5.90 inches (150 mm)
Height 2.16 inches (55 mm)
Weight
(approximate)
14 oz (400 g) (excluding batteries, tape
cartridge)
Operating
temperature
50 to 95 ºF (10 to 35 ºC)
Storage
temperature
14 to 131 ºF (-10 to 55 ºC)
Power supply -
optional AC
adapter
Model APT0615Z1-1
Manufacturer Seiko Epson Corp.
Input AC100-240 V, 0.3 A,
50-60 Hz
Output DC6.5 V, 1.5 A
Total output
power
10 W
Power supply -
batteries
AAA alkaline battery x 6
Supported
tape widths
(approximate)
1/4” (6 mm), 3/8” (9 mm), 1/2” (12 mm)
  • Page 1 1
  • Page 2 2
  • Page 3 3
  • Page 4 4
  • Page 5 5
  • Page 6 6
  • Page 7 7
  • Page 8 8

Epson LabelWorks LW-300 User manual

Category
Label printers
Type
User manual
This manual is also suitable for

Epson LabelWorks LW-300 lets you create professional-looking labels for various uses. With its user-friendly interface, you can easily design and print custom labels with a wide range of fonts, symbols, and frames. You can save up to 30 frequently used labels for quick access. The LW-300 also offers advanced features like mirror and vertical printing, making it suitable for specialized tasks.

Ask a question and I''ll find the answer in the document

Finding information in a document is now easier with AI

in other languages