Page is loading ...
Page is loading ...
Page is loading ...
Page is loading ...
Page is loading ...

6
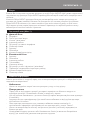
Introduction
Congratulations on your purchase and welcome to Philips AVENT! To fully benet from the support
that Philips AVENT offers, register your product at www.philips.com/welcome.
Philips AVENT is dedicated to producing caring, reliable products that give parents the reassurance
they need. This Philips AVENT baby monitor allows you to hear your baby from wherever you are in
and around your home. The sixteen different channel options guarantee minimal interference and a
secure reception, enabling you to be in constant contact with your baby.
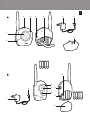
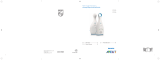
General description (Fig. 1)
Baby unit
1 Microphone
2 Socket for small plug
3 On/off button
4 Power-on light
5 Microphone sensitivity control
6 Channel selector
7 Adapter
8 Small plug
9 Battery compartment lid
B Parent unit
1 Adapter
2 Small plug
3 Power-on light
4 Loudspeaker
5 Connection light
6 Volume control with on/off function
7 Connection alarm switch
8 Battery compartment lid
9 Channel selector
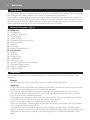
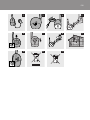
Important
Read these instructions for use carefully before you use the appliance and save them for future
reference.
Danger
Never immerse any part of the baby monitor in water or any other liquid.
Warning
Check if the voltage indicated on the adapters of the baby unit and the parent unit correspond
to the local mains voltage before you connect the appliance.
Only use the adapters supplied to connect the baby unit and the parent unit to the mains.
The adapters contain a transformer. Do not cut off the adapters to replace them with other
plugs, as this causes a hazardous situation.
If the adapters are damaged, always have them replaced with one of the original type in order
to avoid a hazard. For the correct type, see chapter ‘Replacement’.
Never use the baby monitor in moist places or close to water.
Except for the battery compartments, do not open the housing of the baby unit or the parent
unit in order to prevent electric shock.
This appliance is not intended for use by persons (including children) with reduced physical,
sensory or mental capabilities, or lack of experience and knowledge, unless they have been given
supervision or instruction concerning use of the appliance by a person responsible for their
safety.
-
-
-
-
-
-
-
-
ENGLISH

Children should be supervised to ensure that they do not play with the appliance.
The baby monitor has an operating range of 200 meters/600 feet in open air. Depending on the
surroundings and other disturbing factors, the operating range may be smaller (see section
‘Operating range’, in chapter ‘Using the appliance’.
Caution
Use and store the appliance at a temperature between 10°C and 40°C.
Do not expose the baby unit and parent unit to extreme cold, heat or direct sunlight.
Make sure the baby unit and its cord are always out of reach of the baby (at least 1 metre/3
feet away).
Never place the baby unit inside the baby’s bed or playpen.
Never cover the parent unit and the baby unit with anything (e.g. a towel or blanket).
Always place non-rechargeable batteries of the correct type in the baby unit and the parent
unit.
General
This baby monitor is intended as an aid. It is not a substitute for responsible and proper adult
supervision and should not be used as such.
This Philips AVENT appliance complies with all standards regarding electromagnetic elds (EMF). If
handled properly and according to the instructions in this user manual, the appliance is safe to use
based on scientic evidence available today.
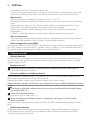
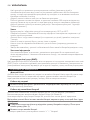
Preparing for use
Baby unit
You can use the baby unit from the mains or on non-rechargeable batteries. Even if you are going to
use the unit from the mains, we advise you to insert the non-rechargeable batteries. This guarantees
automatic back-up in case of mains failure.
Mains operation
1 Put the appliance plug in the baby unit and put the adapter into a wall socket (Fig. 2).
The power-on light goes on.
Operation on non-rechargeable batteries
The baby unit runs on four 1.5V R6 AA batteries (not included). We strongly advise you to use
Philips LR6 PowerLife batteries.
Do not use rechargeable batteries, as the baby unit does not have a charging function.
Unplug the baby unit and make sure your hands and the unit are dry when you insert the non-
rechargeable batteries.
1 Unlock the battery compartment lid by turning the locking knob with a coin. Then remove
the lid (Fig. 3).
2 Insert four non-rechargeable batteries.
Make sure the + and - poles of the batteries point in the right direction.
3 Reattach the battery compartment lid and close it by turning the locking knob with a coin.
When the batteries are low, the power light on the baby unit ashes red.
Parent unit
You can use the parent unit from the mains or on non-rechargeable batteries. Even if you are going
to use the unit from the mains, we advise you to insert the non-rechargeable batteries. This
guarantees automatic back-up in case of mains failure.
-
-
-
-
-
-
-
-
-
ENGLISH 7

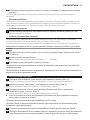
Mains operation
1 Put the appliance plug in the parent unit and put the adapter into a wall socket.
The power-on light goes on.
Operation on non-rechargeable batteries
The parent unit runs on four 1.5V R6 AA batteries (not included). We strongly advise you to use
Philips LR6 PowerLife batteries.
Do not use rechargeable batteries, as the parent unit does not have a charging function.
Unplug the parent unit and make sure your hands and the unit are dry when you insert the non-
rechargeable batteries.
1 Turn the locking knob a quarter turn (1) and slide the battery cover downwards to remove it
(2) (Fig. 4).
2 Insert four non-rechargeable batteries.
Make sure the + and - poles of the batteries point in the right direction.
3 Replace the battery compartment lid.
Note: When the batteries are low, the power light on the parent unit ashes red.
Note: When the batteries are completely empty, the parent unit automatically switches off and loses
contact with the baby unit.
1
Place the two units in the same room to test the connection (Fig. 5).
Make sure the baby unit is at least 1 metre/3 feet away from the parent unit.
2 Press the on/off button to switch on the baby unit (Fig. 6).
The power-on light lights up green continuously.
3 Turn the volume control to switch on the parent unit and to set the volume to the level you
prefer. (Fig. 7)
The power-on light lights up green continuously.
When a connection has been established between the units, the connection light on the
parent unit lights up green constantly.
Note: It takes about 30 seconds before a connection is established.
Note: If a connection cannot be established, the connection light on the parent unit ashes red.
4 Place the baby unit at least 1 metre/3 feet away from your baby (Fig. 8).
5 Place the parent unit within the operating range of the baby unit. Make sure it is at least 1
metre/3 feet away from the baby unit. For more information on the operating range, see
section ‘Operating range’ below (Fig. 9).
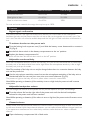
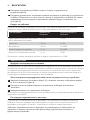
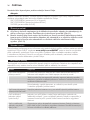
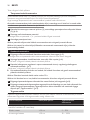
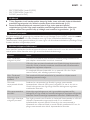
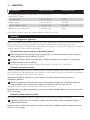
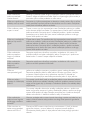
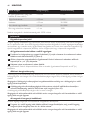
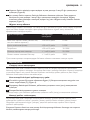
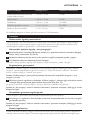
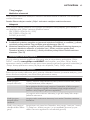
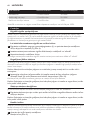
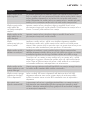
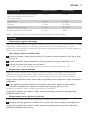
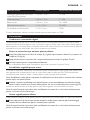
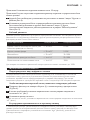
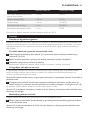
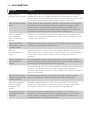
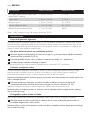
Operating range
The operating range of the baby monitor is 200 metres/600 feet in open air. Depending on the
surroundings and other disturbing factors, this range may be smaller.
Dry materials Material thickness Loss of range
Wood, plaster, plaster cardboard, glass
(without metal, wires or lead)
<30cm/12in 0-10%
Brick, plywood <30cm/12in 5-35%
,
ENGLISH8

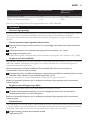
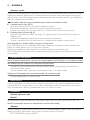
Dry materials Material thickness Loss of range
Reinforced concrete <30cm/12in 30-100%
Metal grilles or bars
<1cm/0.4in 90-100%
Metal or aluminium sheets <1cm/0.4in 100%
For wet and moist materials, the range loss may be up to 100%.
Features
The parent unit has a link light that continuously advises you of the status of the connection
between the baby and the parent units. You can set an alert on the parent unit to notify you if the
link is lost. The alert will sound an audible beep and the link light will ash red when a connection is
lost.
1 Turn the locking knob a quarter turn (1) and slide the battery cover downwards to remove it
(2) (Fig. 4).
2 Set the link alarm switch in the battery compartment to the ‘on’ position.
3 Replace the battery compartment lid.
To switch off the alert, set the link alert switch to the ‘off ’ position.
With the microphone sensitivity control on the baby unit, you can set the sound that is picked up by
the baby unit to the desired level: low, mid or high. When the microphone sensitivity is set to ‘high’,
the baby unit picks up all sounds.
Note: The sensitivity of the baby unit can only be changed when there is a connection between the baby
unit and the parent unit.
1 Use the microphone sensitivity control to set the microphone sensitivity of the baby unit to
the desired level. You can use your own voice as a sound reference (Fig. 10).
The power-on light on the baby unit turns yellow when a sound is transmitted.
Note: Whilst operating on batteries, if the sensitivity is set to a high level, the parent unit will consume
more power.
You can change the volume on the parent unit, so you can adjust to suit your surroundings.
1 Turn the volume dial on the right side of the parent unit until the desired loudspeaker
volume for the parent unit has been reached.
Note: Whilst operating on batteries, if the volume is set to a high level, the parent unit will consume more
power.
Channel selector
Always make sure that the channel selectors inside the battery compartments of both units are set
to the same channel. With these channel selectors, you can select sixteen different channel positions.
If you experience interference from other baby monitors, radio devices etc., select a different
channel..
1 Open the battery compartment lids of both units.
ENGLISH 9

Baby unit: (Fig. 3)
Turn the locking knob with a coin and remove the lid.
Remove the batteries from the battery compartment, if present.
Use a small, at screwdriver to turn the channel selector to the desired position.
Parent unit: (Fig. 4)
Turn the locking knob a quarter turn (1) and slide the battery cover downwards to remove it
(2).
Remove the batteries from the battery compartment, if present.
Use a small, at screwdriver to turn the channel selector to the desired position.
Note: Make sure both units are set to the same channel.
If you do not experience any interference when you test the connection, close the battery
compartments of the baby and the parent units.
If you experience interference, set the selector to another channel and test the connection again.
If the units are operating on non-rechargeable batteries, replace the batteries and close the battery
compartments.
Cleaning and Maintenance
Do not immerse the parent unit or the baby unit in water and do not clean them under the tap.
Do not use cleaning spray or liquid cleaners.
Unplug the baby unit or the parent unit if they are connected to the mains.
Clean the parent unit and the baby unit with a damp cloth.
Make sure the units are dry before you connect them to the mains.
Clean the adapters with a dry cloth.
Storage
When you are not going to use the baby monitor for some time, remove the non-rechargeable
batteries from the baby unit and parent unit. Store the baby unit, the parent unit and the adapters in
a cool and dry place.
Replacement
Baby unit
Batteries
Only replace the non-rechargeable batteries of the baby unit with four 1.5V R6 AA batteries.
Note: We strongly advise you to use Philips non-rechargeable batteries.
Only replace the adapter of the baby unit with an adapter of the original type. You can order a new
adapter from your dealer or a Philips service centre:
SBC CS0920/00W (EU/SGP only)
SBC CS0920/05W (UK only)
9VD200 (AU/NZ only)
Parent unit
Batteries
Only replace the non-rechargeable batteries of the parent unit with four 1.5V R6 AA batteries.
Note: We strongly advise you to use Philips non-rechargeable batteries.
,
-
-
-
,
-
-
-
-
-
-
-
-
-
ENGLISH10

Only replace the adapter of the parent unit with an adapter of the original type. You can order a
new adapter from your dealer or a Philips service centre:
SBC CS0920/00W (EU/SGP only)
SBC CS0920/05W (UK only)
9VD200 (AU/NZ only)
Do not throw away the appliance with the normal household waste at the end of its life, but
hand it in at an ofcial collection point for recycling. By doing this, you help to preserve the
environment (Fig. 11).
Batteries contain substances that may pollute the environment. Do not throw empty
batteries away with the normal household waste, but hand them in at an ofcial collection
point. Always remove the batteries before discarding the appliance or handing it in at an
ofcial collection point. (Fig. 12)
If you need service or information or if you have a problem, please visit the Philips AVENT website
at or contact the Philips Consumer Care Centre in your country (you
can nd the phone number in the worldwide guarantee leaet). If there is no Consumer Care
Centre in your country, go to your local Philips dealer.
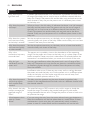
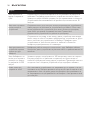
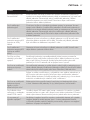
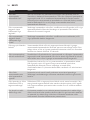
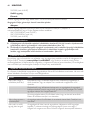
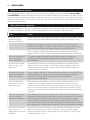
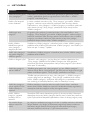
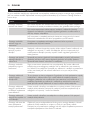
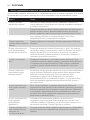
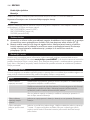
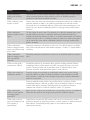
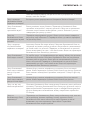
This chapter lists the questions most frequently asked about the appliance. If you cannot nd the
answer to your question, contact the Customer Care Centre in your country.
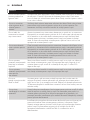
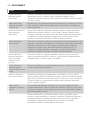
Question Answer
Why is the power-on
light not on?
Perhaps the appliance plug has not been inserted properly into the
socket on the unit, or perhaps the adapter has not or not properly been
inserted into the wall socket.
You may also have forgotten to switch on the units. Press the on/off
button on the baby unit and turn the volume control on the parent unit
downwards to switch on the units.
If you operate the units on batteries, the batteries may be low. In that
case, replace the batteries.
Why does the power
on light ash red?
You are operating the unit on batteries and the batteries are low.
Replace the batteries.
Why does the parent
unit produce a high
pitched noise?
The units are too close together. Move the parent unit at least 1 metre/3
feet away from the baby unit. If this does not help, the volume is too
high. Turn the volume control to a lower volume.
Why is there no
sound coming from
the parent unit?
Check if the volume is set high enough. If the volume is too low, turn the
volume control to a higher volume. Also check the microphone
sensitivity of the baby unit.
-
-
-
,
,
ENGLISH 11

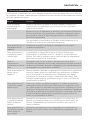
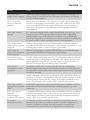
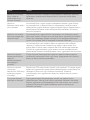
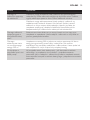
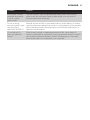
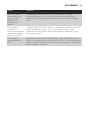
Question Answer
Why does the link
light ash red?
It ashes red because there is no connection. The parent unit may be out
of range of the baby unit or may be set to a different channel than the
baby unit. Check if the parent unit and the baby unit are both set to the
same channel. If they are, put the parent unit in a different place, closer
to the baby unit.
Why does the parent
unit beep?
What you hear is the link alarm. It indicates that there is no link between
the baby and the parent units. The parent unit may be out of range of
the baby unit or may be set to a different channel than the baby unit.
Check if the parent unit and the baby unit are both set to the same
channel. If they are, put the parent unit in a different place, closer to the
baby unit.
Why does the parent
unit react too slowly
to the baby’s sounds?
Set the microphone sensitivity on the baby unit to a higher level and/or
move the baby unit closer to the baby. Make sure the baby unit is at least
1 metre/3 feet away from the baby.
Why does the parent
unit react too quickly
to other sounds?
Set the microphone sensitivity on the baby unit to a lower level and/or
move the baby unit closer to the baby.
Why is the
connection lost every
now and then?
The parent unit is probably close to the boundaries of the operating
range. Put the parent unit closer to the baby unit in a place where it has
better reception. Please note that it takes about 30 seconds before the
connection is re-established when you move one or both of the units.
Why do I get
interference on the
parent unit?
You may get interference when the parent unit is out of range of the
baby unit. The parent unit may also be too close to a window and pick
up interfering signals through this window. Move the parent unit away
from the window.
Interference also occurs if there are too many walls or ceilings between
the parent unit and the baby unit. Put the parent unit in a different place,
closer to the baby unit. Also make sure the units are well away from
mobile or cordless phones, radios or TVs.
Why does the parent
unit pick up signals
from another baby
monitor?
The baby monitor operates on the same channel as another baby
monitor in the neighbourhood. Set both units to a different channel with
the channel selector.
Why doesn’t the baby
monitor manage the
specied range of
200m?
The specied range of 200 metres is only valid in open air. Inside the
house the range is limited by the number and type of walls and/or
ceilings between the two units. Change the position of one or both units
to optimise the range.
What happens when
there is a mains
failure?
If you are using the units from the mains without having put batteries in
them, the connection will be lost when there is a mains failure. If there
are batteries in both units, they will automatically switch to battery
power in case of a mains failure and the connection will not be lost.
ENGLISH12
Page is loading ...
Page is loading ...
Page is loading ...
Page is loading ...
Page is loading ...
Page is loading ...
Page is loading ...
Page is loading ...
Page is loading ...
Page is loading ...
Page is loading ...
Page is loading ...
Page is loading ...
Page is loading ...
Page is loading ...
Page is loading ...
Page is loading ...
Page is loading ...
Page is loading ...
Page is loading ...
Page is loading ...
Page is loading ...
Page is loading ...
Page is loading ...
Page is loading ...
Page is loading ...
Page is loading ...
Page is loading ...
Page is loading ...
Page is loading ...
Page is loading ...
Page is loading ...
Page is loading ...
Page is loading ...
Page is loading ...
Page is loading ...
Page is loading ...
Page is loading ...
Page is loading ...
Page is loading ...
Page is loading ...
Page is loading ...
Page is loading ...
Page is loading ...
Page is loading ...
Page is loading ...
Page is loading ...
Page is loading ...
Page is loading ...
Page is loading ...
Page is loading ...
Page is loading ...
Page is loading ...
Page is loading ...
Page is loading ...
Page is loading ...
Page is loading ...
Page is loading ...
Page is loading ...
Page is loading ...
Page is loading ...
Page is loading ...
Page is loading ...
Page is loading ...
Page is loading ...
Page is loading ...
Page is loading ...
Page is loading ...
Page is loading ...
Page is loading ...
Page is loading ...
Page is loading ...
Page is loading ...
Page is loading ...
Page is loading ...
Page is loading ...
Page is loading ...
Page is loading ...
Page is loading ...
Page is loading ...
Page is loading ...
Page is loading ...
Page is loading ...
Page is loading ...
Page is loading ...
Page is loading ...
Page is loading ...
Page is loading ...
Page is loading ...
Page is loading ...
Page is loading ...
Page is loading ...
Page is loading ...
Page is loading ...
Page is loading ...
Page is loading ...
Page is loading ...
Page is loading ...
Page is loading ...
Page is loading ...
Page is loading ...
Page is loading ...
Page is loading ...
Page is loading ...
Page is loading ...
Page is loading ...
Page is loading ...
Page is loading ...
Page is loading ...
Page is loading ...
Page is loading ...
Page is loading ...
Page is loading ...
Page is loading ...
Page is loading ...
Page is loading ...
Page is loading ...
Page is loading ...
Page is loading ...

4222.002.7303.1
PHL-A480LF-GER
( 42133 5045 790 )
F02-10540-000L
PHL-A480LF-GER
( 42133 5045 790 )
F02-10540-000L
-
 1
1
-
 2
2
-
 3
3
-
 4
4
-
 5
5
-
 6
6
-
 7
7
-
 8
8
-
 9
9
-
 10
10
-
 11
11
-
 12
12
-
 13
13
-
 14
14
-
 15
15
-
 16
16
-
 17
17
-
 18
18
-
 19
19
-
 20
20
-
 21
21
-
 22
22
-
 23
23
-
 24
24
-
 25
25
-
 26
26
-
 27
27
-
 28
28
-
 29
29
-
 30
30
-
 31
31
-
 32
32
-
 33
33
-
 34
34
-
 35
35
-
 36
36
-
 37
37
-
 38
38
-
 39
39
-
 40
40
-
 41
41
-
 42
42
-
 43
43
-
 44
44
-
 45
45
-
 46
46
-
 47
47
-
 48
48
-
 49
49
-
 50
50
-
 51
51
-
 52
52
-
 53
53
-
 54
54
-
 55
55
-
 56
56
-
 57
57
-
 58
58
-
 59
59
-
 60
60
-
 61
61
-
 62
62
-
 63
63
-
 64
64
-
 65
65
-
 66
66
-
 67
67
-
 68
68
-
 69
69
-
 70
70
-
 71
71
-
 72
72
-
 73
73
-
 74
74
-
 75
75
-
 76
76
-
 77
77
-
 78
78
-
 79
79
-
 80
80
-
 81
81
-
 82
82
-
 83
83
-
 84
84
-
 85
85
-
 86
86
-
 87
87
-
 88
88
-
 89
89
-
 90
90
-
 91
91
-
 92
92
-
 93
93
-
 94
94
-
 95
95
-
 96
96
-
 97
97
-
 98
98
-
 99
99
-
 100
100
-
 101
101
-
 102
102
-
 103
103
-
 104
104
-
 105
105
-
 106
106
-
 107
107
-
 108
108
-
 109
109
-
 110
110
-
 111
111
-
 112
112
-
 113
113
-
 114
114
-
 115
115
-
 116
116
-
 117
117
-
 118
118
-
 119
119
-
 120
120
-
 121
121
-
 122
122
-
 123
123
-
 124
124
-
 125
125
-
 126
126
-
 127
127
-
 128
128
-
 129
129
-
 130
130
-
 131
131
-
 132
132


Ask a question and I''ll find the answer in the document
Finding information in a document is now easier with AI
in other languages
- русский: Avent 9VD200 Руководство пользователя
- slovenčina: Avent 9VD200 Používateľská príručka
- polski: Avent 9VD200 Instrukcja obsługi
- čeština: Avent 9VD200 Uživatelský manuál
- eesti: Avent 9VD200 Kasutusjuhend
- română: Avent 9VD200 Manual de utilizare
Related papers


Other documents
-
Philips SCD470 User manual
-
Philips SCD463/00 User manual
-
-
 Philips AVENT SCD535/00 User manual
-
Philips SCD489/00 User manual
-
Philips SCX361/00 User manual
-
Philips FC8473/01 Important information
-
 Philips AVENT SCD486/00 User manual
-
Whirlpool ADG 271 User guide
-
Whirlpool ADP 402 IX User guide

