Page is loading ...

PPT 8800

PPT 8800
© 2003-2005 SYMBOL TECHNOLOGIES, INC. All rights
reserved.
Symbol reserves the right to make changes to any product to
improve reliability, function, or design.
Symbol does not assume any product liability arising out of, or in
connection with, the application or use of any product, circuit, or
application described herein.
No license is granted, either expressly or by implication, estoppel,
or otherwise under any patent right or patent, covering or relating
to any combination, system, apparatus, machine, material,
method, or process in which Symbol products might be used. An
implied license only exists for equipment, circuits, and subsystems
contained in Symbol products.
Symbol, the Symbol logo and Spectrum24
®
are registered
trademarks of Symbol Technologies, Inc. Bluetooth
®
wireless
technology is a trademark of Bluetooth SIG, Inc. Other product
names mentioned in this manual may be trademarks or registered
trademarks of their respective companies and are hereby
acknowledged.
Symbol Technologies, Inc.
One Symbol Plaza
Holtsville, N.Y. 11742-1300
http://www.symbol.com
Patents
This product may be covered by one or more U.S. and foreign
patents. For patent information go to:
http://www.symbol.com/patents.

1
Quick Reference
Introduction
Congratulations on your purchase of Symbol Technologies’ PPT
8800 Series terminal! Its unique combination of features make this
product superior for use in a wide range of applications. These
features include:
• Small rugged lightweight form factor
•Microsoft
®
Embedded Windows
®
CE .NET operating system
• RF communication via Symbol’s Spectrum24
®
wireless net-
work or Bluetooth™
• Printing support
• Scanning capability
• Standard 6-key and 15-key keypad configurations
• Transflective color LCD display.
About This Guide
This guide describes how to set up and use the terminal. The term
PPT 8800 Series refers to the batch, Spectrum24 and Bluetooth
versions of the terminal. Specific topics covered include:
• Accessories on page 2
• Parts of the Terminal on page 3
• Getting Started on page 5
• Resetting the Terminal on page 13
• Host Communications on page 15
• Attaching the Neck Strap on page 16
• Maintenance on page 17
• Troubleshooting on page 17
• Regulatory Information on page 21
• Warranty on page 25
• Service Information on backcover.

2
PPT 8800
The PPT 8800 Series Product Reference Guide for Embedded
Windows
®
CE .NET (p/n 72E-58094-XX) details the applications
available for the terminal. For the latest version of this guide, visit:
http://www.symbol.com/manuals.
Accessories
The following optional accessories will be available from Symbol:
• Spare lithium-ion rechargeable battery
• Large capacity lithium-ion rechargeable battery kit
• Single-Slot Serial Cradle
• Four-Slot Serial Cradle
• Four-Slot Ethernet Cradle
• Holster(s) or case
• Stylus or tethered stylus
• Wall-charging cable
• Serial Charging Cable
• Universal Cable Cup for attachable cables:
- Printer cable options
- DEX cable
- Auto charging cable
• Pistol Grip Handle
• Magnetic Strip Reader
• Vehicle Cradle.

3
Quick Reference
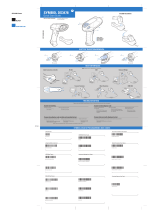
Parts of the Terminal
F3
F4
F2
F1
Keypad
Right Scan
Trigger
Scan LED
LCD Display
Scan Window
Stylus Silo
Infrared Port
Handstrap

4
PPT 8800
Parts of the Terminal (continued)
Locking
Screw
Speaker
Neckstrap/
Handstrap
Connector
Handstrap Connectors
Reset Button
Battery
Compartment
Battery Cover
Serial Port
Tether
Microphone

5
Quick Reference
Getting Started
Before using the PPT 8800, perform the basic setup procedures:
• Install and charge the main battery and backup battery
• Start the terminal
• Initiate the network connection.
Installing the Battery
Note: Also use the following procedures for installing the op-
tional large capacity lithium-ion battery and battery
cover.
1. Turn the locking screw counterclockwise until the battery
cover releases from the terminal.
2. Lift the battery cover away from the terminal.
3. Insert the battery in the battery compartment with the battery
tether positioned as shown, ensuring that the battery snaps
into place.
Teth er

6
PPT 8800
4. Replace the battery cover by inserting the top first, then
pressing the bottom in firmly.
5. Turn the locking screw clockwise to secure the cover to the
terminal.
Charging the Battery
Note: To charge the battery for your mobile device, battery
and charger temperatures must be between +32° F
and +104° F (0° C to +40° C).
Before using your terminal for the first time, charge the main
battery in the terminal for approximately 2 1/2 hours, using a
cradle or the serial charging cable.
Your terminal is equipped with a memory backup battery which
automatically charges from the fully-charged main battery. This
backup battery retains data in memory when the terminal’s battery
is removed, and takes about 24 hours to charge when you first use
your terminal.
Note: If the main battery is removed before the backup bat-
tery is fully charged, data may be lost. For this reason,
DO NOT remove the battery within the first 24 hours of
use.

7
Quick Reference
Charging the Battery Using the Serial Charging Cable
Charge the main battery using the Serial Charging Cable. The
battery charges in approximately 2 1/2 hours.
Charging the Battery Using a Cradle
Note: To ensure the quickest charging time, turn the terminal
off while charging.
Charge the main battery using the UBC Adapter or the CRD 8800
Single-Slot Cradle. The battery charges in approximately 2 1/2
hours. For more information, see the setup instructions in the CRD
8800 Single-Slot Cradle Quick Reference Guide.
Charging a Spare Battery
Charge a spare battery using the UBC Adapter or the CRD 8800
Single-Slot Cradle. For more information on charging with the
cradle, see the setup instructions in the CRD 8800 Single-Slot
Cradle Quick Reference Guide.
F3
F4
F
2
F
1
Serial Charging
Cable

8
PPT 8800
Starting the Terminal
Press the button to turn on the terminal. If the terminal does
not power on, perform a hard reset. See Performing a Hard Reset
on page 13.
As the terminal initializes its unique Flash File system, the Symbol
splash screen displays for about a minute followed by the
calibration screen. Note that these screens also appear every time
you perform a hard reset.
Calibrating the Screen
To calibrate the screen so the cursor on the touch screen aligns
with the tip of your stylus:
1. Remove the stylus from its storage silo on the back of the ter-
minal.
2. Carefully press and briefly hold the tip of stylus on the center
of each target that appears on the screen.
Note: To re-calibrate the screen at anytime, press +
on a 15-key terminal or press
+ on a
Standard 6-key terminal to launch the calibration
screen application.

9
Quick Reference
Using the Power Button
The button turns the terminal on and off and controls the
display’s backlight.
Adjusting the Backlight
Standard 6-Key Configuration
Use the key combinations below to adjust the backlight.
15-Key Configuration
Use the key combinations below to adjust the backlight.
Keys Description
Press and hold
Turn backlight on or off.
Press +
Decrease backlight (decrease brightness).
Press +
Increase backlight (increase brightness).
Keys Description
Press and hold
Turn backlight on or off.
Press +
Decrease backlight (decrease brightness).
Press +
Increase backlight (increase brightness).

10
PPT 8800
Using the Keypad
The terminal has two keypad configurations: A Standard 6-key and
a 15-key configuration.
Power Button
Application
Keys
Enter key
Function key
Scroll Keys
Application
Keys
Standard 6-Key Configuration
*
.
Power Button
Alpha Key
Enter Key
Function Key
Scroll Keys
Alphanumeric
Keys
15-Key Configuration

11
Quick Reference
Using the Stylus
The stylus selects items and enters information. The stylus
functions as a mouse.
• Tap: Touch the screen once with the stylus to press option
buttons and open menu items.
• Double-Tap: Touch the screen twice to execute application
software.
• Drag: Hold the stylus on the screen and drag across the
screen to select text and images. Drag in a list to select mul-
tiple items.
Scanning
The terminal has an integrated scanner which collects data by
scanning bar codes. See the PPT 8800 Series Product Reference
Guide for information on configuring your terminal for scanning.
To scan bar codes:
1. Launch the terminal’s scanning application.
2. Aim the scanner at the bar code.

12
PPT 8800
3. Press either the right, or left scan trigger. Ensure the red
scan beam covers the entire bar code. The green scan LED
lights and a beep sounds to indicate a successful decode.
Initiating a Network Connection
Before using the terminal, set up the Spectrum24 network or
Bluetooth connection. Refer to the PPT 8800 Series Product
Reference Guide for setup instructions.

13
Quick Reference
Resetting the Terminal
If the terminal stops responding to input, reset it.
Performing a Soft Reset
A soft reset restarts the terminal and saves all stored records and
entries.
Caution: Files that remain open during a soft reset may not be
retained.
DO NOT perform a soft reset if the terminal is suspend-
ed. Press the power button to wake the terminal.
To perform a soft reset on the Standard 6-key keypad, press the
Enter and keys while holding down either the left or right scan
trigger and then releasing the keys.
To perform a soft reset on the 15-key keypad, press and
keys while holding down either the left or right scan trigger
and then releasing the keys.
Performing a Hard Reset
A hard reset also restarts the terminal, but erases all stored
records and entries. Therefore, never perform a hard reset unless
a soft reset does not solve the problem.
Note: You can restore any data previously synchronized with
a computer during the next ActiveSync operation. See
the PPT 8800 Series Product Reference Guide.

14
PPT 8800
To perform a hard reset:
1. Remove the battery cover.
2. While holding down the Function key, use the stylus to gently
press the reset button.
3. Release the Function key.
4. Replace the battery cover.
5. Press .
6. As the terminal initializes its unique Flash File system, the
Symbol splash screen displays for about a minute.
7. See Calibrating the Screen on page 8 to perform an initial
setup of the terminal.
Caution: With a hard reset, formats, preferences, and other set-
tings are restored to their factory default settings.
Reset
Button

15
Quick Reference
Host Communications
The terminal can communicate with a host computer either directly
through its communications port using the cradle, or wirelessly via
the Spectrum24
®
wireless LAN or Bluetooth Wireless PAN. For
more information on setting up and performing wireless
communications with your terminal, refer to the PDT 8800 Series
Product Reference Guide.
Using the Serial Charging Cable
To connect the serial charging cable for host communication:
1. Insert the cable into the bottom of the terminal.
2. Connect the other end of the cable into the serial port of the
host computer.
3. Begin host communications as specified by your application.
Using the Cradle
The terminal can communicate with a host computer using the
single-slot serial cradle, four-slot serial cradle and four-slot
ethernet cradle. For more information, see the connection
instructions in the cradle’s Quick Reference Guide.
Communicating with Printers
To print to a standard printer:
1. Attach the Universal Cable Cup to the bottom of the terminal.
2. Attach the appropriate printer cable to the serial port in the
bottom of the Universal Cable Cup.
3. Attach the other end of the cable to the data communications
connector on the printer.
4. Run the application's print function.

16
PPT 8800
To print from an IrDA-compliant printer:
1. Point the IrDA port on the back of the terminal at the IrDA
port on the printer, at a maximum distance of 39 inches (1
meter).
2. Run the application's print function.
Note: The terminal must have software configured to com-
municate with the printer you are using.
Attaching the Neck Strap
1. Thread the elastic band on the neck strap through the hand-
strap connector on the back of the terminal.
2. Slip the strap through the elastic band, and pull it through to
secure the strap to the connector.
Thread elastic band
through connector

17
Quick Reference
Maintenance
• Do not scratch the screen. Use the supplied stylus or plastic
tipped pens intended for use with a touch-sensitive screen.
Never use a pen or pencil or other sharp object on the
screen.
• Do not drop the terminal or subject it to strong impact.
• Do not use the terminal where there is a lot of dust and dirt in.
• Do not leave the terminal in direct sunlight, in very high hu-
midity, and near heat source.
• Do not use the terminal where there is water.
• If the surface of the screen becomes soiled, clean it with a
soft cloth moistened with a diluted window-cleaning solution.
• Discard used lithium-ion battery according to a regulation.
Never put the terminal into a fire because it may explode.
Troubleshooting
Problem Cause Solution
Terminal does not
turn on.
Battery not charged. Charge or replace the battery in the
terminal.
Battery not installed
properly.
Ensure battery is installed properly.
See Installing the Battery on page 5.
System crash. Perform a hard reset. See Mainte-
nance on page 17.
Rechargeable lith-
ium-ion battery
did not charge.
Battery failed. Replace battery. If your terminal still
does not operate, try a soft reset, then
a hard reset; see Resetting the Termi-
nal on page 13.
Terminal removed
from cradle while
battery was charg-
ing.
Insert terminal in cradle and begin
charging. The lithium-ion battery re-
quires up to 2 1/2 hours to recharge
fully.
Cannot see char-
acters on display.
Terminal not pow-
ered on.
Press the Power key.

18
PPT 8800
Fail to communi-
cate with IrDA
printer.
Distance from print-
er is more than 1
meter (39 inches).
Bring the terminal closer to the printer
and attempt communications again.
Obstruction inter-
fered with communi-
cation.
Check the path to ensure no objects
were in the way.
IrDA window is dirty
or obstructed.
Gently clean the IrDA window using a
tissue or other non-abrasive material.
Do not spray any cleaner directly on
the IrDA window.
Application is not
enabled to run IrDA
printing.
Printer support must be included with
the application to run IrDA printing on
the terminal. See your System Admin-
istrator.
During data com-
munication, no
data was transmit-
ted, or transmitted
data was incom-
plete.
Terminal removed
from cradle during
communications.
Replace the terminal in the cradle and
re-transmit.
Incorrect cable con-
figuration.
See your System Administrator.
Communication
software was incor-
rectly installed or
configured.
Perform setup as described in the
PPT 8800 Series Product Reference
Guide.
No sound is audi-
ble.
Volume setting is
low or turned off.
Check the System Volume slider in
the Volume & Sounds properties dia-
log box (under Start - Settings) to en-
sure the volume is set to an adequate
level.
Terminal turns it-
self off.
Terminal is inactive. Your terminal turns off after a period of
inactivity. This period can be set from
one to five minutes, in one-minute in-
tervals. Check the Power dialog box
(under Start - Settings), and change
the setting if you need a longer delay
before the automatic shutoff feature
activates.
Problem Cause Solution
/