Page is loading ...

Single Pipe Stinger
3
APPLICATIONS: 2000-`02 GPR1200R; 1999-`00 XL1200Ltd.; 2001-`03 XLT1200
PART# - RY1522
PART# QTY DESCRIPTION
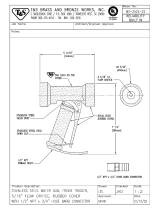
N/A 1 Stinger 3 Billet Flange
N/A 1 Stinger 3 Head Pipe
N/A 1 Stinger 2/3 Tail Pipe
N/A 6 8MM x 20mm Button Hex Head Bolt, SS
N/A 6 8MM Flat Washer, SS
RY15-5021 2 #177 - Lord Mount (short/single stud)
RY15-3.5/1.58 1 3-1/2"ID X 1-5/8"L Silicone Coupler
RY15-04/3.18 2 4"ID x 3-1/8"L Silicone Coupler
RY-AWAB-CLAMP-#64 4 #64 - 4-1/2" AWAB Hose Clamp
N/A 2 1/2" Barbed x 1/4" NPT 45* Brass Fitting
129-8-4 2 1/2" Barbed x 1/4" NPT 90* Brass Fitting
125-6-2 1 3/8" Barbed x 1/8" NPT 90* Brass Fitting
HBT1-664B 1 3/8" Barbed x 1/4" NPT x 3/8" Barbed "T" Fitting
73-8 1 1/2" Barbed Hose Splicer
N/A 1 1/2" Barbed "T" Fitting
RY068 6 3/8" Waterline, Synflex, Black
RY078 8 1/2" Waterline, Synflex, Black
COMCLP0015 6 #12 - 1/2" Hose Clamp
COMCLP0010 6 #06 - 3/8" Hose Clamp
RY8022B 1 3/8" Water Bypass, Black
RY804B 1 1/2" Water Bypass, Black
N/A 2 Variable Pitch Stud
N/A 2 3/8"-16 Flange Nut, SS
N/A 2 3/8" Lock Washer, SS
JW-WR01 1 Inline Water Restrictor
PARTS LISTING
INSTALLATION INSTRUCTIONS
*WARNING! DISCONNECT BATTERY AND TURN FUEL OFF BEFORE PERFORMING WORK!*
Removing OE Exhaust
1. Remove wrist lanyard; disconnect battery cables, spark plug wires and turn fuel valve to off position.
2. FOR GPR’s
: Remove battery and fire extinguisher container from battery tray. Next, remove the electrical box by removing
the two OE M8 nuts and washers on each side of electrical box holding it to the front of the battery tray. NOTE: Be careful
not to cut or damage wiring around and/or leading into electrical box. Then, remove the battery tray by removing the
four cap nuts and lay electrical box down behind bulkhead.
FOR XLL & XLT’s
: Proceed to step 3.
3. Loosen the two OE hose clamps that retain the large black exhaust boot/cooling coupler and slide boot/coupler forward over
OE exhaust head pipe. (Refer to illustration #4) Disconnect catalytic converter and exhaust outlet flange temperature
sensors at their connectors located on the side of electrical box. Loosen hose clamp retaining OE exhaust outlet flange in
exhaust outlet flange coupler. (Refer to illustration #5)
5. Remove rear section of OE exhaust system (catalytic converter to exhaust outlet flange coupler). Retain the two OE #64
hose clamps from the gray coupler that joins the OE exhaust head pipe to the catalytic converter. Discard gray coupler.
(Refer to illustration #1) Remove the two OE exhaust brackets from cylinder head. Leave OE exhaust bracket mounted
on the rear of engine in place.
Word doc. RY1522 © H1 8/26/02 1

6. Remove OE exhaust outlet flange from end of OE rear exhaust section by removing the six M8 X 30mm bolts. Retain
exhaust outlet flange and exhaust outlet flange gasket for later use. Note: The exhaust outlet flange temperature
sensor can be left in place or removed and the location plugged. We have yet to determine the full benefits of
adding water injection to this location. Either way, the sensor probe must remain plugged into the OE wiring
harness on the side of the electrical box for craft to operate properly.
Prepping for installation of Stinger
3
7. Install the included 1/2" barbed x 1/4" NPT 90 degree brass fitting, 3/8" barbed x 1/8" NPT 90 degree brass fitting and 3/8"
barbed x 1/4" NPT x 3/8" barbed brass ‘T’ fitting into Stinger
3
billet flange. (Refer to illustration #2) Note: Use pipe thread
sealant on threads. Do not over tighten.
8. Install included Inline Water Restrictor on Stinger3 billet flange between the 3/8" barbed x 1/8"NPT 90 degree brass fitting
and the 3/8" barbed x 1/4"NPT x 3/8" barbed brass ‘T’ fitting using two 2” long pieces of included 3/8”ID waterline. (Refer to
illustration #2) Secure using two of the included 3/8” hose clamps. Do not over tighten clamps. WARNING: Do not
remove washer between jam nut and valve. Overheat damage could occur if washer is removed and valve is closed
completely. (See ‘Recommendations & Tips’ on page 4 for tuning using Inline Water Restrictor.)
9. Install included 3/8” and 1/2” water bypasses. Note: We recommend installing bypasses under grab handle at rear of
craft as water exiting bypass is hot. Be sure to use silicone sealant when installing. Secure one end of the included
3/8” and 1/2”ID waterlines to their respective bypasses using one of the included 3/8” and 1/2” hose clamps. Do not over
tighten clamps. Run 3/8” waterline forward along right side of craft and 1/2” waterline forward along left side of craft past
bulkhead.
10. Install included 1/2" barbed brass hose splicer into OE 1/2" exhaust cooling line and secure using OE 1/2" hose clamp.
(Refer to illustration #4) Then install included section of 1/2" waterline onto 1/2" brass barded hose splicer and secure
using one of the included 1/2" hose clamps. Do not over tighten clamps. Lay waterline over intake manifold.
11. For OEM Cylinder Head Applications
:
Splice the longer OE 1/2" waterline from exhaust head pipe to cylinder head. Install included 1/2" barbed ‘T’ Fitting and
secure using supplied 1/2" hose clamps. Attach 1/2" waterline for previously installed 1/2" bypass to ‘T’ fitting and secure
using included 1/2" hose clamp. (Refer to illustration #7.) Do not over tighten clamps.
For Riva Performance & Pro-Series Cylinder Head Applications:
Install one each of included 1/2" barbed X 1/4" NPT 45 degree brass fittings into front and center cylinder heads. Install
included 1/2" barbed X 1/4" NPT 90 degree brass fitting into rear cylinder head. Replace OE 1/2" waterline from exhaust
head pipe to cylinder head with included 1/2" waterline and secure using OE 1/2" hose clamps. Attach 1/2" waterline from
previously installed 1/2" bypass to 1/2" barbed X 1/4" NPT 90 degree brass fitting on rear cylinder head and secure using
included 1/2" hose clamp. (Refer to illustration #8.) NOTE: Use pipe thread sealant on threads. Do not over tighten
brass fittings or hose clamps.
12. Install fine-pitched end of the two included Variable Pitch Studs into OE exhaust bracket on rear of engine and into rear
most exhaust bracket-mounting boss on rear cylinder head. Install the two included #177 Lord Mounts (short/single stud)
onto the Variable Pitch Studs. (Refer to illustration #4) Use Loc-Ttite 572 on threads.
13. Thoroughly clean OE exhaust outlet flange and OE exhaust outlet flange gasket. Coat gasket with sealant. (We
recommend using Permatex Copper SPRAY-A-GASKET Hi-Temp Adhesive Sealant. This is available through Riva
Yamaha’s parts department [part# 80697] or most automotive stores. Please follow manufacturer’s instructions when using
sealant.) Install OE exhaust outlet flange onto Stinger
3
tail pipe section using included M8 X 20mm button hex head bolts
and M8 flat washers. (Refer to illustration #3) Use Loc-Tite 572 on bolts. Note: Be sure when installing, the flat edge
of gasket is located at the overheat sensor point. If OEM exhaust outlet flange gasket requires replacing use
Yamaha Genuine Part# 66V-14623-00-00 only.
Installing Stinger
3
** DENOTES: Prior to installing we strongly recommend you thoroughly clean all couplers and
mating surfaces with a non-residual cleaner such as PJ-1 Super Cleaner. (This is available through
Riva Yamaha’s parts department [part# 536003] and at most motorcycle dealerships.) Only use
window cleaner to ease installation. DO NOT use any type of lubricant or solvent!
14. Install included 3-1/2"ID X 1-5/8"L silicone coupler onto OE exhaust head pipe using one of the retained #64 OE hose
clamps. (Refer to illustration #5) Loosely tighten hose clamp securing coupler to head pipe and place second retained
OE #64 hose clamp over silicone coupler.
15. Insert Stinger
3
billet flange into 3-1/2"ID X 1-5/8"L silicone coupler completely**. (The inner venturi sits inside OE exhaust
head pipe.) Secure using retained OE #64 hose clamps. (Refer to illustration #5) Do not over tighten clamps.
Word doc. RY1522 © H1 8/26/02 2

16. Attach 1/2" waterline to 1/2" barbed x 1/4" NPT 90 degree brass fitting on Stinger
3
billet flange and secure using one of the
included 1/2" hose clamps. Attach 3/8” waterline line to 3/8" barbed x 1/4"NPT x 3/8" barbed brass ‘T’ fitting on Stinger
3
billet flange using one of the included 3/8” hose clamps. (Refer to illustration #4) Do not over tighten clamps.
17. Install one of the two included 4"ID x 3-1/8"L silicone couplers onto Stinger
3
billet flange and secure using one of the
included #64 hose clamps**. Loosely place a second included #64 hose clamp over silicone coupler. (Refer to illustration
#5) Do not over tighten clamp.
18. Install tail section of Stinger
3
into exhaust outlet flange coupler and onto lower Lord Mount on rear of engine**. Install one
each of the included 3/8”-16 flange nuts and 3/8” lock washers onto Lord Mount. Loosely tighten flange nut and hose clamp
on exhaust outlet flange coupler. Install one of the two included 4"ID x 3-1/8"L silicone couplers onto upper end of Stinger
3
tail section and place two of the included #64 hose clamps over silicone coupler. (Refer to illustration #5)
19. Insert straight end of Stinger
3
head pipe into 4"ID x 3-1/8"L silicone coupler on Stinger
3
billet flange and onto upper Lord
Mount on cylinder head **. Install one each of the included 3/8”-16 flange nuts and 3/8” lock washers onto Lord Mount.
(Refer to illustration #6) Loosely tighten flange nut and clamp at billet flange.
20. Slide silicone coupler on tail section up onto end of head pipe section splitting the distance between the two sections.
Secure loosely using previously installed #64 hose clamps. (Refer to illustration #6) Secure clamps at flat area of
exhaust tube before bead roll. (Refer to illustration #3)
21. Inspect all joints to ensure they are even, there is no binding and exhaust tubes aren’t rubbing anywhere. Once you are
certain everything lines up, tighten each hose clamp evenly. Do not over tighten clamps. Then tighten the two 3/8”-16
flange nuts. Note: It may be necessary to loosen the OE exhaust bracket located on rear of engine to allow Stinger
3
to line up evenly. If so, remove the two OE M10 X 50mm bolts completely, add Loc-Tite 271 and reinstall. Torque
to 30Nm (3.9m/kgf • 28ft/lbs).
22. Slide large black exhaust boot/cooling coupler Stinger
3
billet flange and secure using OE hose clamps**. (Refer to
illustration #6) Do not over tighten clamps.
23. For GPR’s:
Install battery tray, electrical box, battery and fire extinguisher in reverse order of step 2.
For XLL’s & XLT’s: Proceed to step 23.
24. Check bilge area for tools, loose lines and/or fittings. Reattach battery cables and turn fuel valve to on position.
25. Upon completing installation, run engine on flush kit and check for leaks. After allowing engine to cool, go over all hose
clamps to make sure they are seated properly. After your first test-ride we recommend you go over all hose clamps again to
ensure they are tight and seated properly after allowing engine to cool.
Word doc. RY1522 © H1 8/26/02 3

Single Pipe Stinger
3
PART# - RY1522
INSTALLATION RECOMMENDATIONS & TIPS
Carburetor mixture screws may need to be adjusted. Settings will vary due to altitude, climate and level of modification to craft. Tamper
caps will need to be removed in order to make adjustments. We recommend the following at sea-level:
Stock: Stock settings
Stage I to Stage II: Stock low speed / 1-1/4 +/- high speed. Stock pop-off and needle & seat. Add .020” clearance between
accelerator arm and cam. (These are starting points only. Always tune using an aftermarket tachometer and check spark plugs.)
Single Pipe Big Bore: Contact our technical department by phone; (954) 247-0705 or e-mail; [email protected]
.
Prior to installing any couplers we strongly recommend you thoroughly clean all couplers and mating surfaces with a non-residual cleaner
such as PJ-1 Super Cleaner. This is available through Riva Yamaha’s parts department (part# 536003) and at most motorcycle
dealerships. Only use window cleaner to ease installation. DO NOT use any type of lubricant or solvent!
If you aren’t using an aftermarket ignition such as the Riva Digital CDI (part# RY11820) we recommend installing a Riva Cat Temp Sensor
Chip (part# RY115-20). This will mimic the signal sent to the OE CDI by the catalytic converter’s temperature probe preventing CDI
flutters, warning devices and engine shut downs due removal of catalytic converter and sensor.
To ensure hose clamps remain tight add Red Loc-Tite on the worm drive after tightening. This is available through Riva Yamaha’s parts
department (part# 538070) and at most motorcycle dealerships. For those hard to reach clamps, add Loc-Tite to clamp prior to installing.
For added assurance we recommend using Squeeze-on Stainless Steel Clamps (aka Oetiker Clamps) when installing waterlines. These
stepless clamps won’t loosen or damage waterline like conventional hose clamps. This is available through Riva Yamaha’s parts
department in both 3/8” and 1/2" ID clamps as well as the tool required for installing. (Stepless clamps are not reusable.)
3/8”ID Clamps – Part# C-48549042-QTY Available in pre-packs of 50 or 100.
1/2”ID Clamps – Part# C-8904575-QTY Available in pre-packs of 50 or 100.
Oetiker Pliers – Part# C-48550347 Sold 1 each.
Inline Water Restrictor can be adjusted to dry out exhaust system by restricting water flow at billet flange. Restrictor comes preset in fully
open position. For increased mid-range and top-end speed, close restrictor 1/2-turn at a time. WARNING: Do not remove washer
between jam nut and valve. Overheat damage could occur if washer is removed and valve is closed completely.
For extended
periods of use such as long distance riding or racing we advise against closing valve completely. Always tune using an aftermarket
tachometer.
IMPORTANT: Technical Support
For answers to questions regarding installation or trouble shooting contact:
Riva Yamaha Tech Line @ (954) 247-0705 or online at [email protected]
or you’re local Riva Dealer.
Riva Yamaha Limited 1-Year Warranty
Riva Yamaha Exhaust Systems carry a one-year limited warranty to the original purchaser. They are warranted to be free of defects in materials and
workmanship under normal use and service. Customer modified components will be void of warranty. This warranty is limited to defects in the primary
aluminum components only. Anodized/painted finish, wear marks in or on aluminum parts, lord mounts, brass fittings and hardware are not covered under this
warranty.
Riva Yamaha’s liability is expressly limited to the repair or replacement of the primary aluminum components contained within or associated with this exhaust
system. Riva Yamaha agrees to repair or at Riva Yamaha’s option, replace any defective unit without charge, if product is returned to Riva Yamaha freight
prepaid and accompanied by a copy of the original invoice within the warranty period. Any equipment returned which, in Riva Yamaha’s opinion, has been
subjected to misuse, abuse, overheating, accident or modification shall not be covered by this warranty.
Riva Yamaha shall have no liability for special, incidental or consequential damages or injury to persons or property from any cause arising from the sale,
installation or use of this product.
No other warranty, express or implied, including, but not limited to the implied warranties of merchantability and fitness for a particular purpose, applies. Various
states do not allow for the limitation of incidental or consequential damages and therefore the above exclusion or limitation may not apply to you.
Warranty does not include the expenses related to freight or transportation of parts or compensation for any inconvenience or loss of use while being repaired.
A copy of the original invoice must accompany all warranty claims.
Warranted replacement parts will be returned freight collect.
Remember, the water belongs to everyone!
Please ride responsibly!
Word doc. RY1522 © H1 8/26/02 4

Single Pipe Stinger
3
PART# - RY1522
INSTALLATION ILLUSTRATIONS
OE Rear
Exhaust
Section
OE #64 Hose Clamps
OE Gra
y
Couple
r
3/8” Barbed X
1/8” NPT Fitting
Inline Water
Restrictor
RIVA S3
LOGO
3/8” Barbed X 1/4"
NPT X 3/8” Barbed
‘T’ Fitting
1/2" Barbed X
1/4” NPT Fittin
g
ILLUSTRATION #2
ILLUSTRATION #1
Bead roll.
Tighten hose
clamps here.
Stin
g
er Tail Section
OE Exhaust
Outlet Flange
3/8"
Waterline
1/2"
Waterline
Stinger
3
Billet
Flange Installed
#177 Lord Mounts
1/2" Barbed
S
p
lice
r
ILLUSTRATION #3
Word doc. RY1522 © H1 8/26/02 5
ILLUSTRATION #4

Single Pipe Stinger
3
PART# - RY1522
INSTALLATION ILLUSTRATIONS
RIVA S3
LOGO
3-1/2" Silicone
Coupler
Completed Stinger
3
installation!
OE Exhaust Boot /
Cooling Coupler installed
4" Silicone
Couplers
Exhaust
Outlet Flange
Cou
p
le
r
ILLUSTRATION #5 ILLUSTRATION #6
Word doc. RY1522 © H1 8/26/02 6

Single Pipe Stinger
3
PART# - RY1522
INSTALLATION ILLUSTRATIONS
ILLUSTRATION #7 ILLUSTRATION #8
Word doc. RY1522 © H1 8/26/02 7
/