Fellowes GALAXY E WIRE Owner's manual

Category
Binding machines
Type
Owner's manual

Fellowes GALAXY E WIRE is a versatile binding machine designed to handle various binding tasks with ease. It offers multiple wire comb closure options, catering to both single and multiple documents of varying sizes. The machine features a user-friendly design with an adjustable edge guide for precise punching alignment, ensuring neat and consistent results. With its robust construction and durable components, the GALAXY E WIRE is built to deliver reliable performance, making it an ideal choice for personal or office use.

Fellowes GALAXY E WIRE is a versatile binding machine designed to handle various binding tasks with ease. It offers multiple wire comb closure options, catering to both single and multiple documents of varying sizes. The machine features a user-friendly design with an adjustable edge guide for precise punching alignment, ensuring neat and consistent results. With its robust construction and durable components, the GALAXY E WIRE is built to deliver reliable performance, making it an ideal choice for personal or office use.

fellowes.com
fellowes.com
1789 Norwood Avenue, Itasca, Illinois 60143-1095 • USA • 630-893-1600
Australia Canada Deutschland France Japan Polska United Kingdom
Benelux China España Italia Korea Singapore United States
Electric Premium Wire Binder
Useful Phone Numbers
2012 Fellowes, Inc. Part No. 403315B
Please read these instructions before use.
Veuillez lire ces instructions avant utilisation.
Lea estas instrucciones antes del uso.
Help Line
Australia + 1-800-33-11-77
Canada + 1-800-665-4339
Europe 00-800-1810-1810
México + 1-800-234-1185
United States + 1-800-955-0959
Fellowes
Australia + 61-3-8336-9700
Benelux + 31-(0)-76-523-2090
Canada + 1-905-475-6320
Deutschland + 49-(0)-5131-49770
España + 34-91-748-05-01
France + 33-(0)-1-30-06-86-80
Italia + 39-071-730041
Japan + 81-(0)-3-5496-2401
Korea + 82-2-3462-2884
Malaysia + 60-(0)-35122-1231
Polska + 48-(0)-22-771-47-40
Singapore + 65-6221-3811
United Kingdom + 44-(0)-1302-836836
United States + 1-630-893-1600
Galaxy
Wire
CAPABILITIES
IMPORTANT SAFETY INSTRUCTIONS — Read Before Using!
When punching;
- always ensure the machine is on a stable surface
- test punch scrap sheets and set the machine before punching final documents
- remove staples and other metal articles prior to punching
- never exceed the machines quoted performance
When binding;
Keep the machine away from heat and water sources.
Never attempt to open or otherwise repair the machine.
Plug the machine into an easily accessible socket.
Note - this machine features a thermal cut-out device which activates when the
machine is overheated during use. It will automatically reset when the machine
is safe to operate.
2
Punching Capacity
Paper sheets
70-80g / 20lb 20 sheet
Transparent Covers
100-200 micron / 4-8 mil 3 sheet
200+ micron / 8+ mil 2 sheet
Other Standard Covers
160-270g / 40-60lb 3 sheet
270+g / 60+ lb 2 sheet
Binding Capacity
Max wire comb size 14mm /
9
/16
Max document (80g / 20lb) c. 130 sheet
Technical Data
Paper dimensions A4, A5
Punching slots 34
Fixed 2.5mm
Slot pitch 3:1”
Adjustable edge guide yes- rotary
Waste tray capacity c. 3000 sheets
Voltage 120V 50/60 Hz
Motor wattage 160W 1.0A
Duty cycle 30 mins on / 30 mins off
Net weight 14 kg / 31 lb
Dimensions (LxDxH) 20.9” x 17.7” x 6.5” / 530 x 450 x 165mm
Please read before use. Please keep for future reference.
ENGLISH
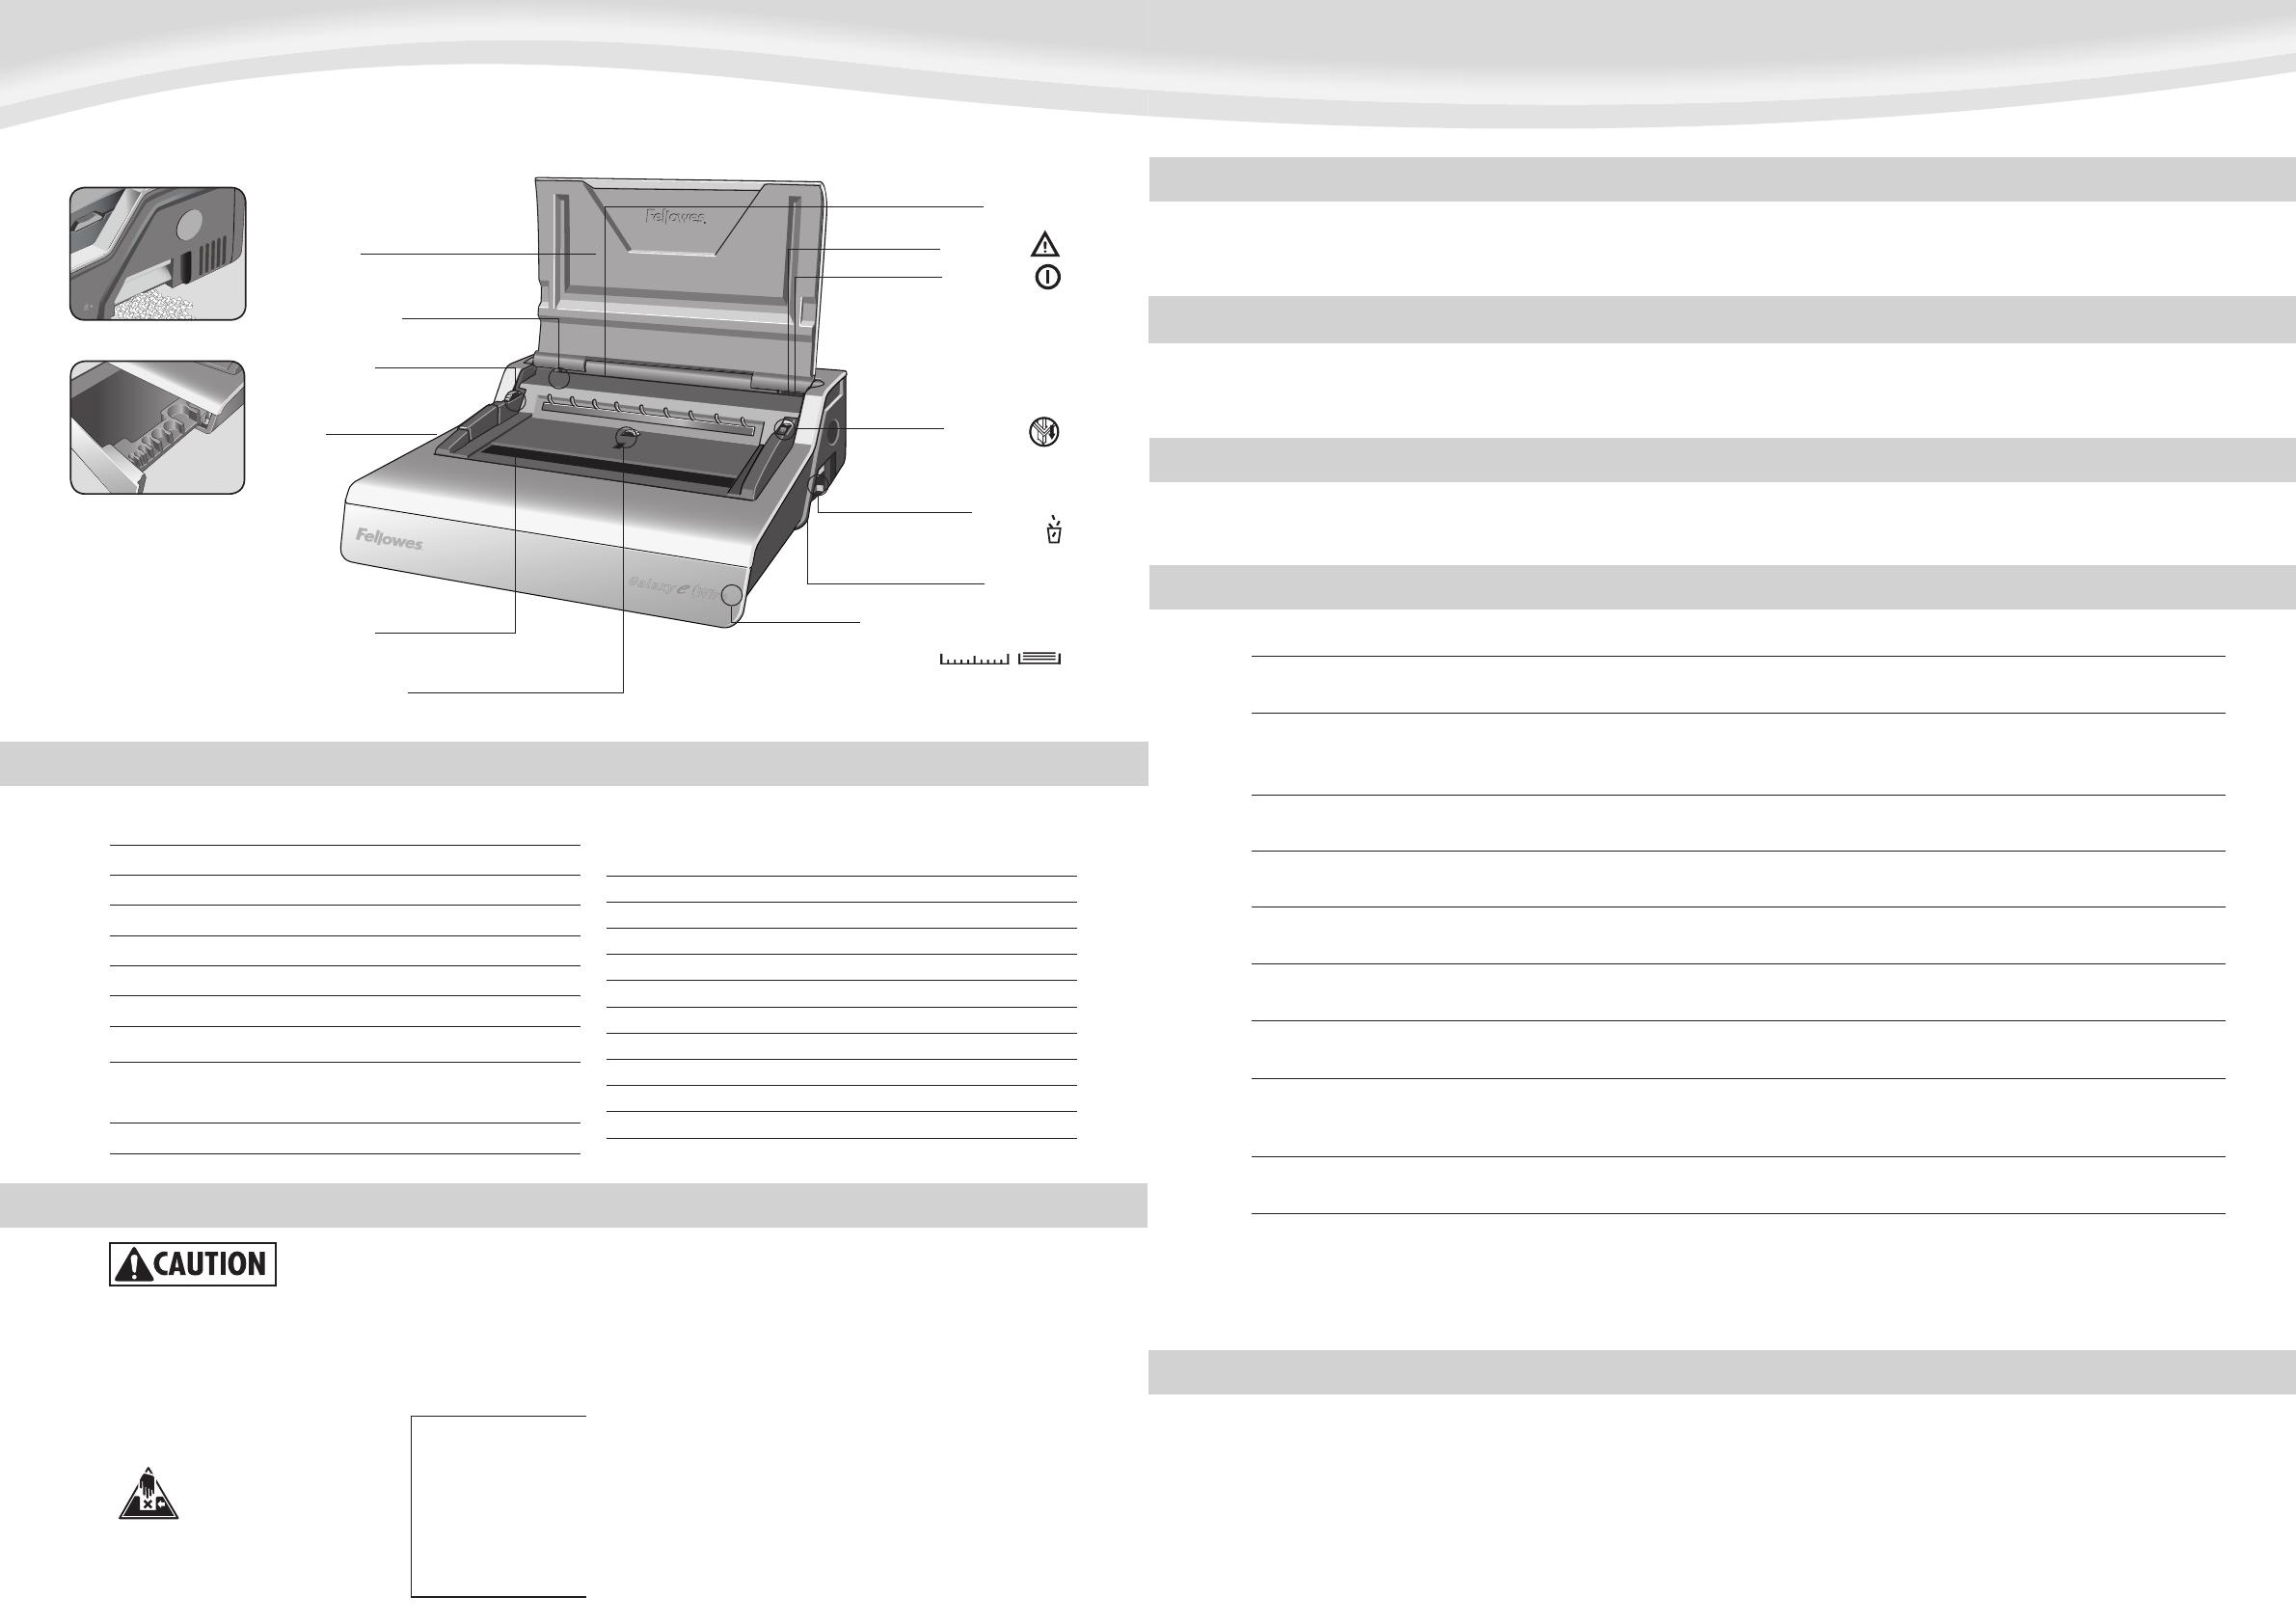
Wire comb storage and
document measure
Document
support (lid)
Adjustable
edge guide
Document
measure and
storage tray
Waste tray
(dual access)
Wire
closing
lever
Paper entry
Wheel to adjust
edge guide
Dual waste tray
Carry handle
Power on neon
Overload neon
Punch button
Need Help?
Customer Service….
www.fellowes.com
Let our experts help you
with a solution.
Always call Fellowes
before contacting
your place of purchase.
When binding;
- take care, potential pinch point
Wire closing jaws
Selectable lock control
19
CORRECCIÓN DE UN DOCUMENTO ENCUADERNADO
EXTRACCIÓN DE LOS RECORTES DESECHADOS
GARANTÍA MUNDIAL
Fellowes garantiza que todas las otras piezas de la encuadernadora estarán libres de defectos
de material y mano de obra durante 2 años a partir de la fecha en que el consumidor original
haya adquirido el producto. Si se encuentra algún defecto en cualquiera de las piezas durante
el período de garantía, la única y exclusiva solución será la reparación o el cambio de la pieza
defectuosa, a criterio y cuenta de Fellowes. Esta garantía no se aplica en los casos de uso
indebido, manejo inapropiado o reparación no autorizada. Por medio del presente, toda garantía
implícita, incluida la garantía de comerciabilidad o adaptabilidad para un propósito específico,
se limita al período de duración correspondiente de la garantía conferida anteriormente. En
ningún caso, Fellowes será responsable de cualquier daño directo, que pueda atribuírsele a este
producto. Esta garantía le confiere derechos legales. Podría tener otros derechos legales que
difieran de lo expuesto en esta garantía. La duración, los términos y las condiciones de esta
garantía son válidos en todo el mundo, excepto en los lugares donde la legislación local exija
limitaciones, restricciones o condiciones diferentes. Para obtener más detalles o recibir servicio
conforme con esta garantía, comuníquese con Fellowes o con su distribuidor.
SOLUCIÓN DE PROBLEMAS
La encuadernación con alambre es un sistema seguro. No se pueden agregar hojas adicionales a menos que se desarme el documento y se vuelva a encuadernar.
La bandeja para desechos está ubicada debajo de la máquina y se obtiene acceso a ésta desde ambos lados. Para obtener mejores resultados, vacíe la bandeja
con regularidad.
A fin de asegurarse de que no ocurran bloqueos, la bandeja debe vaciarse después de cada 50 operaciones.
ALMACENAMIENTO
Baje la tapa. La encuadernadora con peine Galaxy está diseñada para almacenarse horizontalmente sobre el escritorio.
Problema
El indicador verde de neón de encendido
no está iluminado
Indicador rojo de neón de estado
en espera
No se puede cerrar bien el peine
de alambre
Bordes de agujeros dañados
La bandeja para desechos pierde
Los agujeros perforados no
están centrados
La máquina no perfora
Los agujeros perforados no están
paralelos al borde
Bordes de agujeros parciales
Las hojas se salen del documento
Causa
La máquina no está encendida
La máquina se sobrecargó al perforar
Las mordazas de cierre están configuradas en un
diámetro demasiado grande
Es posible que haya sobrecargado la máquina
La bandeja para desechos no está correctamente
insertada o se ha activado la ‘función de ráfaga’
No se colocó la guía de bordes
Bloqueo
Hay desechos debajo de los troqueles
Las hojas no están correctamente alineadas al
patrón de perforación
El peine de alambre no está bien cerrado
Solución
Encienda la máquina en la parte trasera, junto a la entrada
del enchufe
Presione el botón de perforación. La máquina cancelará las
perforaciones y se restablecerá. Continúe este proceso hasta que
finalice el ciclo de perforación
Corrija la configuración del dispositivo de cierre de modo que
corresponda con un diámetro más pequeño, según sea necesario
Perfore las tapas plásticas con hojas de papel. Reduzca la cantidad de
hojas que perfora
Verifique que la bandeja para desechos esté vacía y que la ‘función
de ráfaga’ no esté activada
Ajuste la guía de bordes hasta que el patrón de los agujeros
sea correcto
Verifique que la bandeja para desechos esté vacía. Verifique que la
entrada del papel no esté bloqueada.
Deslice un cartón rígido por la entrada del papel. Mueva el cartón
de manera lateral para liberar los recortes sueltos en la bandeja
para desechos
Ajuste la guía de bordes y perfore hojas a modo de prueba hasta
corregir el problema
Verifique el cierre del peine de alambre. Colóquelo en el mecanismo
de cierre y mejore el cierre de la encuadernación. Corrija la
configuración del dispositivo de cierre de modo que corresponda con
un diámetro más pequeño, según sea necesario
18
mm inch number of sheets
6mm
1
/4” 2-35
8mm
5
/16” 36-50
10mm
3
/8” 51-61
11mm
7
/16” 61-80
12mm
1
/2” 81-100
14mm
9
/16” 100-130
WIRE COMB DIAMETER & DOCUMENT SIZES
3
Need Help?
Customer Service…. www.fellowes.com
Let our experts help you with a solution.
Always call Fellowes before contacting your
place of purchase.
SET UP
1. Ensure the machine is on a
stable surface.
1
2. Check waste tray is empty and cor-
rectly fitted. The tray can be accessed
from the left and right sides. The tray
has a ‘burst feature’ that operates
when the chip tray is ‘over-full’.
2
3. The machine is supplied with loose
power leads. Select the correct lead
for appropriate power supply.
3
4. Plug the lead into grounded
socket outlet.
4
5. Switch the machine on (located
at the rear of the machine).
5
6. Ensure the wire closing lever is
pushed backwards.
Galaxy
Wire
6
Galaxy
Wire
7. Lift the lid. Check the
green power neon is on.
7
ENGLISH
4
Galaxy includes two methods of wire comb closure, for all sizes of wire comb diameters between 6 and 14mm.
1– Visual scale. – ideal for binding single documents.
The moving closing jaw includes an easy to read scale
6mm 1/4”
8mm 5/16”
10 mm 3/8”
12mm 1/2”
14mm 9/16”
2– Selectable lock control. – ideal for multiple documents of the same sizes.
Set the red STOP bar to the preferred position. Turn the control wheel towards MAX
or MIN positions as required.
The red stop bar moves up and down within the central window.
BEFORE YOU BIND
4
2. Hang the selected wire
comb onto wire comb support.
3. Test punch scrap sheets to
check edge guide setting.
3
2
4. Punch sheets in small batches
that do not overload the machine
or user.
1. Select the correct wire comb
diameter using the storage
tray guide.
1
STEPS TO BIND – SINGLE DOCUMENT
3. Lift the wire comb upwards off
the hooks. Carefully place into the
open wire closing jaws. Ensure the
wire comb is open and touching the
bottom of the mechanism.
3
1. Starting with the rear cover.
Load punched sheets directly onto
the hanging open wire comb.
2. Punch and hang the front
cover. Punch and hang the
remaining sheets.
2
1
4. Lift the wire closing lever
forwards. The closing scale guide is
on the moving jaw. Close the jaws
until the wire gauge shows the size
of wire being closed.
4
6mm 1/4”
Max
niMxaM
14mm 9/16”
STOP
Min
Max 20
(80gsm)
17
PASOS PARA LA ENCUADERNACIÓN: VARIOS DOCUMENTOS
1. Pruebe el cierre del peine de
alambre seleccionado. Coloque
el dispositivo de cierre según sea
necesario. Verifique que el cierre
de la junta de alambre sea total.
1
4. Levante el peine de alambre
para quitarlo de los ganchos.
Colóquelo con cuidado en las
mordazas abiertas de cierre de
alambre. Asegúrese de que el
peine de alambre esté abierto
y que toque la parte inferior
del mecanismo.
2. Comience por la tapa trasera.
Cargue las hojas perforadas
directamente en el peine de
alambre abierto colgante.
3. Perfore y coloque la tapa
delantera. Perfore y coloque
las hojas restantes.
TERMINACIÓN DE LA ENCUADERNACIÓN
1. Verifique la junta cerrada.
Si la junta no está cerrada
correctamente, es posible
colocar el documento
en las mordazas y
cerrarlo nuevamente.
2. Para ocultar la junta,
coloque la tapa trasera atrás.
Ahora se ve la tapa delantera.
La junta está oculta dentro
del documento.
1 2
3. Verifique que el cierre de la
junta de alambre sea total. Si
la encuadernación está abierta,
pueden perderse hojas. Un buen
cierre retiene todas las hojas.
3
5. Levante la palanca de cierre
de alambre. Las mordazas se
cerrarán en la posición de parada
seleccionada previamente.
4
3
2
5
ESPAÑOL
16
Galaxy incluye dos métodos de cierre del peine de alambre, para todos los tamaños de diámetro de peines de alambre entre 6 y 14 mm.
1– Escala visual. – ideal para encuadernar documentos individuales.
La mordaza de cierre móvil incluye una escala fácil de leer
6mm 1/4”
8mm 5/16”
10 mm 3/8”
12mm 1/2”
14mm 9/16”
2– Control de cierre seleccionable. – ideal para varios documentos del mismo
tamaño. Coloque la barra STOP (PARADA) de color rojo en la posición que prefiera.
Gire la rueda de control hacia las posiciones MAX (MÁX) o MIN (MÍN) según
sea necesario.
La barra de parada de color rojo se mueve hacia arriba y hacia abajo dentro de la
ventana central.
ANTES DE LA ENCUADERNACIÓN
4
2. Coloque el peine de alambre
seleccionado en el soporte del
peine de alambre.
3. Perfore hojas a modo de prueba
para verificar la configuración de
la guía de bordes.
3
2
4. Perfore las hojas en lotes
pequeños de modo de no
sobrecargar la máquina ni
al usuario.
1. Seleccione el diámetro
correcto del peine de alambre
con la guía de la bandeja
de almacenamiento.
1
PASOS PARA LA ENCUADERNACIÓN: UN DOCUMENTO
3. Levante el peine de alambre
para quitarlo de los ganchos.
Colóquelo con cuidado en las
mordazas abiertas de cierre de
alambre. Asegúrese de que el
peine de alambre esté abierto
y que toque la parte inferior
del mecanismo.
3
1. Comience por la tapa trasera.
Cargue las hojas perforadas
directamente en el peine de
alambre abierto colgante.
2. Perfore y coloque la tapa
delantera. Perfore y coloque
las hojas restantes.
2
1
4. Levante la palanca de cierre
de alambre y colóquela hacia
adelante. La guía de escala de
cierre está sobre la mordaza
móvil. Cierre las mordazas hasta
que el indicador de alambre
muestre el tamaño del alambre
que se cierra.
4
6mm 1/4”
Max
niMxaM
14mm 9/16”
STOP
Min
Max 20
(80g/m
2
)
5
STEPS TO BIND – MULTIPLE DOCUMENTS
1. Test close selected wire comb.
Set closure lock as required. Check
wire seam closure is complete.
1
4. Lift the wire comb upwards off
the hooks. Carefully place into the
open wire closing jaws. Ensure the
wire comb is open and touching the
bottom of the mechanism.
2. Starting with the rear cover.
Load punched sheets directly onto
the hanging open wire comb.
3. Punch and hang the front
cover. Punch and hang the
remaining sheets.
FINISHING THE BINDING
1. Check the closed seam. If
the seam is not closed correctly,
the document can be placed
into the jaws and closed again.
2. To hide the seam, turn the
rear cover backwards. The front
cover is now visible. The seam is
hidden inside the document.
1 2
3. Check wire seam closure is
complete. Loose binding allows
sheet loss. Good closure retains
all sheets.
3
5. Lift the wire closing lever. The
jaws will close at the pre-selected
stop position.
4
3
2
5
Galaxy
Wire
CAPACIDADES
INSTRUCCIONES DE SEGURIDAD IMPORTANTES ¡Léalas antes de usar la máquina!
Al perforar;
- siempre asegúrese de que la máquina esté sobre una superficie estable
- perfore hojas a modo de prueba y configure la máquina antes de perforar los
documentos finales
- retire las grapas y otros artículos de metal antes de la perforación
- nunca supere la capacidad indicada de
las máquina
Al encuadernar;
Mantenga la máquina alejada de fuentes de calor o agua.
Nunca intente abrir o reparar la máquina de ninguna otra forma.
Enchufe la máquina en un tomacorriente con fácil acceso.
Nota: esta máquina incluye un dispositivo de corte térmico que se activa cuando
la máquina se sobrecalienta durante el uso. Se restablecerá automáticamente
cuando la máquina sea segura para operarla.
PRECAUCIÓN
14
Capacidad de perforación
Hojas de papel
70-80 g/m 20 hojas
Tapas transparentes
100-200 micrones / 4-8 mil 3 hojas
más de 200 micrones / 8+ mil 2 hojas
Otras tapas estándar
160-270g/m 3 hojas
más de 270 g/m 2 hojas
Capacidad de encuadernación
Tamaño máx. del peine de alambre 14 mm
Tamaño máx. del documento (80 g) c. 130 hojas
Información técnica
Dimensiones del papel A4, A5
Ranuras de perforación 34
Fijo 2,5 mm
Espaciado 3:1”
Guía de bordes ajustable sí, giratoria
Capacidad de la bandeja para desechos c. 3000 hojas
Tensión 120 V 50/60 Hz
Vataje del motor 160 W 1,0 A
Ciclo de trabajo 30 min. encendido / 30 min. apagado
Peso neto 14 kg
Dimensiones (LxPxA) 530 x 450 x 165 mm
Léalas antes de usar la máquina. Consérvelas como referencia futura.
ESPAÑOL
Almacenamiento del peine
de alambre y medida del
documento
Soporte para
documentos (tapa)
Guía de bordes ajustable
Medida del documento
y bandeja de
almacenamiento
Bandeja
para desechos
(doble acceso)
Palanca de
cierre de
alambre
Entrada del papel
Rueda para ajustar
la guía de bordes
Bandeja doble para desechos
Manija de transporte
Indicador
de neón de
encendido
Indicador
de neón de
sobrecarga
Botón de
perforación
¿Necesita
ayuda?
Servicio de atención al cliente….
www.fellowes.com
Deje que nuestros expertos lo
ayuden y le den una solución.
Siempre llame a Fellowes antes de
comunicarse con su vendedor.
Al encuadernar;
- tenga cuidado; punto posible de compresión
Mordazas de cierre
de alambre
Control de cierre seleccionable
7
CORRECTING A BOUND DOCUMENT
REMOVAL OF WASTE CLIPPINGS
WORLDWIDE WARRANTY
Fellowes warrants all parts of the binder to be free of defects in material and workmanship
for 2 years from the date of purchase by the original consumer. If any part is found to be
defective during warranty period, your sale and exclusive remedy will be repair or replacement,
at Fellowes’ option and expense, of the defective part. This warranty does not apply in
cases of abuse, mishandling or unauthorised repair. Any implied warranty, including that of
merchantability or fitness for particular purpose, is hereby limited in duration to the appropriate
warranty period set forth above. In no event shall Fellowes be liable for any consequential
damages attributable to this product. This warranty gives you specific legal rights. You may
have other legal rights that vary from this warranty. The duration, terms and conditions of this
warranty are valid worldwide, except where different limitations, restrictions or conditions may
be required by local law. For more details or to obtain services under this warranty, please
contact Fellowes or your dealer.
TROUBLESHOOTING
Problem
No Green power neon
Red standby neon
Cannot close wire comb tightly enough
Damaged hole edges
Waste tray leaks
Punched holes are not central
Machine will not punch
Punch holes are not parallel to edge
Partial hole edges
Sheets fall out of document
Cause
Machine is not switched on
Machine has overloaded when punching
Closing jaws set at too large a diameter
Possibly overloading the machine
Waste tray is not correctly inserted or ‘burst
feature’ has activated
Edge guide not set
Blockage
Debris is stuck below dies
Sheets not correctly aligned to punch pattern
Wire comb is not closed enough
Solution
Switch on machine at rear next to plug inlet
Press the punch button. The machine will withdraw the punches
and re-set itself. Continue this process until the punch cycle is
complete
Revise closure lock setting to suit smaller diameter as required
Punch plastic covers with paper sheets. Reduce number of
sheets being punched
Check waste tray is empty and ‘burst feature’ is closed
Adjust edge guide until hole pattern is correct
Check waste tray is empty. Check for blockage to paper entry
Take stiff cardboard and slide into the paper entry. Move the
cardboard sideways to release any stray clippings into the
waste tray
Adjust edge guide and test punch scrap sheets until correct
Check closure of wire comb. Place into closing mechanism and
improve binding closure. Revise closure lock setting to suit
smaller diameter as required
Wire binding is a secure binding system. Additional sheets cannot be added unless the document is disassembled and then re-bound.
The waste tray is located under the machine and is accessed from each side. For best results empty the tray regularly.
The tray should be emptied after every 50 operations to ensure no blockages occur.
STORAGE
Lower the lid. The Galaxy wire binder is designed to be stored horizontally on the desk.
  • Page 1 1
  • Page 2 2
  • Page 3 3
  • Page 4 4
  • Page 5 5
  • Page 6 6
  • Page 7 7
  • Page 8 8
  • Page 9 9
  • Page 10 10

Fellowes GALAXY E WIRE Owner's manual

Category
Binding machines
Type
Owner's manual

Fellowes GALAXY E WIRE is a versatile binding machine designed to handle various binding tasks with ease. It offers multiple wire comb closure options, catering to both single and multiple documents of varying sizes. The machine features a user-friendly design with an adjustable edge guide for precise punching alignment, ensuring neat and consistent results. With its robust construction and durable components, the GALAXY E WIRE is built to deliver reliable performance, making it an ideal choice for personal or office use.

Ask a question and I''ll find the answer in the document

Finding information in a document is now easier with AI