Ironman 5903 Owner's manual
- Type
- Owner's manual
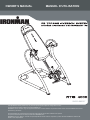
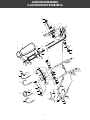
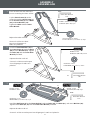
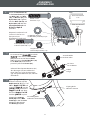
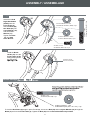
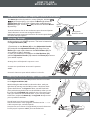
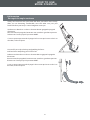
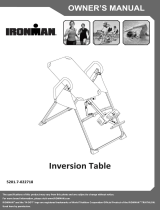
Ironman 5903 is an inversion table designed to help reduce back pain and improve flexibility. It is suitable for home use and can be used by people up to 6'6" tall and weighing up to 300lbs. The table features a padded backrest and adjustable ankle clamps for a comfortable and secure fit. The inversion angle can be adjusted to suit your individual needs, and the table folds for easy storage.
Here are some of the benefits of using the Ironman 5903 inversion table:
- Helps to reduce back pain by decompressing the spine
- Improves flexibility by stretching the muscles and ligaments in the back
- Helps to improve circulation


-
 1
1
-
 2
2
-
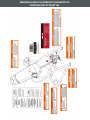 3
3
-
 4
4
-
 5
5
-
 6
6
-
 7
7
-
 8
8
-
 9
9
-
 10
10
-
 11
11
-
 12
12
-
 13
13
-
 14
14
-
 15
15
-
 16
16
-
 17
17
-
 18
18
-
 19
19
-
 20
20


Ironman 5903 Owner's manual
- Type
- Owner's manual
Ironman 5903 is an inversion table designed to help reduce back pain and improve flexibility. It is suitable for home use and can be used by people up to 6'6" tall and weighing up to 300lbs. The table features a padded backrest and adjustable ankle clamps for a comfortable and secure fit. The inversion angle can be adjusted to suit your individual needs, and the table folds for easy storage.
Here are some of the benefits of using the Ironman 5903 inversion table:
- Helps to reduce back pain by decompressing the spine
- Improves flexibility by stretching the muscles and ligaments in the back
- Helps to improve circulation
Ask a question and I''ll find the answer in the document
Finding information in a document is now easier with AI
in other languages
- français: Ironman 5903 Le manuel du propriétaire
Related papers


Other documents
-
Igloo FR176 User manual
-
-
 Tortuga Outdoor PSR2-C-WH Operating instructions
-
LifeGear 75164 Owner's manual
-
Frigidaire EFR176-MOONBEAM User manual
-
 Fitness Gear 5426 Owner's manual
-
Ironman Fitness 5402 Owner's manual
-
Ironman Fitness 6571 Owner's manual
-
-
Fitness Reality 2500 Owner's manual

