
TE 6-A36
TE DRS6-A
English en
Français fr
Español es
Português pt
Printed: 25.01.2016 | Doc-Nr: PUB / 5265030 / 000 / 00

1
Printed: 25.01.2016 | Doc-Nr: PUB / 5265030 / 000 / 00

2
3
4
5
Printed: 25.01.2016 | Doc-Nr: PUB / 5265030 / 000 / 00

6
7
8
Printed: 25.01.2016 | Doc-Nr: PUB / 5265030 / 000 / 00

9
10
11
12
Printed: 25.01.2016 | Doc-Nr: PUB / 5265030 / 000 / 00

13
Printed: 25.01.2016 | Doc-Nr: PUB / 5265030 / 000 / 00

14
15
16
17
Printed: 25.01.2016 | Doc-Nr: PUB / 5265030 / 000 / 00

18
19
Printed: 25.01.2016 | Doc-Nr: PUB / 5265030 / 000 / 00

TE 6-A36
TE DRS6-A
en Original operating instructions . . . . . . . . . . . . . . . . . . . . . . . . . . . . . . . . . . . . . . . 1
fr Mode d'emploi original . . . . . . . . . . . . . . . . . . . . . . . . . . . . . . . . . . . . . . . . . . . 12
es Manual de instrucciones original . . . . . . . . . . . . . . . . . . . . . . . . . . . . . . . . . . . . 24
pt Manual de instruções original . . . . . . . . . . . . . . . . . . . . . . . . . . . . . . . . . . . . . . 36
Printed: 25.01.2016 | Doc-Nr: PUB / 5265030 / 000 / 00

1
1 Information about the documentation
1.1 Explanation of signs used
1.1.1 Warnings
Warnings alert persons to hazards that occur when handling or using the product. The following signal words
are used in combination with an icon:
DANGER! Draws attention to imminent danger that will lead to serious personal injury or fatality.
WARNING! Draws attention to a potentially dangerous situation that could lead to serious per-
sonal injury or fatality.
CAUTION! Draws attention to a potentially dangerous situation that could lead to slight personal
injury or damage to the equipment or other property.
1.1.2 Symbols
The following symbols are used:
Read the operating instructions before use.
Instructions for use and other useful information
Drilling without hammering
Drilling with hammering action (hammer drilling)
Chiseling
Chisel positioning
Forward / reverse
Rated speed under no load
1.1.3 Illustrations
The illustrations in these operating instructions are intended to convey a basic understanding and may differ
from the actual version of the product:
These numbers refer to the corresponding illustrations found at the beginning of these operating
instructions.
The numbering in the illustrations reflects the order of the work steps in the illustration and may
deviate from the numbering of work steps in the text.
Item reference numbers are used in the overview illustration. In the product overview section, the
numbers shown in the legend relate to these item reference numbers.
1.2 About this documentation
▶ Read these operating instructions before the product is used or operated for the first time. This is a is a
prerequisite for safe, trouble-free handling and use of the product.
▶ Observe the safety instructions and warnings printed in this documentation and on the tool.
▶ Always keep the operating instructions with the tool and make sure that the operating instructions are
with the tool when it is given to other persons.
1.3 Product information
Hilti products are designed for professional use and may be operated, serviced and maintained only by
trained, authorized personnel. This personnel must be informed of any particular hazards that may be
encountered. The product and its ancillary equipment may present hazards when used incorrectly by
untrained personnel or when used not as directed.
The type designation and serial number are printed on the type identification plate.
Printed: 25.01.2016 | Doc-Nr: PUB / 5265030 / 000 / 00

2
▶ Write down the serial number in the table below. You will be required to state the product details when
contacting Hilti Service or your local Hilti organization to enquire about the product.
Product information
Rotary hammer TE 6A36
Generation: 04
Serial no.:
Product information
Dust removal attachment TE DRS6A
Generation: 02
Serial no.:
We reserve the right to make changes. Errors excepted.
2 Safety
2.1 Safety instructions
The safety rules given in the following section contain all general safety rules for electric tools which, in
accordance with the applicable standards, require to be listed in the operating instructions. Accordingly,
some of the rules listed may not be relevant to this electric tool.
2.1.1 General power tool safety warnings
WARNING
Read all safety warnings and all instructions. Failure to follow the warnings and instructions may result in
electric shock, fire and/or serious injury.
Save all warnings and instructions for future reference.
The term “power tool” in the warnings refers to your mains-operated (corded) power tool or battery-operated
(cordless) power tool.
Work area safety
▶ Keep work area clean and well lit. Cluttered or dark areas invite accidents.
▶ Do not operate power tools in explosive atmospheres, such as in the presence of flammable
liquids, gases or dust. Power tools create sparks which may ignite the dust or fumes.
▶ Keep children and bystanders away while operating a power tool. Distractions can cause you to lose
control.
Electrical safety
▶ Power tool plugs must match the outlet. Never modify the plug in any way. Do not use any adapter
plugs with earthed (grounded) power tools. Unmodified plugs and matching outlets will reduce risk of
electric shock.
▶ Avoid body contact with earthed or grounded surfaces, such as pipes, radiators, ranges and
refrigerators. There is an increased risk of electric shock if your body is earthed or grounded.
▶ Do not expose power tools to rain or wet conditions. Water entering a power tool will increase the
risk of electric shock.
▶ Do not abuse the cord. Never use the cord for carrying, pulling or unplugging the power tool. Keep
cord away from heat, oil, sharp edges or moving parts. Damaged or entangled cords increase the
risk of electric shock.
▶ When operating a power tool outdoors, use an extension cord suitable for outdoor use. Use of a
cord suitable for outdoor use reduces the risk of electric shock.
▶ If operating a power tool in a damp location is unavoidable, use a residual current device (RCD)
protected supply. Use of an RCD reduces the risk of electric shock.
Personal safety
▶ Stay alert, watch what you are doing and use common sense when operating a power tool. Do
not use a power tool while you are tired or under the influence of drugs, alcohol or medication. A
moment of inattention while operating power tools may result in serious personal injury.
▶ Use personal protective equipment. Always wear eye protection. Protective equipment such as dust
mask, non-skid safety shoes, hard hat, or hearing protection used for appropriate conditions will reduce
personal injuries.
Printed: 25.01.2016 | Doc-Nr: PUB / 5265030 / 000 / 00

3
▶ Prevent unintentional starting. Ensure the switch is in the off‐position before connecting to power
source and/or battery pack, picking up or carrying the tool. Carrying power tools with your finger on
the switch or energising power tools that have the switch on invites accidents.
▶ Remove any adjusting key or wrench before turning the power tool on. A wrench or a key left
attached to a rotating part of the power tool may result in personal injury.
▶ Do not overreach. Keep proper footing and balance at all times. This enables better control of the
power tool in unexpected situations.
▶ Dress properly. Do not wear loose clothing or jewellery. Keep your hair, clothing and gloves away
from moving parts. Loose clothes, jewellery or long hair can be caught in moving parts.
▶ If devices are provided for the connection of dust extraction and collection facilities, ensure these
are connected and properly used. Use of dust collection can reduce dust-related hazards.
Power tool use and care
▶ Do not force the power tool. Use the correct power tool for your application. The correct power tool will
do the job better and safer at the rate for which it was designed.
▶ Do not use the power tool if the switch does not turn it on and off. Any power tool that cannot be
controlled with the switch is dangerous and must be repaired.
▶ Disconnect the plug from the power source and/or the battery pack from the power tool before
making any adjustments, changing accessories, or storing power tools. Such preventive safety
measures reduce the risk of starting the power tool accidentally.
▶ Store idle power tools out of the reach of children and do not allow persons unfamiliar with the
power tool or these instructions to operate the power tool. Power tools are dangerous in the hands
of untrained users.
▶ Maintain power tools. Check for misalignment or binding of moving parts, breakage of parts and
any other condition that may affect the power tool’s operation. If damaged, have the power tool
repaired before use. Many accidents are caused by poorly maintained power tools.
▶ Keep cutting tools sharp and clean. Properly maintained cutting tools with sharp cutting edges are
less likely to bind and are easier to control.
▶ Use the power tool, accessories and tool bits etc. in accordance with these instructions, taking
into account the working conditions and the work to be performed. Use of the power tool for
operations different from those intended could result in a hazardous situation.
Battery tool use and care
▶ Recharge only with the charger specified by the manufacturer. A charger that is suitable for one type
of battery pack may create a risk of fire when used with another battery pack.
▶ Use power tools only with specifically designated battery packs. Use of any other battery packs may
create a risk of injury and fire.
▶ When battery pack is not in use, keep it away from other metal objects, like paper clips, coins,
keys, nails, screws or other small metal objects, that can make a connection from one terminal to
another. Shorting the battery terminals together may cause burns or a fire.
▶ Under abusive conditions, liquid may be ejected from the battery; avoid contact. If contact
accidentally occurs, flush with water. If liquid contacts eyes, additionally seek medical help. Liquid
ejected from the battery may cause irritation or burns.
Service
▶ Have your power tool serviced by a qualified repair person using only identical replacement parts.
This will ensure that the safety of the power tool is maintained.
2.1.2 Hammer safety warnings
▶ Wear ear protectors. Exposure to noise can cause hearing loss.
▶ Use auxiliary handles, if supplied with the tool. Loss of control can cause personal injury.
▶ Hold power tool by insulated gripping surfaces, when performing an operation where the cutting
accessory may contact hidden wiring.. Cutting accessory contacting a "live" wire may make exposed
metal parts of the power tool "live" and could give the operator an electric shock.
2.1.3 Additional safety precautions
Personal safety
▶ Modification of the power tool is not permitted.
▶ Always hold the power tool with both hands on the grips provided. Keep the grips dry, clean and
free from oil and grease.
▶ Improve the blood circulation in your fingers by relaxing your hands and exercising your fingers
during breaks between working.
Printed: 25.01.2016 | Doc-Nr: PUB / 5265030 / 000 / 00

4
▶ Avoid touching rotating parts. Switch the power tool on only after bringing it into position at the
workpiece. Touching rotating parts, especially rotating drill bits or other accessories, may lead to injury.
▶ Activate the safety lock (forward / reverse selector switch in the middle position) when storing or
transporting the tool.
▶ The tool is not intended for use by debilitated persons who have received no special training. Keep
the tool out of reach of children.
▶ Dust from materials, such as paint containing lead, some wood species, concrete/masonry/stone
containing silica, and minerals as well as metal, may be harmful. Contact with or inhalation of the dust
may cause allergic reactions and/or respiratory or other diseases to the operator or bystanders. Certain
kinds of dust are classified as carcinogenic such as oak and beech dust, especially in conjunction
with additives for wood conditioning (chromate, wood preservative). Material containing asbestos
may be handled only by specialists. Use the TE DRS6A(02) dust removal module whenever
possible. Alternatively, a suitable vacuum cleaner may be used. When indicated, wear a respirator
appropriate for the type of dust generated. Ensure that the workplace is well ventilated. Observe
national regulations applicable to the materials you intend to work with.
▶ If the work involves breaking right through, take the appropriate safety measures on the opposite
side. Parts breaking away could fall out and / or fall down and injure other persons.
▶ Before beginning work, check the working area (e.g. using a metal detector) to ensure that no
concealed electric cables or gas and water pipes are present. External metal parts of the power tool
may become live, for example, if an electric cable is damaged accidentally. This presents a serious risk
of electric shock.
▶ In accordance with the applications for which it is designed, the tool produces a high torque. Always
use the side handle and hold the tool with both hands. The user must be prepared for sudden sticking
and stalling of the cutting tool.
▶ Secure the workpiece. Use clamps or a vice to secure the workpiece. The workpiece is thus held
more securely than by hand and both hands remain free to operate the tool.
▶ Wear protective gloves. The product can get hot during operation. There is a risk of injury (cutting or
burning) if the accessory tool is touched while changing it.
▶ The work you are doing may cause flying fragments. Wear eye protection, protective gloves and, if
you are not using a dust removal system, wear light respiratory protection. Flying fragments present
a risk of injury to the eyes and body.
▶ Observe the nationally applicable industrial safety regulations.
▶ To reduce the risk of injury, use only genuine Hilti accessories and accessory tools.
Careful handling and use of batteries
▶ Observe the special guidelines applicable to the transport, storage and use of lithium-ion batteries.
▶ Do not expose batteries to high temperatures, the direct heat of the sun, and keep them away
from fire. There is a risk of explosion.
▶ Do not disassemble, squash or incinerate batteries and do not subject them to temperatures over
80°C (176°F). This presents a risk of fire, explosion or injury through contact with caustic substances.
▶ Never continue to use or attempt to charge damaged batteries, e.g. batteries with cracks, broken
parts, bent or pushed-in / pulled-out contacts).
▶ Do not use the battery as a power source for other unspecified appliances.
▶ If the battery is too hot to touch it may be defective. In this case, place the power tool in a non-
flammable location, well away from flammable materials, where it can be kept under observation
and allowed to cool down. Contact Hilti Service after the battery has cooled down.
3 Description
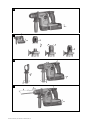
3.1 Overview of the product 1
@
Dust shield
;
chuck
=
Insert tool unlocking device
%
Depth gauge
&
Function selector switch
(
Forward / reverse selector switch with
safety lock
)
Control switch
+
Grip
§
Battery release buttons
/
Charge status and fault display (Li-ion
battery)
:
Battery
∙
Connection for the TE DRS-6-A(02) dust
removal module
$
Side handle
£
Light to illuminate the work area
Printed: 25.01.2016 | Doc-Nr: PUB / 5265030 / 000 / 00

5
3.2 Intended use
The product described is a cordless (battery-powered) rotary hammer. It is designed for hammer drilling in
concrete and masonry, for drilling in steel, wood and masonry and for driving in and removing screws. The
product can also be used for light chiseling work on masonry and surface finishing on concrete.
For use where dust must be kept to an absolute minimum, Hilti offers the TE DRS-6-A (2) dust removal
module and the DCD dust collection module as accessories.
▶ Use only Hilti Li-ion batteries from the B 36 series with this product.
▶ Use only the Hilti battery chargers from the C4/36 series for these batteries.
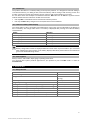
3.3 Lithiumion battery status display
The charge status of the Li-ion battery and malfunctions of the power tool are indicated by the display on
the Liion battery. The charge status of the Liion battery is displayed after pressing one of the two battery
release buttons.
Status Meaning
4 LEDs light up. • Charge status: 75 % to 100 %
3 LEDs light up. • Charge status: 50 % to 75 %
2 LEDs light up. • Charge status: 25 % to 50 %
1 LED lights up. • Charge status: 10 % to 25 %
1 LED blinks. • Charge status: < 10 %
Note
Battery charge status cannot be displayed while the control switch is pressed and for up to 5 seconds
after releasing the control switch. If the battery display LEDs blink, please observe the instructions
given in the Troubleshooting section.
3.4 Items supplied
Rotary hammer, side handle, depth gauge, operating instructions.
You can find other system products approved for your product at your local Hilti Center or online at:
www.hilti.com.
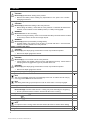
4 Technical data
4.1 Rotary hammer
TE 6A36
Rated voltage
36 V
Weight
8.2 lb
(3.7 kg)
Rated speed under no load
1,050 rpm
Single impact energy
2.5 J
Drilling diameter range in concrete/masonry (hammer drilling)
1/8 in … 3/4 in
Drilling diameter range in concrete/masonry (hammer drilling)
5 mm … 20 mm
Drilling diameter range in wood (solid)
1/8 in … 3/4 in
Drilling diameter range in wood (solid)
3 mm … 20 mm
Drilling diameter range in metal (solid-head drill bit)
1/8 in … 1/2 in
Drilling diameter range in metal (solid-head drill bit)
3 mm … 13 mm
Printed: 25.01.2016 | Doc-Nr: PUB / 5265030 / 000 / 00

6
5 Operation
Safety precaution
CAUTION
Risk of injury! Inadvertent starting of the product.
▶ Remove the battery before making any adjustments to the power tool or before
changing accessories.
Inserting the battery
CAUTION
Risk of injury Inadvertent starting of the rotary hammer.
▶ Before fitting the battery, check that the rotary hammer is switched off and that the
forward / reverse switch is in the middle position (i.e. safety lock engaged).
WARNING
Risk of fire! Risk of short circuiting.
▶ Before inserting the battery, check to ensure that the battery terminals and the contacts
in the rotary hammer are free from foreign objects.
WARNING
Risk of injury Hazard presented by a falling battery.
▶ A falling battery may present a risk of injury to yourself and others. Check that the
battery is securely seated in the rotary hammer.
2
Fitting / removing the chuck
CAUTION
Risk of injury The depth gauge, if fitted but not used, may hinder the operator.
▶ Remove the depth gauge from the tool.
3
Fitting the side handle
CAUTION
Risk of injury Loss of control over the rotary hammer.
▶ Check that the side handle is fitted correctly and tightened securely. Check that the
clamping band is engaged in the groove provided on the tool.
CAUTION
Risk of injury The depth gauge, if fitted but not used, may hinder the operator.
▶ Remove the depth gauge from the tool.
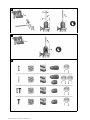
4
Fitting and adjusting the depth gauge
5
Fitting the chisel
Note
The use of unsuitable grease may cause damage to the tool. To reduce the risk of injury,
use only genuine Hilti tools and accessories.
Note
After fitting the drill bit, grip it and pull it in order to check that it is securely engaged.
6
Removing the accessory tool
7
Function selector switch
Risk of damage Actuation while the tool is running may result in damage to the gearing.
▶ Do not operate the function selector switch while the motor is running.
8
Drilling without hammering
Hammer drilling
Chisel positioning
Chiseling
Note
For optimum motor cooling, select forwards rotation (direction of rotation when drilling).
Forward / reverse
9
Fitting the dust collection module for overhead work
10
Printed: 25.01.2016 | Doc-Nr: PUB / 5265030 / 000 / 00

7
Removing the battery
11
6 Care, transport and storage
6.1 Care of the rotary hammer
WARNING
Electrical hazards! Improper repairs to electrical parts may lead to serious injuries.
▶ Electrical parts may be repaired only by trained electrical specialists.
▶ Keep the tool, especially its grip surfaces, clean and free from oil and grease. Do not use cleaning
agents which contain silicone.
▶ Never operate the product when the air vents are blocked. Clean the air vents carefully using a dry brush.
Do not permit foreign objects to enter the interior of the rotary hammer.
▶ Clean the outside of the electric tool at regular intervals with a slightly damp cloth. Do not use a spray,
steam pressure cleaning equipment or running water for cleaning.
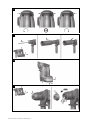
6.2 Cleaning the dust shield 12
▶ Clean the dust shield on the chuck with a dry, clean cloth at regular intervals.
▶ Clean the sealing lip by wiping it carefully and then grease it again lightly with Hilti grease.
▶ It is essential that the dust shield is replaced if the sealing lip is damaged.
6.3 Care of the lithiumion batteries
▶ Do not allow moisture to enter the interior.
▶ Keep the battery clean and free from oil and grease.
▶ Clean the outer surfaces with a slightly damp cloth at regular intervals. Do not use cleaning agents
containing silicone.
▶ To achieve maximum battery life, stop drawing power from the battery as soon as a significant drop in
the performance of the power tool is noticed.
▶ Charge the batteries using the Hilti chargers approved for use with Li-ion batteries.
6.4 Transport and storage
Transport
CAUTION
Inadvertent starting during transport. Uncontrolled starting during transport may occur if the battery
is fitted, thereby resulting in damage to the tool.
▶ Always remove the battery before transporting the tool.
▶ Remove the battery.
▶ Transport the tool and battery individually packaged.
▶ Never transport batteries in bulk form (loose, unprotected).
▶ Check tools and batteries for damage before use after long periods of transport.
Storage
CAUTION
Inadvertent damage caused by defective battery. Leaking batteries may damage the tool.
▶ Always remove the battery before storing the tool.
▶ Store the tool and battery in a place that is as cool and dry as possible.
▶ Never store batteries in direct sunlight, on heating units or behind a window pane.
▶ Store the tool and batteries in a place where they cannot be accessed by children or unauthorized
persons.
▶ Check the tool and batteries for damage before use after long periods of storage.
Printed: 25.01.2016 | Doc-Nr: PUB / 5265030 / 000 / 00

8
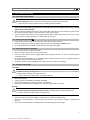
7 Troubleshooting
▶ If the trouble you are experiencing is not listed in this table or you are unable to remedy the problem by
yourself, please contact Hilti Service.
7.1 The rotary hammer is not in working order
Malfunction Possible cause Action to be taken
The LEDs on the battery indi-
cate nothing.
The battery is not fully inserted. ▶ Push the battery in until it
engages with a double click.
The battery is discharged. ▶ Change the battery and charge
the empty battery.
The battery is too hot or too cold. ▶ Allow the battery to cool
down or to warm up to room
temperature.
1 LED on the battery blinks. The battery is discharged. ▶ Change the battery and charge
the empty battery.
The battery is too hot or too cold. ▶ Allow the battery to cool
down or to warm up to room
temperature.
4 LEDs on the battery blink. The rotary hammer has been over-
loaded briefly.
▶ Release the control switch and
then press it again.
7.2 The rotary hammer is in working order
Trouble or fault Possible cause Action to be taken
No hammering action. The rotary hammer is too cold. ▶ Bring the tip of the drill bit
into contact with the working
surface, switch the rotary
hammer on and allow it to
run. If necessary, repeat the
procedure until the hammering
mechanism begins to operate.
The function selector switch is set
to “Drilling without hammering” .
▶ Set the function selector switch
to “Hammer drilling” .
The control switch can’t be
pressed, i.e. the switch is
locked.
The forward / reverse switch is in
the middle position.
▶ Push the forward / reverse
switch to the right or left.
The drive spindle does not
rotate.
The permissible operating temper-
ature of the rotary hammer’s elec-
tronics has been exceeded.
▶ Allow the tool to cool down.
The battery is discharged. ▶ Change the battery and charge
the empty battery.
The function selector switch is
not correctly engaged, is set to
“Chiseling” , or is set to “Chisel
positioning” .
▶ Set the function selector switch
to “Drilling without hammering”
or “Hammer drilling” .
The rotary hammer switches
itself off automatically.
The overload cut-out has been
activated.
▶ Release the control switch.
Allow the rotary hammer to cool
down. Press the control switch
again. Reduce the load on the
tool.
The battery runs down more
quickly than usual.
Very low ambient temperature. ▶ Allow the battery to warm up
slowly to room temperature.
The battery does not en-
gage with an audible "double
click".
The retaining lugs on the battery
are dirty.
▶ Clean the retaining lugs and refit
the battery.
Printed: 25.01.2016 | Doc-Nr: PUB / 5265030 / 000 / 00

9
Trouble or fault Possible cause Action to be taken
The rotary hammer or the
battery gets very hot.
Electrical fault. ▶ Switch off the rotary hammer
immediately. Remove the
battery and keep it under
observation. Allow it to cool
down. Contact Hilti service.
The rotary hammer has been over-
loaded.
▶ Use a more powerful tool.
The insert tool can’t be re-
leased.
The chuck is not pulled back fully. ▶ Pull the chuck back as far as it
will go and remove the tool.
The tool makes no progress. The rotary hammer has been set to
reverse rotation.
▶ Move the forward / reverse
selector switch to the “Forward”
position.
The function selector switch is set
to “Drilling without hammering” .
▶ Set the function selector switch
to “Hammer drilling” .
8 TE DRS-6-A dust removal module (optional)
The TE DRS6A dust removal module is an accessory for the Hilti TE 6A36 rotary hammer. It collects a
high percentage of the dust generated and can be quickly and easily attached to the rotary hammer. The
dust removal module is equipped with a suction fan. This fan is driven by its own motor. When the rotary
hammer is switched on the dust removal module draws its electric power from the rotary hammer’s battery.
The dust removal module is not suitable for working on metal and wood.
8.1 Overview of the product 13
@
Suction head
;
Stroke preselection button
=
DRS electrical interface
%
Release buttonDRS
&
Dust container release
(
Depth gauge
8.2 Technical data
Rated power input
60 W
Suction performance
66 liq. gal
US
/min
(250 ℓ/min)
Weight
2.2 lb
(1.0 kg)
8.3 Safety instructions
WARNING
Risk of injury Failure to follow safety instructions may lead to injury and / or damage to the equipment
or other property.
▶ Follow these safety instructions in order to avoid injury and / or damage to the equipment or other
property.
▶ Observe all safety instructions printed in this documentation and on the tool.
▶ Use respiratory protection to keep any remaining dust away from the face and airways when drilling and
when servicing the tool or accessories.
▶ Always use the side handle on the Hilti rotary hammer, even when the dust module is fitted.
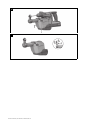
8.4 Fitting the dust removal module 14
Note
Before fitting the module, check that the attachment points and the electrical interface on the rotary
hammer and dust removal module are free of dust and that the parts fit or move freely and easily.
1. Move the forward / reverse selector switch on the rotary hammer to the middle position.
Printed: 25.01.2016 | Doc-Nr: PUB / 5265030 / 000 / 00

10
2. Remove the depth gauge from the side handle.
3. Position the dust removal module on the guides and push it from the front onto the power tool until it
engages.
4. After fitting the dust removal module, check that it is securely attached.
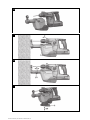
8.5 Setting the length (stroke) 15
WARNING
Risk of injury The telescopic section will jump out when the stroke preselection button is pressed.
▶ Hold the rotary hammer with the dust removal module so that the telescopic section cannot injure
you when it jumps out.
Note
In the standard setting, the stroke is set to a drill bit length of 170 mm. The stroke must be adjusted if
shorter drill bits are used.
1. Press the stroke adjustment button and hold it in this position.
2. With the drill bit fitted, press the rotary hammer against the working surface until the tip of the drill bit
comes into contact with the surface.
3. Release the stroke preselection button.
8.6 Setting drilling depth (depth gauge) 16
Note
If an exact drilling depth is required, this must be determined by drilling test holes.
1. Press the depth gauge button and hold it in this position.
2. Move the ring to the desired drilling depth.
3. Release the depth gauge button.
8.7 Emptying the dust container 17
Note
Dust may be released when the filter container is full. Accordingly, the container must be emptied
regularly. Wear respiratory protection when doing this.
1. Hold the power tool horizontally and allow it to run for a short time.
◁ This ensures that any dust remaining in parts of the dust removal module are drawn into the dust
container.
2. Press the dust container release button and hold it in this position.
3. Pull the dust container downwards away from the module.
4. Empty the dust container.
5. Push the empty dust container back into the dust removal module from below until it engages.
8.8 Removing the module 18
1. Move the forward / reverse selector switch on the rotary hammer to the middle position.
2. Press the DRS release button and hold it in this position.
3. Pull the dust removal module forwards away from the power tool.
8.9 Replacing the suction head 19
1. Detach the dust removal module from the rotary hammer.
2. Press the suction head release knob and hold it in this position.
3. Pull the old suction head upwards out of its guide.
4. Press the new suction head into the guide until it engages.
Printed: 25.01.2016 | Doc-Nr: PUB / 5265030 / 000 / 00

11
8.10 Care and maintenance
▶ Check all external parts of the module at regular intervals for damage and to ensure that they operate
faultlessly. Do not use the module if parts are damaged or if they do not function faultlessly.
▶ Do not use water, oil, grease or cleaning agents.
▶ Use only a dry brush and a cloth to clean the dust removal module.
▶ Do not touch the filter material when cleaning it and do not use compressed air to clean it. The filter
material may suffer damage.
8.11 Troubleshooting
If the fault you are experiencing is not listed or the recommended remedial measures do not successfully
solve the problem, please return the dust removal module to Hilti Service.
Trouble or fault Possible cause Action to be taken
An excessive amount of dust
is generated.
The dust container is full. ▶ Empty the dust container.
The filter is defective. ▶ Replace the filter.
The suction head is defective. ▶ Replace the suction head.
The suction head brush is worn. ▶ Replace the suction head.
The drill bit is not centered in
the suction head.
The dust removal module is not
fitted correctly.
▶ Push the dust removal module
onto tool until it engages.
9 Disposal
WARNING
Risk of injury. Hazards presented by improper disposal.
▶ Improper disposal of the equipment may have the following consequences: The burning of plastic
components generates toxic fumes which may present a health hazard. Batteries may explode
if damaged or exposed to very high temperatures, causing poisoning, burns, acid burns or
environmental pollution. Careless disposal may permit unauthorized and improper use of the
equipment. This may result in serious personal injury, injury to third parties and pollution of the
environment.
▶ Dispose of defective batteries right away. Keep them out of reach of children. Do not disassemble
or incinerate the batteries.
▶ Batteries that have reached the end of their life must be disposed of in accordance with national
regulations or returned to Hilti.
Most of the materials from which Hilti tools and appliances are manufactured can be recycled. The
materials must be correctly separated before they can be recycled. In many countries, your old tools,
machines or appliances can be returned to Hilti for recycling. Ask Hilti Service or your Hilti representative
for further information.
10 Manufacturer’s warranty
▶ Please contact your local Hilti representative if you have questions about the warranty conditions.
Printed: 25.01.2016 | Doc-Nr: PUB / 5265030 / 000 / 00
Page is loading ...
-
 1
1
-
 2
2
-
 3
3
-
 4
4
-
 5
5
-
 6
6
-
 7
7
-
 8
8
-
 9
9
-
 10
10
-
 11
11
-
 12
12
-
 13
13
-
 14
14
-
 15
15
-
 16
16
-
 17
17
-
 18
18
-
 19
19
-
 20
20
-
 21
21


Hilti 3554452 User manual
- Category
- Power tools
- Type
- User manual
Ask a question and I''ll find the answer in the document
Finding information in a document is now easier with AI
Related papers
-
Hilti TE 70-ATC Operating instructions
-
Hilti TE 6-CL User manual
-
Hilti TE 6-A22 User guide
-
-
-
-
-
Hilti 3476284 User manual
-
-
Hilti TE 4-A22 User manual