Dish Network 811 User manual

Type
User manual

This manual is also suitable for

Q
Q
Q
u
u
u
i
i
i
c
c
c
k
k
k
F
F
F
a
a
a
c
c
c
t
t
t
s
s
s
Quick Remote Control Programming
& Tips for Installers
Downloaded from SatelliteGuys.US
Contents subject to change without notice. Rev. 7/17/2006
EchoStar Technologies Corporation
Page 1 of 2
TM
Introduction
This document only provides
the steps to program various
remote features. For more
details on each feature,
refer to Chapter 8 - Remote
Controls of the Installation
Reference Handbook.
Highlights
Discrete ON and OFF
commands for learning
remotes
Limited Mode &
Easy Limited Mode
Power Scan
Recover Button
Extended Remote
Addresses
The programming
instructions included on this
page are for the following
remote control versions:
3.0, 3.1, 3.2, 4.0, 5.0, 5.2,
5.3, 6.0, 6.2, 6.3, 8.0, 8.1,
10.1
Sending Discrete Power On and Off
For most newer DISH Network remote
controls.
1. Program remote for desired remote
address.
2. Hold the SAT mode button down until all
mode lights are backlit, then release.
3. Press POWER (not TV Power).
4. Press VOLUME UP for discrete power on,
or VOLUME DOWN for discrete power off.
5. Press any other button when done to end
this procedure.
Programming Limited Mode for TV
While the steps below show how to program
Limited Mode for a TV, you can also program
Limited Mode for a connected VCR using the
same procedure (use VCR mode instead of
TV mode).
1. Turn the TV on.
2. Press and hold the TV mode button until
all mode buttons light up.
3. Enter one of the three-digit codes for your
TV model from the remote control user’s
guide table.
4. Press 1 to program Limited Mode.
5. Press POUND (#).
6. Confirm that only the remote POWER,
MUTE, and VOLUME buttons work with the
TV.
Easy Limited Mode Setup
Only available in remote control models
3.2, some 5.2, 5.3, some 6.2 and 6.3.
To remove Limited Mode for these remotes,
use the procedure below and press the PAGE
DOWN button instead. This procedure can be
done for TV mode, VCR mode, and TVs and
VCRs programmed into AUX mode.
After programming one of the mode buttons:
1. Press and hold that MODE button until all
four mode lights are lit, then release.
2. Press PAGE UP once.
3. Press POUND (#).
Scanning for TV Code
(“Power Scan”)
Use the quick steps below to scan the remote
control’s memory for the code that works the
TV. You can also scan for other devices
(VCRs, etc.) using the same procedure (use
the other device mode instead of TV mode).
1. Turn the TV on.
2. Press and hold the TV mode button until all
mode buttons light up.
3. Press POWER (not TV Power).
4. Press just UP ARROW (or just DOWN
ARROW, but not both) repeatedly until the
TV turns off – a new code is sent each time
you press the button.
5. Press POUND (#).
6. Turn the TV on and confirm the remote
operates it.
Recover Button for
Remote Control 2
You can also program RECOVER for a
connected VCR using the same procedure
(use VCR mode instead of TV mode).
1. Program Remote Control 2 to control your
TV.
2. Press and hold the TV mode button until all
mode buttons light up.
3. Press STAR (*)
4. Enter your TV2 Agile channel using 3 digits
(ex. 0-6-0 for Channel 60).
5. Press POUND (#)
Extended Remote Address (17–31)
To program a remote control to operate in
the extended range (17 to 31), complete the
following:
1. Open the receiver’s System Information
screen using the front panel SYS INFO or
SYSTEM INFO button.
2. Hold the SAT mode button down until all
mode lights are backlit, then release.
3. Press POUND (#).
4. Press CHANNEL UP to enter the extended
address mode.
5. Choose an extended remote address (a
number from 17 to 31), then subtract 16
from that address. Enter the result.
6. Press POUND (#). If the address was
entered correctly, the SAT mode button
flashes three times.
7. Press RECORD. Make sure the extended
remote address you see on the System
Information screen is the same as what you
wanted in step 5 (17 to 31). If it isn’t, the
remote cannot control the receiver.
Mode
Buttons
POWER
VOLUME
MUTE
UP & DOWN
ARROWS
Numbers
POUND (#)
STAR (*)
Q
Q
Q
u
u
u
i
i
i
c
c
c
k
k
k
F
F
F
a
a
a
c
c
c
t
t
t
s
s
s
Quick Remote Control Programming
& Tips for Installers
Contents subject to change without notice. Rev. 7/17/2006
EchoStar Technologies Corporation
Page 2 of 2
TM
Remote Antenna
The UHF remote control antenna
MUST be connected to R
EMOTE
ANTENNA port on the rear of each
applicable receiver for proper
UHF remote/receiver operation.
Teaching/Learning Remotes
The IR address from the
“teaching remote” must match
the IR address of the receiver.
For example, if the DISH Network
IR remote used to teach the
universal remote is set to address
4, the address of the receiver
must also be set to address 4.
Because the DISH 811 & DISH
Player-DVR 921 receivers ship
with UHF Pro only remote
controls, both receivers have a
“Teach Remote” feature, so that
the UHF Pro remote can be used
to tell the receiver to blast IR
commands out to a learning
remote.
IR commands from any of our
past remotes (excluding
7100/7200) can be used to
program a universal IR learning
remote.
The EZ remote uses a
“broadcast” IR address. If used to
teach a universal remote, it will
not matter what address the
receiver is set to.
UHF Pro Remotes
UHF Pro technology is not
compatible with UHF. A UHF Pro
receiver cannot be controlled using
the UHF signal from a UHF remote.
A UHF receiver cannot be
controlled by the UHF Pro signal of
a UHF Pro remote.
For UHF Pro remotes with an A/B
switch inside the battery
compartment: If you use a UHF Pro
remote near another UHF Pro
remote on the same frequency (for
example, another receiver in the
home, or a neighbor has one),
selecting the other band tells the
remote to use a different remote
frequency, and eliminates conflicts
with the other remote control(s).
For use with DISH Player-DVR 942,
ViP622 DVR and later dual-tuner
receivers only.
Dual-Tuner Receivers
TV1 of dual-tuner, two-TV receivers
can be configured to accept either
IR or UHF Pro commands. A TV1
UHF Pro key installed in the remote
is required. Use the replacement
remote’s user guide to ensure the
correct TV1 UHF Pro key is used
(one is for DISH Player-DVR
522/625, one is used for all
others).
TV2 of dual-tuner, two-TV receivers
is UHF Pro ONLY.
The TV2 remote control for dual-
tuner, two-TV receivers can be
configured for use as an IR remote
control for TV1 or as a UHF Pro
remote control for TV2 (the TV2
remote ships with the blue UHF Pro
key installed).
UHF/UHF Pro Reception Tips
Make sure the satellite
receiver’s UHF antenna and tip
is away from metal objects,
wiring, and electronics (DVD
player, etc.) located on a shelf
above or below the satellite
receiver. The antenna should
be angled away so the tip is
separated from the electronics
by a couple of inches if
possible. Also, shifting the
position of the satellite
receiver on the shelf may help.
For dual-tuner, two TV
receivers, if the TV2 room is a
floor or two above or below
where the receiver is located,
it might help to orient the
antenna as horizontal (flat) as
possible.
It may help to move the
antenna away from the back of
entertainment center wiring
and other electronics with a
length of RG-6 cable (3 to 5
feet).
A 6 to 15 dB F-connector
attenuator (from Radio Shack,
etc.) can be installed in
between the UHF antenna input
and the antenna to improve
performance in certain
circumstances. This works best
for distances of up to
approximately 75 feet within a
residence.
Combining the RG-6 cable
extension with the attenuator
might be needed if the prior
steps are not effective.
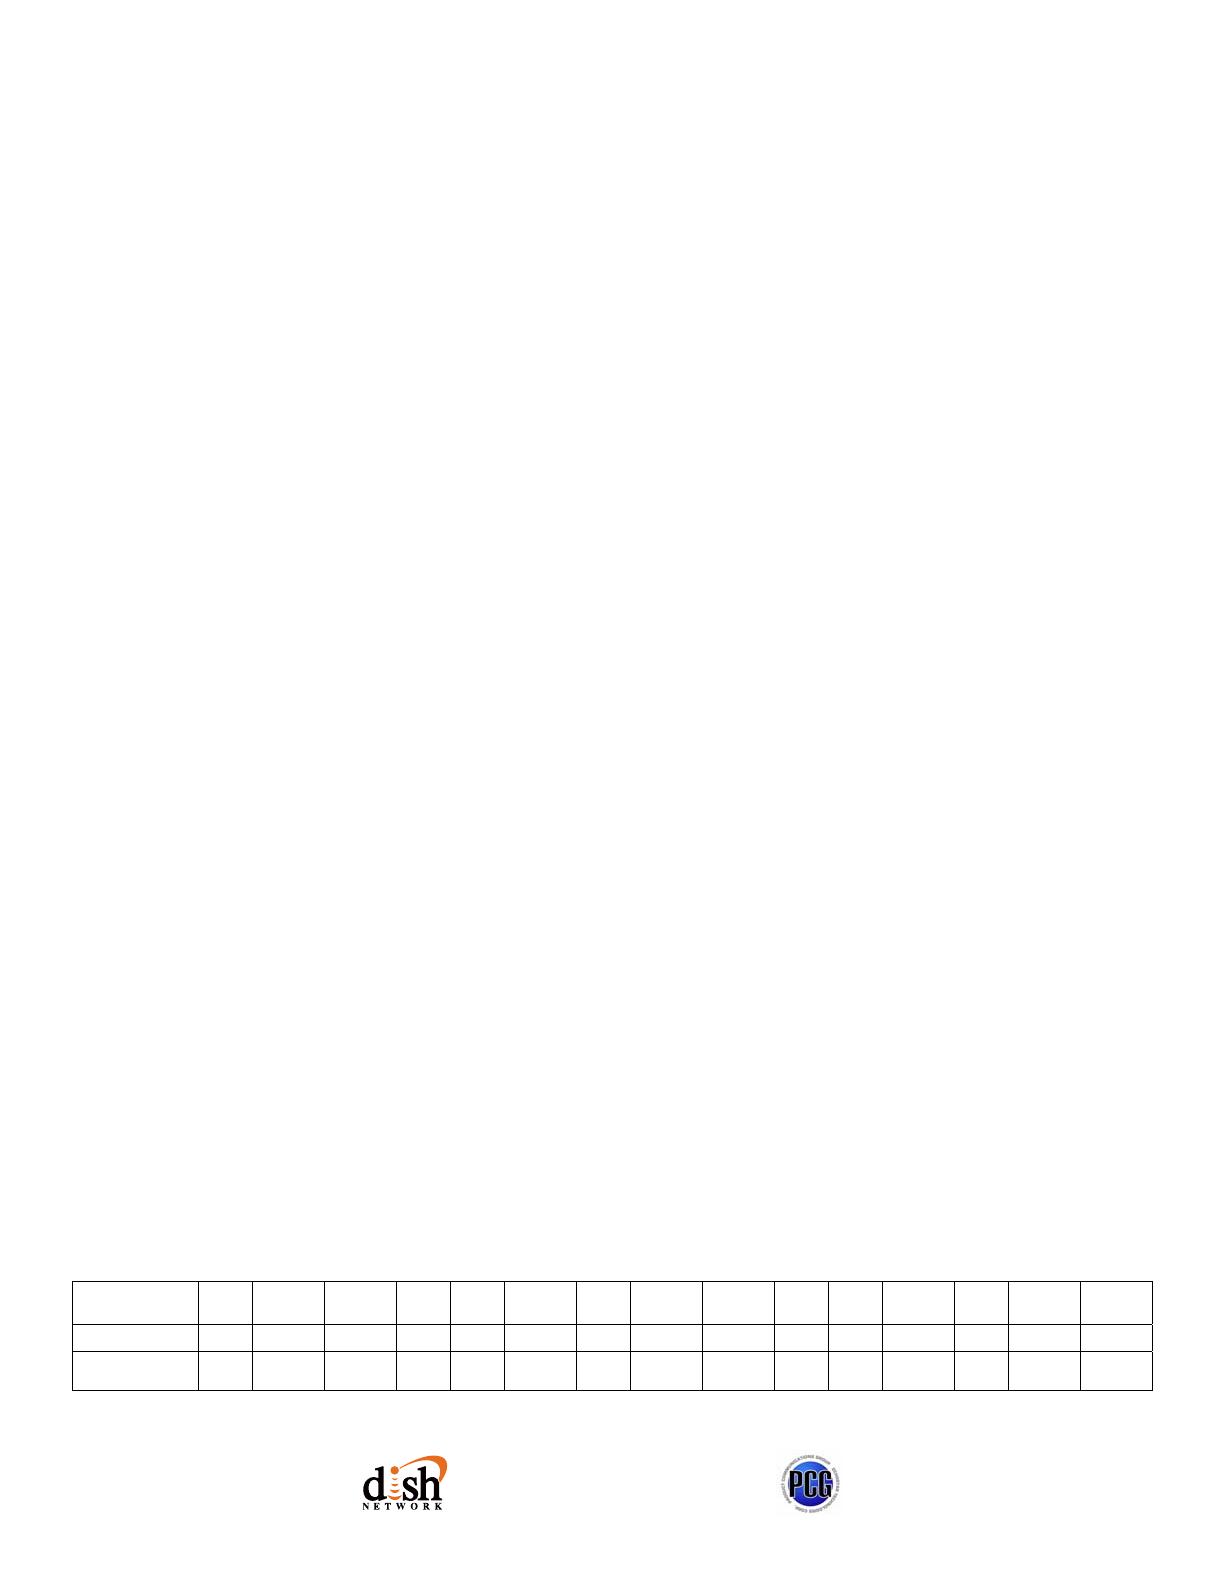
Receivers
Feature 111* ViP 211*
222
TV1
222
TV2
311*
322
TV1
322
TV2
522/625
TV1
522/625
TV2
811 921
942
TV1
942
TV2
ViP622
TV1
ViP622
TV2
Receives IR Yes Yes Yes No Yes Yes No Yes No Yes Yes Yes No Yes No
Receives
UHF Pro
No No Yes** Yes No Yes** Yes Yes** Yes Yes Yes Yes** Yes Yes** Yes
*The IR-to-UHF Pro Upgrade Kit can be purchased to provide remote control operation from a distance.
**TV1 can be controlled by UHF Pro when using the applicable replacement remote control with a TV1 UHF Pro key installed.
  • Page 1 1
  • Page 2 2

Dish Network 811 User manual

Type
User manual
This manual is also suitable for

Ask a question and I''ll find the answer in the document

Finding information in a document is now easier with AI