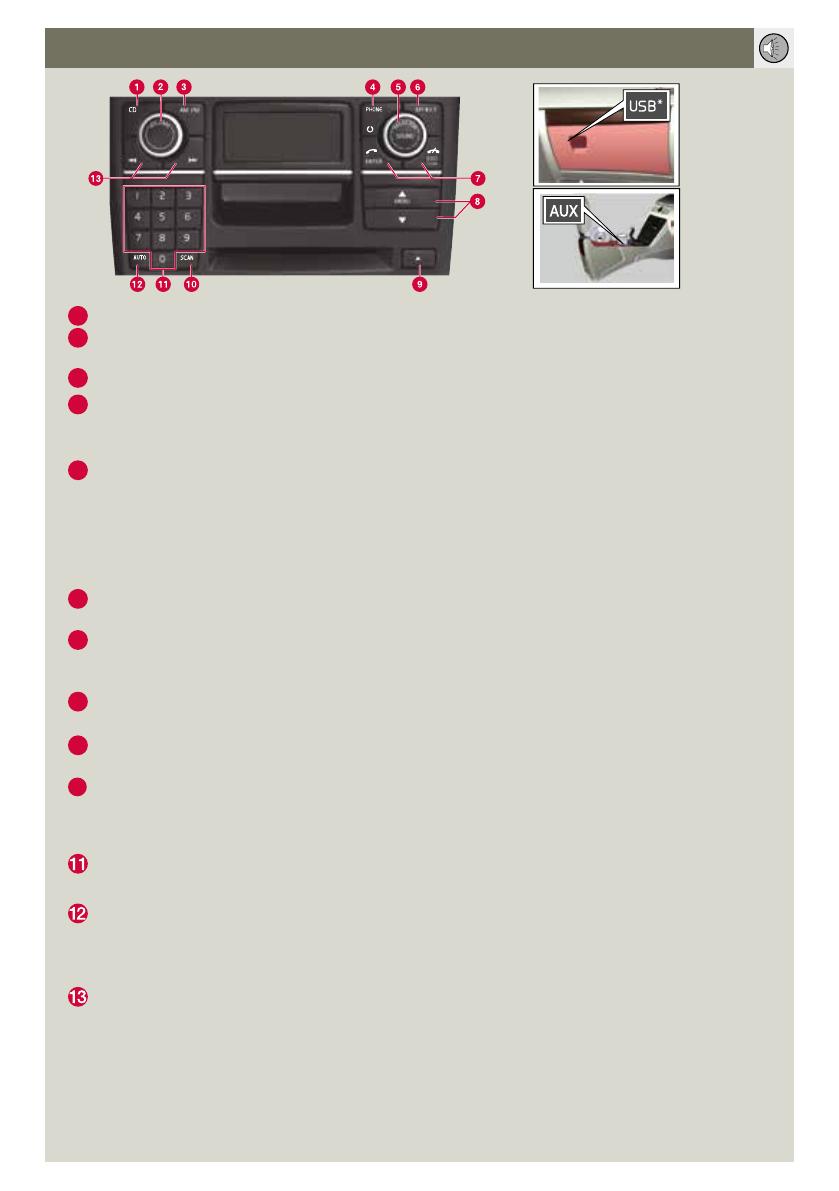
Volvo XC90 Quick start guide

Category
Cars
Type
Quick start guide

Volvo XC90: Experience unparalleled luxury and safety with our cutting-edge SUV. Master every journey with effortless handling, advanced technology, and a spacious cabin designed for comfort and versatility.

Volvo XC90: Experience unparalleled luxury and safety with our cutting-edge SUV. Master every journey with effortless handling, advanced technology, and a spacious cabin designed for comfort and versatility.

WELCOME TO THE GLOBAL FAMILY OF
VOLVO OWNERS!
Getting to know your new vehicle is an exciting experience.
This Quick Guide provides a brief overview of the most common features
and functions in your Volvo.
However, for the most up-to-date and detailed descriptions and
instructions, as well as important warnings and other information not
included in this folder, please refer to your Owner’s Manual.
An asterisk (*) indicates optional equipment.
For additional information, contact Customer Service:
U.S.A.: 1-800-458-1552 www.volvocars.us
Canada: 1-800-663-8255 www.volvocars.ca
XC90
Quick GUIDE Web edition
REMOTE KEY
Locks the doors, fuel filler door,
tailgate and arms the alarm.
Unlocks the doors, fuel filler door,
and tailgate
A
and disarms the alarm.
Unlocks (but does not open) the
tailgate.
Approach lighting illuminates lights
in door mirrors, cabin, footwells,
license plates. Turn signals and park-
ing lights illuminate.
“Panic” alarm.
– Press and hold for approx.
5 seconds to sound the alarm. Turn
off alarm by pressing the unlock/lock
button twice.
A.
Automatic relock occurs if no door/tailgate is
opened within 2 minutes after unlock.
The key blade can be used to lock/unlock the
glove compartment.
WIPERS AND RAIN SENSOR*
1
Rain sensor On/Off with the lever in the
0 position.
A green LED in button 1 illuminates
when the rain sensor is switched on.
2
Turn to adjust intermittent wiper speed or
rain sensor sensitivity where applicable.
3
Tailgate wiper – normal/interval.
A
Single wiper sweep.
0
Off
B
Intermittent wipers. Turn (2) to adjust
interval.
C
Normal wiper speed.
D
High wiper speed.
E
Windshield and headlight washer.
F
Tailgate washer.
NOTE
After cold starts, your engine may idle at a
higher speed for a short time to bring the
engine to normal operating temperature as
quickly as possible, enabling the emission
control system to function optimally.
COLD START AUTOSTART
Turn the key to position III and release it. The
engine will start automatically.
1
2
2
1
DRIVER’S DOOR CONTROL PANEL
L R
Adjusting the door mirrors. Select L
or R. Adjust with the control.
1
Open/close a window partially.
2
Open/close a window fully.
Locks/unlocks all doors, fuel filler
door and tailgate.
Lockout switch for rear windows.
LIGHTING PANEL
Headlights off. High beam flash only.
Parking lights.
Headlights: turn off when ignition is
switched off, high/low beams.
Display & instrument panel lighting
intensity.
Fuel filler door unlock.
Press to turn on
A
the LED DRL (Daytime
Running Lights) function.
Rear fog light (driver’s side only).
A
High beam flash.
B
Toggle between high/low beams, home
safe lighting.
PARKING BRAKE
APPLYING THE PARKING BRAKE
1. Press firmly on the brake pedal and then
press the parking brake pedal (1).
2. Release the brake pedal. If the vehicle rolls,
press the parking brake pedal again.
3. Put the gear selector in Park.
Releasing the parking brake
1. Press firmly on the brake pedal and then pull
the handle (2) – the parking brake pedal will
come up.
2. Release the brake pedal.
A.
The headlight switch must first be turned to the position.
AUDIO SYSTEM
1
CD select
C
.
2
Press to turn on/off.
Turn to adjust volume.
3
Press to select
AM,
FM1
or
FM2
.
4
PHONE:
press briefly to activate the
hands-free system. Press and hold to
deactivate.
5
Sound settings:
Press to select BASS, TREBLE, etc.
Turn to adjust.
Sound source:
Turn to select e.g., CD, SiriusXM™
satellite radio*, Bluetooth® streaming
audio or the AUX/USB sockets
A
.
6
MY KEY: press to store a favorite function
(see your Owner’s Manual for details).
7
Press Enter to answer a call/confirm a
menu selection, or EXIT to end/
reject calls or cancel menu selections.
8
Open the menu system and navigate
among the alternatives.
9
Press to eject the current CD
.
Press and hold to eject all CDs
C
.
10
SCAN: search for strong stations
(which will play for approx. 8 seconds
before scanning to the next station). Press
EXIT to cancel.
Station preset buttons/select a disc in
the CD changer (1-6)*
AUTO: store stations by pressing for 2
seconds. AUTOSTORE is displayed dur-
ing the search. The 10 strongest stations
are stored. Press 09 to select a station.
Search for stations with left/right arrows
or change CD tracks. Store up to 20
stations by pressing and holding one
of the preset buttons 09 in FM1 and
09 in FM2, until the stored station is
confirmed in the display.
BLUETOOTH
®
HANDS-FREE CONNECTION
Using the vehicles menus
1. Activate the
cell phone’s
Bluetooth® func-
tion.
2. Activate the
vehicle’s
Bluetooth® hands-free
system by briefly pressing PHONE (4).
3. Select Add phone.
4. Select a phone shown in the center console
display.
5. Using the cell phone’s keypad, enter the
digits shown in the center console display.
Using the cell phone’s menus
1. Activate the hands-free system by briefly
pressing PHONE (4). If there is a cell phone
connected, disconnect it from the hands-free
system.
2. Perform a search using the cell phone’s
Bluetooth
®
function.
3. Select My Volvo Car in the list of devices
shown in the cell phone’s display.
4. Enter the PIN code 1234 in the cell phone.
5. Connect to My Volvo Car from the cell
phone.
HD RADIO
HD radio reception is subject to coverage limi-
tations. See your Owner’s Manual for details.
A.
AUX/USB sockets for e.g., mp3 player. Set the devices’s vol-
ume to medium for best sound quality. An iPod® connected
to the USB socket will also be charged.
B.
CDs containing files in mp3 and WMA formats can
also be played.
C.
Optional CD changer only.
AUTOMATIC CONTROL
In AUTO mode, ECC controls all functions
automatically and makes driving more pleasant
with optimal air quality.
4
Turn to individually set the desired tempera-
ture on the driver’s and passenger’s sides.
The selected temperature will be shown in
the display.
6
Press AUTO to maintain automatic cabin
temperature, balanced airflow and other
settings.
In AUTO mode, if your vehicle has been parked
in the sun, the blower will function at full speed
when the engine is started to cool the cabin as
quickly as possible. To adjust, turn the blower
control (1) to the desired speed.
ELECTRONIC CLIMATE CONTROL (ECC)*
MANUAL CONTROL
1
Blower speed.
2
Recirculation/Interior air quality sen-
sor*, manual (MAN) or automatic (AUT).
3
Air conditioning on or off to cool the
cabin and defog the windows (on if De-
frost is selected).
5
Air distribution. Direct airflow to the
floor, panel vents, windshield, etc.
7
Front seat heating* (high/low/off).
8
Max. defroster to quickly defog the wind-
shield and side windows (A/C also on).
9
Heated rear window and door mirrors.
Direct airflow to the floor, panel vents,
windshield, etc.
INTEGRATED BOOSTER CUSHION
RAISING
1. Pull the handle at the front of the cushion
forward.
2. Lift the rear edge of the cushion and using
both hands, push the cushion rearward and
downward until it locks in place. Move the
seat belt latch to the side if necessary.
LOWERING
1. Pull the handle at the front of the cushion
forward.
2. Pull the cushion forward and press the
center section down until the cushion locks
in place.
The booster cushion must be fully pressed
down before the backrest can be folded down.
TRIP COMPUTER AND ODOMETER
8
Press to display or erase a message.
9
Turn to show trip computer information
alternatives.
10
A short press resets the current function.
A long press resets all functions.
1
Driver information display, select infor-
mation with (9).
2
Trip computer control: A short press
toggles between T1 & T2.
A long press resets the displayed
odometer.
3
Top display row: Odometer
Lower display row: Two separate trip
odometers, T1 & T2.
4
Top display row: Clock.
Lower display row: Ambient temperature.
5
Set the clock: Turn clockwise/counter-
clockwise as far as possible and hold to
set the time (4).
6
Fuel gauge.
7
Low fuel level indicator
When the symbol illuminates, refuel as
soon as possible.
NOTE
The display text MILES TO EMPTY TANK is
an approximation, based on recent average
fuel consumption.
INDICATOR AND WARNING LIGHTS
Yellow symbol: caution - take the
action shown in the display.
Red symbol: warning - stop safely
as soon as possible and take the
action shown in the display.
Low oil pressure, stop safely and
check the oil level
A
.
Brake failure warning light, stop
safely. Check brake fluid level
A
.
DSTC stability system, flashes
when the system is working.
A
Have the vehicle towed if the symbol remains
illuminated.
ACCESSING THE THIRD ROW OF
SEATS
TURN SIGNALS
A
Lane-change sequence, three flashes.
B
Full turn sequence.
WARNING
Never adjust the steering wheel while
driving.
STEERING WHEEL ADJUSTMENT
When a low tire pressure warning message
(LOW TIRE PRESS. CHECK TIRES or VERY
LOW TIRE PRESSURE) has been displayed
and the tire pressure warning light (
) has
illuminated, one or more tires has low inflation
pressure.
Check the inflation pressure of all four tires
with a tire pressure gauge as soon as possible
and pump the tire(s) with low pressure to the
recommended inflation pressure.
Refer to the inflation pressure tables in the
chapter “Wheels and tires” in the Owner’s
Manual.
TIRE PRESSURE MONITORING
SYSTEM (TPMS)
Moving a second-row seat forward
1. Pull up and hold the handle (A) on the side
of the backrest.
2. Push the backrest forward to move the
entire seat forward.
Moving a second-row seat rearward
1. Pull up and hold the handle (A).
2. Push the front of the seat cushion to move
the entire seat rearward.
3. Return the backrest to the upright position.
Hand washing is gentler on the paint than an
automatic car wash. Since the paint on a new
vehicle may take several months to harden
completely, we recommend washing the vehi-
cle by hand during this period. Use clean water,
a suitable car washing detergent and a sponge.
Keep in mind that dirt or grit on the sponge can
scratch the paint.
CAR CARE
REFUELING
Hang the fuel filler cap on the hook while
refueling.
ADJUSTING THE POWER SEAT
STORAGE SPACES
1
Adjusts lumbar support.
2
Raises/lowers the front edge of the seat
cushion.
3
Moves the seat forward/rearward.
4
Raises/lowers the seat.
5
Backrest tilt.
REMOTE KEY AND THE POWER SEAT
Each of the remote keys can be used by differ-
ent drivers to store the driver’s seat position in
the following way:
• Adjust the seat to your preferences.
• Lock the vehicle by pressing the lock but-
ton on the remote key that you normally
use. This stores the seat’s current position
in that remote key’s memory
A
.
• Unlock the vehicle (by pressing the unlock
button on the same remote key) and open
the driver’s door. The driver’s seat will
automatically move to the position stored in
the remote key (if the seat has been moved
since you left it).
A.
This setting does not affect the separate power seat memory.
Consult your owner’s manual for detailed information.
TP 16234 (USA & Canada) AT 1320. Printed in Sweden, Göteborg 2013, Copyright © 2000-2013 Volvo Car Corporation
1
Rear seat cup holders.
2
Control for lifting out the center console (not available on models with the optional Rear Seat
Entertainment system).
  • Page 1 1
  • Page 2 2
  • Page 3 3
  • Page 4 4
  • Page 5 5
  • Page 6 6
  • Page 7 7
  • Page 8 8

Volvo XC90 Quick start guide

Category
Cars
Type
Quick start guide

Volvo XC90: Experience unparalleled luxury and safety with our cutting-edge SUV. Master every journey with effortless handling, advanced technology, and a spacious cabin designed for comfort and versatility.

Ask a question and I''ll find the answer in the document

Finding information in a document is now easier with AI

Other documents