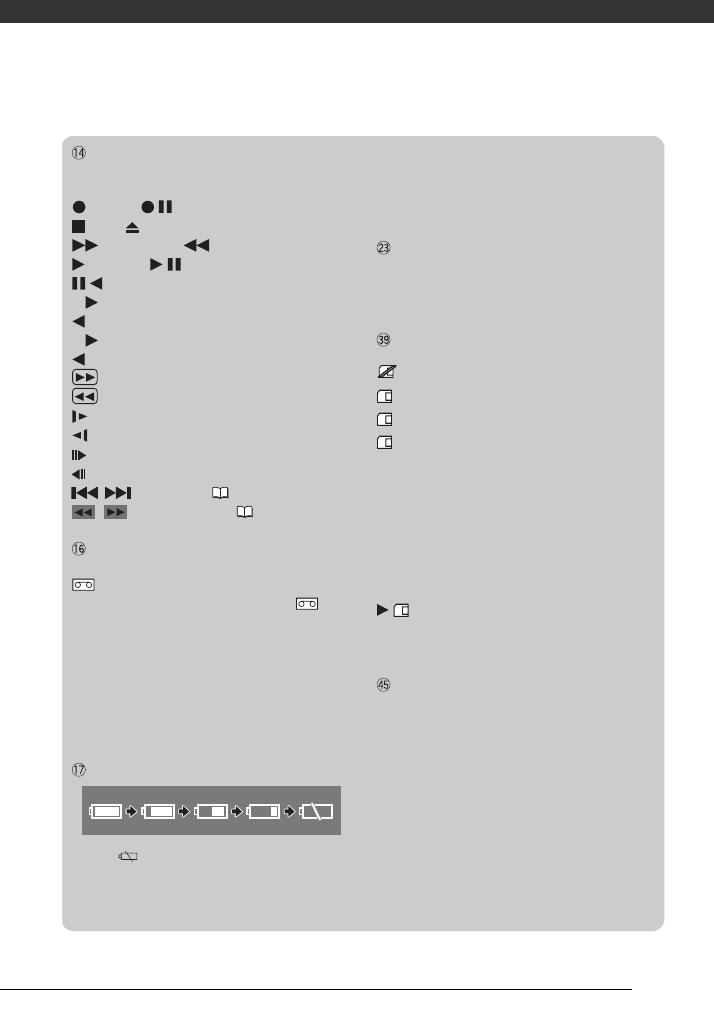
Canon MD255 User manual

Category
Camcorders
Type
User manual
PUB. DIE-294
Digital Video Camcorder
Instruction Manual
PAL
Please read also the Digital
Video Software instruction
manual (on PDF file).
2
Introduction
Cleaning the Video Heads
Digital video camcorders record video signals onto the tape in very thin lines (as thin
as 1/8 the width of a hair). The following anomalies may appear if the video heads
become dirty even a little.
Mosaic or other blocky video artifacts (Fig. 1) or banding
(Fig. 2) appear on the picture during playback.
Sound becomes distorted, or there is no sound during
playback.
The message “HEADS DIRTY, USE CLEANING CASSETTE”
appears.
If such symptoms appear, clean the video heads with the
Canon DVM-CL Digital Video Head Cleaning Cassette* or a
commercially available dry cleaning cassette.
If the symptoms reappear shortly after the cleaning, the
videocassette may be defective. Stop using it.
* Availability differs from area to area.
Video heads may become dirty under the following conditions:
When using the camcorder in humid or hot places.
When using cassettes with damaged or dirty tapes.
When using the camcorder in dusty places.
When using the video heads for a long time without cleaning them.
NOTES
Before you make important recordings, clean the video heads and make a test recording
first. We also recommend cleaning the video heads after use, before storing the
camcorder.
Do not use wet type cleaning cassettes as this may damage the camcorder.
Even after cleaning the video heads you may not be able to play back correctly tapes
that were recorded with dirty video heads.
Fig. 1
Fig. 2
3
Important Usage Instructions
WARNING!
TO REDUCE THE RISK OF ELECTRIC SHOCK, DO NOT REMOVE COVER (OR
BACK). NO USER SERVICEABLE PARTS INSIDE. REFER SERVICING TO
QUALIFIED SERVICE PERSONNEL.
WARNING!
TO REDUCE THE RISK OF FIRE OR ELECTRIC SHOCK, DO NOT EXPOSE THIS
PRODUCT TO RAIN OR MOISTURE.
CAUTION:
TO REDUCE THE RISK OF ELECTRIC SHOCK AND TO REDUCE ANNOYING
INTERFERENCE, USE THE RECOMMENDED ACCESSORIES ONLY.
CAUTION:
DISCONNECT THE MAINS PLUG FROM THE SUPPLY SOCKET WHEN NOT IN USE.
The Mains plug is used as the disconnect device. The Mains plug shall remain readily operable to disconnect the
plug in case of an accident.
While using the compact power adapter, do not wrap it or cover it with a piece of cloth, and do not place it in
confined narrow spaces. Heat may build up, the plastic case may deform and it could result in electric shock or fire.
CA-590E identification plate is located on the bottom.
Using any device other than the Compact Power Adapter CA-590E may damage the camcorder.
European Union (and EEA) only.
This symbol indicates that this product is not to be disposed of with your household waste, according to
the WEEE Directive (2002/96/EC) and your national law. This product should be handed over to a
designated collection point, e.g., on an authorized one-for-one basis when you buy a new similar product
or to an authorized collection site for recycling waste electrical and electronic equipment (EEE). Improper
handling of this type of waste could have a possible negative impact on the environment and human
health due to potentially hazardous substances that are generally associated with EEE. At the same time, your
cooperation in the correct disposal of this product will contribute to the effective usage of natural resources. For
more information about where you can drop off your waste equipment for recycling, please contact your local city
office, waste authority, approved WEEE scheme or your household waste disposal service. For more information
regarding return and recycling of WEEE products, please visit
www.canon-europe.com/environment
.
(EEA: Norway, Iceland and Liechtenstein)
4
Table of contents
Introduction ______________________________
8 About this Manual
9 Getting to Know the Camcorder
9 Supplied Accessories
10 Components Guide
13 Screen Displays
Preparations _____________________________
16 Getting Started
16 Charging the Battery Pack
18 Installing the Backup Battery
18 Preparing the Wireless Controller and Accessories
20 Basic Operation of the Camcorder
20 Operating Modes
20 Joystick and Joystick Guide
21 Using the Menus
23 First Time Settings
23 Changing the Language
23 Changing the Time Zone
24 Setting the Date and Time
24 Getting Ready to Start Recording
24 Opening the Lens Cover and Adjusting the LCD Screen
26 Inserting and Removing a Tape
27 Inserting and Removing a Memory Card
5
Table of contents
Video ____________________________________
28 Basic Recording
28 Shooting Video
30 Zooming: Optical, Advanced and Digital Zoom
31 Quick Start Function
32 Reviewing the Last Scene Recorded
33 Basic Playback
33 Playing Back Video
34 Returning to a Pre-marked Position
35 Locating the Beginning of a Recording Date
35 Locating the End of the Last Scene
36 On-Screen Displays (Data Code)
37 Advanced Function
37 : Special Scene Recording Programs
39 Flexible Recording: Changing the Shutter Speed
40 LCD Video Light
40 Self Timer
41 Audio Recording Mode
41 Audio Playback Modes
42 Manual Focus Adjustment
43 Manual Exposure Adjustment
44 White Balance
45 Image Effects
45 Digital Effects
6
Photos __________________________________
47 Basic Recording
47 Taking Photos
48 Selecting Photo Size and Quality
49 Erasing or Protecting a Photo Right After Recording It
49 Basic Playback
49 Viewing Photos
50 Magnifying Photos during Playback
51 Erasing Photos
52 Additional Functions
52 Automatic Focus Priority
52 Protecting Photos
53 Initializing the Memory Card
54 Printing Photos
54 Printing Photos – Direct Print
54 Selecting the Print Settings
56 Print Orders
External Connections _______________________
58 Connecting to a TV or VCR
59 Connection Diagrams
60 Playback on a TV Screen
60 Copying your Recordings to an External Video Recorder
61 Digital Video Dubbing
63 Audio Dubbing
64 Connecting to a Computer
64 PC Connection Diagrams
65 Transferring Video Recordings
66 Transferring Photos – Direct Transfer
68 Transfer Orders
7
Table of contents
Additional Information ______________________
69 Appendix: Menu Options Lists
69 FUNC. Menu
70 Setup menus
70 Camera Setup (Advanced Zoom, Image Stabilizer, etc.)
71 VCR Setup (Recording Mode, TV Type, etc.)
72 Audio Setup (Audio Mode, Wind Screen, etc.)
73 Card Operations (Card Initialization, etc.)
73 Display Setup (LCD Brightness, Language, etc.)
74 System Setup (Beep, Power Save, etc.)
75 Date/Time Setup
76 Trouble?
76 Troubleshooting
79 List of Messages
83 Do’s and Don’ts
83 Handling Precautions
86 Maintenance/Others
87 Using the Camcorder Abroad
88 General Information
88 System Diagram
89 Optional Accessories
92 Specifications
95 Index
Introduction
8
Thank you for purchasing the Canon MD265/MD255. Please read this manual
carefully before you use the camcorder and retain it for future reference. Should your
camcorder fail to operate correctly, refer to Troubleshooting ( 76).
Conventions Used in this Manual
IMPORTANT: Precautions related to the camcorder’s operation.
NOTES: Additional topics that complement the basic operating procedures.
POINTS TO CHECK: Restrictions or requirements regarding the function
described.
: Reference page number.
: Text that applies only to the model(s) shown in the icon.
“Screen” refers to the LCD and the viewfinder screen.
The photos included in the manual are simulated pictures taken with a still camera.
About this Manual
Setting the Date and Time
1 Open the date and time setup
screen.
[ MENU]
[ DATE/TIME SETUP]
[DATE/TIME]
Blinking arrows will be displayed
around the first field of the date.
2 Change each field of the date and
time with the joystick ( ) and
move ( ) to the next field.
3 Press ( ) to start the clock.
4 Press to close the menu.
NOTES
You can also change the date format
( 93).
FUNC.
( 30)
FUNC.
FUNC.
Brackets [ ] and capital letters are used to refer to menu
options as they are displayed on screen. In tables in this
manual the default value is shown in boldface.
For example [ON], [OFF].
Buttons and switches to be operated
Names of buttons and switches other than the joystick
are indicated within a “button” frame.
For example .
FUNC.
9
Getting to Know the Camcorder
* Includes the electronic version of the Digital Video Software instruction manual on PDF file.
Supplied Accessories
CA-590E Compact Power
Adapter
(incl. power cord)
BP-2L5 Battery Pack
Lithium Button Battery
(CR1616)
STV-250N Stereo Video
Cable
(incl. ferrite core)
WL-D85 Wireless Controller
Lithium Button Battery
(CR2025) for Wireless
Controller
IFC-300PCU USB Cable
Software CD-ROM*
DIGITAL VIDEO
Solution Disk
Introduction
10
Names of buttons and switches other than the
joystick are indicated within a
button frame
(for example ).
Components Guide
Left side view
Front view
Right side view
Lens cover switch ( 28, 47)
( open, closed)
DV terminal ( 59, 64)
USB terminal ( 64)
AV terminal ( 59)
CARD access indicator ( 47)/
CHARGE indicator ( 16)
Speaker
Mode switch ( 29)
Easy recording
Recording programs
/
(tape/card) switch ( 20)
Grip belt ( 19)
Strap mount
( 90)
Lock button
switch ( 20)
Stereo microphone
FUNC.
11
Names of buttons and switches other than the
joystick are indicated within a
button frame
(for example ).
Back view
Top view
Bottom view
Joystick ( 20)
FUNC. button ( 21, 69)
D.EFFECTS button ( 45)
Remote sensor ( 19)
Viewfinder ( 29)
Dioptric adjustment lever ( 29)
QUICK START button ( 31)
Start/Stop button ( 28, 47)
DC IN terminal ( 16)
Backup battery compartment ( 18)
Serial number/
Battery attachment unit ( 16)
LCD screen ( 24)
Cassette compartment
( 26)
Cassette compartment cover
(26)
Zoom lever ( 30)
OPEN/EJECT switch
(26)
Tripod socket
( 19)
Memory card slot ( 27)
BATT. (battery release) switch ( 16)
FUNC.
Introduction
12
Wireless Controller WL-D85
WIRELESS CONTROLLER WL
-
D85
START/
STOP
PHOTO
ZOOM
CARD
DATE SEARCH
REW
PLAY
FF
STOP
PAUSE
SLOW
AUDIO DUB.
ZERO SET
MEMORY
TV SCREEN
START/STOP button ( 28)
CARD –/+ buttons ( 49)
DATE SEARCH / buttons ( 35)
REW button ( 33)
button ( 33)
PAUSE button ( 33)
SLOW button ( 33)
AUDIO DUB. button ( 63)
ZERO SET MEMORY button ( 34)
PHOTO button ( 47)
Zoom buttons ( 30)
PLAY button ( 33)
FF button ( 33)
STOP button ( 33)
button ( 33)
button ( 33)
TV SCREEN button ( 74)
13
Screen Displays
Recording Movies
Zoom ( 30), Exposure ( 43)
Recording program ( 37)
White balance ( 44)
Image effect ( 45)
LCD video light ( 40)
Digital effects ( 45)
Condensation warning ( 86)
Shutter speed ( 39)
Self timer ( 40)
Playing Movies
Exposure adjustment ( 43)
Manual focus ( 42)
Image stabilizer ( 71)
Recording mode ( 72)
Tape operation ( 15)
Time code (hours : minutes : seconds)
Remaining tape ( 15)
Remaining battery charge ( 15)
Wind screen off ( 72)
Audio recording mode ( 41)
Remote sensor off ( 74)
Backup battery warning ( 18)
Level marker ( 74)
Recording reminder ( 15)
Operating mode ( 20)
Audio playback mode ( 42)
Speaker volume ( 33)
Search function display
END SEARCH ( 35)/
DATE SEARCH ( 35)
Playback time
(hours : minutes : seconds : frames)
Joystick guide ( 20)
Data code ( 36)
Introduction
14
Recording Still Images
Zoom ( 30), Exposure ( 43)
Recording program ( 37)
White balance ( 44)
Image effect ( 45)
LCD video light ( 40)
Digital effects ( 45)
Still image quality/size ( 48)
Self timer ( 40)
Number of still images available on the
memory card ( 15)
AF frame ( 52)
Joystick guide ( 20)
Camcorder shake warning ( 71)
Viewing Still Images
Slideshow ( 50)
Image protection mark ( 52)
Image number ( 15, 75)
Current image /Total number of images
Still image size
Data code ( 36)
15
Tape operation
Note that some playback and search modes are
only available when using the wireless controller.
Record, Record pause,
Stop, Eject,
Fast forward, Rewind,
Playback, Playback pause,
Reverse playback pause,
x1 Playback (normal speed),
x1 Reverse playback (normal speed),
x2 Playback (double speed),
x2 Reverse playback (double speed),
Fast forward playback,
Rewind playback,
Slow playback,
Slow reverse playback,
Frame advance,
Frame reverse,
/ Date search ( 35),
/ Zero set memory ( 34)
Remaining tape
Indicates the remaining time of the tape in minutes.
moves during recording. When the tape
reaches its end, the display changes to “ END”.
• When the time left is less than 15 seconds, the
remaining tape time may not appear.
• Depending on the type of tape, the remaining
time displayed may not be correct. In any case,
you will be able to record on the tape the number
of minutes that appears on the cassette’s label
(for example, 85 minutes).
Remaining battery charge
• When starts flashing in red replace the
battery pack with a fully charged one.
• When you attach an empty battery pack, the
power may turn off without displaying the icon.
• Depending on the conditions under which the
camcorder and the battery pack are used, the
actual battery charge may not be indicated
accurately.
Recording reminder
The camcorder counts from 1 to 10 seconds when
you start recording. This is helpful to avoid scenes
that are too short.
Number of still images available on the memory
card
flashing in red: No card
in green: 6 or more images
in yellow: 1 to 5 images
in red: No more images can be recorded
• When viewing the still images, the display will
always be in green.
• Depending on the recording conditions, the
number of available still images displayed may
not decrease even after a recording has been
made, or may decrease by 2 still images at once.
Card Access Display
is displayed next to the number of images
available while the camcorder is writing on the
memory card.
Image number
The image number indicates the name and location
of the file on the memory card. For example, the file
name of image 101-0107 is “IMG_0107.JPG”,
stored under the folder “DCIM\101CANON”.
16
Preparations
This chapter describes basic operations, such as navigating the
menus, and first time settings to help you learn more about your
camcorder.
Getting Started
Charging the Battery Pack
The camcorder can be powered with a
battery pack or directly using the
compact power adapter. Charge the
battery pack before use.
For approximate charging times and
recording/playback times with a full
battery pack, refer to the tables on
page 90.
1 Turn off the camcorder.
2 Attach the battery pack to the
camcorder.
Press the battery pack lightly and
slide it up until it clicks.
3 Connect the power cord to the
compact power adapter.
4 Plug the power cord into a power
outlet.
5 Connect the compact power
adapter to the camcorder’s DC IN
terminal.
The CHARGE indicator starts
flashing. The indicator will stay on
when the charging is completed.
Getting Started
Remove the battery
terminal cover before
attaching the battery
BATT. switch
CHARGE
indicator
DC IN
terminal
17
You can also use the compact
power adapter without attaching a
battery pack.
When the compact power adapter
is connected, even if a battery is
attached its power will not be
consumed.
1 Disconnect the compact power
adapter from the camcorder.
2 Unplug the power cord from the
power outlet and the compact
power adapter.
Press to release the battery
pack. Slide the battery pack down
and then pull it out.
IMPORTANT
You may hear some noise from the
compact power adapter during use.
This is not a malfunction.
We recommend charging the battery
pack in temperatures between 10 °C
and 30 °C. Outside the temperature
range of 0 °C to 40 °C, charging will not
start.
Do not connect to the camcorder’s DC
IN terminal or to the compact power
adapter any electrical equipment that is
not expressly recommended for use
with this camcorder.
To prevent equipment breakdowns and
excessive heating, do not connect the
supplied compact power adapter to
voltage converters for overseas travels
or special power sources such as those
on aircraft and ships, DC-AC inverters,
etc.
NOTES
The CHARGE indicator also serves as a
rough estimate of the battery charge
status.
Continuously on: Battery pack fully
charged.
Two quick flashes at 1-second intervals:
Battery pack at least 50% charged. If
the indicator flashes quickly but not
exactly in this pattern, refer to
Troubleshooting (76).
One flash at 1-second intervals: Battery
pack less than 50% charged.
We recommend that you prepare battery
packs 2 to 3 times longer than you think
you might need.
ONCE THE BATTERY IS FULLY CHARGED
TO REMOVE THE BATTERY PACK
BATT.
Preparations
18
Installing the Backup Battery
The backup battery (lithium button battery
CR1616) allows the camcorder to retain
the date, time ( 24) and other
camcorder settings while the power
source is disconnected. Connect a power
source to the camcorder when replacing
the backup battery to retain the settings.
1 If a battery pack is attached,
remove it first.
2 Open the backup battery cover.
3 Insert the backup battery with the
+ side facing out.
4 Close the cover.
NOTES
The battery life of the backup battery is
about one year. flashes in red when
the lithium button battery is not installed,
or when it needs to be replaced.
Preparing the Wireless Controller and
Accessories
First, insert the supplied lithium button
battery (CR2025) into the wireless
controller.
1 Press the tab in the direction of
the arrow and pull out the battery
holder.
2 Place the lithium button battery
with the + side facing up.
3 Insert the battery holder.
Tab
19
Point the controller at the
camcorder’s remote sensor when
you press the buttons.
You can rotate the LCD panel 180
degrees to use the wireless controller
from the front of the camcorder.
NOTES
The wireless controller may not work
properly when the remote sensor is
situated under strong light sources or
direct sunlight.
If the wireless controller does not work,
check that [WL.REMOTE] is not set to
[OFF ] ( 74). Otherwise, replace
the battery.
Accessories
Fasten the grip belt.
Adjust the grip belt so that you can
reach the zoom lever with your index
finger, and the button with
your thumb.
Do not leave the viewfinder
exposed to direct sunlight
as it may melt (due to
concentration of the light by
the lens). Do not use tripods
with fastening screws
longer than 5.5 mm. Doing
so may damage the camcorder.
TO USE THE WIRELESS CONTROLLER
WHEN YOU MOUNT THE CAMCORDER ON A
TRIPOD
Start/Stop
Preparations
20
Basic Operation of the Camcorder
Operating Modes
The camcorder’s operating mode is
determined by the positions of the
switch and the / switch. In the
manual, indicates that a function is
available in the operating mode shown
and indicates that the function is not
available. When no operating mode icons
are given, the function is available in all
operating modes.
Joystick and Joystick Guide
Use the joystick to operate the
camcorder's menus.
The joystick can also be used in
combination with the joystick guide to
operate additional functions. Press ( )
to display/hide the joystick guide (when
recording, the joystick guide will appear
only when the mode switch is set to
). The functions that appear on the
joystick guide will change depending
on the operating mode.
Operating
mode
switch / switch Icon display Operation
Recording movies
on a tape
28
Recording still images
on a memory card
47
Playing movies
from a tape
33
Playing back still images
from a memory card
49
(Tape)
(Card)
(Tape)
(Card)
Basic Operation of the
Camcorder
Press the joystick itself ( ) to save the
settings or confirm an action. On menu
screens, this is indicated by the icon
.
Push the joystick up, down, left or right
( , ) to select an item or change
settings.
  • Page 1 1
  • Page 2 2
  • Page 3 3
  • Page 4 4
  • Page 5 5
  • Page 6 6
  • Page 7 7
  • Page 8 8
  • Page 9 9
  • Page 10 10
  • Page 11 11
  • Page 12 12
  • Page 13 13
  • Page 14 14
  • Page 15 15
  • Page 16 16
  • Page 17 17
  • Page 18 18
  • Page 19 19
  • Page 20 20
  • Page 21 21
  • Page 22 22
  • Page 23 23
  • Page 24 24
  • Page 25 25
  • Page 26 26
  • Page 27 27
  • Page 28 28
  • Page 29 29
  • Page 30 30
  • Page 31 31
  • Page 32 32
  • Page 33 33
  • Page 34 34
  • Page 35 35
  • Page 36 36
  • Page 37 37
  • Page 38 38
  • Page 39 39
  • Page 40 40
  • Page 41 41
  • Page 42 42
  • Page 43 43
  • Page 44 44
  • Page 45 45
  • Page 46 46
  • Page 47 47
  • Page 48 48
  • Page 49 49
  • Page 50 50
  • Page 51 51
  • Page 52 52
  • Page 53 53
  • Page 54 54
  • Page 55 55
  • Page 56 56
  • Page 57 57
  • Page 58 58
  • Page 59 59
  • Page 60 60
  • Page 61 61
  • Page 62 62
  • Page 63 63
  • Page 64 64
  • Page 65 65
  • Page 66 66
  • Page 67 67
  • Page 68 68
  • Page 69 69
  • Page 70 70
  • Page 71 71
  • Page 72 72
  • Page 73 73
  • Page 74 74
  • Page 75 75
  • Page 76 76
  • Page 77 77
  • Page 78 78
  • Page 79 79
  • Page 80 80
  • Page 81 81
  • Page 82 82
  • Page 83 83
  • Page 84 84
  • Page 85 85
  • Page 86 86
  • Page 87 87
  • Page 88 88
  • Page 89 89
  • Page 90 90
  • Page 91 91
  • Page 92 92
  • Page 93 93
  • Page 94 94
  • Page 95 95
  • Page 96 96
  • Page 97 97
  • Page 98 98

Canon MD255 User manual

Category
Camcorders
Type
User manual

Ask a question and I''ll find the answer in the document

Finding information in a document is now easier with AI