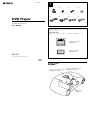
Sony MV-101: A Versatile DVD Player for Your Car
The Sony MV-101 is a feature-rich DVD player designed to enhance your in-car entertainment experience. Here's a brief overview of its capabilities:
-
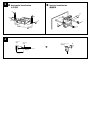
DVD Playback: Enjoy your favorite DVDs on the go with the MV-101's high-quality DVD playback.
-
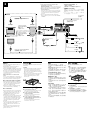
Multiple Monitor Compatibility: Connect either the XVM-R70 overhead monitor or the XVM-H65 headrest monitor to the MV-101 for a more immersive viewing experience.
-
Remote Control: Operate the player conveniently with the included wireless remote control.
-
Audio and Video Outputs: Connect the MV-101 to your car's audio system via the R (audio right), L (audio left), and V (video) outputs.
Sony MV-101: A Versatile DVD Player for Your Car
The Sony MV-101 is a feature-rich DVD player designed to enhance your in-car entertainment experience. Here's a brief overview of its capabilities:
-
DVD Playback: Enjoy your favorite DVDs on the go with the MV-101's high-quality DVD playback.
-
Multiple Monitor Compatibility: Connect either the XVM-R70 overhead monitor or the XVM-H65 headrest monitor to the MV-101 for a more immersive viewing experience.
-
Remote Control: Operate the player conveniently with the included wireless remote control.
-
Audio and Video Outputs: Connect the MV-101 to your car's audio system via the R (audio right), L (audio left), and V (video) outputs.


-
 1
1
-
 2
2
-
 3
3
-
 4
4


Sony MV-101: A Versatile DVD Player for Your Car
The Sony MV-101 is a feature-rich DVD player designed to enhance your in-car entertainment experience. Here's a brief overview of its capabilities:
-
DVD Playback: Enjoy your favorite DVDs on the go with the MV-101's high-quality DVD playback.
-
Multiple Monitor Compatibility: Connect either the XVM-R70 overhead monitor or the XVM-H65 headrest monitor to the MV-101 for a more immersive viewing experience.
-
Remote Control: Operate the player conveniently with the included wireless remote control.
-
Audio and Video Outputs: Connect the MV-101 to your car's audio system via the R (audio right), L (audio left), and V (video) outputs.
Ask a question and I''ll find the answer in the document
Finding information in a document is now easier with AI
Related papers
-
Sony 11b User manual
-
Sony DVX-11A Installation guide
-
-
-
-
-
-
-
-
