Parrot ASTEROID SMART User manual
- Category
- Navigators
- Type
- User manual
This manual is also suitable for

User guide

Table of content
.......................................................................................................................................................6
Before you begin
...........................................................................................................................................................................................................6Software updates
...........................................................................................................................................................................................................6SD card
...........................................................................................................................................................................................................6Warnings
...........................................................................................................................................................................................................7Steering wheel control interface
.......................................................................................................................................................8
Installation
...........................................................................................................................................................................................................8Safety instructions
...........................................................................................................................................................................................................8Before you begin
...........................................................................................................................................................................................................9Installation diagram
...........................................................................................................................................................................................................9Installation using the holder
...........................................................................................................................................................................................................10Installation using the side screw holes
...........................................................................................................................................................................................................10Installing the GPS receiver
...........................................................................................................................................................................................................11Connecting the parking brake lead
...........................................................................................................................................................................................................12Installing a rear view camera
...........................................................................................................................................................................................................12Installing the microphone
...........................................................................................................................................................................................................13Installing the ISO cable
...........................................................................................................................................................................................................13Installing the USB cables
...........................................................................................................................................................................................................13Basic operations
.......................................................................................................................................................15
Getting started
...........................................................................................................................................................................................................15Turning the Parrot ASTEROID Smart on / off
...........................................................................................................................................................................................................15Home screen
...........................................................................................................................................................................................................15Personalizing the home screen
...........................................................................................................................................................................................................16Changing settings
...........................................................................................................................................................................................................16Connecting a phone via Bluetooth
...........................................................................................................................................................................................................16Connecting two phones
...........................................................................................................................................................................................................17Synchronising the phonebook
.......................................................................................................................................................18
Phone
...........................................................................................................................................................................................................18Receiving a call
...........................................................................................................................................................................................................18Making a call
...........................................................................................................................................................................................................19Consulting the call history
...........................................................................................................................................................................................................20Manage favourite contacts

...........................................................................................................................................................................................................20Using the Parrot ASTEROID whilst on a call
.......................................................................................................................................................22
Music
...........................................................................................................................................................................................................22Using vocal music search
...........................................................................................................................................................................................................22Screen commands
...........................................................................................................................................................................................................23iPod
...........................................................................................................................................................................................................23USB storage device
...........................................................................................................................................................................................................23SD card
...........................................................................................................................................................................................................24Audio player connected via Bluetooth
...........................................................................................................................................................................................................24Analogue audio player
...........................................................................................................................................................................................................25Radio
.......................................................................................................................................................27
Internet
...........................................................................................................................................................................................................27Connection with a USB Modem
...........................................................................................................................................................................................................27Connection via Bluetooth
...........................................................................................................................................................................................................28Connection via USB
...........................................................................................................................................................................................................28Connection to a Wi-Fi network
...........................................................................................................................................................................................................29Using the ASTEROID Market
...........................................................................................................................................................................................................30Using the browser
.......................................................................................................................................................34
Video
...........................................................................................................................................................................................................34Rear view camera
...........................................................................................................................................................................................................34Playback of a video via an external source
...........................................................................................................................................................................................................35Playback of a video via a SD card
...........................................................................................................................................................................................................35Screen connected to video output terminals
.......................................................................................................................................................36
Settings
...........................................................................................................................................................................................................36Time / Date
...........................................................................................................................................................................................................36Bluetooth
...........................................................................................................................................................................................................37Phone
...........................................................................................................................................................................................................37Audio
...........................................................................................................................................................................................................39Music
...........................................................................................................................................................................................................40Display
...........................................................................................................................................................................................................40Network
...........................................................................................................................................................................................................41Other settings
.......................................................................................................................................................43
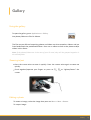
Gallery
...........................................................................................................................................................................................................43Using the gallery
...........................................................................................................................................................................................................43Zooming in/out
...........................................................................................................................................................................................................43Editing a photo
...........................................................................................................................................................................................................44Defining an image as screen background

.......................................................................................................................................................45
Pre-installed applications
...........................................................................................................................................................................................................45Calculator
...........................................................................................................................................................................................................45Diary
.......................................................................................................................................................48
General information

5

6 Before you begin
Before you begin
Software updates
Download the latest update for free (and consult the update procedure) on the Parrot
ASTEROID Smart support page on our website www.parrot.com. These updates will enable
you to receive new features and improve the product’s compatibility.
SD card
An SD card is included with the Parrot ASTEROID Smart. It allows you to play music tracks
and is mandatory in order to use applications.
Note: The iGO application is provided for free with the Parrot ASTEROID Smart. The
necessary navigation datas are stored on the provided SD card. Do not delete or move the
SD card content. Without it you will not be able to use the iGo application.
Warnings
All functions requiring an increased attention should only be used while the vehicle is
stationary. Your safety and the one of the other road users prevails over phone calls, music
and driving assistance applications. Be responsible: drive carefully and pay full attention
to your surrounding. Parrot denies any liability should you choose not to respect this
warning.
Use the Parrot ASTEROID Smart with a reasonable volume level so that you can hear all
external noises while driving.
The Parrot ASTEROID Smart includes NdFeB magnets which can damage objects sensitive
to magnetic fields (pacemakers, credit cards, mechanical clocks…).
The Parking Brake wire of Parrot ASTEROID Smart's ISO cable detects whether or not the
parking brake is on. It must be connected following the installation instructions provided in
this document. Incorrect installation or connection may be dangerous and illegal in many
states / countries. If the screen is located in the driver's field of vision, under no
circumstances should videos be played whilst the vehicle is moving. The same applies to
any applications other than those for driving or navigation assistance.
If you attempt to use an application that is not intended for navigation or driving
assistance when you are driving, an on-screen warning will be displayed. To watch a video
on the Parrot ASTEROID Smart's screen, make sure that the vehicle is stopped in a safe
area and that the parking brake is on.

7Before you begin
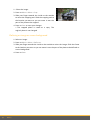
Steering wheel control interface
A steering wheel control interface can be used to connect your vehicle’s steering wheel
controls to your Parrot ASTEROID Smart. With this interface, you will be able to make
phone calls via the steering wheel controls while keeping your hands on the wheel. Refer
to our website www.parrot.com for more information.

8 Installation
Installation
Safety instructions
Note: We advise our customers to have the Parrot ASTEROID Smart installed by a Parrot
certified installer.
Turn the ignition off before installing the Parrot ASTEROID Smart.
Do not install the Parrot ASTEROID Smart where it may interfere with the driver operation
of the vehicle.
Do not drill holes in the dashboard or any panel without first making sure there is nothing
behind it. Do not damage any fuel line, electronic component or cable.
If you need to use screws, do not allow them to come into contact with any power cable.
Install the Parrot ASTEROID Smart only on vehicles with a 12 V battery. If your vehicle
(e.g. : truck) has a 24V battery, the use of a step-down converter is essential.
Place all cables away from hot places (heater outlet) and moving parts (gear shift, seat
rails...). Make sure they will never wind around the steering column or gearstick.
Confirm the proper function of your vehicle's other equipment after installing the Parrot
ASTEROID Smart.
Do not install the Parrot ASTEROID Smart or one of its components where the airbag may
deploy.
Do not install the Parrot ASTEROID Smart in places subject to high temperatures or
humidity.
Make sure you leave enough space behind the Parrot ASTEROID Smart once installed so
that proper heat dispersal is ensured.
Before you begin
Remove your car stereo from your vehicle. You may need release keys to do so.
Try to connect the audio and power connectors of the Parrot ASTEROID Smart to the
connectors of your vehicle. If this connection is impossible, you have to obtain an ISO
adapter before installing the Parrot ASTEROID Smart. Refer to the vehicle compatibility
section on the Parrot ASTEROID Smart support page for more information.
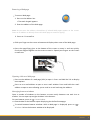
Compare the Parrot ASTEROID Smart antenna connector to the antenna connector of your

9Installation
vehicle. If an adapter is necessary, contact your local car audio specialist.
Note : Make sure you also supply power to your antenna if it is amplified. Power to the
antenna can be supplied using the Parrot ASTEROID Smart ISO cable.
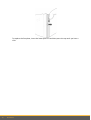
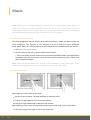
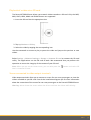
Parrot ASTEROID Smart antenna
connector
Example of antenna adaptor -DIN / Fakra (not provided)
Installation diagram
Installation using the holder
1. Loosen the 4 screws to remove the Parrot ASTEROID Smart holder.
2. Insert the holder into the dashboard. To do so, bend the tabs 90 degrees.

10 Installation
3. Install the Parrot ASTEROID Smart and fasten the screws.
4. Attach the trim ring.
Installation using the side screw holes
1. Loosen the 4 screws to remove the Parrot ASTEROID Smart holder.
2. Remove the two side brackets.
3. Position the Parrot ASTEROID Smart so that its screw holes are aligned with the screw
holes of the bracket.
4. Tighten as many screws as necessary depending on the model of your vehicle. Only
use the provided screws.
Installing the GPS receiver
Stick the GPS receiver in an unobstructed area inside the car.
Athermic windshields and windows with a built-in antenna can interfere with GPS
reception and reduce the reliability of information from navigation applications.

11Installation
The GPS receiver antenna is located on the side where "Parrot ASTEROID GPS" is
written and where the star-shaped logo is. This logo must always be directed
towards the sky.
If your vehicle has an athermic windshield, stick the GPS receiver on the windshield on the
non athermic area. The side where the star-shaped logo is must be stuck on the
windshield.
Note : The non athermic area of the windshield depends on the model of your vehicle. It is
usually located near the rear view mirror.
If your vehicle does not have an athermic windshield, stick the GPS receiver on the
dashboard. The side where the star-shaped logo is must be visible.
To make sure the adhesive tape adheres well :
use the provided adhesive tape ;
clean the area with an appropriate cleaning product before sticking the support ;
once you have stuck the support on the dashboard, wait for approximately 2 hours
without handling it.
Note: Once the GPS receiver is connected to the Parrot ASTEROID Smart, the GPS receiver
light becomes white while searching for a GPS signal. The light blinks as soon as a signal is
detected. Select Settings > Location & security > Activate the external GPS LED to activate/
deactivate the light.
Connecting the parking brake lead
The parking brake lead allows you to use the Parrot ASTEROID Smart video function or
applications only when the parking brake is set. If this cable is not connected to your
vehicle parking brake system, the video function will not be available.

12 Installation
1. Connect the parking brake extension lead to the Parrot ASTEROID Smart green cable.
2. Locate and test the parking brake signal cable in the vehicle. This cable connects your
parking brake to the parking brake signal on your dashboard.
3. Route the Parrot ASTEROID Smart parking brake extension lead (green) safely and
securely from the Parrot ASTEROID Smart and connect this to the parking brake signal
cable using a suitable method.
Warning: An improper connection or use of this cable is dangerous and illegal in many
states.
Installing a rear view camera
If you are to use the Parrot ASTEROID Smart with a rear view camera (not provided), the
orange cable on the Parrot ASTEROID Smart ISO cable will detect when the gearstick is
moved to "reverse". Connect this cable to the one providing power to the reverse lamp of
your vehicle in order to display the rear view camera image when backing your vehicle.
Connect the rear view camera video cable to the Video CAM connector located at the back
of the Parrot ASTEROID Smart.
Installing the microphone
The optimum location for the microphone is in the centre of the vehicles roof near the rear
view mirror. The microphone ideally needs to be less than 60cm’s from the users mouth
pointing directly towards them with no obstructions.
Please take care when routing the microphone cable through the vehicle to the desired
location, we recommend routing alongside existing manufacture’s wiring looms securing
as you go making sure the microphone cable is not pinched or trapped.
Warning: Do not run the microphone cable in such a way as to obstruct or interfere with
the vehicles operation or cause injury to its occupants. In particular vehicle safety device
such as airbags and other SRS systems.

13Installation
Installing the ISO cable
Connect the audio and power connectors of the Parrot ASTEROID Smart to the ones of your
vehicle.
Once the connections are made, check your installation. To do so, turn the ignition on then
off. The "Goodbye" message must be displayed. If it is not the case, it is necessary to
swap the positions of the red and yellow wires. Indeed, the red wire of the power cable
must be connected to the 12V ignition, the yellow wire to the permanent 12V and the black
wire to the ground. This can be done simply by reversing both bullet connectors located on
the Parrot wiring.
Installing the USB cables
Connect the USB cables to the Parrot ASTEROID Smart. We recommend you connect all
audio cables to the Parrot ASTEROID Smart even if you do not plan on using them. Route
the audio cables to a suitable location in your vehicle such as the glove box or arm rest
compartment. It may be necessary to drill a hole in your dashboard to do so. Avoid using
USB extension cables.
Note: Use the provided cable ties to make sure the cables are well fixed to the car stereo.
Insert one of the cable ties into the slots in the top of the back of the car stereo.
The USB cable (1.2m - 2A) to which you will connect the USB / iPod cable extension must
be connected to its specific white USB port. "iPod" is written above it.
To guarantee an optimal reception quality we recommend you do not connect your USB
Modem on the Parrot ASTEROID Smart directly : use the USB cable to install your device on
the dashboard (or any other open area).
Basic operations
The Parrot ASTEROID Smart faceplate can be removed to protect your unit from theft. The
Parrot ASTEROID Smart cannot work without its faceplate.
Handle the faceplate with care. Do not force while installing or removing it. Keep it away
from sunlight, humidity or high temperatures.
To remove the faceplate, hold down the button on the top left and slide it downwards.

14 Installation
To replace the faceplate, insert the lower part first and then press the top until you hear a
click.

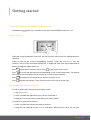
15Getting started
Getting started
Turning the Parrot ASTEROID Smart on / off
Hold down the button for 2 seconds to turn the Parrot ASTEROID Smart on / off.
Home screen
Slide your finger horizontally to the left. You will discover more space for adding functions
shortcuts.
Touch an icon to get to the corresponding function. Touch the Applications icon for
instance. The list of the available applications is displayed. Slide your finger downward to
browse through the applications list.
Press to get back to previous menu. Press to get to the home screen.
Press to access the pop-up menu corresponding to the current application. The pop-up
menu allows you to change several settings or to access more functions.
Press to display the last applications used or currently in use.
Press to adjust the volume. Then slide the cursor to the left or to the right.
Personalizing the home screen
To add an application shortcut on your home screen:
1. Tap Applications.
2. Press and hold the application icon you are interested in.
3. Drag the icon to the home screen where you want to add it.
To remove an application shortcut:
1. Press and hold the shortcut you want to remove.
2. Drag the icon upwards to the Remove indication. When the icon turns red, lift your

16 Getting started
finger.
Changing settings
To change the Parrot ASTEROID Smart settings, tap Applications, then Settings. You can
also tap , then Settings.
Connecting a phone via Bluetooth
Note : Refer to the compatibility page of our website to check if your phone is compatible
with the Parrot ASTEROID Smart and to consult the specific pairing procedures for the most
common phones : www.parrot.com/uk/compatibility.
If you are using the Parrot ASTEROID Smart with your phone for the very first time, you
must initially pair both devices. Once your telephone is paired with the Parrot ASTEROID
Smart, the 2 devices will automatically connect when they are turned on (as well as
Bluetooth® features) and in proximity of each other.
1. In the Settings menu, press Wireless & networks > Bluetooth.
2. If necessary, activate the Bluetooth and Discoverable options.
3. From your phone, search for Bluetooth peripherals and select «Parrot ASTEROID
Smart».
4. The pairing procedure depends on which telephone model you have:
If the phone asks you to enter the Bluetooth PIN code, enter “0000”.
If the Parrot ASTEROID Smart and your telephone display two codes, verify that the
codes are identical, then either confirm or invalidate.
Note: Depending on the model of your phone, you may need to authorize the connection
to the Parrot ASTEROID Smart to allow further automatic connections. Refer to the user
guide of your phone for more information.
Connecting two phones
To activate Dual Mode (multipoint) and connect two phones :
1. Tap Phone.
2. Tap , then Bluetooth > Options.
3. Activate the Dual Mode option.
When the Parrot ASTEROID Smart is switched on, it attempts to connect to all paired
phones in the vehicle. If there are more than two paired phones in the vehicle, the device
connects to the two phones with the oldest pairing.
When two phones are connected to the Parrot ASTEROID Smart, one of them becomes the
main phone and the other is the secondary phone. By default, the main phone is the one
with the oldest pairing to the Parrot ASTEROID Smart.

17Getting started
You can receive calls to the main or secondary phones.
Only the phonebook for your main phone may be accessed through the Parrot ASTEROID
Smart. You can only make calls using the main phone. However, you can easily switch
between the connected phones. To do so :
1. Tap Phone.
2. Tap , then Phone.
3. Select the main phone.
Synchronising the phonebook
With most of the Bluetooth phones, the phonebook is automatically synchronized in the
system’s memory. Each time you change your directory, synchronization will start
automatically the next time it is connected.
Warning: Only the contacts stored in the phone memory are synchronized. If your contacts
are stored in your SIM card memory, transfer them onto your phone memory.
The automatic synchronization is limited to 5000 contacts (or phone numbers) for each
paired phone.

18 Phone
Phone
Receiving a call
An incoming call is indicated by a ringtone.
If you want to answer this call, tap the green button on the Parrot ASTEROID Smart
screen. Then tap the red button to end the call.
If you want to refuse this call, tap the red button.
Making a call
You can make a call using voice recognition directly after automatic synchronization. The
Parrot ASTEROID Smart will automatically recognize the contact you wish to call.
1. Tap Voice Command > Contacts to launch the voice recognition feature.
> The Parrot ASTEROID Smart asks you the name of the contact you want to call.
2. Say the name of the contact and the type of number («WORK», «CELLPHONE»...) if
there are several numbers associated to your contact. Then say a number if there are
several numbers of a same type associated to your contact («HOME 1»,
«CELLPHONE 2»...).
> The call is automatically launched if the voice tag is correctly understood. If it is not
the case, a confirmation message is asked. Confirm by saying «YES» or «CALL».
Note: At any time, press the the button to exit voice recognition mode.

19Phone
If there are several phone numbers associated to the contact you want to call, you can
specify the type of number:
- Home
- At home
- Work
- At work
- Office
- At office
- At the office
- Mobile
- Cellular
- Cell
- On mobile
- On cellular
- On cell
- On mobile phone
- On cellular phone
- On cell phone
- Mobile phone
- Cellular phone
- Cell phone
- Other
- General
- Default
- Preferred
You can combine several words from the list above to make a call. For instance, « CALL
‘PAUL’», « CALL ‘PAUL’ ON MOBILE PHONE », or just « PAUL CELLPHONE».
Calling a contact from the phonebook
1. Select Phone > Contacts.
2. Select the contact to make a call to the default number or select among the different
numbers of the contact («WORK», «MOBILE»...).
Dialling a number
1. Select Phone > Keypad.
2. Type the phone number.
3. Select OK to make the call.
Consulting the call history
Select Phone > Call History to see the list of dialed, received and missed calls. You can
make a call by selecting a contact.

20 Phone
Manage favourite contacts
To define a contact in favourites:
1. Press on Phone > Contacts.
> The list of your contacts is
displayed.
2. Select a contact.
3. Press the star to the right of your
contact's name.
To call a favourite contact:
1. Press on Phone > Favourites.
2. Press on the contact then on their phone number to make the call.
Using the Parrot ASTEROID whilst on a call
Adjusting the volume
Press to adjust the communication volume. The volume setting is saved for subsequent
calls.
Note : You can also change this setting by selecting Settings.
To adjust the ringtone volume while receiving a call, slide your finger upwards/
downwards.
Transfering a call to the phone
During a call, if you want to continue the conversation on your phone (private
conversation), press the button.
If you want to switch back to the kit, press the button again.
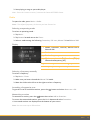
When the ignition is turned off while on call, the window
below is displayed.
To confirm the shut down of the Parrot ASTEROID Smart
and to transfer the communication on your phone, select
Accept shutdown.
To continue the communication on the Parrot ASTEROID
Smart, select Wait end of call. The Parrot ASTEROID
Smart remains on for 30 minutes.
Page is loading ...
Page is loading ...
Page is loading ...
Page is loading ...
Page is loading ...
Page is loading ...
Page is loading ...
Page is loading ...
Page is loading ...
Page is loading ...
Page is loading ...
Page is loading ...
Page is loading ...
Page is loading ...
Page is loading ...
Page is loading ...
Page is loading ...
Page is loading ...
Page is loading ...
Page is loading ...
Page is loading ...
Page is loading ...
Page is loading ...
Page is loading ...
Page is loading ...
Page is loading ...
Page is loading ...
Page is loading ...
Page is loading ...
Page is loading ...
-
 1
1
-
 2
2
-
 3
3
-
 4
4
-
 5
5
-
 6
6
-
 7
7
-
 8
8
-
 9
9
-
 10
10
-
 11
11
-
 12
12
-
 13
13
-
 14
14
-
 15
15
-
 16
16
-
 17
17
-
 18
18
-
 19
19
-
 20
20
-
 21
21
-
 22
22
-
 23
23
-
 24
24
-
 25
25
-
 26
26
-
 27
27
-
 28
28
-
 29
29
-
 30
30
-
 31
31
-
 32
32
-
 33
33
-
 34
34
-
 35
35
-
 36
36
-
 37
37
-
 38
38
-
 39
39
-
 40
40
-
 41
41
-
 42
42
-
 43
43
-
 44
44
-
 45
45
-
 46
46
-
 47
47
-
 48
48
-
 49
49
-
 50
50


Parrot ASTEROID SMART User manual
- Category
- Navigators
- Type
- User manual
- This manual is also suitable for
Ask a question and I''ll find the answer in the document
Finding information in a document is now easier with AI
Related papers
-
Parrot ASTEROID SMART User manual
-
-
Parrot Asteroid Tablet User guide
-
Parrot ASTEROID User manual
-
-
Parrot ASTEROID Mini User manual
-
Parrot ASTEROID Classic Quick start guide
-
-
-
Other documents
-
Axxess GMOS-MOST-01 Installation Instructions Manual
-
-
-
Metra 99*5853CH Owner's manual
-
-
-
-
-
-