FLEXCO PAT Air Tank Operating instructions
- Type
- Operating instructions

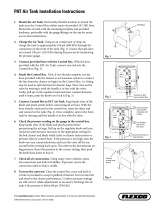
1. Mount the PAT Air Tank. Find sturdy/durable location to mount the tank near the PAT Control Box within reach of
provided 10' (3M) hose. If using a dual tank for supplying to two cleaners, mount within reach of both PAT Control Boxes.
Mount the air tank with provided hardware, preferably with the gauge/ttings on the top for easier access and maintenance.
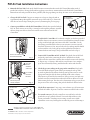
2. Charge the PAT Air Tank. Using an air compressor or shop air, charge the tank to
approximately 100 psi through the connection on top of the tank (Fig. 2). Ensure the
tank does not exceed 150 psi during this process by monitoring the pressure gauge.
3. Connect provided hose with the PAT Control Box. With the hose provided with the
PAT Air Tank, connect one end (Fig. 3) routing hose through the grommet. Assemble
the hose clamp over the hose, then insert into the center connection of the PAT
Control Box.
4. Ready the PAT Control Box. If not already complete, use the hoses provided
with the cleaner or air tensioner system to connect both lines from the cleaner
air bags to the le and right connections of the PAT Control Box. Use the
hose clamps provided with the cleaner or air tensioner system to secure all
hose/barb connections. Next, turn on both valves by rotating until the handle
is in line with the valve. Lastly, pull up on the regulator knob and turn it
counterclockwise until it stops, then push the knob in to lock it (Fig. 4).
5. Connect PAT Control Box to PAT Air Tank. Keep hands clear of the blade
and pinch-points before connecting all air lines. With the hose already
connected to the control box, route the other end and connect to the tank (Fig.
5). Repeat steps 3-5 if using a dual tank for second cleaner. Once complete,
open valve from tank by turning until the handle is in line with the valve.
PAT Air Tank Installation Instructions
6. Check the pressure reading on the gauge in the control box. Keep hands
clear of the blade and pinch-points before pressurizing the air bags. Pull
up on the regulator knob and turn clockwise until pressure increases to the
appropriate setting for the belt cleaner and blade width (refer to cleaner
instructions or pressure label in control box). If the pressure is too high, turn
the knob one turn counterclockwise and turn both valves o for one second
before turning back open. is relieves the downstream air bag pressure. Reset
the pressure to the correct setting, then push the knob back down to lock it.
8. Test run the conveyor. Close the control box cover and latch it. A hole is
provided to accept a padlock if desired. Test run the belt and observe the
cleaner performance. Conrm pressure settings are still correct. Make
adjustments as necessary. Recharge the air tank if the pressure is below 80 psi.
Fig. 2
Air connection
for charging tank
Fig. 5
Connect hose
to tank
Fig. 3
Connect air tank hose
to the PAT Control Box
Fig. 4
Turn handles
until in line
with valve
Turn knob
counter-
clockwise
until it stops
Connect lines
from air bag if not
already complete
1
3
2
7. Check all air connections. Using soapy-water solution, spray all connections
and look for bubbles. If present, secure the connection until no leak is visible.
2525 Wisconsin Avenue • Downers Grove, IL 60515-4200 • USA
Tel: (630) 971-0150 • Fax: (630) 971-1180 • E-mail: info@exco.com
Visit www.flexco.com for other Flexco locations and products.
©2015 Flexible Steel Lacing Company. 03/15. For Reorder: X2922
-
 1
1

FLEXCO PAT Air Tank Operating instructions
- Type
- Operating instructions
Ask a question and I''ll find the answer in the document
Finding information in a document is now easier with AI
Related papers


Other documents
-
Cub Cadet Tank S S7237 User manual
-
Dodge Intrepid User manual
-
Chrysler Intrepid User manual
-
-
-
Polaris RANGER RZR 170 User manual
-
Fiat Uno User manual
-
-
Ford Ranger Maintaince And Repair Manual
-
 Hagie STS 10 User manual
