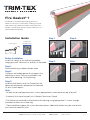
Trim-Tex Fire Gasket for Drywall Installation guide
- Type
- Installation guide

Before Installation:
Install Fire Gasket to the wall framing before
hanging drywall. Measure, cut and dry fit the bead.
Step 1:
Remove backing on adhesive foam tape.
Step 2:
Compress the bubble gasket firmly against the
adjoining structure. Pressure the product into
place while adhering it to the framing.
Step 3:
Install drywall directly over Fire Gasket per the
deflection requirement allowed by the required
UL joint system reports.
Note:
• To keep the drywall gap consistent, use an appropriately sized spacer on top of drywall.
• If desired, finish top of drywall with L Bead or Tear Away L Bead.
• Fire Gasket can optionally be fastened to the framing using appropriate ½” screws through
the adhesive foam on its lower leg.
• There should be no gaps left in joints between pieces. Additional sealant may be used at butt
joint to ensure seamless joints.
3700 W Pratt Avenue, Lincolnwood, IL 60712 • (800) 874-2333 • trim-tex.com
Installation Guide Step 1: Step 2:
Note:
Fire Gasket® 1
1 of 1
Step 3:
Technical Specs Scan Below for
Installation Video
Fire Gasket is the fastest firestopping solution for
head-of-wall joints on the market, installing up to five
times faster than traditional sealants and sprays. Fire
Gasket is installed pre-drywall, and provides up to 1” of
unencumbered movement.
1 ⁄ "
ø ⁄ "
-
 1
1

Trim-Tex Fire Gasket for Drywall Installation guide
- Type
- Installation guide
Ask a question and I''ll find the answer in the document
Finding information in a document is now easier with AI
Related papers

Other documents
-
Kingsman Marquis Fireplaces MQVL60N, MQVL60NE, MQVL60NE2, MQVL60LP, MQVL60LPE, MQVL60LPE2 User manual
-
Vermont Casting DVRSR User manual
-
NAPOLEON BGD40-P Installation And Operating Instructions Manual
-
 Regency Fireplace Products CitySeries New York View 40 Owner's manual
-
Napoleon Fireplaces Indoor Fireplace BGD40-P User manual
-
 Regency Fireplace Products CitySeries Chicago Corner 40LE Owner's manual
-
Enviro Haven Direct Vent Fireplace User manual
-
-
 Regency Fireplace Products San Francisco Bay 40 Owner's manual
-
 Regency Fireplace Products CitySeries San Francisco Bay 60 Power Vent Owner's manual


