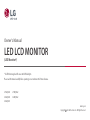
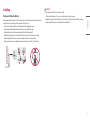
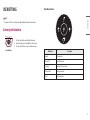
The LG 27UQ850-W is a state-of-the-art monitor designed to deliver an immersive and versatile computing experience. With its stunning 27-inch IPS display and 4K UHD resolution, this monitor offers incredibly sharp and detailed visuals, making it ideal for graphic design, video editing, and gaming. The monitor also features HDR10 support, providing vibrant colors and enhanced contrast for a more realistic viewing experience. Additionally, the LG 27UQ850-W boasts a wide range of connectivity options, including HDMI, DisplayPort, and USB-C, allowing you to connect various devices with ease.
The LG 27UQ850-W is a state-of-the-art monitor designed to deliver an immersive and versatile computing experience. With its stunning 27-inch IPS display and 4K UHD resolution, this monitor offers incredibly sharp and detailed visuals, making it ideal for graphic design, video editing, and gaming. The monitor also features HDR10 support, providing vibrant colors and enhanced contrast for a more realistic viewing experience. Additionally, the LG 27UQ850-W boasts a wide range of connectivity options, including HDMI, DisplayPort, and USB-C, allowing you to connect various devices with ease.


-
 1
1
-
 2
2
-
 3
3
-
 4
4
-
 5
5
-
 6
6
-
 7
7
-
 8
8
-
 9
9
-
 10
10
-
 11
11
-
 12
12
-
 13
13
-
 14
14
-
 15
15
-
 16
16
-
 17
17
-
 18
18
-
 19
19
-
 20
20
-
 21
21
-
 22
22
-
 23
23
-
 24
24
-
 25
25
-
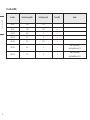 26
26
-
 27
27
-
 28
28
-
 29
29
-
 30
30
-
 31
31


The LG 27UQ850-W is a state-of-the-art monitor designed to deliver an immersive and versatile computing experience. With its stunning 27-inch IPS display and 4K UHD resolution, this monitor offers incredibly sharp and detailed visuals, making it ideal for graphic design, video editing, and gaming. The monitor also features HDR10 support, providing vibrant colors and enhanced contrast for a more realistic viewing experience. Additionally, the LG 27UQ850-W boasts a wide range of connectivity options, including HDMI, DisplayPort, and USB-C, allowing you to connect various devices with ease.
Ask a question and I''ll find the answer in the document
Finding information in a document is now easier with AI