Page is loading ...

1
TWO YEAR LIMITED WARRANTY
Betsey Johnson time pieces have a two year limited warranty from date of original purchase. This
warranty covers all manufacturers’ defects in material and workmanship. The warranty does not apply
to normal wear and tear or abuse and excludes battery, case, crystal, strap/bracelet, malfunction or
deterioration resulting from accident, negligence and tampering. Most Betsey Johnson watches are
water resistant, though extensive use in water activities such as swimming or bathing is not
recommended.
In the event of a defect or malfunction, it will be repaired or replaced at our option, provided that it is
returned prepaid with a check or money order for $8.50 to cover the cost of handling, return postage,
and insurance. (This is not a repair charge). PLEASE DO NOT SEND CASH. No additional charge will be
made unless additional servicing is required for reasons beyond our control such as battery, case,
crystal, or strap/bracelet. See last page of booklet for address of Service Center.

2
BATTERY LIFE
The battery in your Betsey Johnson watch should last approximately 2 years. When the battery expires,
replace it as soon as possible to prevent any malfunction. Battery type is engraved on the case back.
WATER RESISTANCE
* Before using your watch in or near water, be sure that the crown is pushed in completely.
* If the watch is under water or wet, do not use pushers, rotating bezels or crowns.
* If the watch becomes wet, wipe it dry as soon as possible.
* If the watch comes in contact with salt water, rinse case and bracelet immediately and thoroughly in
fresh water.
* Do not take your watch into a hot tub or sauna. Extreme heat and pressure may cause your watch to
lose its water resistance.
* Water resistance is not permanent. Over the course of time, as your case becomes worn, the water
resistance of the watch may decrease.
PRECAUTIONS
DEPTH
--
--
30M
50M
100M
CASEBACK MARKING
--
WATER RESISTANT
3ATM
5ATM
10ATM
LIGHT SPRAY, PERSPIRATION, LIGHT RAIN
NO
YES
YES
YES
YES
HAND WASHING, ACCIDENTAL IMMERSION
NO
NO
YES
YES
YES
SWIMMING
NO
NO
YES
YES
YES
SNORKELING, AND SHALLOW DIVING
NO
NO
NO
NO
YES
SCUBA DIVING
NO
NO
NO
NO
NO

3
SETTING INSTRUCTIONS
Please see description that most resembles your watch:
WATCHES WITH TWO HANDS
Includes all models with an hour and minute hand. These styles do not have a second hand.
Time setting:
1. Pull the crown out to the 1st position.
2. Turn the crown to set hour and minute hands.
3. Push the crown back to the normal position.

4
4. WATCHES WITH 3 HANDS
Includes all models with an hour, minute, and second hand.
Time setting:
1. Pull the crown out to the 1st position.
2. Turn the crown to set hour and minute hands.
3. Push the crown back to the normal position.

5
WATCHES WITH A CALENDAR
Includes all models with an hour, minute, second hand and date at 3:00, 4:00, or 6:00
Time setting:
1. Pull the crown out to the 2nd position.
2. Turn the crown to set hour and minute hands.
3. Push the crown back to the normal position.
Date setting:
1. Pull out crown to the 1st position.
2. Turn crown counter clockwise to the correct date.
3. Push the crown back to the normal position.

6
SMALL SECOND HAND IL45/40
Time setting:
1. Pull the crown out to the 1st position.
2. Turn the crown to set hour and minute hands.
3. Push the crown back to the normal position.

7
WATCHES WITH DUAL TIME
Includes all models with two sets of an hour and minute hand. These styles may not have seconds
hands.
Time setting:
1. Pull the crown out to the 1st position.
2. Turn the crown tot set hour and minute hands.
3. Push the crown back to the normal position.

8
WATCHES WITH DAY AND DATE
Setting the day and date:
1. Pull the crown out to the 1st position.
2. Turn crown clockwise to set the day. Turn the crown counter clockwise to the correct date.
3. Push the crown back to the normal position.
Setting the time:
1. Pull the crown out to the 2nd position.
2. Turn the crown clockwise or counter clockwise to the correct time.
3. Push the crown back to the normal position.

9
WATCHES WITH 3-EYE MULTI FUNCTION
(no side pushers and crown at 3:00)
Setting the day and time:
1. Pull the crown out to the 2nd position.
2. Turn the crown clockwise to set the day.
3. Turn the crown counter clockwise to set the time.
4. Push the crown back to the normal position.
Setting the date:
1. Pull the crown out to the 1st position.
2. Turn crown counter clockwise to the correct date.
3. Push the crown back to the normal position.

10
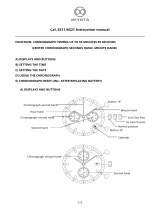
CHRONOGRAPH STOPWATCH VD55 (with date – VD57)
(1 crown/2 pushers)
Setting the time:
1. Pull out crown to position “3”.
2. Turn the crown to set hour and minute hands.
3. Push the crown back to the normal position.
Using the stopwatch:
1. Press “A” to start /stop the stopwatch.
2. Press “B” to control the split time and reset.
Stopwatch hand adjustment
1. Pull out crown to position “3”.
2. Press “A” to reset the stopwatch 1/10 second hand to the 0 position.
3. Press “B” to reset the second and minute hand. The hands only move clockwise.
4. With each press of “A” or “B”, the hands move one position. They move quickly if the buttons are
kept pressed.
NOTE: If the stopwatch hands function improperly, pull out crown and press “a” and “b” at the
same time for over 2 seconds. When the buttons are released, the stopwatch second hands will
spin around and return to ”0”. This will indicate that the internal circuit has been reset.

11
Setting the date (on some models only):
1. Pull the crown out to the position “2”
2. Turn crown clockwise to the correct date.
3. Push the crown back to the normal position.

12
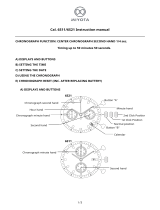
CHRONOGRAPH STOPWATCH OS10 (no date – 0S30)
(1 crown/2 pushers)
Time setting:
1. Pull the crown out to the 2nd position.
2. Turn the crown clockwise or counter clockwise to the correct time.
3. Push the crown back to the normal position.
Setting the date (on some models only):
1. Pull the crown out to the 1st position.
2. Turn crown counter clockwise to the correct date.
3. Push the crown back to the normal position
Chronograph Operation:
1. Press “A” to start/stop the chronograph.
2. Press “B” to reset.

13
Adjusting The Chronograph:
1. Pull the crown out to the 2nd position.
2. Press “A” to reset the second hand to “0”
3. Press “B” to reset the chronograph minute and hour hands.
Reset the watch to the current time and return crown to normal position.

14
CHRONOGRAPH STOPWATCH OS20, FS00
(1 crown/2 pushers)
Time setting:
1. Pull the crown out to the 2nd position.
2. Turn the crown clockwise to the correct time.
3. Push the crown back to the normal position
Setting the date:
1. Pull the crown out to the 1st position.
2. Turn crown counter clockwise to the correct date.
3. Push the crown back to the normal position
Chronograph Zero reset:
This procedure should be performed when the chronograph second hand does not return to the “0”
position after the chronograph has been reset.
1. Pull the crown out to the 2nd position.
2. Press “A” to reset the second hand to “0”. Note: The hands move quickly if the pushers are kept
pressed.
3. Once the hand has been zeroed, reset the time and return the crown to position “1”. Do not
return the crown to position “1” while the hands are returning to “0”. Doing so will cause the
position of the hands to be recognized as the new “0” position.

15
Chronograph Operation:
1. Press “A” to start/stop the chronograph.
2. Press “B” to reset the chronograph.

16
TWO EYE MULTIFUNCTION 6P25
Setting the date:
1. Pull the crown out to the 1st position.
2. Turn crown counter clockwise to the correct date.
3. Push the crown back to the normal position
Setting the day and time:
1. Pull the crown out to the 2nd position.
2. Turn the crown clockwise to set the hour and minute hands. The hands showing days of the
week will also move with the hour and minute hands. Keep turning until you have reached the
desired day.
3. Push the crown back to the normal position.

17
THREE EYE MULTIFUNCTION VX3J
(1 crown)
Setting the date:
1. Pull the crown out to position “2”.
2. Turn crown counter clockwise to the correct date.
3. Push the crown back to the normal position
Setting the day and time:
1. Pull the crown out to position “3”
2. Turn the crown clockwise to set the hour and minute hands. The hands showing days of the week
will also move with the hour and minute hands. Keep turning until you have reached the desired
day.
3. Push the crown back to the normal position.
24-Hour Sub-Dial Setting:
The 24-hour hand moves correspondingly with the hour and minute hand. When setting the time be
sure to check that the 24-hour hand is set properly.

18
CENTER SECOND HAND CHRONOGRAPH 1/1 SEC 0S30
Time setting:
4. Pull the crown out to the 2nd position.
5. Turn the crown clockwise to the correct time.
6. Push the crown back to the normal position
Chronograph Zero reset:
This procedure should be performed when the chronograph second hand does not return to the “0”
position after the chronograph has been reset.
1. Pull the crown out to the 2nd position.
2. Press “A” to reset the second hand to “0”
Note: The hands move quickly if the pushers are kept pressed.
3. Once the hand has been zeroed, reset the time and return the crown to position “1”. Do not return
the crown to position “1” while the hands are returning to “0”. Doing so will cause the position of
the hands to be recognized as the new “0” position.
Chronograph Operation:
1. Press “A” to start/stop the chronograph.
2. Press “B” to reset the chronograph.

19
Features:
Time display in Hour, Minute and Second
12-Hour display format only
EL backlight. (Press A )
Calendar display in Month & Date
Mode:
“Normal Time Mode” is the first mode. Press B to change modes in the following sequence:
Normal Time Mode
Press B Press B
2nd time Date mode 1st time

20
Operation and setting of each mode:
1. Normal time mode
- During this mode:
- Time display in Hour, Minute and Second (big digit is Hour, small digit is Minute and blink digit is Second)
- Press A for EL backlight
- Press B to enter the “Date Mode”
2. Date mode
- During this mode:
- Date display in Month and Date (big digit is Month, small digit is Date)
- There is no key operation for 3 seconds, it will automatically return to “Normal Time Mode”
- Press A for EL backlight
- Press A or B to enter the “Normal Time Mode”
3. Normal time and date setting mode
- In Normal time mode, it displays in Hour (12-Hour display format only), Minute & Second
- Press & hold A for 3 seconds to set Time & Date when digit is blink first
- Press A to adjust the setting of the blinking Hour digit (or press and hold the A key for fast advance) then
press B to confirm
- Press A to adjust the setting of the blinking Minute digit (or press and hold the A key for fast advance)
then press B to confirm
- Press A to adjust the setting of the blinking Year digit (or press and hold the A key for fast advance) then
press B to confirm
- Press A to adjust the setting of the blinking Month digit (or press and hold the A key for fast advance)
then press B to confirm
- Press A to adjust the setting of the blinking Date digit (or press and hold the A key for fast advance) then
press B to confirm
Battery Replacement:
CR2025 or equivalent battery.
/