Alienware Alienware Aurora R3 Owner's manual
- Type
- Owner's manual


ALIENWARE DESKTOP MANUAL

e contents herein are subject to change without notice.
© 2010 Dell Inc. All rights reserved.
Reproduction of these materials in any manner whatsoever without the prior
written permission of Dell Inc. is strictly prohibited.
Trademarks used in this manual: Alienware
®
, AlienFX
®
, and the AlienHead logo
are trademarks or registered trademarks of Alienware Corporation; Dell™ is a
trademark of Dell Inc; Microsoft
®
, Windows
®
, and the Windows start button
logo are either trademarks or registered trademarks of Microsoft Corporation in
the United States and/or other countries; Intel
®
is a registered trademark and
Core™ and Speedstep™ are trademarks of Intel Corporation in the U.S. and other
countries; Blu-ray Disc™ is a trademark of the Blu-ray Disc Association; Bluetooth
®
is a registered trademark owned by Bluetooth SIG, Inc. and is used by Dell Inc.
under license.
Other trademarks and trade names may be used in this manual to refer to either
the entities claiming the marks and names or their products. Dell Inc. disclaims
any proprietary interest in trademarks and trade names other than its own.
Regulatory Model: D0IM Regulatory Type: D0IM003
Rev. A00 September 2010
Notes, Cautions, and Warnings
NOTE: A NOTE indicates important information that helps you make better
use of your computer.
CAUTION: A CAUTION indicates either potential damage to hardware or
loss of data and tells you how to avoid the problem.
WARNING: A WARNING indicates a potential for property damage,
personal injury, or death.
is item incorporates copy protection technology that is protected by U.S.
patents and other intellectual property rights of Rovi Corporation. Reverse
engineering and disassembly are prohibited.

3
CONTENTS
CONTENTS
CHAPTER 1: SETTING UP YOUR DESKTOP ................................... 7
Before Setting Up Your Desktop.......................................8
Connect the Display ..................................................9
Connect the Keyboard and Mouse....................................10
Connect the Network Cable (Optional)................................10
Connect the Power Cable ............................................ 11
Press the Power Button ............................................. 11
Set Up Microsoft Windows...........................................12
Connect to the Internet (Optional) ...................................12
CHAPTER 2: GETTING TO KNOW YOUR DESKTOP ........................... 15
Front View Features .................................................16
Back View Features..................................................17
Top View Features...................................................21
CHAPTER 3: USING YOUR DESKTOP .......................................23
Alienware Command Center .........................................24
Working With RAID ..................................................24
Optimizing Performance ............................................26
Conguring the BIOS ................................................26
CHAPTER 4: INSTALLING ADDITIONAL OR REPLACEMENT COMPONENTS ....33
Before You Begin................................................... 34
Removing and Replacing the Side Panel ............................. 36
Inside View of Your Computer ........................................37
Removing and Replacing Memory Module(s)..........................37
Removing and Replacing Hard Drive(s) . . . . . . . . . . . . . . . . . . . . . . . . . . . . . . 39
Removing and Replacing Expansion Card(s) ..........................42
CHAPTER 5: TROUBLESHOOTING .........................................45
Basic Hints and Tips................................................ 46
Backup and General Maintenance................................... 46
Software Diagnostic Tools ...........................................47
CHAPTER 6: SYSTEM RECOVERY ..........................................55
AlienRespawn ..................................................... 56
Dell DataSafe Online Backup (Optional) ..............................57
CHAPTER 7: SPECIFICATIONS .............................................59
APPENDIX A: GENERAL AND ELECTRICAL SAFETY PRECAUTIONS............63
APPENDIX B: CONTACTING ALIENWARE ...................................65

4

5
Dear Valued Alienware Customer,
Welcome to the Alienware family. We are thrilled to include you among the
growing number of savvy high-performance computer users.
e Alienware technicians who have crafted your computer have made certain
that your high-performance computer is properly optimized and performs to its
fullest potential. We build computers with a single unwavering purpose: Build
It As If It Were Your Own. e technicians will not rest until your new computer
meets or exceeds our very demanding criteria!
We have tested your computer extensively in order to ensure that you enjoy
the highest levels of performance. In addition to a standard burn-in period,
your computer has been evaluated using real-world tools such as synthetic
performance benchmarks.
We invite you to share your experience with your new high-performance computer
with us, so do not hesitate to either e-mail or call Alienware with any questions
or concerns. e entire sta shares your enthusiasm for new technology and we
hope that you enjoy using your new computer as much as Alienware enjoyed
building it for you.
Sincerely,
Alienware Sta

6

7
CHAPTER 1: SETTING UP YOUR DESKTOP
CHAPTER 1: SETTING UP YOUR DESKTOP
CHAPTER 1: SETTING UP YOUR DESKTOP

8
CHAPTER 1: SETTING UP YOUR DESKTOP
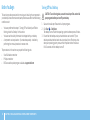
Product Documentation and Media
e documentation that ships with your Alienware desktop is designed to
provide answers to many of the questions that may arise as you explore your new
desktop’s capabilities. You may see the documentation for technical information
or general use as required to answer questions in the future, or aid you in nding
answers and solutions. e media included with your desktop is referenced in
some sections of the documentation and may be needed to complete certain
tasks. As always, our technical support sta is available to assist you.
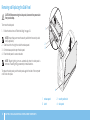
Placing Your Desktop
WARNING: Do not place the desktop near or over a radiator or heating
vent. If all or parts of your desktop are placed in a cabinet, ensure that
adequate ventilation is provided. Do not place the desktop in a humid
location or in any area where the desktop may be exposed to rain or
water. Be careful not to spill liquid of any kind on or into the desktop.
When placing your desktop, ensure that:
It is placed on a surface that is both level and stable. •
e power and other cable connectors are not jammed between the desktop •
and a wall – or any other object.
Nothing obstructs airow in front of, behind, or below the desktop.•
e desktop has enough room so that optical drives and other external •
storage drives can be easily accessed.
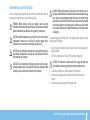
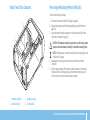
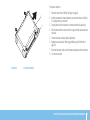
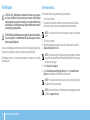
Before Setting Up Your Desktop
Congratulations on the purchase of your Alienware Aurora!
Read all safety and setup instructions before connecting your new desktop. Begin
by carefully opening the box and removing all components that were shipped
to you.
Before setting up your desktop or components, see the included invoice to verify
that all items ordered are present and be sure to inspect all items for any physical
damage that may have occurred during shipment. Report any missing components
to customer service within 5 days of receiving the shipment. Anything reported
missing after the rst 5 days of receiving a shipment will not be honored. Some
of the most common items to check for include:
Computer•
Microsoft• CD-key located at the back of the desktop
Keyboard (if ordered)•
Mouse (if ordered)•
Multimedia speakers and sub-woofer (if ordered)•
Joystick controllers (if ordered)•
You may also need a small athead and/or a Phillips head screwdriver for
connecting peripheral cables to the desktop.

9
CHAPTER 1: SETTING UP YOUR DESKTOP
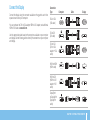
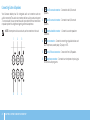
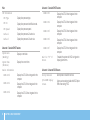
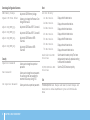
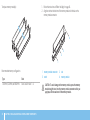
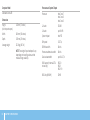
Connection
Type Computer Cable Display
VGA-to-VGA
(VGA cable)
DVI-to-DVI
(DVI cable)
DVI-to-VGA
(DVI-to-VGA
adapter + VGA
cable)
HDMI-to-HDMI
(HDMI cable)
HDMI-to-DVI
(HDMI-to-DVI
adapter + DVI
cable)
DisplayPort-
to-DisplayPort
(DisplayPort
cable)
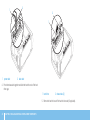
Connect the Display
Connect the display using the connector available on the graphics card in the
expansion card slot on your computer.
You can purchase the DVI-to-VGA adapter, HDMI-to-DVI adapter, and additional
HDMI or DVI cables at www.dell.com.
Use the appropriate cable based on the connectors available on your computer
and display. See the following table to identify the connectors on your computer
and display.

10
CHAPTER 1: SETTING UP YOUR DESKTOP
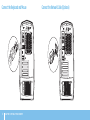
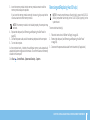
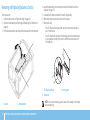
Connect the Network Cable (Optional)
Connect the Keyboard and Mouse

11
CHAPTER 1: SETTING UP YOUR DESKTOP
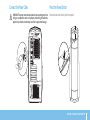
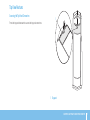
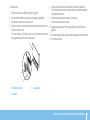
Press the Power Button
Press the power button on the top of the computer.
Connect the Power Cable
WARNING: e power connectors and power strips vary among countries.
Using an incompatible cable or improperly connecting the cable to a
power strip or electrical outlet may cause re or equipment damage.

12
CHAPTER 1: SETTING UP YOUR DESKTOP
To complete setting up your wired Internet connection, follow the instructions in
“Setting Up Your Internet Connection” on page 13.
Setting Up a Wireless Connection
NOTE: To set up your wireless router, see the documentation that shipped
with your router.
Before you can use your wireless Internet connection, you need to connect to your
wireless router.
To set up your connection to a wireless router:
Save and close any open les, and exit any open programs.1.
Click 2. Start → Control Panel.
In the search box, type 3. network, and then click Network and Sharing
Center→ Connect to a network.
Follow the instructions on the screen to complete the setup.4.
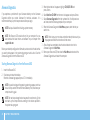
Set Up Microsoft Windows
Your computer is precongured with the Microsoft Windows operating system.
To set up Windows for the rst time, follow the instructions on the screen. ese
steps are mandatory and may take some time to complete. e Windows setup
screens will take you through several procedures including accepting license
agreements, setting preferences, and setting up an Internet connection.
CAUTION: Do not interrupt the operating system’s setup process. Doing
so may render your desktop unusable.
NOTE: For optimal performance of your computer, it is recommended that
you download and install the latest BIOS and drivers for your computer
available at support.dell.com.
NOTE: For more information on the operating system and features, see
support.dell.com/MyNewDell.
Connect to the Internet (Optional)
Setting Up a Wired Connection
If you are using a dial-up connection, connect the telephone line to the •
optional external USB modem and to the telephone wall jack before you set
up your Internet connection.
If you are using a DSL or cable/satellite modem connection, contact your ISP •
or cellular telephone service for setup instructions.

13
CHAPTER 1: SETTING UP YOUR DESKTOP
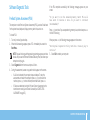
Setting Up Your Internet Connection
ISPs and ISP oerings vary by country. Contact your ISP for oerings available in
your country.
If you cannot connect to the Internet but have successfully connected in the past,
the Internet Service Provider (ISP) might have a service outage. Contact your ISP
to check the service status, or try connecting again later.
Have your ISP information ready. If you do not have an ISP, the Connect to the
Internet wizard can help you get one.
To set up your Internet connection:
Save and close any open les, and exit any open programs.1.
Click 2. Start → Control Panel.
In the search box, type 3. network, and then click Network and Sharing
Center→ Set up a new connection or network→ Connect to the Internet.
e Connect to the Internet window appears.
NOTE: If you do not know which type of connection to select, click Help me
choose or contact your ISP.
Follow the instructions on the screen and use the setup information 4.
provided by your ISP to complete the setup.

14
CHAPTER 1: SETTING UP YOUR DESKTOP

15
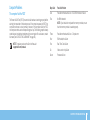
CHAPTER 2: GETTING TO KNOW YOUR DESKTOP
is chapter provides information about your new desktop to familiarize you with
its various features, and to get you up and running quickly.
CHAPTER 2: GETTING TO KNOW
YOUR DESKTOP
CHAPTER 2: GETTING TO KNOW YOUR DESKTOP

16
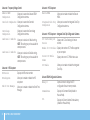
CHAPTER 2: GETTING TO KNOW YOUR DESKTOP
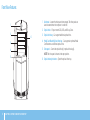
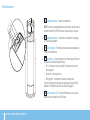
1 Alienhead — Lowers the drive panel when pressed. e drive panel can
also be lowered when the computer is turned o.
2 Optical drive — Plays or records CDs, DVDs, and Blu-ray Discs.
3 Optical-drive bay — Can support additional optical drive.
4 Media Card Reader/Optical-drive bay — Can support an optional Media
Card Reader or an additional optical drive.
5 Drive panel — Covers the optical drive(s) or optical-drive bay(s).
NOTE: e drive panel is shown in the open position.
6 Optical drive eject button — Ejects the optical-drive tray.
Front View Features
3
4
2
1
6
5

17
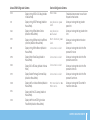
CHAPTER 2: GETTING TO KNOW YOUR DESKTOP
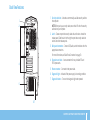
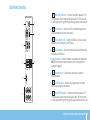
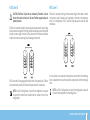
1 Security cable slot — Attaches a commercially available security cable to
the computer.
NOTE: Before you buy a security cable, ensure that it ts into the security
cable slot on your computer.
2 Latch — Closes or opens the security cable slot and locks or unlocks the
release panel. Slide the latch to the right to open the security cable slot
and to unlock the release panel.
3 Back panel connectors — Connect USB, audio, and other devices into the
appropriate connectors.
For more information, see “Back Panel Connectors” on page 19.
4 Expansion card slots — Access connectors for any installed PCI and
PCI Express cards.
5 Power connector — Connects to the power cable.
6 Diagnostic light — Indicates if the power supply is in working condition.
7 Diagnostic button — Turns on the diagnostic light when pressed.
Back View Features
1
2
4
5
6 7
3

18
CHAPTER 2: GETTING TO KNOW YOUR DESKTOP
Back Light Button
Press the back light button to turn on the light to view the back panel connectors.
is light automatically turns o after a few seconds.
Page is loading ...
Page is loading ...
Page is loading ...
Page is loading ...
Page is loading ...
Page is loading ...
Page is loading ...
Page is loading ...
Page is loading ...
Page is loading ...
Page is loading ...
Page is loading ...
Page is loading ...
Page is loading ...
Page is loading ...
Page is loading ...
Page is loading ...
Page is loading ...
Page is loading ...
Page is loading ...
Page is loading ...
Page is loading ...
Page is loading ...
Page is loading ...
Page is loading ...
Page is loading ...
Page is loading ...
Page is loading ...
Page is loading ...
Page is loading ...
Page is loading ...
Page is loading ...
Page is loading ...
Page is loading ...
Page is loading ...
Page is loading ...
Page is loading ...
Page is loading ...
Page is loading ...
Page is loading ...
Page is loading ...
Page is loading ...
Page is loading ...
Page is loading ...
Page is loading ...
Page is loading ...
Page is loading ...
Page is loading ...
Page is loading ...
Page is loading ...
-
 1
1
-
 2
2
-
 3
3
-
 4
4
-
 5
5
-
 6
6
-
 7
7
-
 8
8
-
 9
9
-
 10
10
-
 11
11
-
 12
12
-
 13
13
-
 14
14
-
 15
15
-
 16
16
-
 17
17
-
 18
18
-
 19
19
-
 20
20
-
 21
21
-
 22
22
-
 23
23
-
 24
24
-
 25
25
-
 26
26
-
 27
27
-
 28
28
-
 29
29
-
 30
30
-
 31
31
-
 32
32
-
 33
33
-
 34
34
-
 35
35
-
 36
36
-
 37
37
-
 38
38
-
 39
39
-
 40
40
-
 41
41
-
 42
42
-
 43
43
-
 44
44
-
 45
45
-
 46
46
-
 47
47
-
 48
48
-
 49
49
-
 50
50
-
 51
51
-
 52
52
-
 53
53
-
 54
54
-
 55
55
-
 56
56
-
 57
57
-
 58
58
-
 59
59
-
 60
60
-
 61
61
-
 62
62
-
 63
63
-
 64
64
-
 65
65
-
 66
66
-
 67
67
-
 68
68
-
 69
69
-
 70
70


Alienware Alienware Aurora R3 Owner's manual
- Type
- Owner's manual
Ask a question and I''ll find the answer in the document
Finding information in a document is now easier with AI
Related papers
-
Alienware Aurora User manual
-
Alienware Alienware Area-51 ALX Owner's manual
-
Alienware Area-51 ALX User manual
-
Alienware M17X Owner's manual
-
-
-
-
Alienware Alienware P08G001 User manual
-
-
Alienware Aurora R6 Quick start guide
Other documents
-
Dell Alienware Area-51 ALX User manual
-
-
Dell Alienware M17x-R2 User manual
-
Dell Alienware X51 Owner's manual
-
-
-
-
-
Dell Studio XPS 8100 User manual
-
Dell X8700-1258BLK User manual