Page is loading ...

ADG100
MODEL: PRODUCT TYPE:
Page 1
WARNING
www.astrotools.com
PLEASE DO NOT RETURN ANY PRODUCT WITHOUT CALLING
1-800-221-9705 FOR INSTRUCTIONS
PRODUCT INFORMATION:
WARNING
MADE IN CHINA
Study, understand and follow all instructions provided with
this product. Read these instructions carefully before
installing, operating, servicing or repairing this tool. Keep
these instructions in a safe accessible place.
INTENDED USE OF THE TOOL 1 YEAR LIMITED WARRANTY
Before Use
Caution: To help prevent personal injury
When unpacking, check the parts diagram and part
number listing on page 7 to make sure all parts are
included. If any parts are missing or damaged,
please call your distributor.
DO NOT DISCARD – GIVE TO USER
• Normal use of this product is likely to expose the user
to dust and/or microscopic particles containing
chemicals known to the State of California to cause
cancer, birth defects or other reproductive harm.
Always wear appropriate safety equipment and
clothing when using this product. Study, understand
and follow all instructions provided with this product.
Failure to read and follow all warnings and operating
instructions may result in damages and serious injury
or death.
• Always wear ANSI approved goggles when using this
product. (Users and By standers).
• Never use this tool for any application other than for
which it was designed.
• Only use accessories designed for this tool.
• Never alter or modify this tool in any way.
• Improper operation and/or maintenance of the tool,
modification of the tool, or use of the tool with
accessories not designed for it could result in serious
injury or death.
• Always select the correct accessories of the correct
size and design for the job that you are attempting to
perform.
• Always work in a clean, safe, well-lit, organized and
adequately equipped area.
• Do not begin repairs without assurance that vehicle
is in secure position, and will not move during repair.
GREASE GUN DRILL ADAPTER
GREASE GUN
DRILL ADAPTER
This tool is designed to be used with corded, cordless
or air screw drivers, drills and impact drivers for the
purpose of dispensing and packing grease only. Do not
use this tool outside of the designed intent. Never modify
the tool for any other purpose or use.
• Astro Pneumatic Tool Co. warrants our products to the original
user against defective material or workmanship for a period of 1
year (except where noted on our price schedule) from the date of
1st use. Astro reserves the right to determine whether the product
failed because of defective material, workmanship or other causes
and to charge back for missing parts. Astro Pneumatic Tool Co., at
its discretion, will repair products covered under this warranty free of
charge. The distributor should direct the original user to return the
product (with the exceptions listed below) with the distributor’s
name, address, adequate proof of date of purchase or a copy of
warranty card, and a short note explaining the problem. Failures
caused by accident, alteration, or misuse are not covered by
this warranty.
• If one part of this product fails, please do not return the entire
product. Astro will replace free of charge component parts of
this product that fail within 1 year of first use by the original
user. Items included in this category include but are not
limited to kits, hand tool kits and any other product where there
are multiple items or components that make up the unit. Please
contact the phone number below in order to obtain the
replacement components covered under warranty.
• Astro Pneumatic Tool Co. or its authorized service representatives
must perform all warranty repairs. Any repair to the product by
unauthorized service representatives voids this warranty. The rights
under this warranty are limited to the original user and may not be
transferred to subsequent owners.
• This warranty is in lieu of all other warranties, expressed or
implied, including warranties of merchantability and fitness for a
particular purpose. Some states do not allow the exclusion of
limitations of incidental or consequential damages so the above
limitations may not apply to you.
• Easily convert cordless drills and impact drivers into
cordless power grease guns
• 1/4" hex drive with adjustable bracket to fit nearly
all cordless, corded and air drivers
• Works with standard 14-14.5 oz. grease tubes, or bulk fill
• 4,000psi working pressure, 8,000psi max pressure
• Includes 18" nylon hose w/ locking coupler

Cordless Drill Driver
(Keyless Chuck type)
3/8" (9.5mm)
1/2" (13mm)
Impact Driver
(Hex. Drive shank chuck)
1/4" (6.35mm)
Impact Wrench
(Square Drive)
3/8" (9.5mm),
1/2" (13mm)
(adaptor needed,
not included)
Corded Drill
(Key chuck type)
3/8" (9.5 mm)
1/2" (13mm)
Air Drill
(Key chuck type)
3/8" (9.5mm)
1/2" (13mm)
Holder
Adjusts from 1.5-3"
to fit all of the above
power tools
ADG100
WARNING
GREASE GUN DRILL ADAPTER
MODEL: PRODUCT TYPE:
Page 2
I. SPECIFICATIONS OF UNIVERSAL POWER COUPLING-GREASER
• Working Pressure: 4,000 psi
• Max Pressure: 8,000 psi (9,000 psi safety vent)
• Capacity: 14-14.5 oz.
• 3-Way Loading: Cartridge / Dispenser / Bulk
• What’s included: (Power tool is not included.)
- Grease Gun Adapter
- 18" Nylon Hose w/ Locking Coupler
- Adjustable Holder
• Do not exceed recommended pressure during
operation to avoid serious injury or facilities
damage.
• Read your power tool’s safety instruction manual
carefully before using this universal grease
adapter.
II. CATEGORIES OF COMPATIBLE POWER TOOLS & SAFETY INSTRUCTIONS FOR USE
WARNING
• Read all safety warnings and instructions. Failure to follow the warnings and instructions may result in
electric shock, fire and/or serious injury.
• Save all warnings and instructions for future reference. The term “power tool” in the warnings refers to your
mains-operated(corded) power tool or battery-operated(cordless) power tool or air power tool.

(Power tool is not included)
CONTAINER TUBE
BOTTOM
CAP
GUN HEAD
PRESSURE-VENT
PROTECTOR
AIR VENT VALVE
18" HIGH PRESSURE
NYLON HOSE
GEAR CAP
GEAR HOUSING
SHANK
BUTTERFLY
LOCK PLUG
HOLDER
STOPPER
PLUNGER
HANDLE
IV. FUNCTIONAL DESCRIPTION
V. HOW TO ASSEMBLE
NOTE:
• The information contained in this Instruction Manual is designed to assist you in the safe operation and
maintenance of the power tool.
• Never operate, or attempt any maintenance on the tool unless you have first read and understand all safety
instructions contained in your power tool’s manual.
• Some illustrations in this Instruction Manual may show details or attachments that differ from those on your
own power tool.
1. Load grease cartridge or pack container tube before use. (See instructions on Page 5)
2. Remove any bits, parts or attachment currently in your power tool's chuck.
3. Unscrew the chuck. Join and couple your power tool to the shank of
the grease gun adapter via the chuck properly (around 1/4-5/16" from
gear housing). Tighten chuck securely.
4. Unscrew the butterfly lock plug to allow proper room for the container tube
and your power Tool. Install the holder in the space between container tube
and power tool.
5. Adjust the holder to proper position. (available inner width for power tool is
1.5" to 3"). Tighten the butterfly lock plug securely.
6. Install the 18" nylon hose to the gun head and tighten with a wrench securely.
III. INSTRUCTIONS
ADG100 GREASE GUN DRILL ADAPTER
MODEL: PRODUCT TYPE:
Page 3

ADG100 GREASE GUN DRILL ADAPTER
MODEL: PRODUCT TYPE:
Page 4
1. Set your power tool to “FORWARD” mode, “reverse” mode is not recommended.
2. Evacuate air pocket from container tube if necessary. (See instructions on Page 6)
3. Insert the end of the grease coupler at the end of the hose onto your intended grease fitting. Ensure that the
coupler's adjustable jaws are at the tightness you require.
4. Depress the trigger on your power tool to start work.
Switch operation:
When the trigger switch is depressed, the tool rotates.
When the trigger switch is released, the tool stops.
5. The end of operation
Take off the battery pack or air source in advance to avoid accidents.
WARNING
Do not exceed recommended pressure when operating to avoid serious injury or mechanical damage.
Read your power tool’s safety instruction manual carefully before using this universal
coupling-greaser.
* CAUTION:
• To reduce the risk of injury, keep hands and away from the outlet and all moving parts.
• Release the trigger when grease filling is full. If switched repeatedly, it could cause the Motor to
overheat, resulting in mechanical damage or injury.
* NOTE: A buzzing noise is produced when the motor is about to operate on brushed motor power
tools, this noise is normal.
VI. OPERATION
• Although the products described in this catalogue have been designed and manufactured to the highest
standard of quality and safety, they are powerful devices capable of producing high pressure. Misuse or
misapplication of this equipment can cause component rupture, fire or explosion and result in serious
bodily injury, including fluid injection or splashing in the eyes or on the skin. Seek medical attention
immediately if such injuries occur. The attending doctor will need to know the exact nature of the fluids
injected into the victim before treatment can begin.
• Any pressurized system is only as strong as its weakest component. Never exceed the maximum working
pressure of the lowest-rated component in the system. Check and tighten all connections, fitting and hoses
regularly. A worn or damaged hose can rupture, harming both people and property.
• Do not hold nylon hose while pumping the grease gun.
• Regular product inspection and maintenance, coupled with responsible operation, are required for
continued safe operation of these products.
• Always wear safety glasses or eye shields when operation power tools.
VII. SAFETY INSTRUCTION

FOLLOWER HANDLE
GREASE
CARTRIDGE
CARTRIDGE LOADING
DISPENSER
LOADING
CONTAINER
TUBE
FOLLOWER
ROD
ADG100 GREASE GUN DRILL ADAPTER
MODEL: PRODUCT TYPE:
Page 5
VIII. INSTRUCTIONS FOR 3 DIFFERENT LOADING METHODS OF GREASE GUN
RECOMMENDATION:
1. If loading grease by cartridge, note that the Rubber Plunger may change shape over time due to
prolonged squeezing of grease cartridge. Inspect during changes.
2. A misshaped rubber plunger may then cause a small amount of leak-by at the stopper and plunger
handle when switching to Dispenser or Bulk loading grease.
3. Thus it is recommended to pick a method of grease loading and stick to this method in the future for
best results.
FOLLOW THESE STEPS CAREFULLY BEFORE USING THIS GUN
CARTRIDGE LOADING
1. Remove gun head from container tube.
2. To remove an empty cartridge, pull back on the follower handle until the follower
rod is fully extended. Then, release the stopper lock and allow the follower handle
to lower the empty cartridge from the container tube. Pull back on the follower
handle. When the follower rod is fully extended, the stopper should hold the
rod extended.
3. Remove the caps from both ends of the new grease cartridge and insert the
open cardboard end of the cartridge into the container tube with the metal
rimmed end out.
4. Loosely assemble the gun head and the container tube. Release the stopper lock
and allow the follower handle to go free.
5. Unscrew the container tube 1-2 turns from the gun head and push down on the
follower handle until grease oozes from the outlet of the gun head. Tighten
container tube into the gun head securely.
• Please make sure that the end of the grease cartridge that has been inserted
into the container tube is not damaged, had its cardboard rim folded and
remains in an exact round shape. Otherwise the plunger rubber will be
prevented from entering into the grease cartridge and grease cannot be forced
out. If this case happens correct the above errors. Grease can be pumped out
only it the above errors have been corrected.
• Do not re-use the empty grease cartridge again after using it.
• Application of some grease on the plunger rubber will make it easier to enter
into the grease cartridge.
DISPENSER LOADING
1. Remove slotted plug from head assembly and insert the proper loader fitting that
adapts to pump being used.
2. Extend level out on the grease gun and insert the loader fitting into pump adapter and fill.
NOTE : Always remove used cartridge from gun when bulk filling.

ADG100
GREASE GUN DRILL ADAPTER
MODEL: PRODUCT TYPE:
Page 6
BULK LOADING
FILL WITH SCOOP OR WOODEN TOOL
1. Remove the gun head from the container tube.
2. Draw back the plunger handle entirely. Fill loose grease into empty container tube.
3. Reassemble the gun head onto the container tube. Release the plunger rod.
Push down the plunger handle.
IMPORTANT
• If gun loses its prime, it is due to air pockets in the lubricant.
TO REPRIME:
• Unscrew container tube 1-2 turns. Withdraw rod, push rod into container tube to expel the air pockets.
• Draw back plunger rod fully and release quickly. Repeat several times. This will help exert force to move the
rubber plunger to enter the cartridge and expel the air pockets which is essential for a grease gun to work.
• Push plunger rod all the way in, tighten the head to the container tube.
• Now your grease gun is ready to use.
IX. TROUBLE SHOOTING
Problem Problem Cause Recommendation
Plunger does not enter
the grease cartridge
Leakage from
outlet of gun head
Size of cartridge
not standard
The end edge of
cartridge is rough
or irregular
• Check the size of cartridge corresponds
to specifications.
• Grease the plunger or cartridge end to help
it enter cartridge.
• Always use standard size of cartridge.
• Check that the end edge of cartridge should not
be damaged or folded and remains in exact
round shape. Otherwise the plunger rubber will
be prevented from entering the grease cartirdge.
If this case happened, correct above errors.
• Do not re-use the empty grease cartridge.
• Remove used cartridge from container tube
when bulk loading.
Tool runs normal but
does not output grease
Air pocket inside
container tube
• Take off hose from Gun Head.
• Unscrew container tube 1-2 turns from Gun Head.
• Withdraw plunger rod, push plunger rod into
container tube to help expel the air pockets.
• Draw back plunger rod fully and release quickly.
• Operate power tool to check flow of grease.
• Repeat above steps if necessary.
• Re-tighten container tube to gun head firmly.
• Re-screw hose securely.
• Grease gun is ready for use.
Hose is not
tightened securely
• The thread size is tapered, this means if the
hose is not tightened enough it will not seal.
Tighten with wrench.

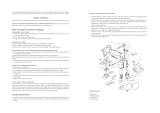
ADG100-01
ADG100-02
ADG100-03
ADG100-04
ADG100-05
ADG100-06
ADG100-07
ADG100-18
ADG100-09
ADG100-10
ADG100-11
ADG100-12
ADG100-13
ADG100-14
ADG100-15
ADG100-16
ADG100-17
ADG100-18
ADG100-19
ADG100-20
1
2
3
4
5
6
7
8
9
10
11
12
13
14
15
16
17
18
19
20
Screw
Gear Cap
Cap Plate
Piston Controller
Piston
Axle Guide
Roller
Roller Pin
Washer
Controller Body
Body Pin
Screw
Gun Holder
Filler Plug
Air Vent Valve
Adapter
Gear Holder
Gasket
Roller Bearing
Gear Pin
4
1
1
1
1
1
1
1
2
1
2
4
1
1
1
1
1
1
1
2
2
1
2
1
1
1
1
1
1
1
1
1
2
1
1
1
1
1
1
1
Index
Part No.
Description Qty
21
22
23
24
25
26
27
28
29
30
31
32
33
34
35
36
37
38
39
40
ADG100-21
ADG100-22
ADG100-23
ADG100-24
ADG100-25
ADG100-26
ADG100-27
ADG100-28
ADG100-29
ADG100-30
ADG100-31
ADG100-32
ADG100-33
ADG100-34
ADG100-35
ADG100-36
ADG100-37
ADG100-38
ADG100-39
ADG100-40
Small Gear
Control Axle
Axle Bearing
Bearing Divider
Jointer
Protect Cover
Long Spring Kit
Container Tube
Bottom Cap
Catch Plate
Plunger Handle
Plunger Washer
Plunger
Backlash Gasket
Plunger Rod
Holder
18" High Pressure Nylon Hose
Round Plunge
Vent Spring
Pressure Vent
Index
Part No. Description Qty
Parts List
711
Call 1.800.221.9705 for questions concerning
performance of the product or other inquiries.
372 Old US Highway 52 South
Mount Airy, NC 27030
PARTS BREAKDOWN:
MODEL: PRODUCT TYPE:
Page 7
ADG100
GREASE GUN DRILL ADAPTER
/